Technique Tuesday – Brusho Baby Wipe!!!

Posted on

Happy Tuesday!!! You all know what that means…..I have a fabulous technique to share with you today! I’m showing your this fun Brusho Baby Wipe Technique. This idea came from my upline, Meg Loven! I knew I had to try it because she said it was a safe way to use Brusho and that’s all me! I prefer to have more control with my Brusho or technique than just tapping it on! If you want to see more samples using Brusho, check them out here, here, and here!

Brusho Baby Wipe, www.LaurasStampPad.com

I just love that funky background with the Converse looking shoes and awesome greeting! This card is great for tweens, teens, and adults!! I love it!

I started with a Night of Navy card base. Next, I cut two pieces of Whisper White cardstock (4″ x 5-1/4″), one for the front and one for the inside to write on. For the technique, I took a baby wipe (wet) and tapped on some Brusho Crystal Colour. Right away the color starts to bleed all over. Then I just pressed the cardstock into the baby wipe to pick up the color. A full baby wipe of ink is not necessary, simple press the cardstock into the spot where the ink is as much or as little as you wish! This technique can be used on a few cards or until the baby wipe dries up, simply add more color. Actually you could always spray the baby wipe to moisten it again too! Once it was dry, I added it to the card front with Tear And Tape for a nice strong hold. I just prefer to know it’s going to stick really well and not come apart since water warps the paper.

Navy Converse Shoes, www.LaurasStampPad.com

Now for the decorations, I cut a 2-1/2″ Night of Navy square and a 2-1/4″ Whisper White square. Then, I stamped the shoes from the Epic Celebrations Sale-A-Bration Stamp Set in Memento Black Ink. Using the Dark Navy Stampin’ Blends Marker, I colored in the shoes. This was probably the hardest part as I was so afraid I would color the laces or the bottom on accident! 🙂 I added this piece to the card front with Stampin’ Dimensionals.

Then I stamped the greeting from the same set in Night of Navy Ink. Using the Magical Mates Framelits, I die cut out the banner. Then I die cut another banner in Night of Navy and cut it in half. I added one half peaking out on the left and the other peaking out on the right. Layering with a single framelit or punch like this really makes them more useful and that makes me happy! 🙂 I added the greeting to the card front with Stampin’ Dimensionals as well!

Red Converse Shoes, www.LaurasStampPad.com

If you would like to see this all in action, check out the Video Tutorial below or click here! Be sure to give the video a thumbs up if you liked it and don’t forget to subscribe if you are new. If you would like a notification when I post a new video, be sure to click the bell right next to the subscribe!!!

Happy Stampin’

~Laura

Product List


Little Warrior & His Dragon!!!

Posted on

Happy Monday!!! I hope you all had a wonderful weekend and are ready to rock this week! For a little inspiration, I thought I would share this little warrior & his dragon card!!!

Little Warrior & His Dragon, www.LaurasStampPad.com

This card is super cute and so easy to make because I let the designer paper do all of the work for me. I love it!!!

I started with a Lemon Lime Twist card base measuring 5-1/2″ x 8-1/2″. Next, I took a piece of Myths & Magic Specialty Designer Series Paper (4″ x 5-1/4″) and added a strip of the Myths & Magic Washi Tape along the bottom portion. The designer paper has glitter portions on the dragons and the warrior and the washi tape is all bling too! You can  never have enough bling. Also, I feel like with these colors it is still a great card for boys and girls so that’s awesome too! I think if I did this for a girl, I might use more of the Tangerine Tango and Fresh Fig but it all depends.

Sparkle Washi Tape, www.LaurasStampPad.com

For the greeting, I used the Special Celebrations Stamp Set and stamped it in Basic Gray Ink onto Smoky Slate cardstock. Then using the Everyday Label Punch, I punched out the greeting. Next, I punched again in Tranquil Tide cardstock and cut the label in half. I added a dab of adhesive to the left hand side of the back of the greeting and added one side of Tranquil Tide. Next, I repeated that on the other side. This is a fun way to layer with punches and you can have a lot show or just a little bit! I added the greeting to the card front with Stampin’ Dimensionals for a little bit of texture and so it would look smooth over the washi tape!

If you want to see more samples using the Myths & Magic Suite, click here! I will be posting more soon too so stay tuned! This suite is just so much fun!

Happy Stampin’

~Laura

Product List


Myths & Magic Suite!!!

Posted on

Oh My Goodness!!! I first saw the Myths & Magic Suite in the Occasions Mini Catalog and thought I need that for making cards for the kids I send cards too! Well I fell super in love and feel like these cards are great for kids and adults…..even better!!! I’ll be sharing samples with this Suite over the next week or so so stay tuned (or get a sneak peak in the video below)!

Unicorns & Rainbows, www.LaurasStampPad.com


Do you believe in unicorns?? You should now! Look at this beauty! I did play with a few other options for clouds in stamp class. Plain white clouds, white clouds with Wink of Stella and the iridescent glimmer paper from the Myths & Magic Glimmer Paper Pack….I love them all!

I started with a Pumpkin Pie card base. Next, I took a piece of Soft Sky measuring 3-3/4″ x 5″ to layer on all of the decorations. For the greeting, I stamped it in Bermuda Bay Ink from the Magical Day Stamp Set. Then I punched it out with the Pretty Label Punch and added it to the upper left corner! Next, I added the rainbow from the Rainbow Builder Framelits. I only used 4 colors (Rich Razzleberry, Crushed Curry, Bermuda Bay, and Pumpkin Pie) for my rainbow, omitting the smallest and two largest! This is all personal preference. I picked these colors because I used them for the Unicorn hair with my Stampin’ Blends. I just added some Snail in a rainbow curve and placed each color on top but the Fine Tip Glue Pen would also work!

Myths & Magic Suite, www.LaurasStampPad.com

Next, I added my unicorn before filling in with clouds. For the unicorn, I stamped her in Memento Black Ink from the Magical Day Stamp Set and then die cut her out with the coordinating Magical Mates Framelits (Bundle & Save 10%). Using the Stampin’ Blends, I colored the hair of the unicorn and then added her to the card front. To finish it off, I filled in with clouds on the rainbow and around the card. For the clouds, there are lots of options…..Soft Sky, Whisper White, Glimmer Paper, and adding Wink of Stella! If you need to cut a large cloud, simply use the other part in another spot! The small cloud on the bottom is a die for a half cloud!

If you would like to see this all in action and other samples using this Suite, check out the Video Tutorial below or click here! Be sure to give the video a thumbs up if you liked it and don’t forget to subscribe if you are new. If you would like a notification when I post a new video, be sure to click the bell right next to the subscribe!!!

To purchase any of the items used for this card, check out the supply list below and start earning Sale-A-Bration goodies and Laura’s Loyal Stampers Stickers!!!

Happy Stampin’

~Laura

Product List


Happy Birthday 2 U!!!

Posted on

Here is another fun Eclipse Technique Card. You can check out the other sample I posted last week here! Today, I’m using numbers and letters with this Happy Birthday 2 U card!

Happy Birthday 2 U, www.LaurasStampPad.com

I love how this one turned out with my homemade designer paper by stamping all over the background!!! It also uses my favorite stamp set right now….Picture Perfect Birthday from the Occasions Mini Catalog!

I started with a Lemon Lime Twist card base measuring 4-1/4″ x 11″. Next, I took a piece of Whisper White cardstock (4″ x 5-1/4″) and stamped all over the background using the Picture Perfect Birthday Stamp Set. The greeting was stamped in Bermuda Bay Ink and the confetti in Lemon Lime Twist Ink. For the bows, I stamped the big part off once using Berry Burst Ink and then stamped the small detailed pieces in full strength Berry Burst.

Eclipse Technique, www.LaurasStampPad.com

Now that I have my “designer paper” ready  to go, I die cut out the 2 U using the Large Letter Framelits and Large Number Framelits. Also, I die cut 3 more 2’s and U’s in Lemon Lime cardstock. To assemble, I added the die cut piece to the card front flat with regular Snail Adhesive. Then using the Fine Tip Glue Pen, I added all 3 layers of the Lemon Lime Twist 2’s and U’s like a puzzle. Just layering them on top of each other for that raised look. Once the 3 layers are on, I added the stamped 2 and U. That simple popped up look is just fabulous!

Large Number Framelits, www.LaurasStampPad.com

I finished off the card with some Silver Metallic Enamel Shapes for a pop of bling and some ribbon. Wondering where that ribbon came from?? It’s the Whisper White Metallic Edge Ribbon colored with a Bermuda Bay Stampin’ Blends Marker. MIND BLOWN! It’s so much fun and super quick to create. I love it!!

Blends Colored Ribbon, www.LaurasStampPad.com

Let me know what you would create with your Eclipse Technique. I need some words….short words…..to use for cards. I’m thinking maybe Hope or Love for the next one. Give me some ideas in the comments below! Also, if you are ready to make the leap and get these fabulous framelits, now is the time because you will earn Sale-A-Bration goodies with the order! Woot Woot! Click the items below to start shopping!

Happy Stampin’

~Laura

Product List


Technique Tuesday – Creating a Background Frame!!!

Posted on

Happy Tuesday!!! That means I have a fabulous technique to share with you today! I’m showing you how creating a background frame for your focal point is super easy and fun to do!!!

Creating a Background Frame, www.LaurasStampPad.com

You all know how much I love flowers……I just can’t help myself!!! 🙂 This technique can be used for any type of card though and not just flowers! Simply sponge on the frame and add your focal point!

I started with a Soft Sky card base. Next, I took a piece of Whisper White measuring 3″ x 5-1/4″ for the focal point. Using the Lots of Labels Framelits, I die cut out one in some of the “cardboard” that comes with Designer Paper. That thicker piece with the paper pack details on it. This will hold up better for multiple uses and I’m not wasting cardstock! 🙂 I placed the reverse image (not the label) over the cardstock and added Soft Sky Ink with a Sponge Dauber! Just fill in to the desired color!

Next, I filled in with the greeting and flowers! Using Basic Gray Ink, I stamped the greeting from the Petal Palette Stamp Set and the flowers from the Lots of Lavender Sale-A-Bration Stamp Set. Then I stamped the flowers in Elegant Eggplant Ink and stems in Garden Green Ink. The bow was stamped in Crushed Curry! Next, I layered this piece onto Elegant Eggplant which I tore both ends for some texture. Using the Copper Trim, I pulled it apart a bit and added a strip along the bottom. Then I took another piece and made a bow and attached it with some Mini Glue Dots! I added this focal point to the card base with Stampin’ Dimensionals!

Don’t forget that Sale-A-Bration is almost over! It ends March 31st so be sure to stock up and get those items on your wish list now so you can take advantage of the freebies!!

If you would like to see this all in action, check out the Video Tutorial below or click here! Be sure to give the video a thumbs up if you liked it and don’t forget to subscribe if you are new. If you would like a notification when I post a new video, be sure to click the bell right next to the subscribe!!!

Happy Stampin’

~Laura

Product List


Perennial Birthday Card Kit!!!

Posted on

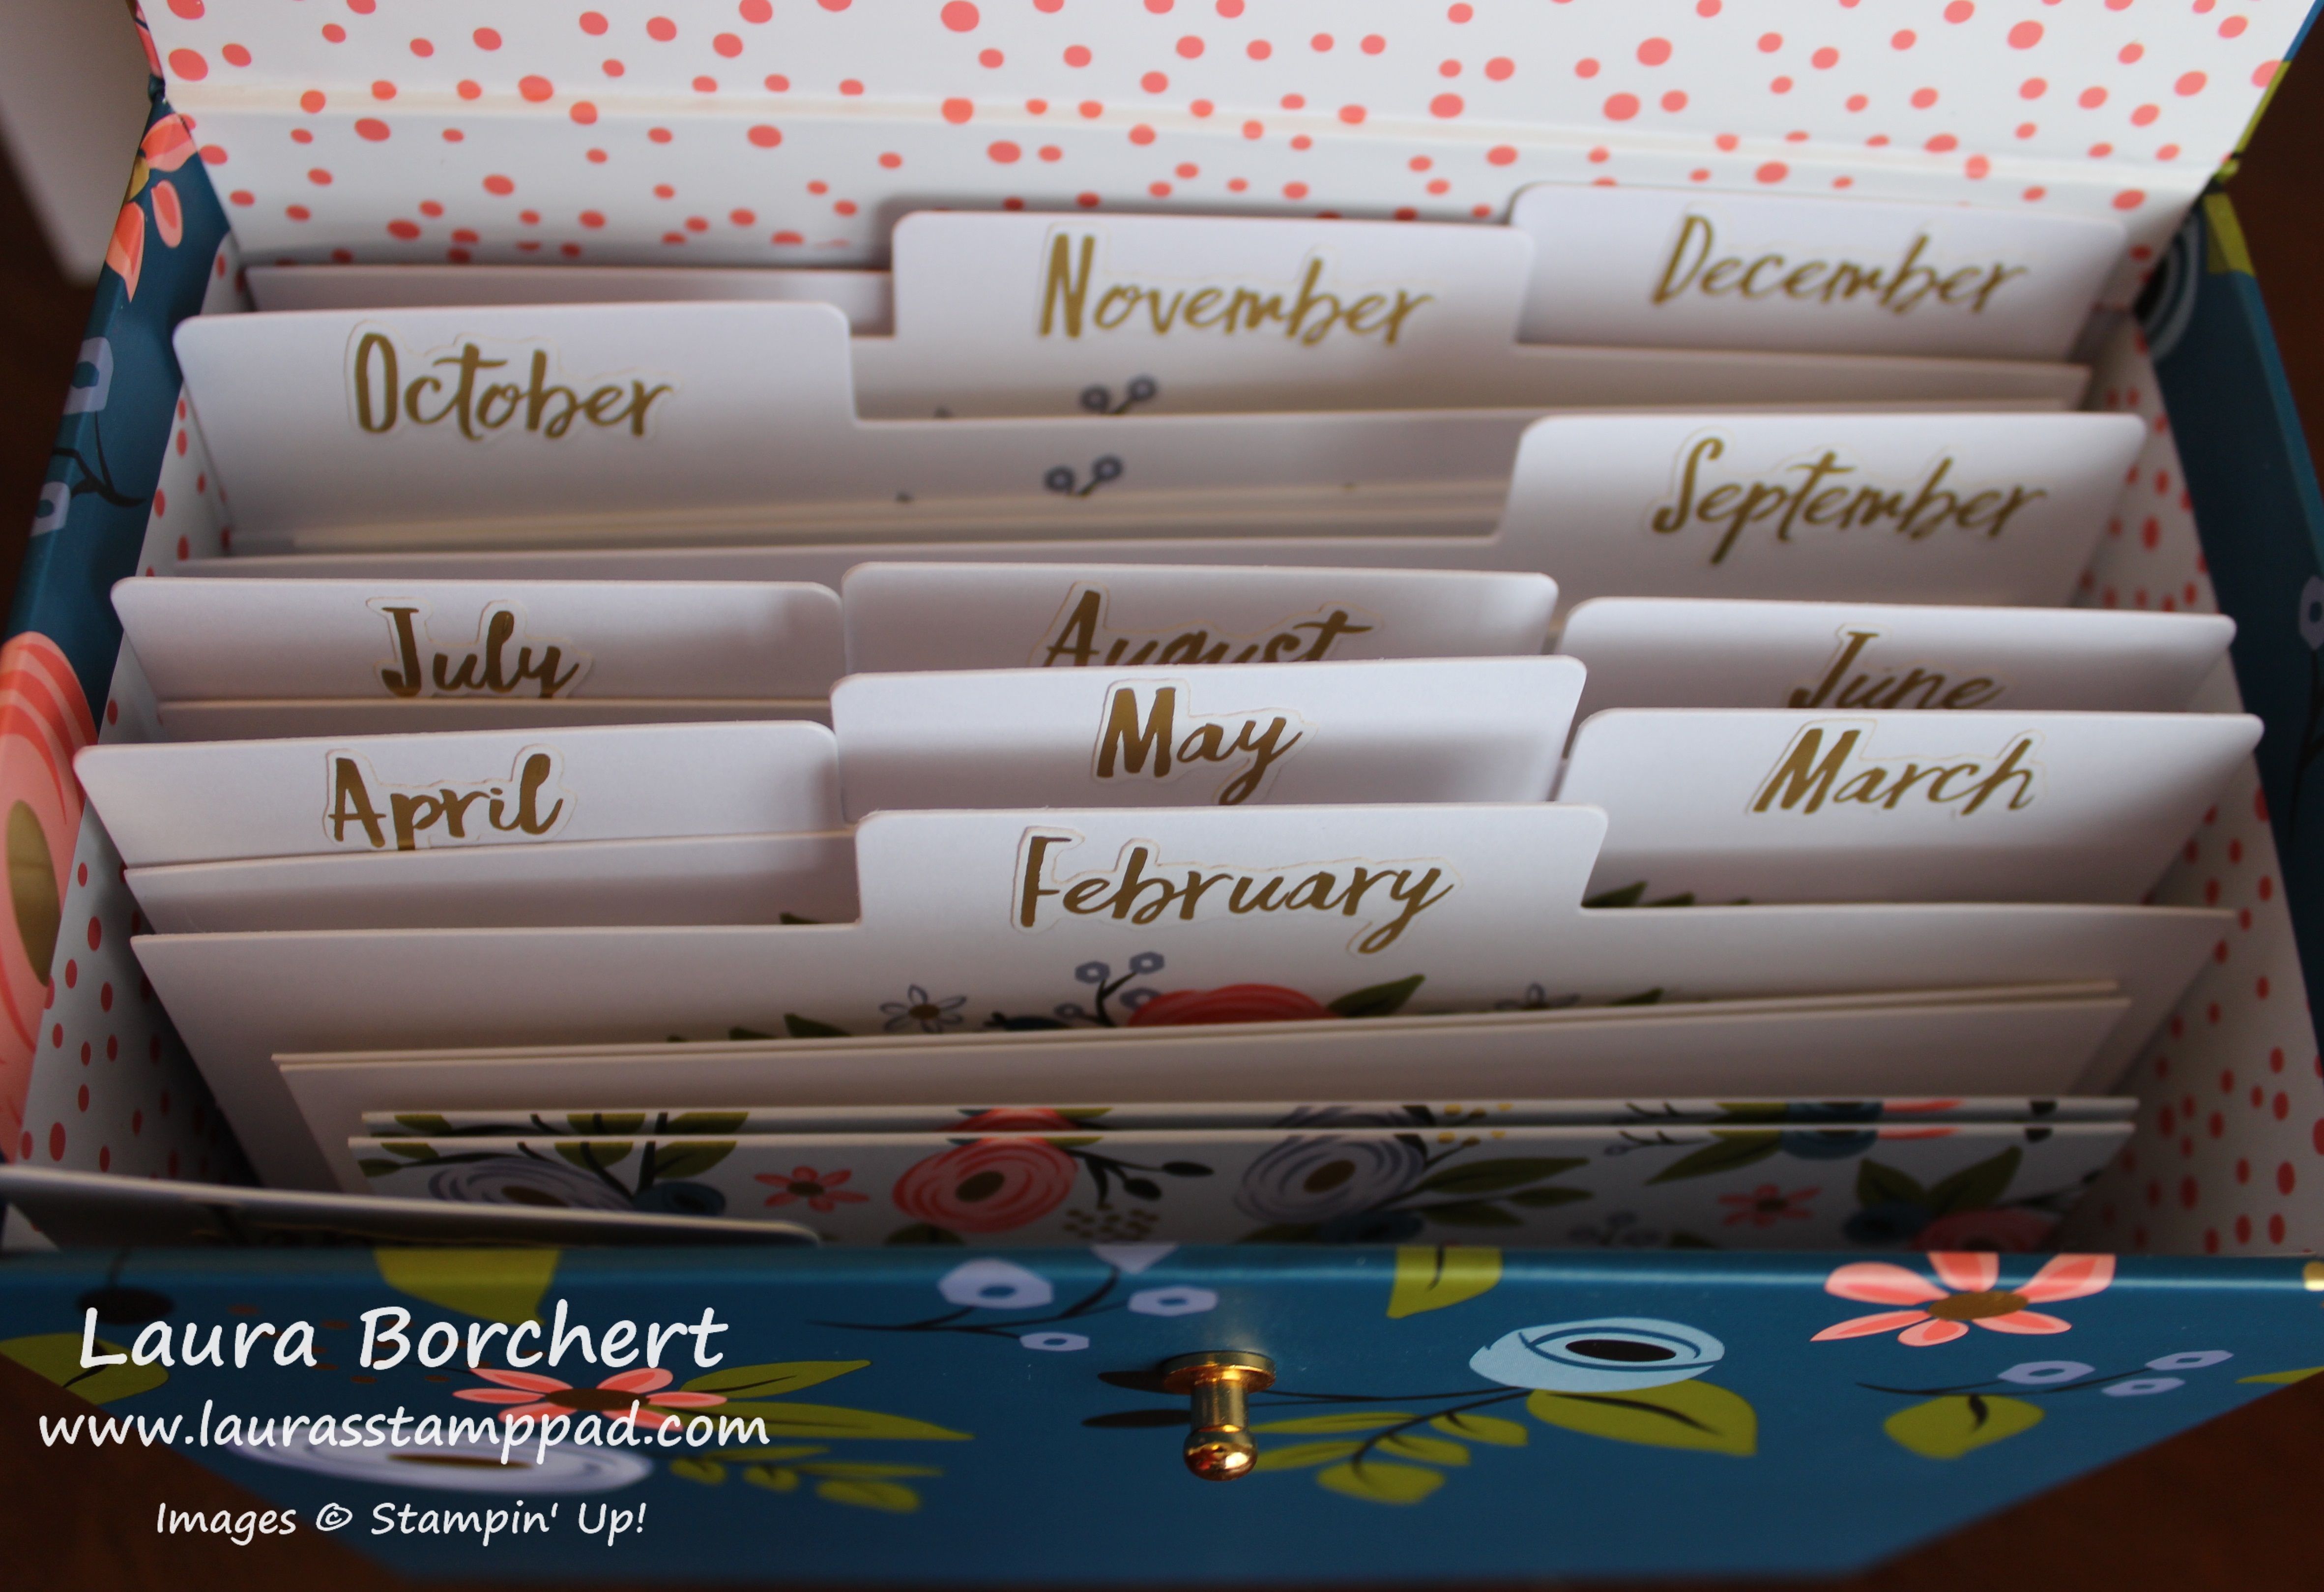
Happy Monday!!! Today I’m sharing the fabulous Perennial Birthday Card Kit which has been super popular lately!!! I’m loving it for the colors, the organization, and cute cards!!!

Perennial Birthday Card Kit, www.LaurasStampPad.com

I love Birthday Calendars and always suggest them to everyone! They make great gifts as well. This card kit is a birthday calendar and card holder all in one! A birthday calendar is one that doesn’t need changed due to dates and days each year. My birthday is on August 29th so on the August Tab my name is on the line for the 29th. Looking into this box, you can see how many cards you will need each month and who to send them too! As you make more cards, add them behind the months that are still needing some. Amazing concept and look at those fun polka dots!!!

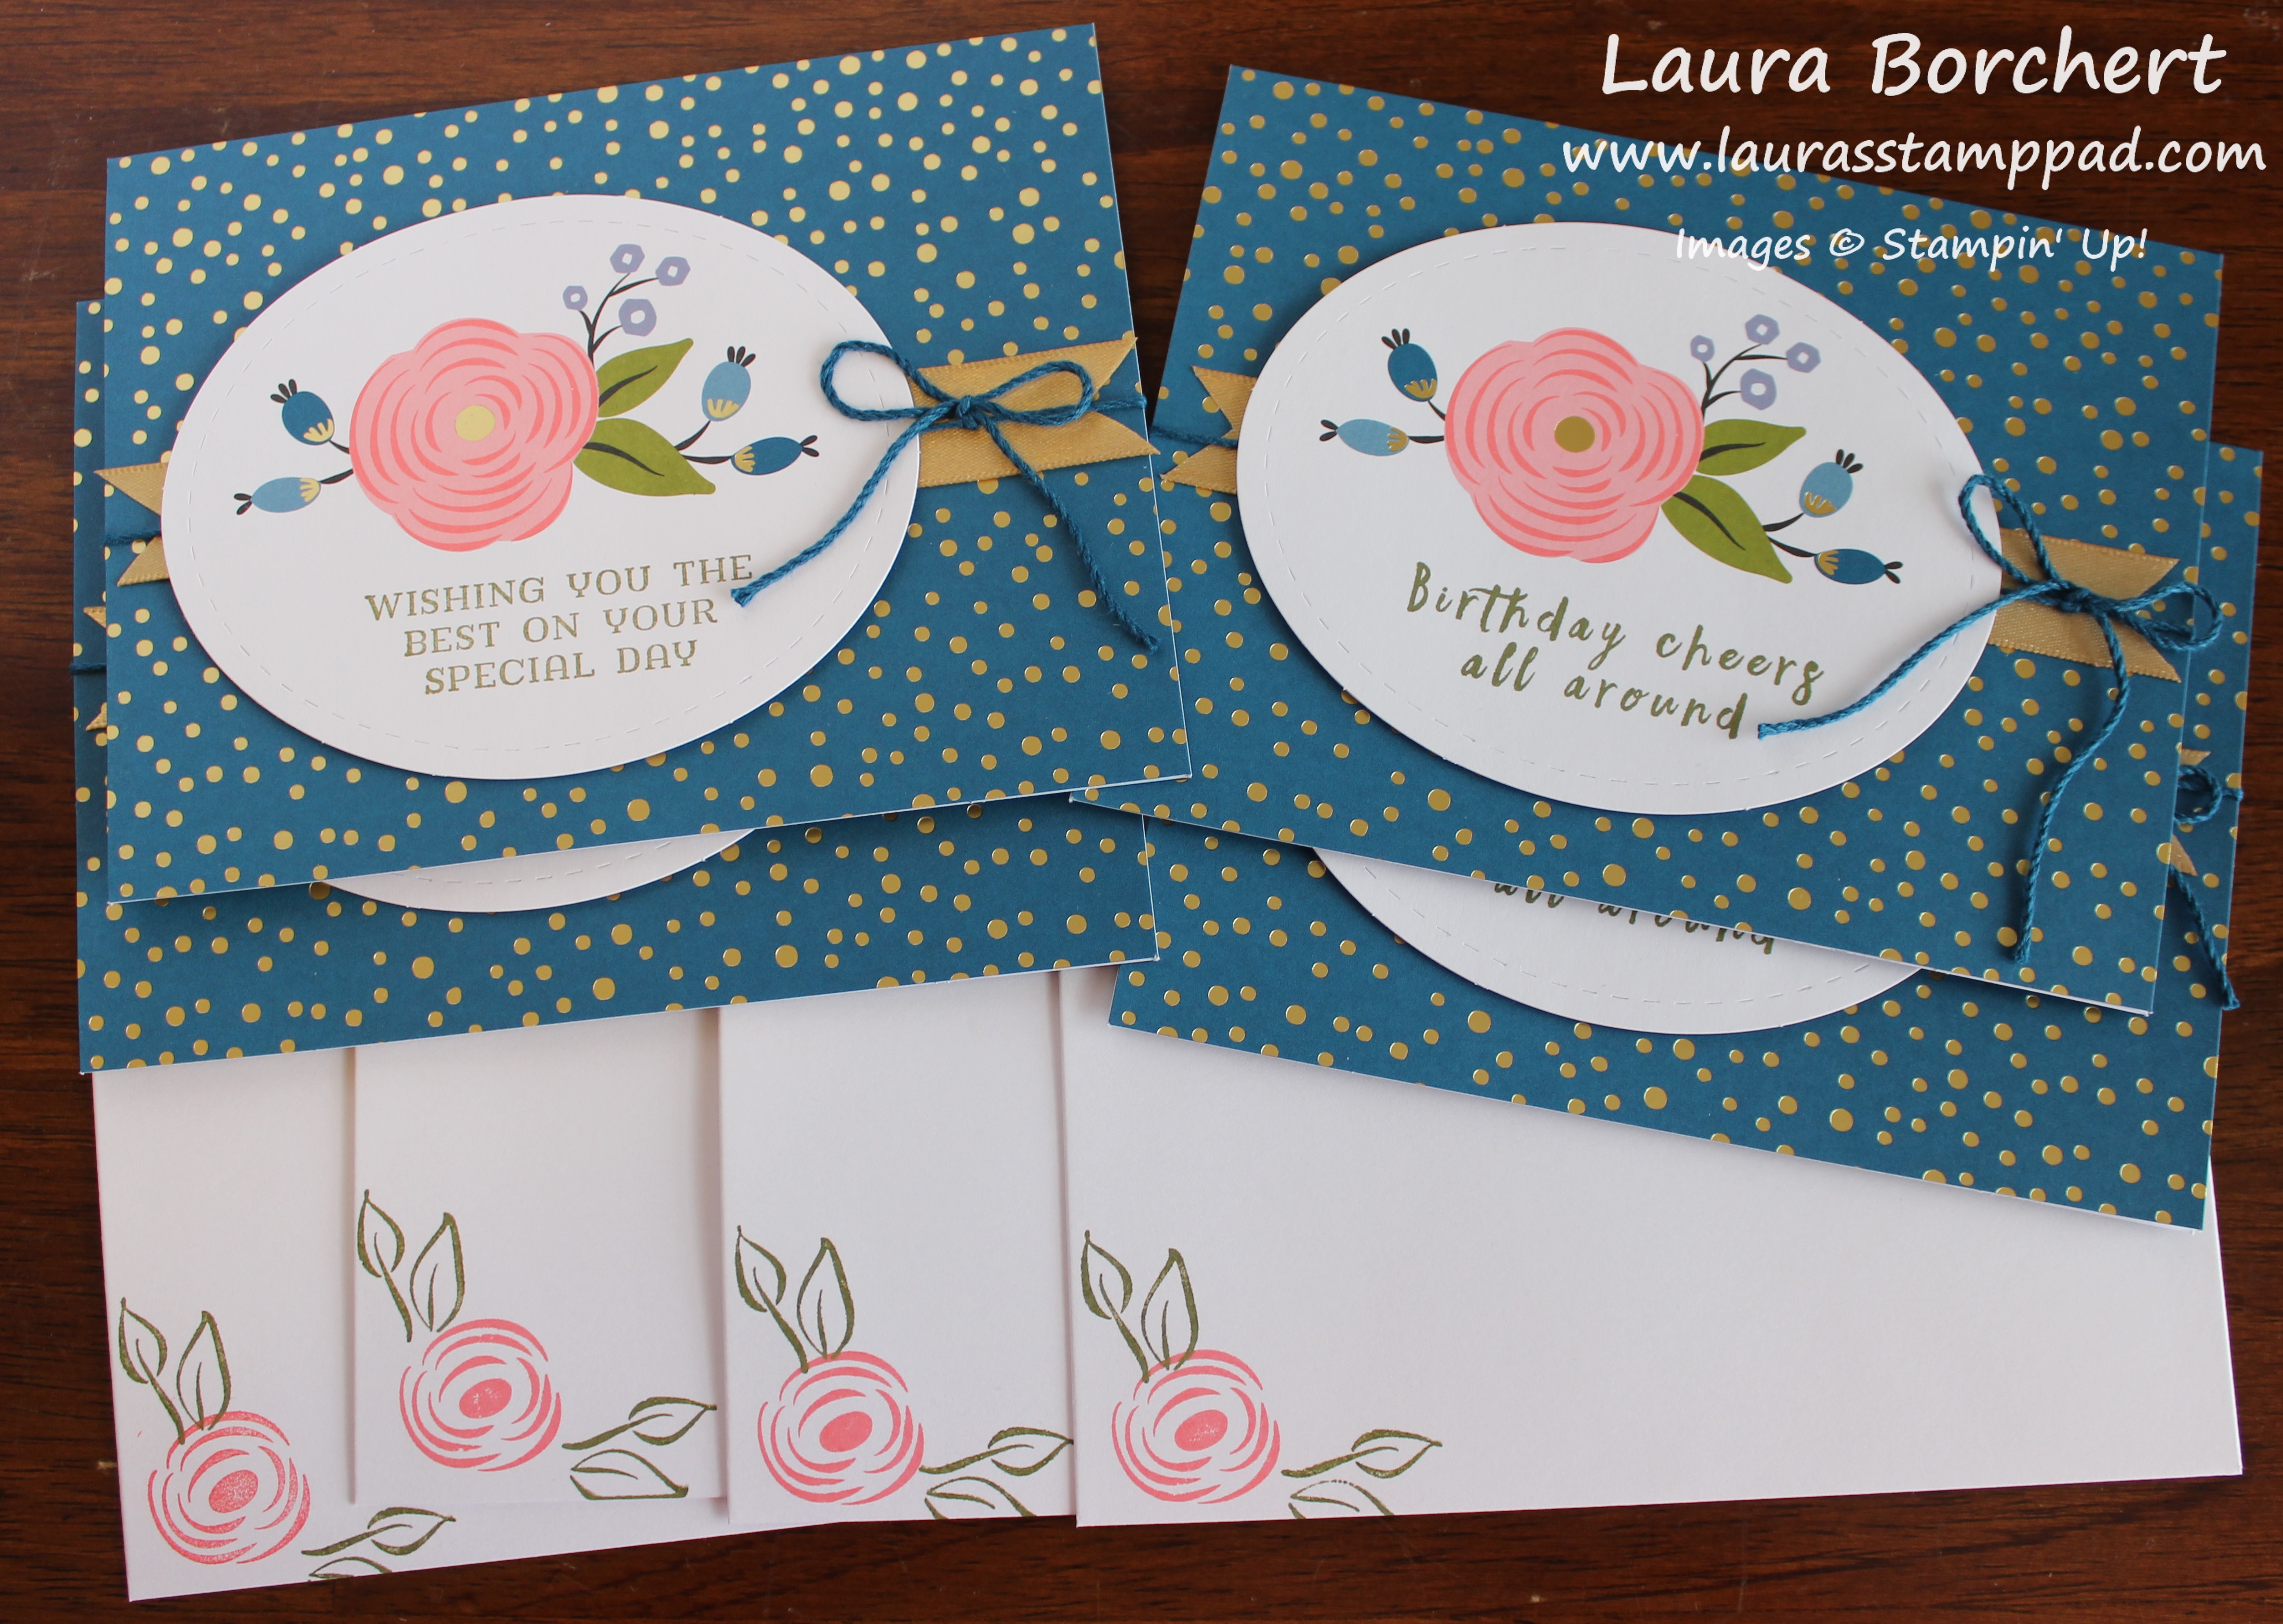
Wishing You the Best, www.LaurasStampPad.com

There are 16 total cards that come in the kit – 4 each of 4 designs. I made mine with different greetings to mix it up! There are also great inside and outside greetings in the Perennial Birthday Stamp Set which is super fabulous!! The gold foil adds some bling and fun to these cards as well. Don’t forget to stamp your envelopes for some added fun in the mail!

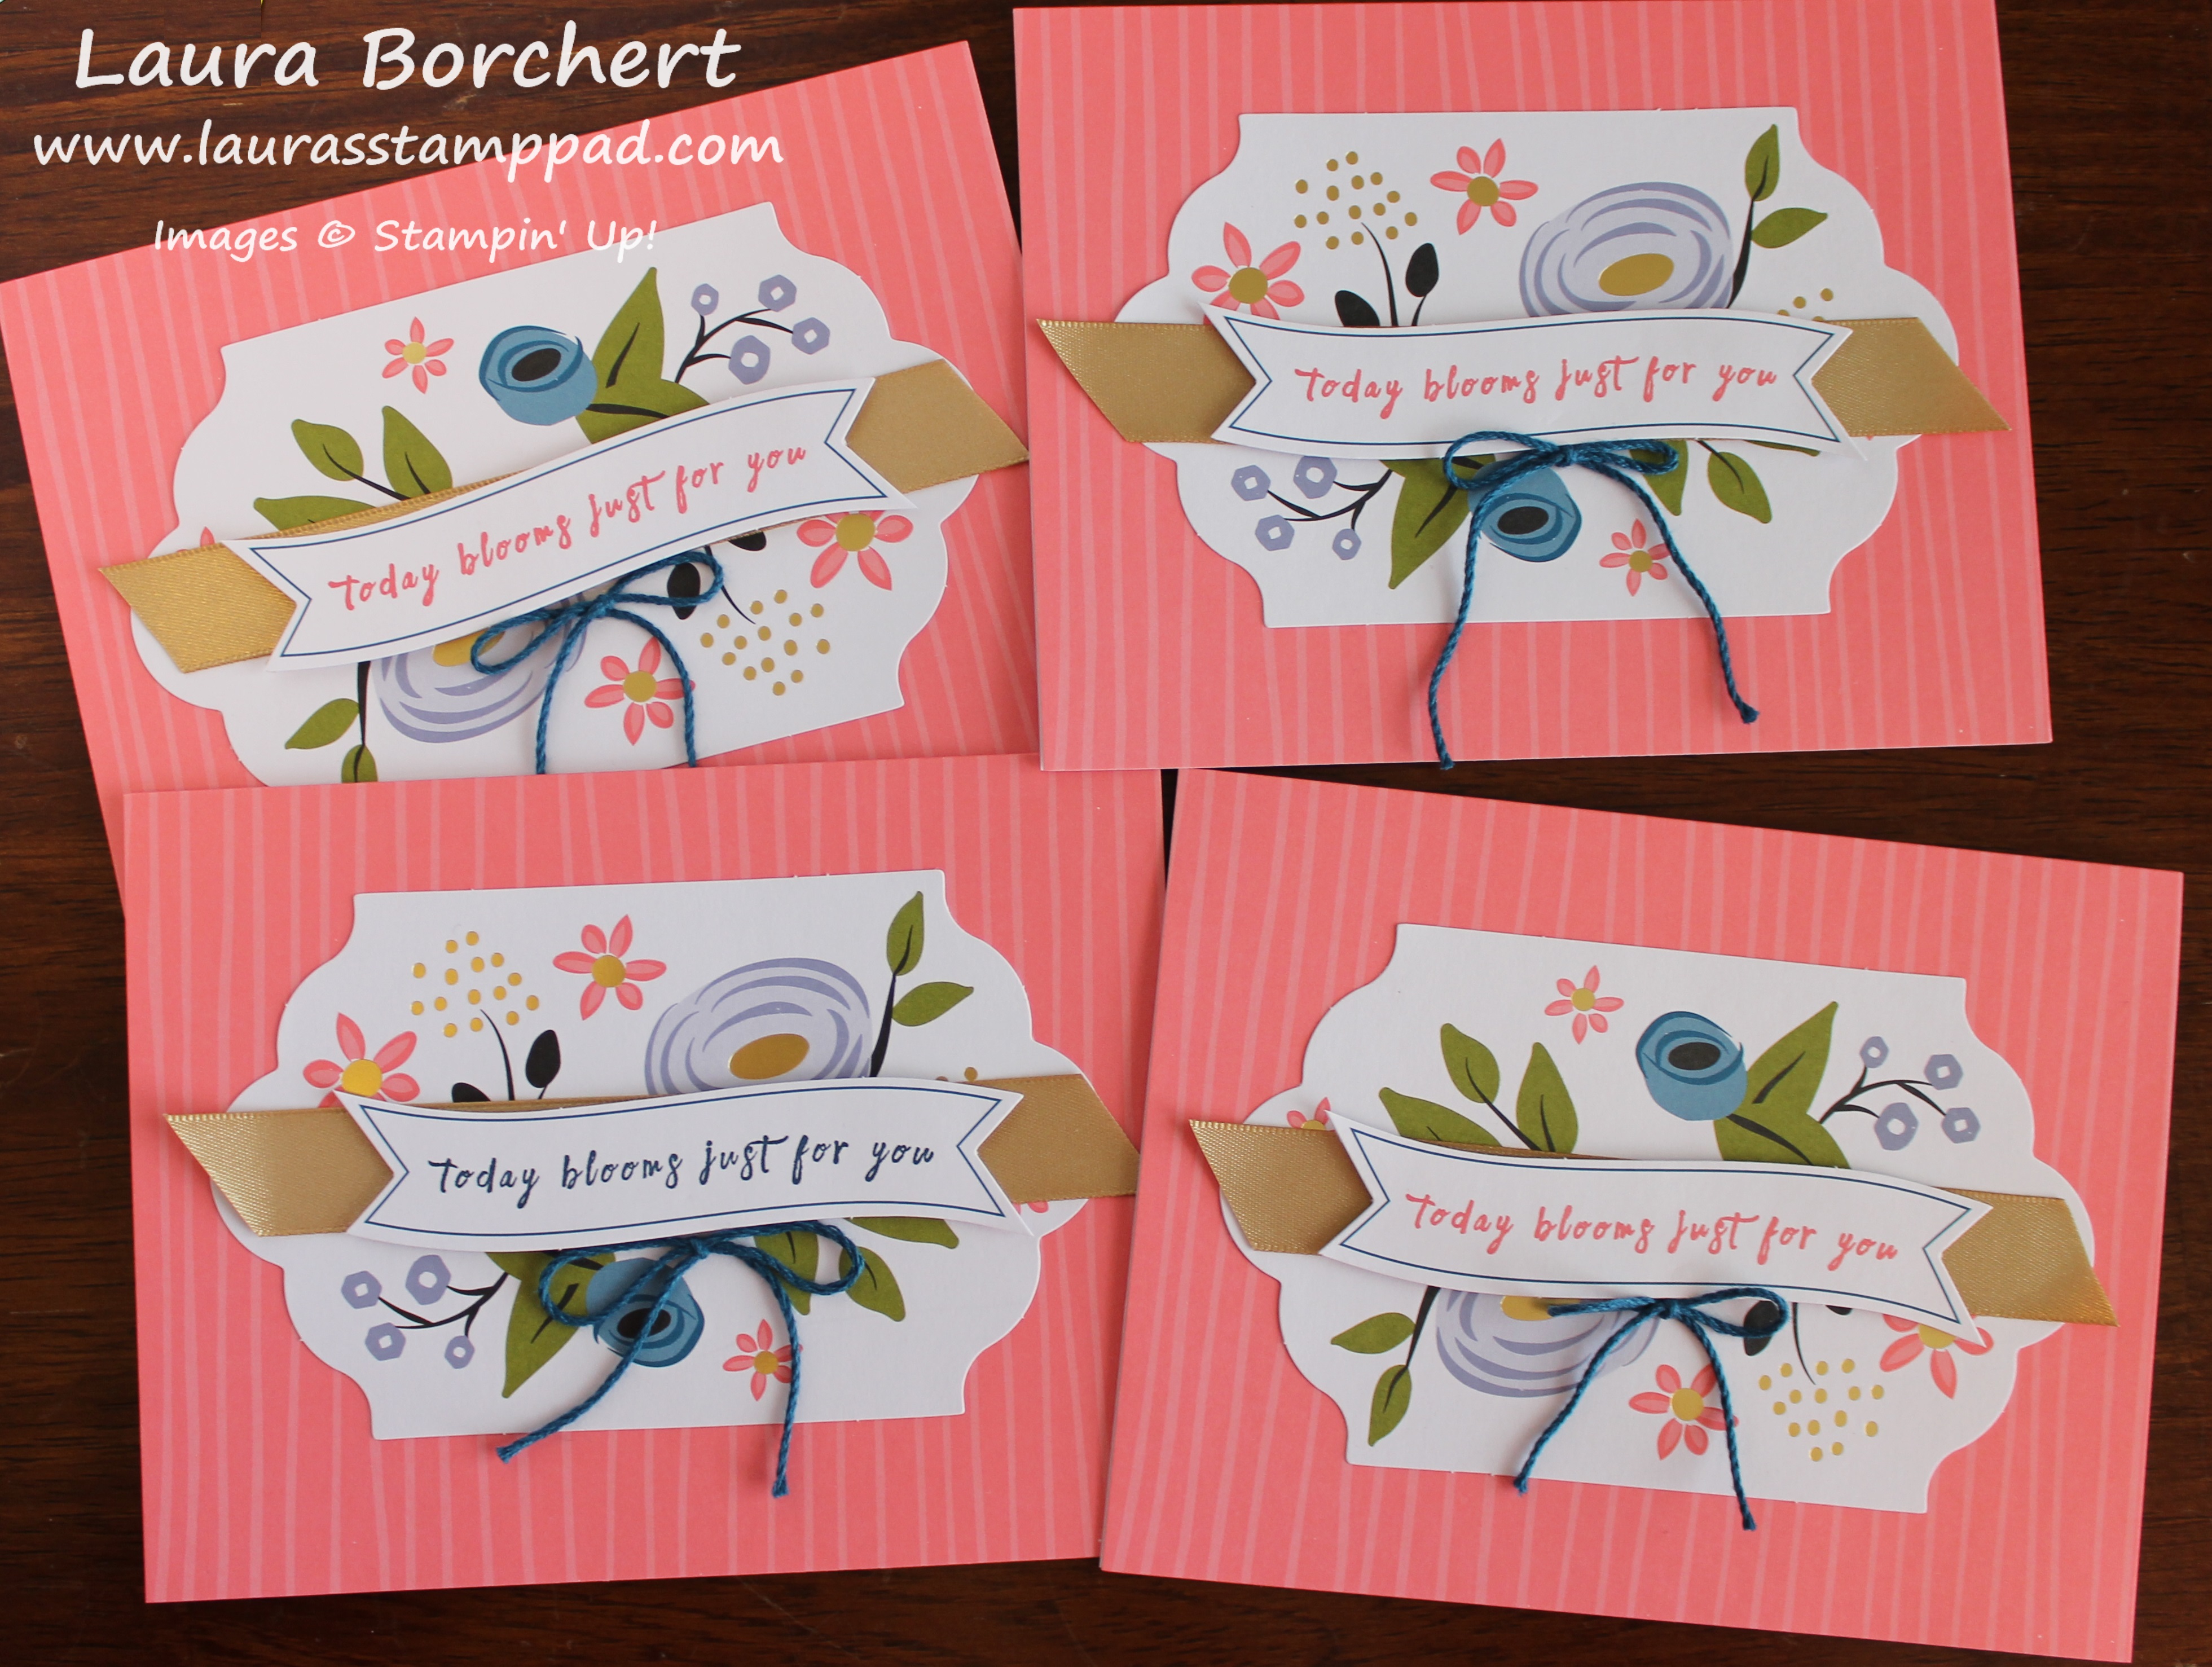
Today Blooms for You, www.LaurasStampPad.com

This kit only needs 3 ink pads – Old Olive, Flirty Flamingo, and Dapper Denim. As you can see I mixed up the colors for this card to see what popped more! The little bow at the bottom was tied into a knot and then I added it to the card front with a little Mini Glue Dot!

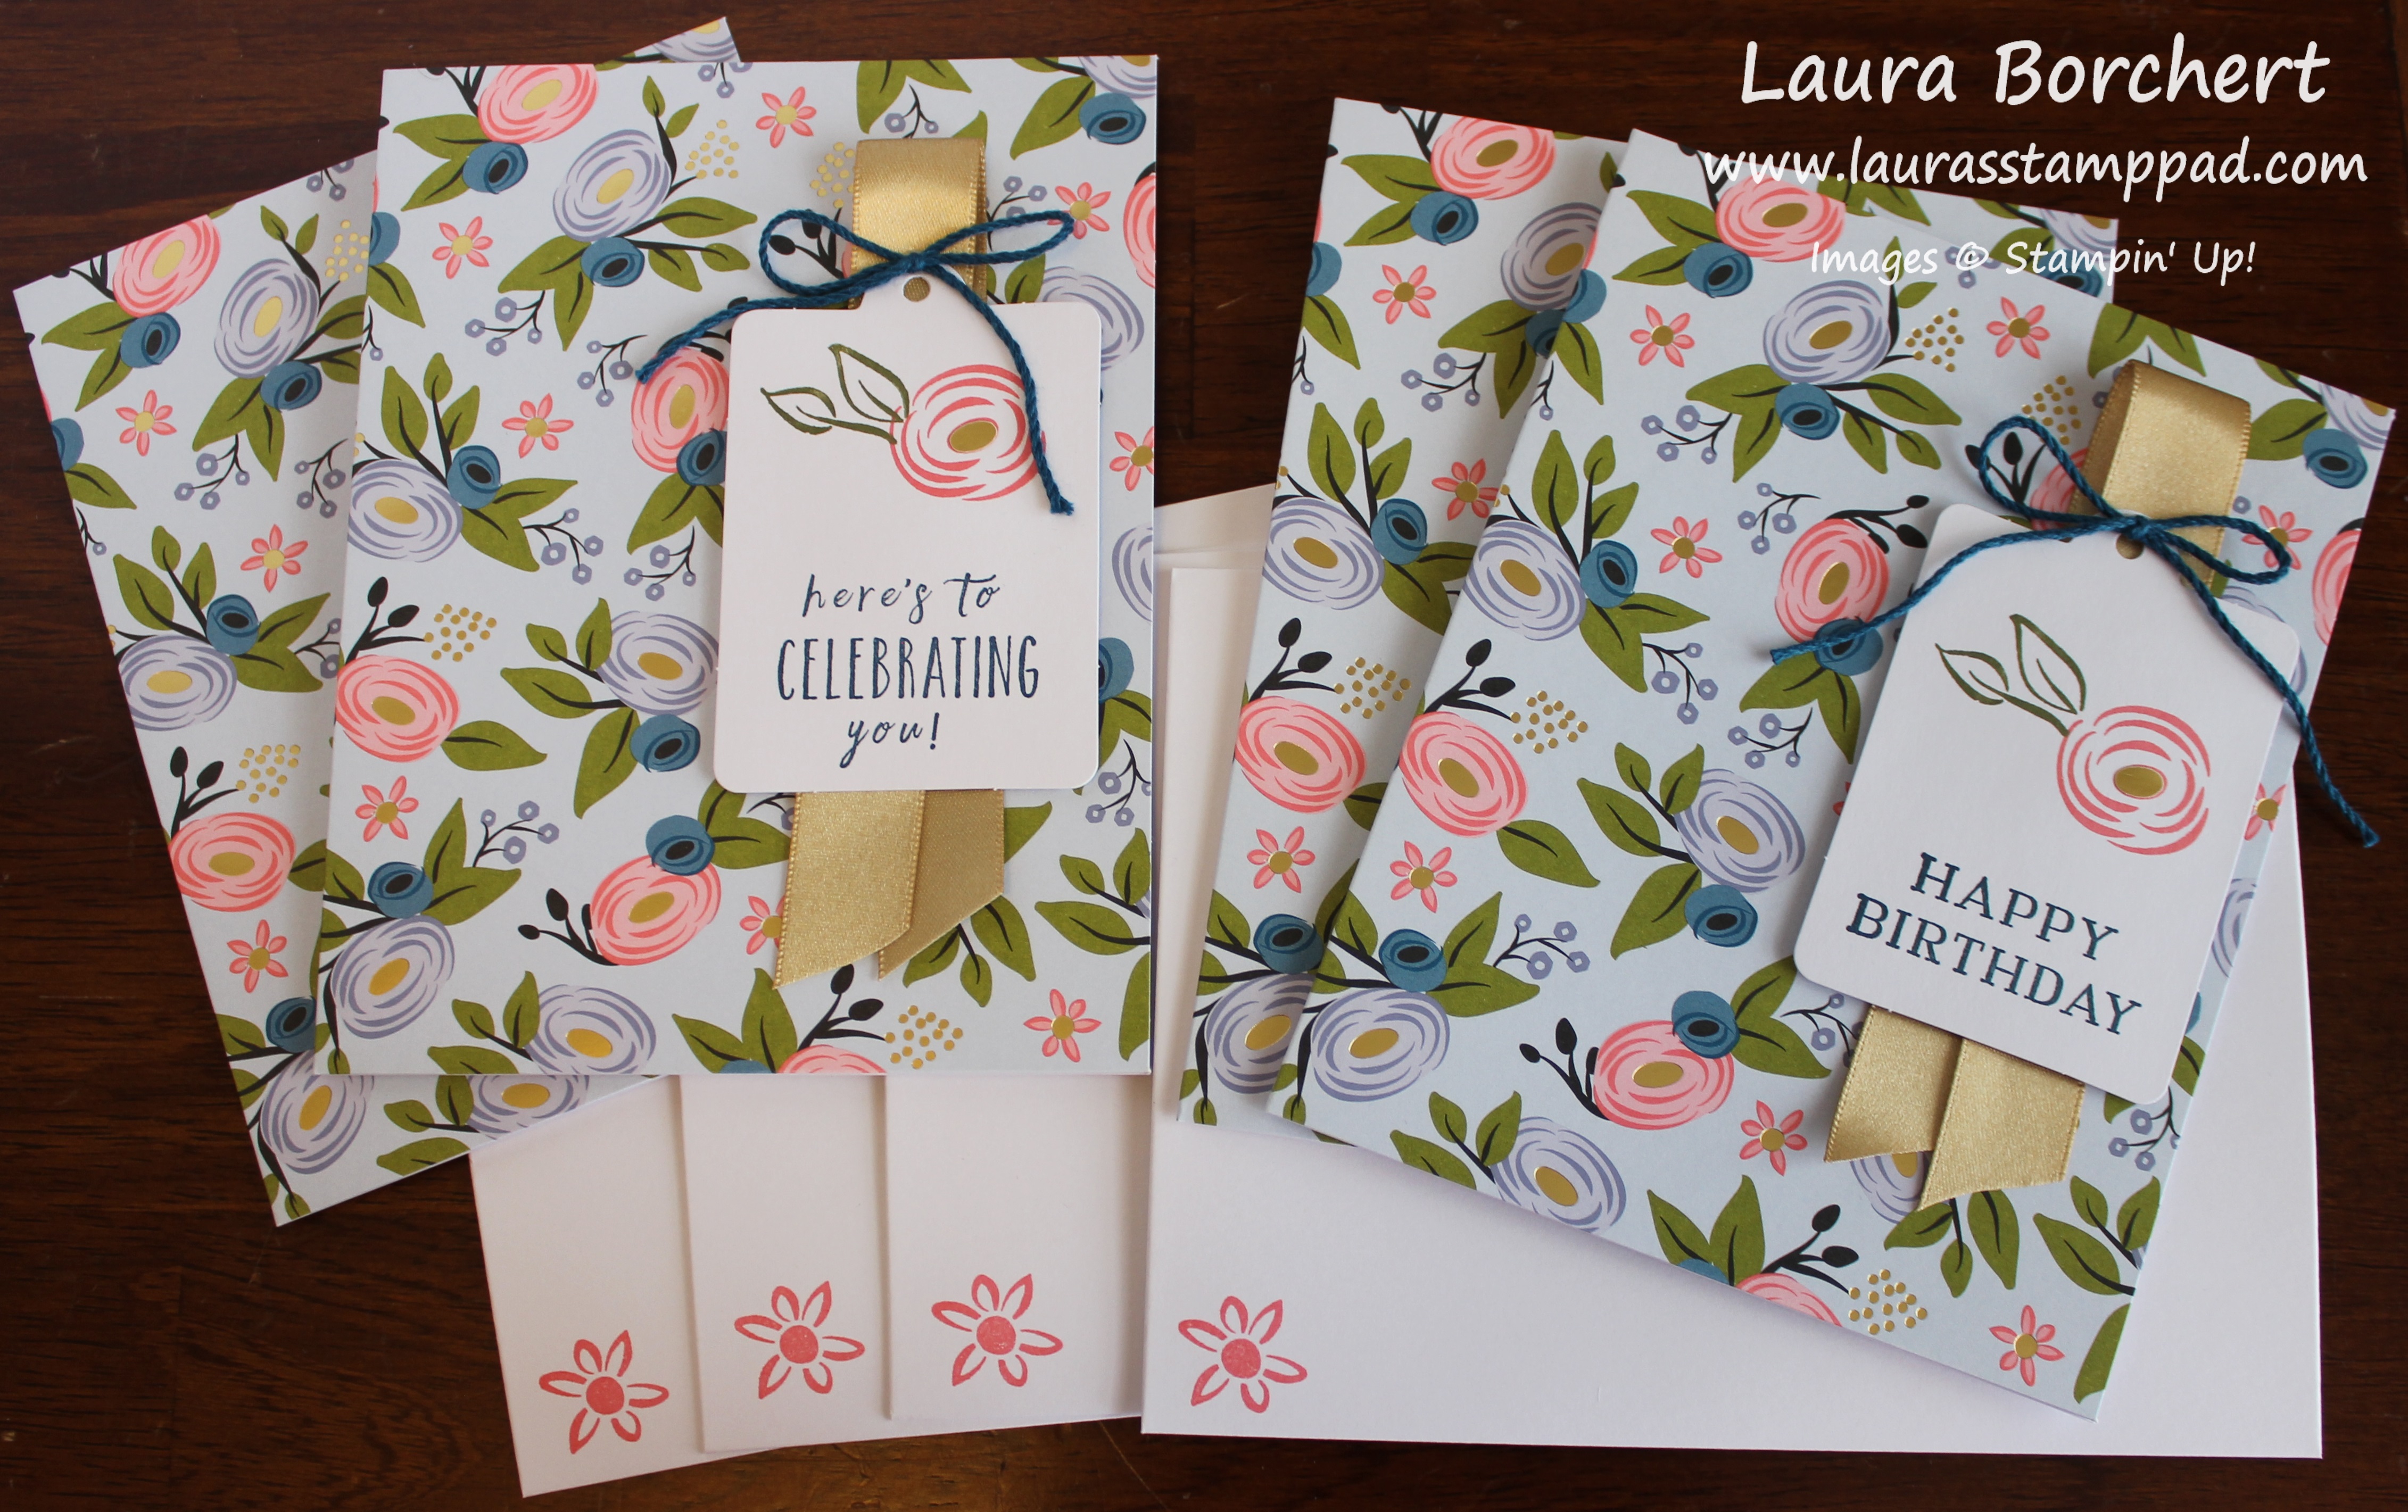
Celebrating You, www.LaurasStampPad.com

I really loved the color combination and flower print of these cards in the kit! This card is great for anniversary, birthday, wedding, and so much more!! Again, for this one, I didn’t actually tie the Baker’s Twine around the tag hole because I find that my bow ends up sideways. I simply tied a bow and stuck it over the hole with a Mini Glue Dot. This was much quicker for me and came out perfect each time!

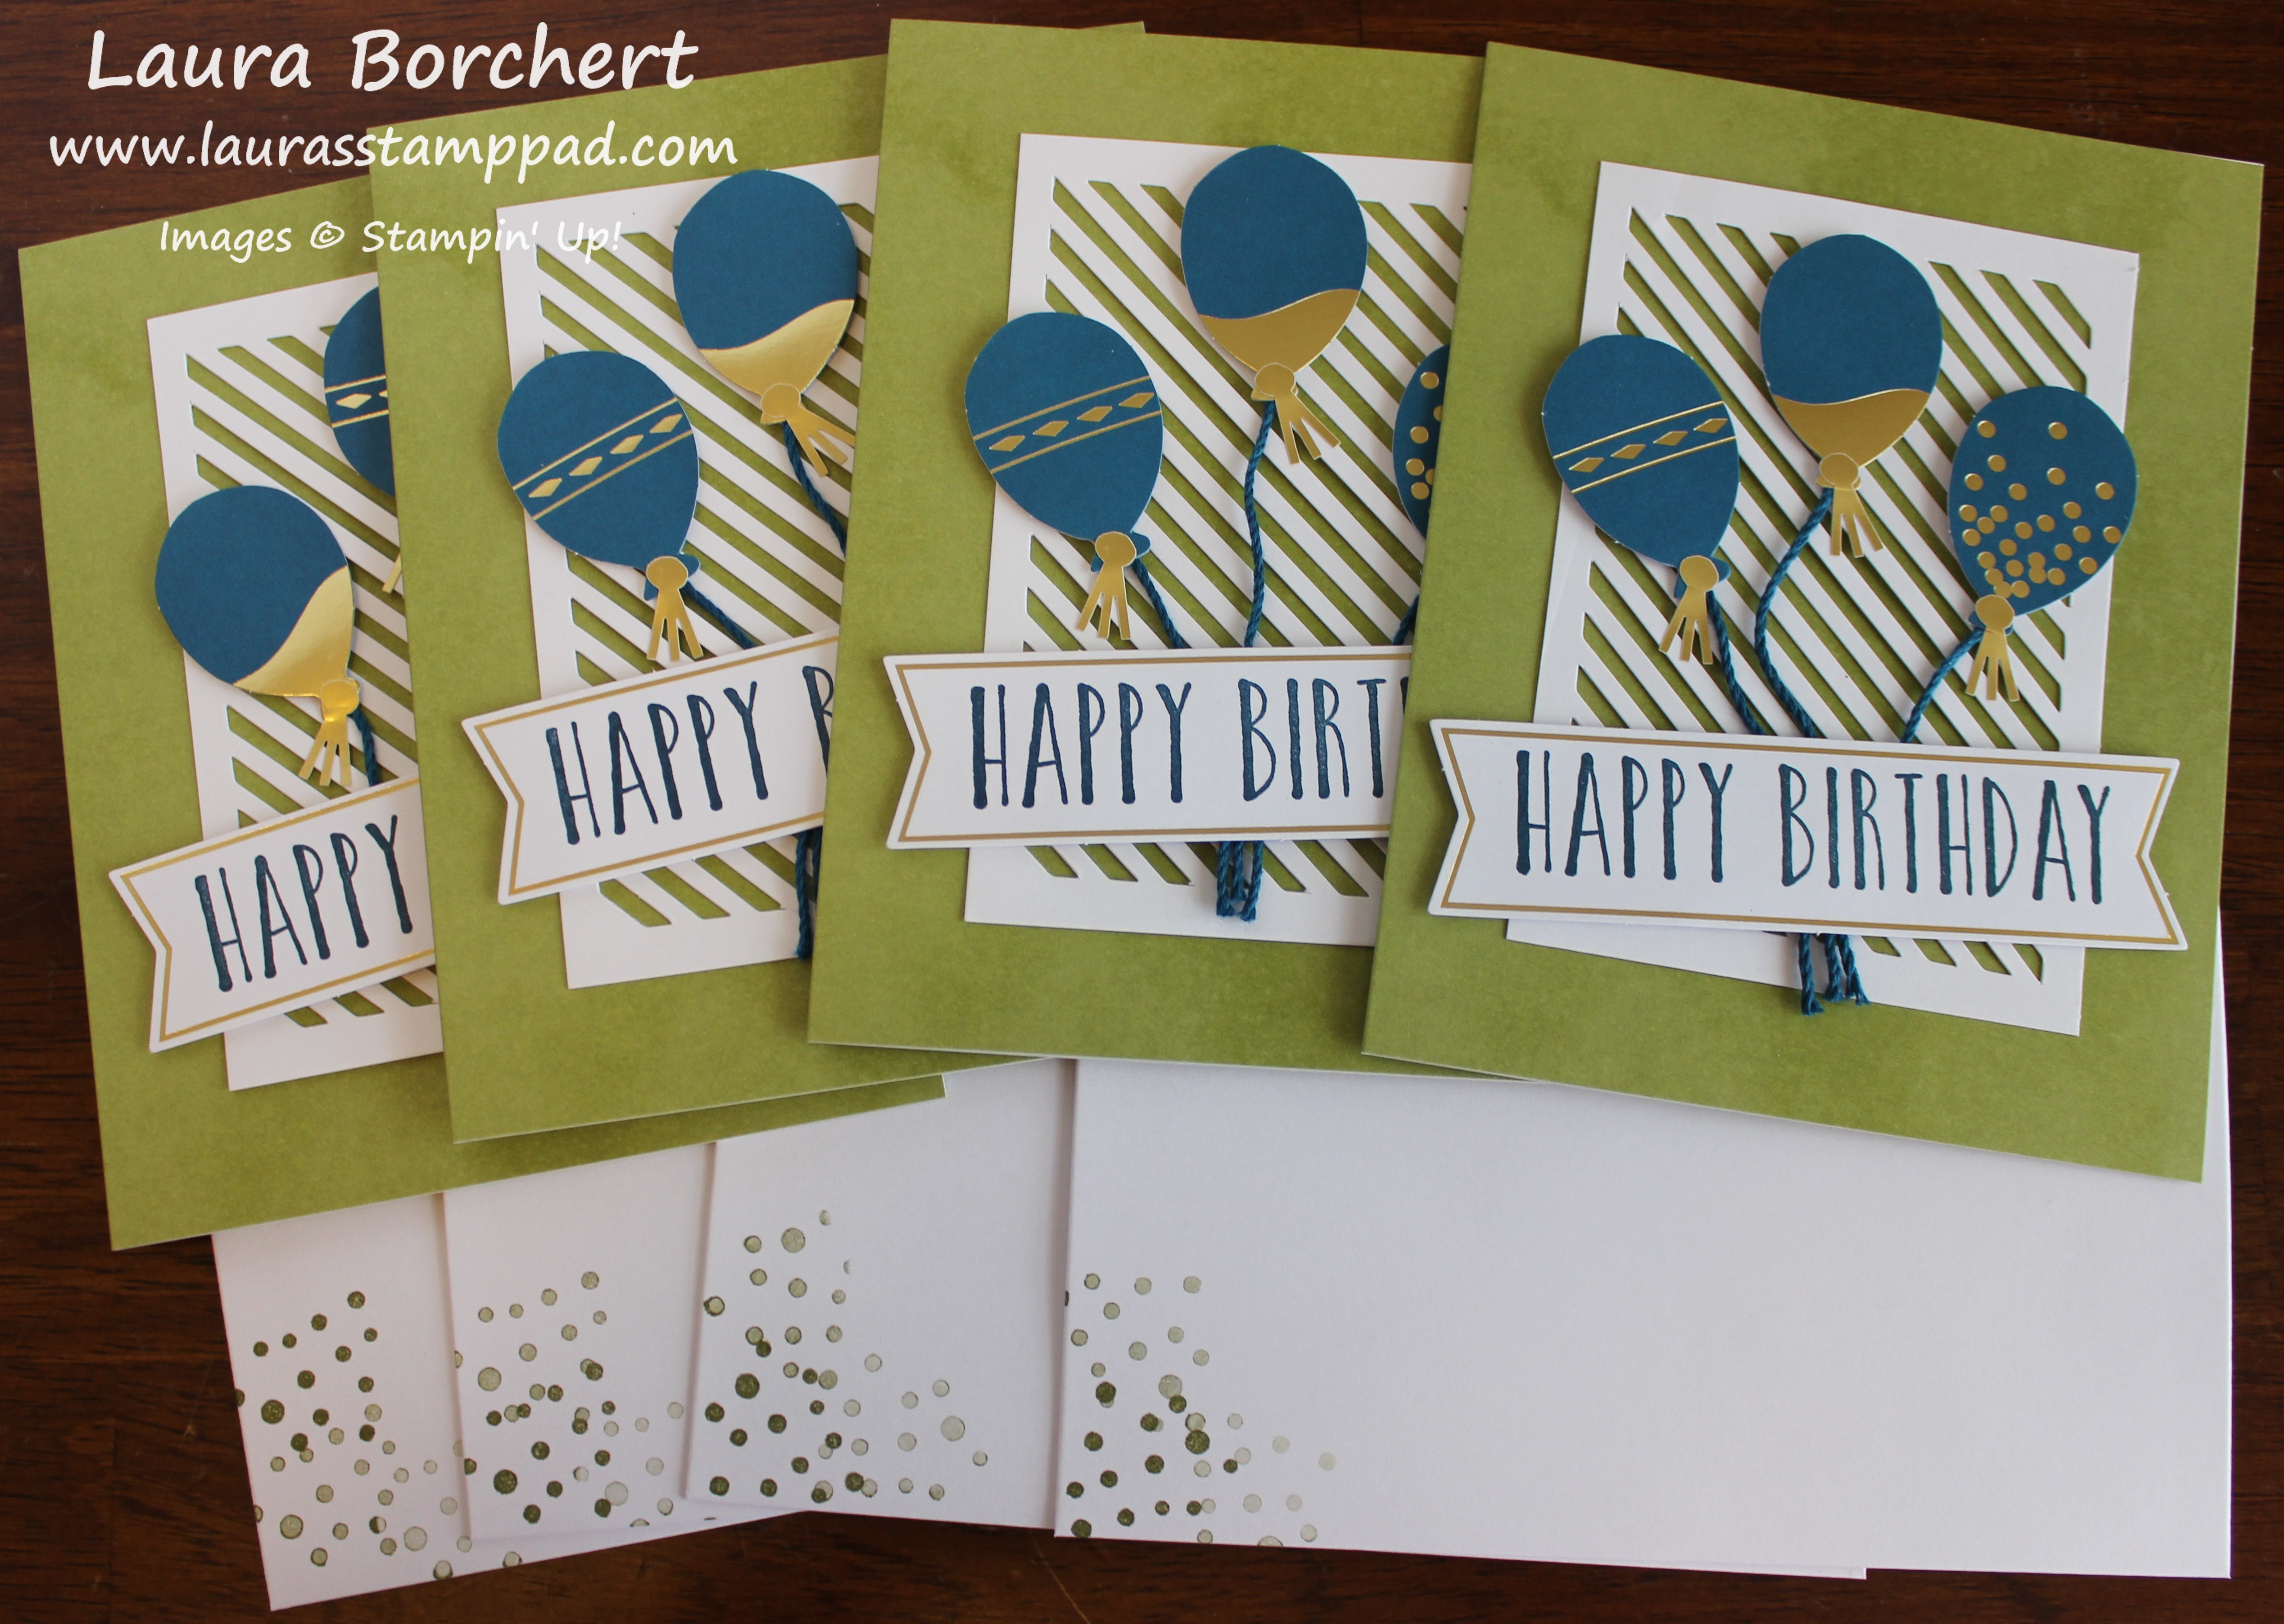
Birthday Foil Balloons, www.LaurasStampPad.com

And because flowers aren’t very masculine, there’s always this set of cards! I love how the kit has a little bit of everything and not just all flowers or all masculine! I only added 1 little tassel to my balloons as I thought 2 was just too much. That’s all personal preference. Also, I kept all of the white background pieces together in a stack and was able to punch out the stripes all at once rather than each one individually. The envelopes were stamped with the dots in Old Olive. I just inked it up, stamped once and then a second and third time without going back to the ink.

This kit was super fun and versatile. I love the cards and the box is just so adorable! This makes a great gift or something to keep for yourself. If you would like to see all of the goodies in this kit, check out my unboxing video here! Get your kit and start creating with the supply list below!

Happy Stampin’

~Laura

Product List


Sponging Over Petal Passion Designer Paper!!!

Posted on

You all know how I love black and white with a pop of color! Well check out this fabulous card where I did some sponging over Petal Passion Designer Paper!! It takes the plain black and white paper to a whole new level. The best part is that its super simple to do and you can pick any color you want!

Sponging Over Petal Passion Designer Paper, www.LaurasStampPad.com

This card uses lots of fun Sale-A-Bration items like the Shimmer Ribbon and the Happy Wishes Stamp Set! Getting items for free to create amazing cards like this one makes it even more fun!!!

I started with a Pool Party card base measuring 4-1/4″ x 11″! Next, I took a piece of Petal Passion Designer Series Paper measuring 4″ x 3″. This is a perfect measurement because then I can use every piece of the 12″ x 12″ sheet! I love that!!! Using a Sponge Brayer and Pool Party Ink Pad, I added color to the Designer Series Paper. Remember that when using the Sponge Brayer to lightly go over in the ink pad and then back and forth on the paper. Pressing harder on the ink pad doesn’t make it pick up more color. If a darker look is what you are going for, just have patience (I know, I don’t do that well either) and keep going back and forth until the desired look is achieved!

Now it’s time to assemble the card! I stamped the greeting from the Happy Wishes Sale-A-Bration Stamp Set in Calypso Coral Ink onto Whisper White measuring 2-1/2″ x 4″. The greeting was added to the top portion of the card front and the designer paper on the bottom portion. Then I added some Calypso Coral Shimmer Ribbon from the Sale-A-Bration Pack around the center overlap of papers! Using the Layering Circles Framelits, I die cut out a Whisper White and Pool Party circle. I stamped the rest of the greeting on the circle and added them to the card front with Stampin’ Dimensionals! There are so many different greeting options in this stamp set that there is something for every occasion.

If you would like to see this all in action, check out the Video Tutorial below or click here! Be sure to give the video a thumbs up if you liked it and don’t forget to subscribe if you are new. If you would like a notification when I post a new video, be sure to click the bell right next to the subscribe!!!

Happy Stampin’

~Laura

Product List


Little Blue Bird!!!

Posted on

My husband sent me a photo of robins all over the ground outside his work and he said, “Spring is coming!” I’m not sure if robins on the ground mean Spring is coming but I’ll take it. I love the colors of Spring with birds, flowers, trees, and grass all gaining their color!!! Just like this cute card with a little blue bird!!!

Little Blue Bird, www.LaurasStampPad.com

I started with a Soft Sky card base and layered on a piece of Night of Navy measuring 4″ x 5-1/4″! Next, I took a piece of Whisper White (3-3/4″ x 5) and stamped the dots from the Petal Palette Stamp Set along the bottom. I stamped them in Night of Navy Ink starting at the bottom and then 3 more times without going back to the ink pad. This is how I got that variation in color. I also moved a little back and forth with each stamp to fill in and not just stack them all going straight up.

Petal Palette Stampin' Up Bundle, www.LaurasStampPad.com

Next, I started adding all the layers and texture. Using the coordinating Petals and More Framelits, I die cut out all the pieces. The greenery in Old Olive, the lattice in Silver Glimmer Paper, and the label in Soft Sky! Using the Fine Tip Glue Pen, I added the lattice and the greenery. Then I stamped the greeting from the Petal Palette Stamp Set (Bundle & Save 10%) onto the label in Night of Navy Ink and added it to the card front with Stampin’ Dimensionals. This gives some dimension to the project and the foam dimensionals adhere well between all the bumps of the cardstock in the die cuts!

Now on to that little blue bird! I stamped him from the Petal Palette Stamp Set in Basic Gray Ink onto Whisper White. I like the more subtle look of the gray verses black. Then I made a little color palette on a clear block with some water and the Brusho Crystal Colour. Using an Aqua Painter, I colors in the birdie and once it was dry, I die cut it with the Petals and More Framelits! Then I added him to the card front with Stampin’ Dimensionals!

I think this card would look fabulous with a little yellow bird and maybe layers of yellow and coral. What are some birdie colors you would create?? Let me know in the comments below!

Also, don’t forget that if you purchase the Petal Palette Stamp Set & Framelit Bundle this month, you will earn a Sale-A-Bration goodie as well!!! Woot Woot. Click here to purchase it in Clear Mount or here for Wood Mount!

Happy Stampin’

~Laura

Product List


Technique Tuesday – Eclipse Card!!!

Posted on

Happy Tuesday!!! You all know that means I have a fabulous technique to share today! This Eclipse Card is super fun and has a major WOW factor!!!

Eclipse Card, www.LaurasStampPad.com

I love the subtle and double take effect you get with this card! There are also so many options for greetings with this as well!

I started with a Whisper White card base. Then I took a piece of the Bubbles & Fizz Sale-A-Bration Designer Series Paper (4″ x 5-1/4″) and I die cut the word “YOU” in the bottom. The Large Letters Framelits make this super fun and any words could be created!

Large Letter Framelits, www.LaurasStampPad.com

To keep the letters all lined up and it was easier to move all of them around together, I added some Post-It Note tape across them. After die cutting out the words from the designer paper, I die cut out Bermuda Bay cardstock 3 more times. I totally thought I would need 5 layers but 3 seemed to be plenty for that popped up look! Next, I adhered the designer series paper outline onto the card base making sure to add in the center of the “O”. All of this layer was flat on the card. Then I added all three layers of the cardstock letters in each spot like a puzzle. I used the Fine Tip Glue Pen to adhere the letters. It went fairly quickly. After the cardstock layers, I added the designer series die cut letter to the top layer. Perfect!!!

Stamping Technique, www.LaurasStampPad.com

Now that the focal point is complete, I needed to add the rest of the greeting and embellishments! Using the greeting from the Picture Perfect Birthday Stamp Set that ends in You, I stamped it on a piece of Whisper White. In order to omit the You, I inked it with a Bermuda Bay Marker. Next, I layered that piece on Pool Party cardstock and added it to the card front with Stampin’ Dimensionals for some texture. I added some Whisper White Baker’s Twine around the top of the card because I felt like it needed a little more!

What word would you spell out with the letters? I need more fun ideas!!! Let me know in the comments below! Also, don’t forget that if you purchase the Large Letters Framelits before the end of the month, you will earn Sale-A-Bration items as well as Laura’s Loyal Stampers Stickers and my Free Stamp Set of the Month!!!

If you would like to see this all in action, check out the Video Tutorial below or click here! Be sure to give the video a thumbs up if you liked it and don’t forget to subscribe if you are new. If you would like a notification when I post a new video, be sure to click the bell right next to the subscribe!!!

Happy Stampin’

~Laura

Product List


Beautiful Shining Rainbow!!!

Posted on

I love bright colors and seeing the Sunshine & Rainbows Bundle made me super happy! This beautiful shining rainbow card is what I created for our Baby Shower Thank You Notes and I’m in love!!!

Beautiful Shining Rainbow, www.LaurasStampPad.com

Isn’t it just precious??? I am loving how they turned out!!!

I started with a Whisper White card base and then I layered on a piece of Soft Sky measuring 4″ x 5-1/4″. Next, I took a piece of Whisper White (3-3/4″ x 5″) and did all of the stamping!!! I used the Sunshine & Rainbows Stamp Set from the Occasions Mini Catalog for the sun and rainbow. The greeting is from the One Big Meaning Stamp Set! Since I was making multiples I did these cards in an assembly line and each piece in a section. First, I stamped the greetings in Basic Black Ink and the sun in Crushed Curry Ink. Then, using the Stamparatus, I got started on the rainbows!!! I did 2 of the…….rays? bows?…..colors at a time. I started with smallest ones first and I’m not sure if it really would have mattered whether I started with the smallest or largest!

Baby Thank You Notes, www.LaurasStampPad.com

A few tips for the Stamparatus that I want to share since I used it a lot and over and over. I put one color on the platform at the top and one at the side. Making sure I didn’t get the colors mixed up, I tried to keep one ink pad to the left and one to the right. Most of this stamping was done while watching the Olympics so I had my husband help me out. He inked up one of the rainbow rays while I did the other one and it went much faster!

While there is not a problem with getting ink all over the platform and having that end up on your cardstock, it is a problem with getting it on the magnets. I realized that when I stamped down and ink got onto the magnet, then it got onto my hand when I moved the magnet off the cardstock. This resulted in a nice red fingerprint on one of the cards. That card just has a few more clouds on it! 😉

Rainbow Glimmer Clouds, www.LaurasStampPad.com

To finish off the card, I added the clouds that were die cut using the coordinating Rainbow Builder Framelits (Bundle & Save 10%). Some of the clouds I did in Soft Sky cardstock and some I did with the Myths & Magic Glimmer Paper! I’m not sure sure which I like better. Some of the clouds got a little shimmer from the Wink of Stella Pen as well! Let me know which one you would use in the comments below!!! Also, the little heart in the greeting was punched out with Cookie Cutter Builder Punch and added with the Fine Tip Glue Pen.

Thank You Note & Envelope, www.LaurasStampPad.com

I added a little sun to the envelope as well!!! I was super excited with how they turned out and can’t wait to use them!

If you would like to see this all in action and my tips and tricks, check out the Video Tutorial below or click here! Be sure to give the video a thumbs up if you liked it and don’t forget to subscribe if you are new. If you would like a notification when I post a new video, be sure to click the bell right next to the subscribe!!!

Happy Stampin’

~Laura

Product List