Technique Tuesday – Spinner Cards!!!

Posted on

Happy Tuesday!! That means I have a fabulous technique to share with you today and it’s a major WOW!!! This spinner card is just soooo cool. Be sure to watch the video to really see it in action!

Spinner Card, www.LaurasStampPad.com

Traditional red and green and just so precious with that little reindeer!!! Thank you to Jessica Ingold for this amazing idea! Let’s get started!!!

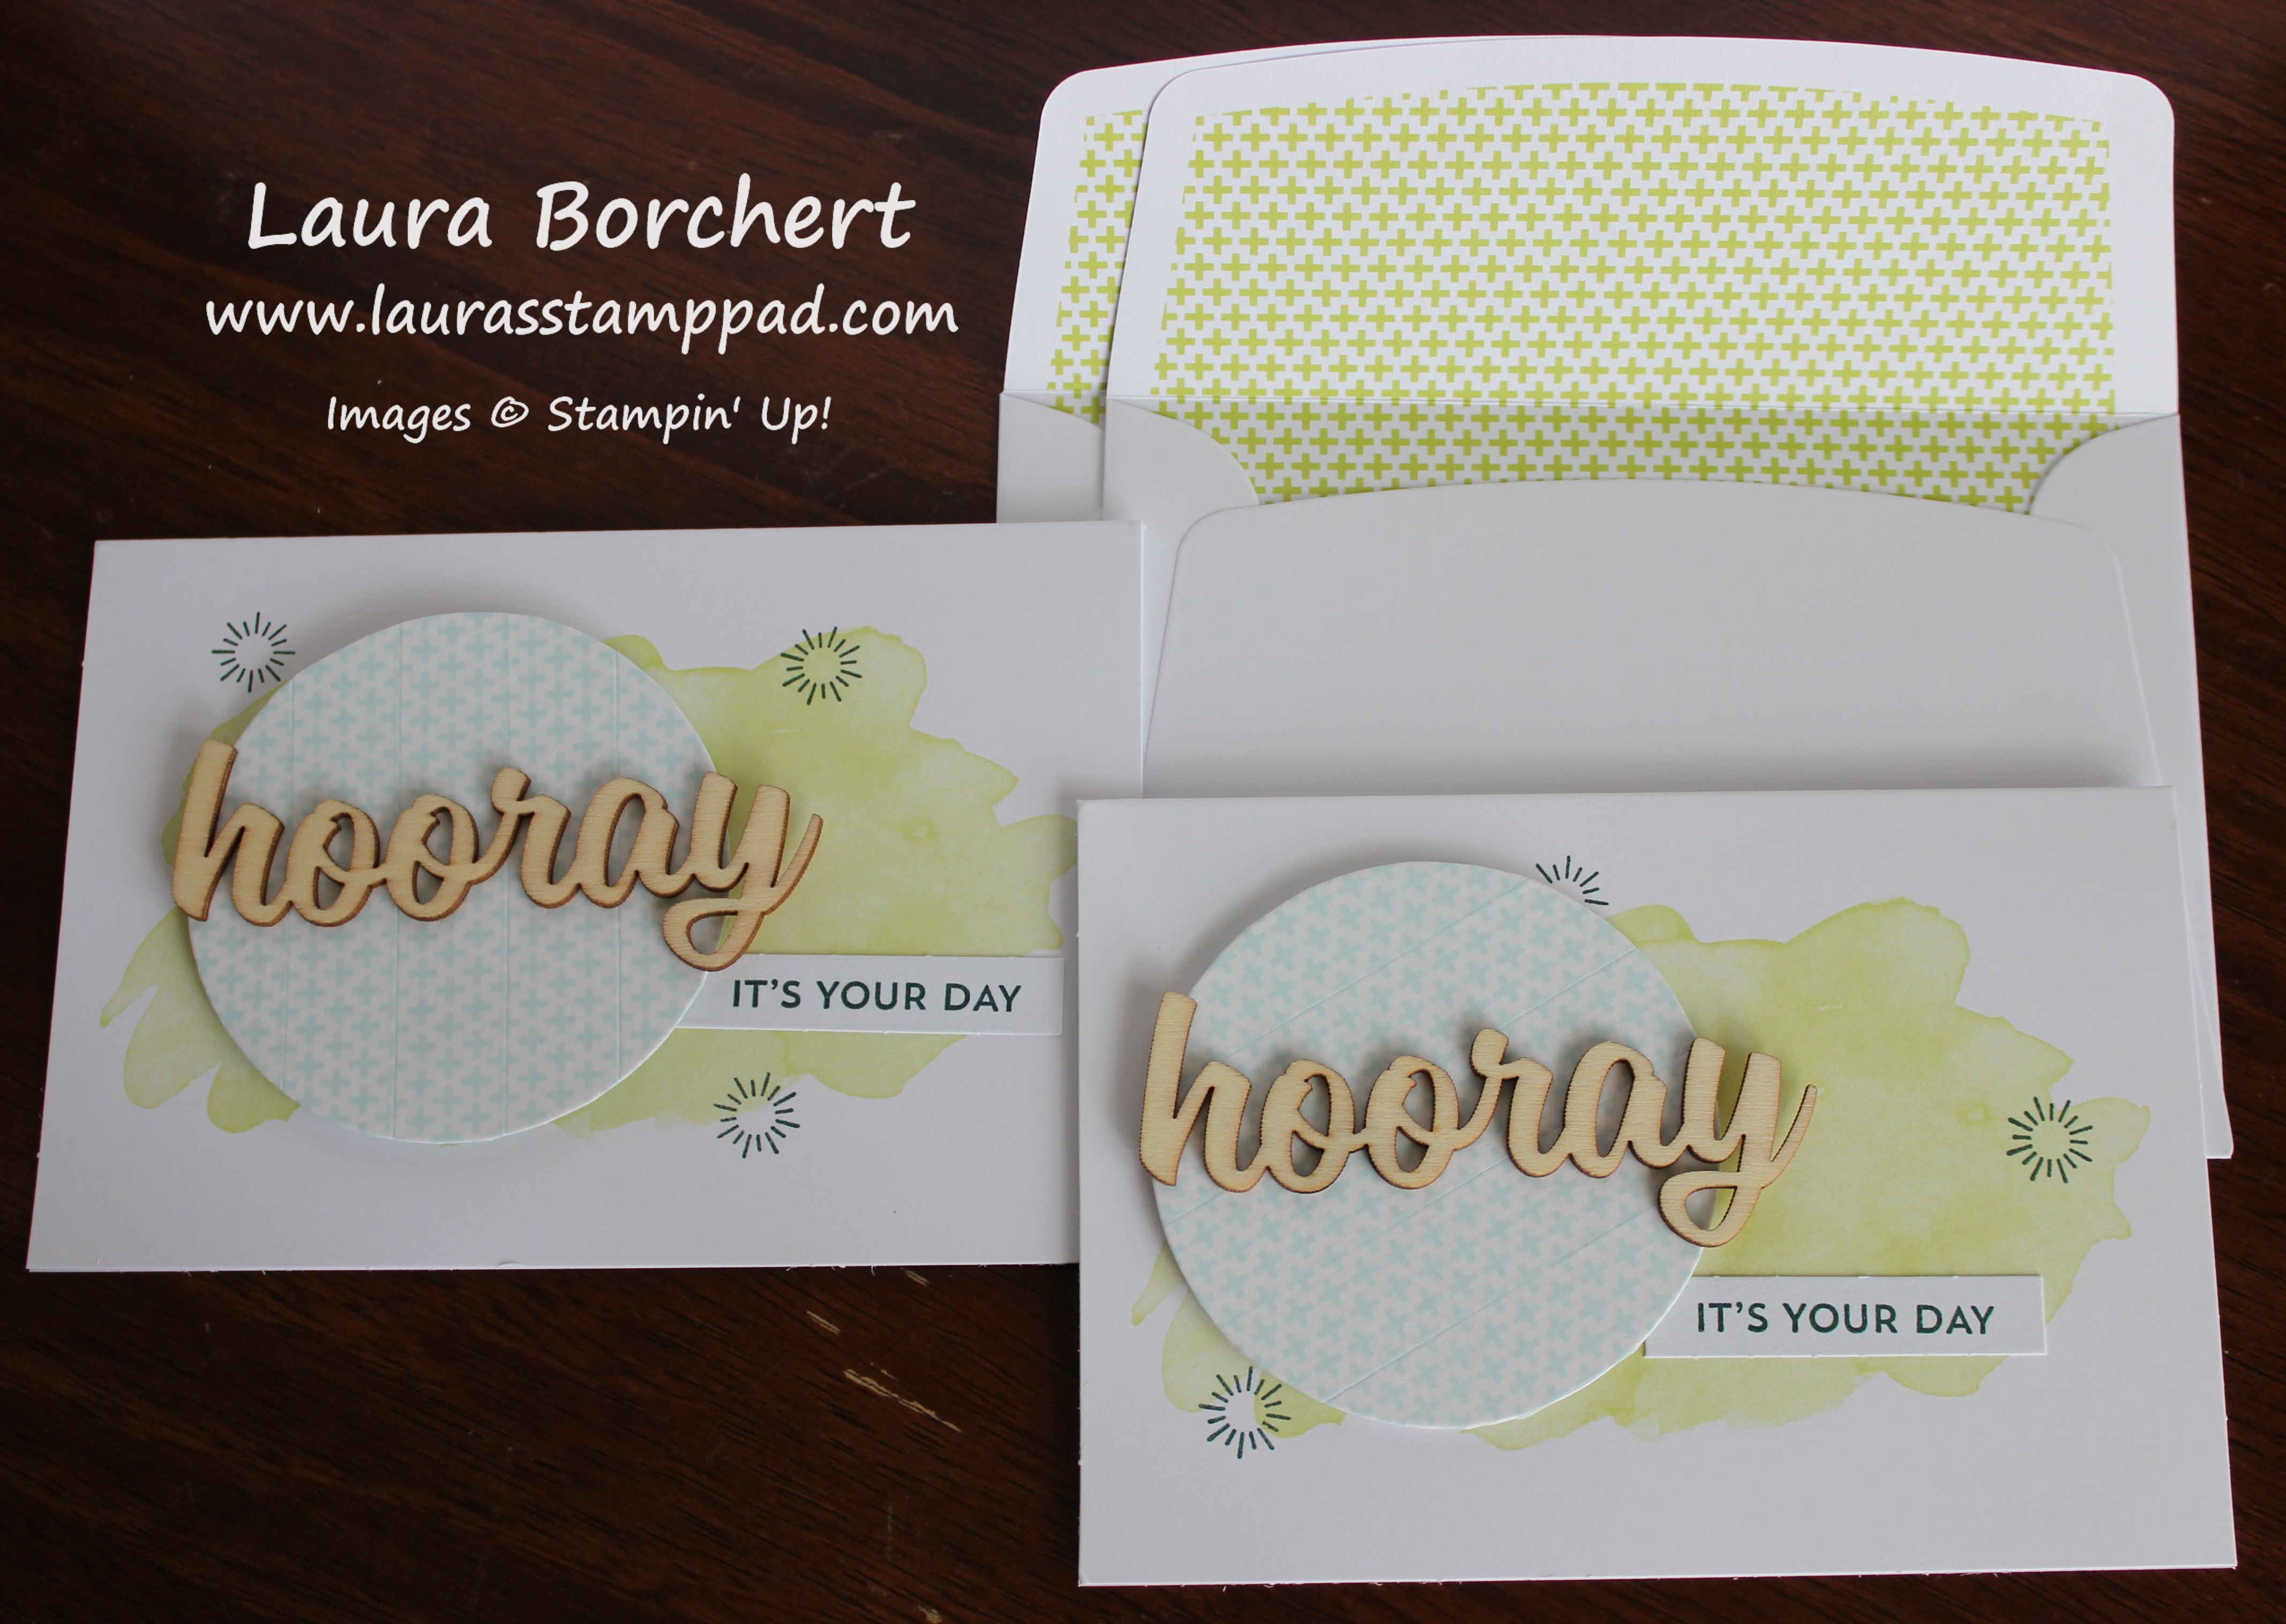
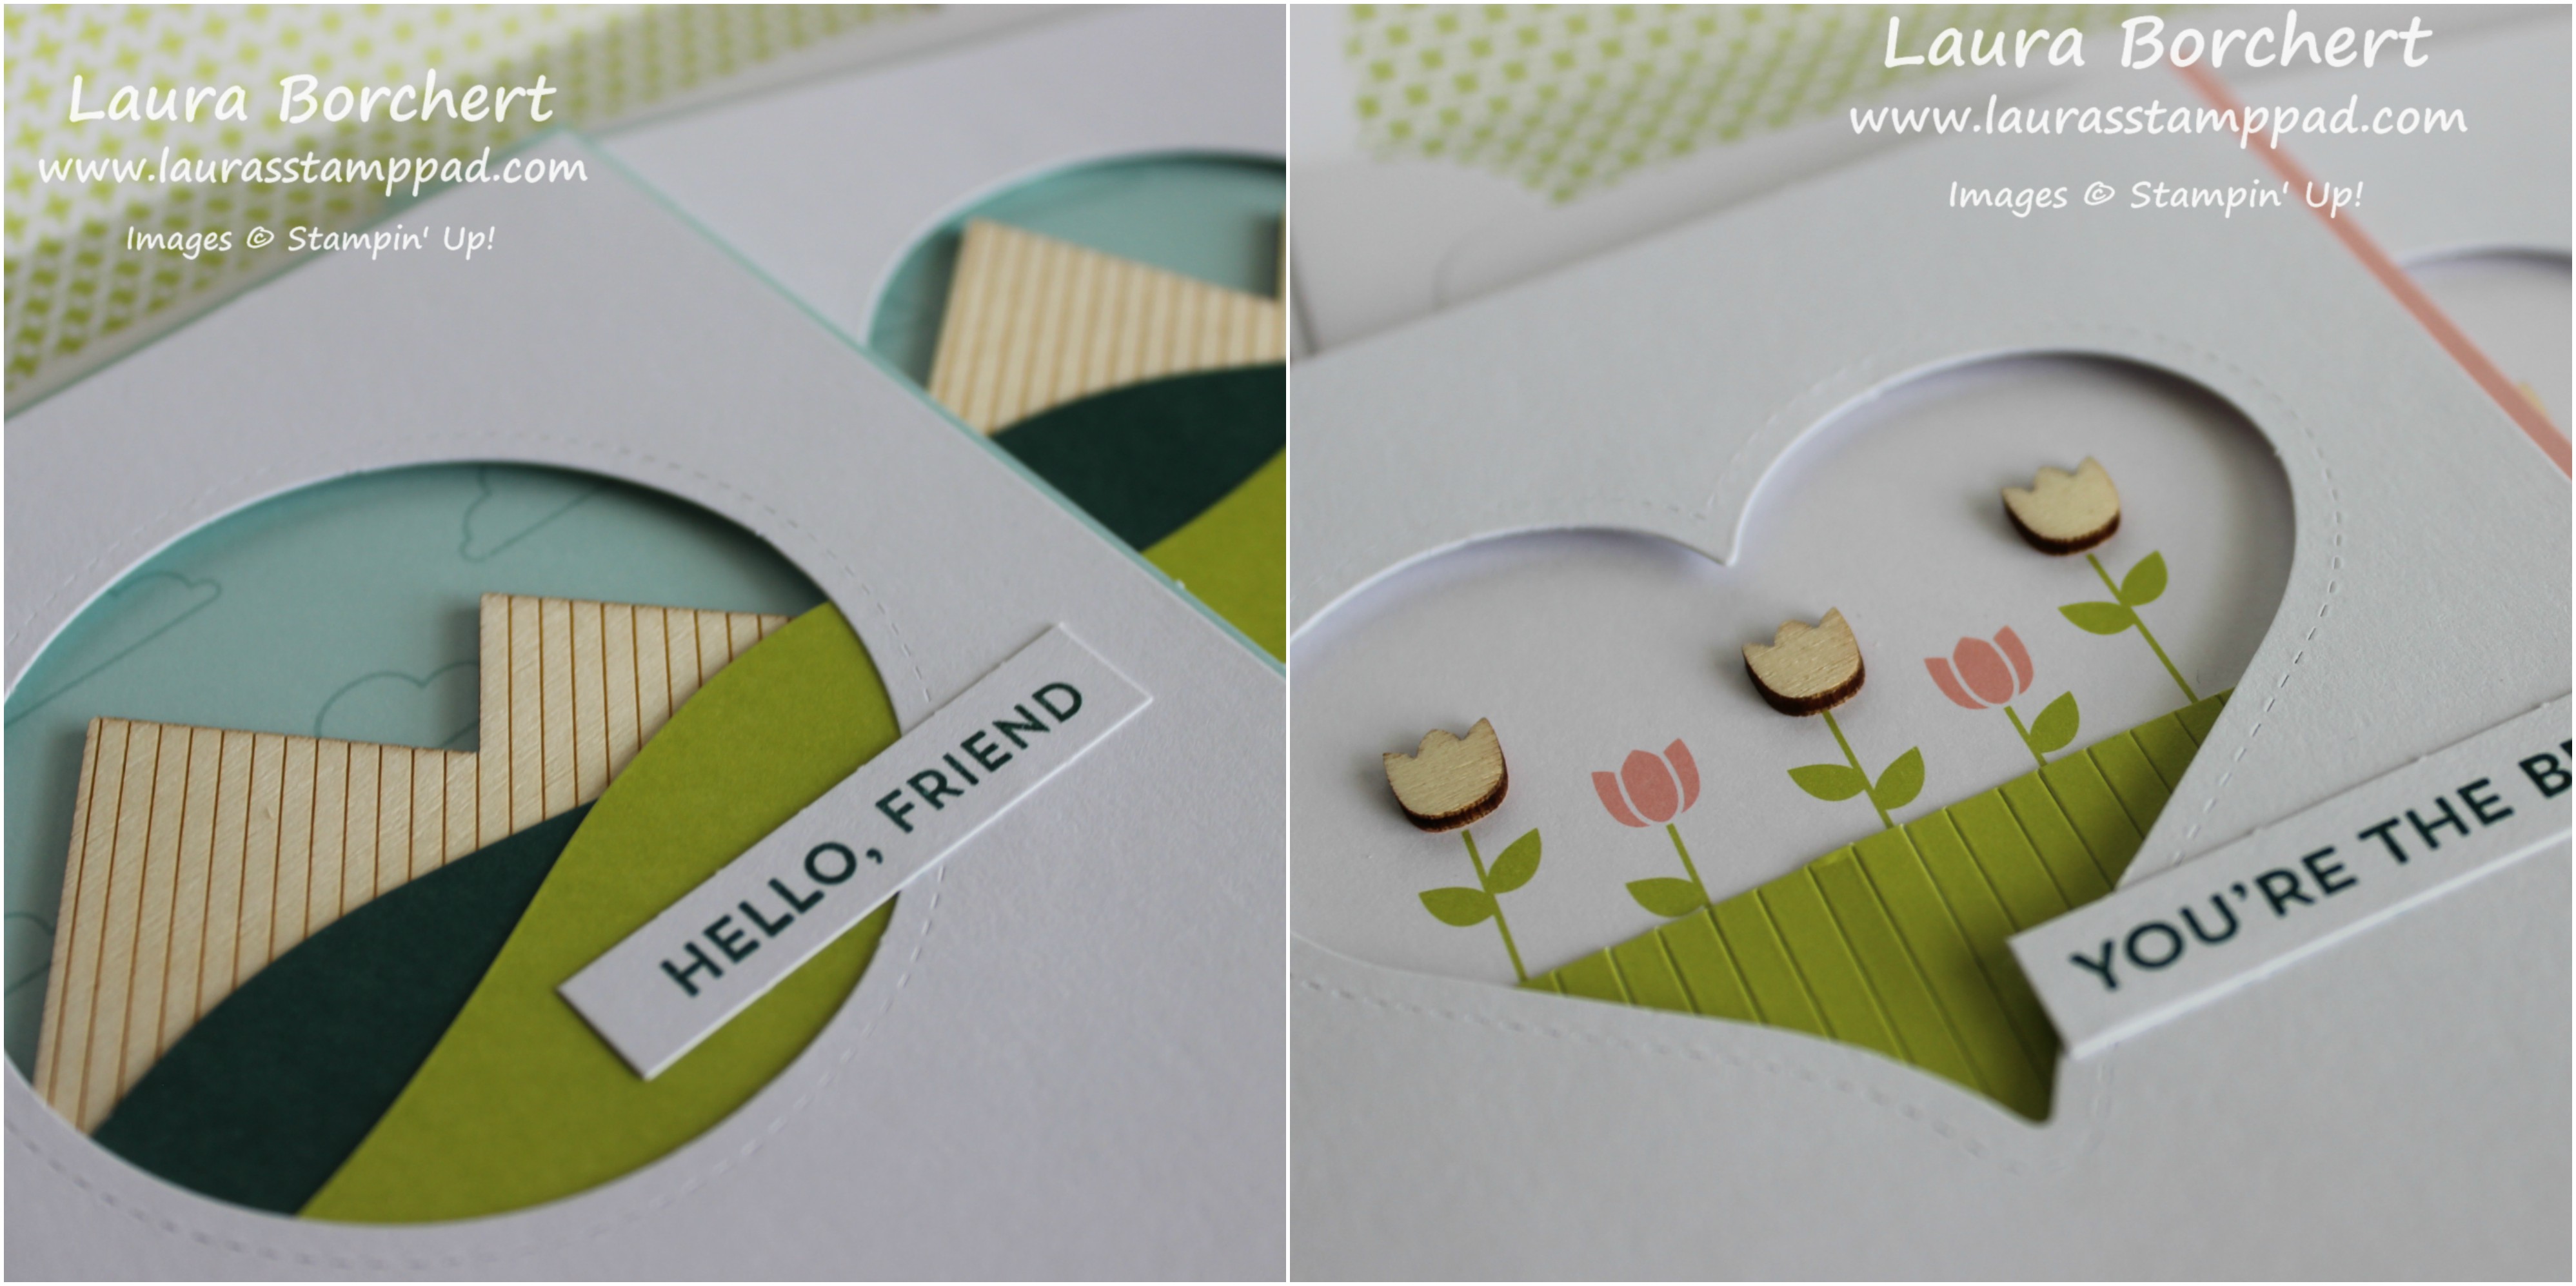
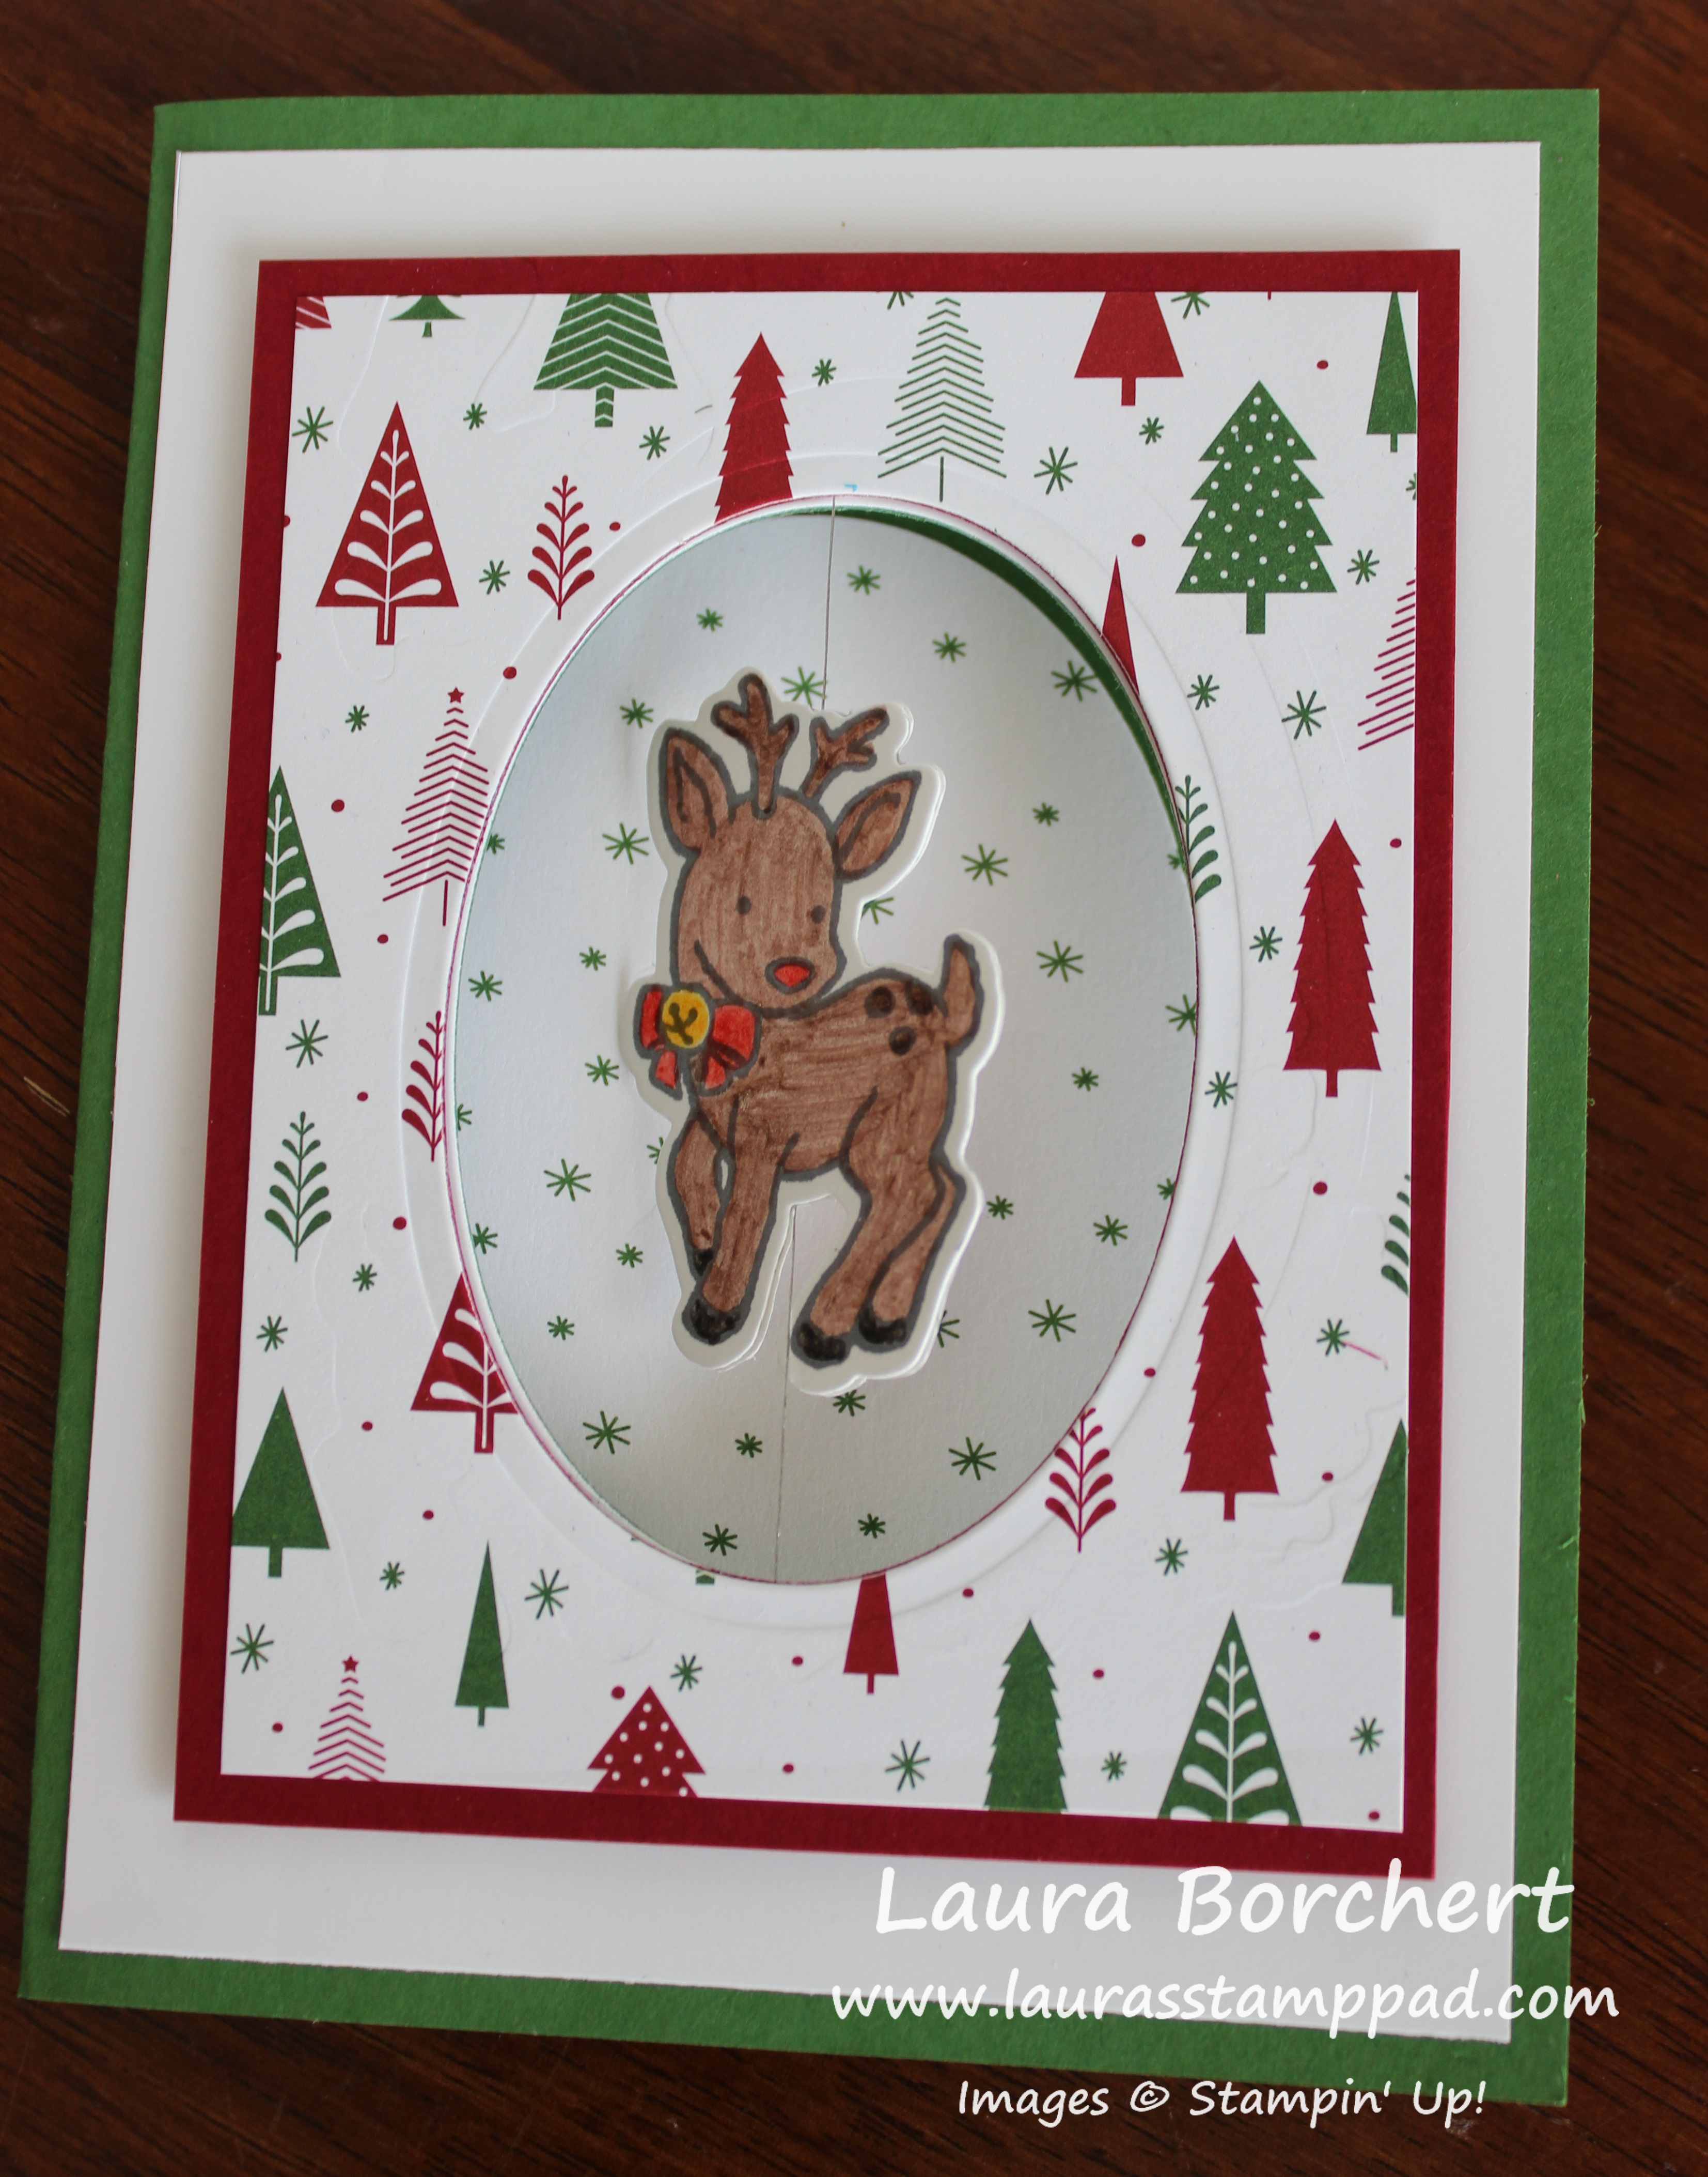
I started with a Garden Green Card Base (5-1/2″ x 8-1/2″) and layered on a piece of Whisper White (4″ x 5-1/4″). Be sure to only put adhesive around the edges and then you can use your cut out ovals for another project. Next, I layered Cherry Cobbler (3-1/2″ x 4-1/2″) and a piece of the Be Merry Designer Paper (3-1/4″ x 4-1/4″) together. Using the Layering Ovals Framelits (3rd largest), I die cut an oval in the center. I placed this on top of my card base in the center and traced with a pencil around the middle of the oval. This helps to line up the oval on the card base layers. Be sure to open the card up when running the base through the Big Shot with the Layering Ovals Framelits. Again using the 3rd largest oval for this piece as well.

Be Merry Designer Paper, www.LaurasStampPad.com

Now let’s work on that little reindeer spinner part. I stamped the reindeer from the Seasonal Chums Stamp Set from the Holiday Mini Catalog. Next, I colored him with Watercolor Pencils and a Blender Pen. Using the coordinating Seasonal Tags Framelits, I die cut them out. Since I don’t need the tag portion, I snipped off the string hole and the fold. Now there are 2 separate reindeer. I added Fast Fuse to the back of both reindeer. Next, I placed some Silver Metallic Thread down the center and pressed it between the 2 reindeer.

Spinner Card Tutorial, www.LaurasStampPad.com

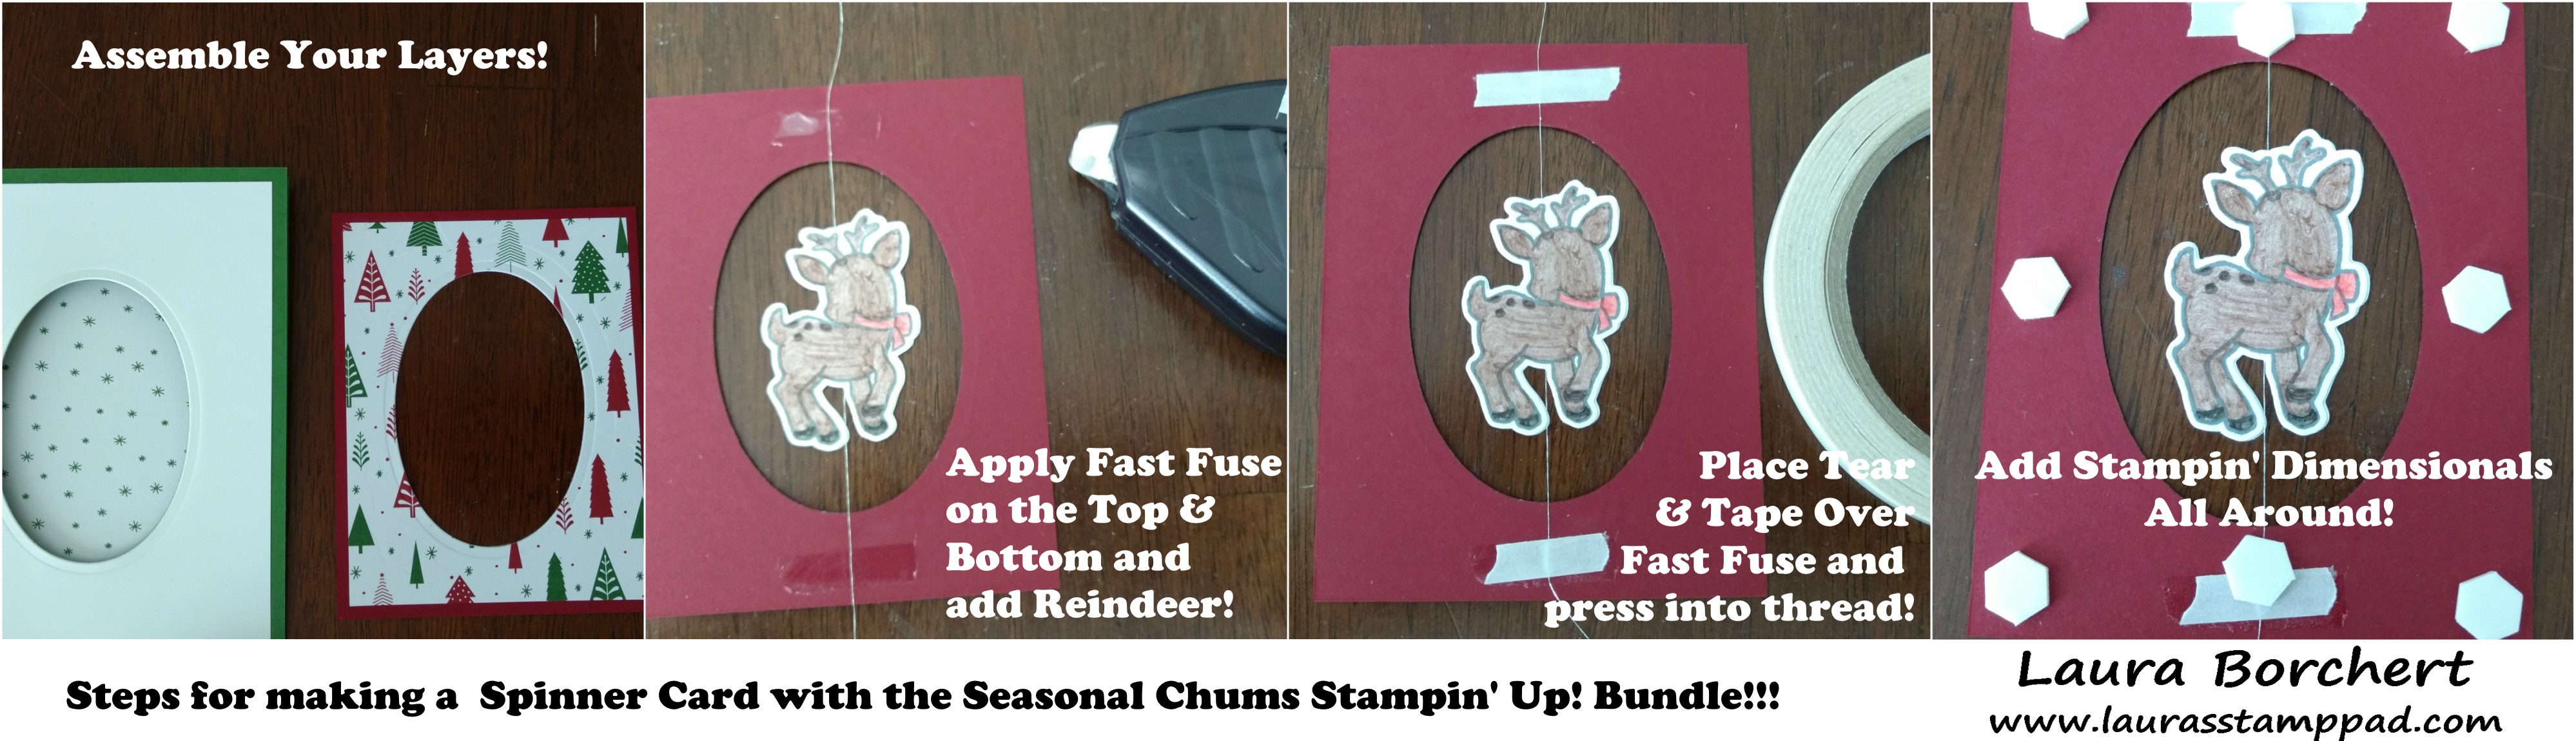
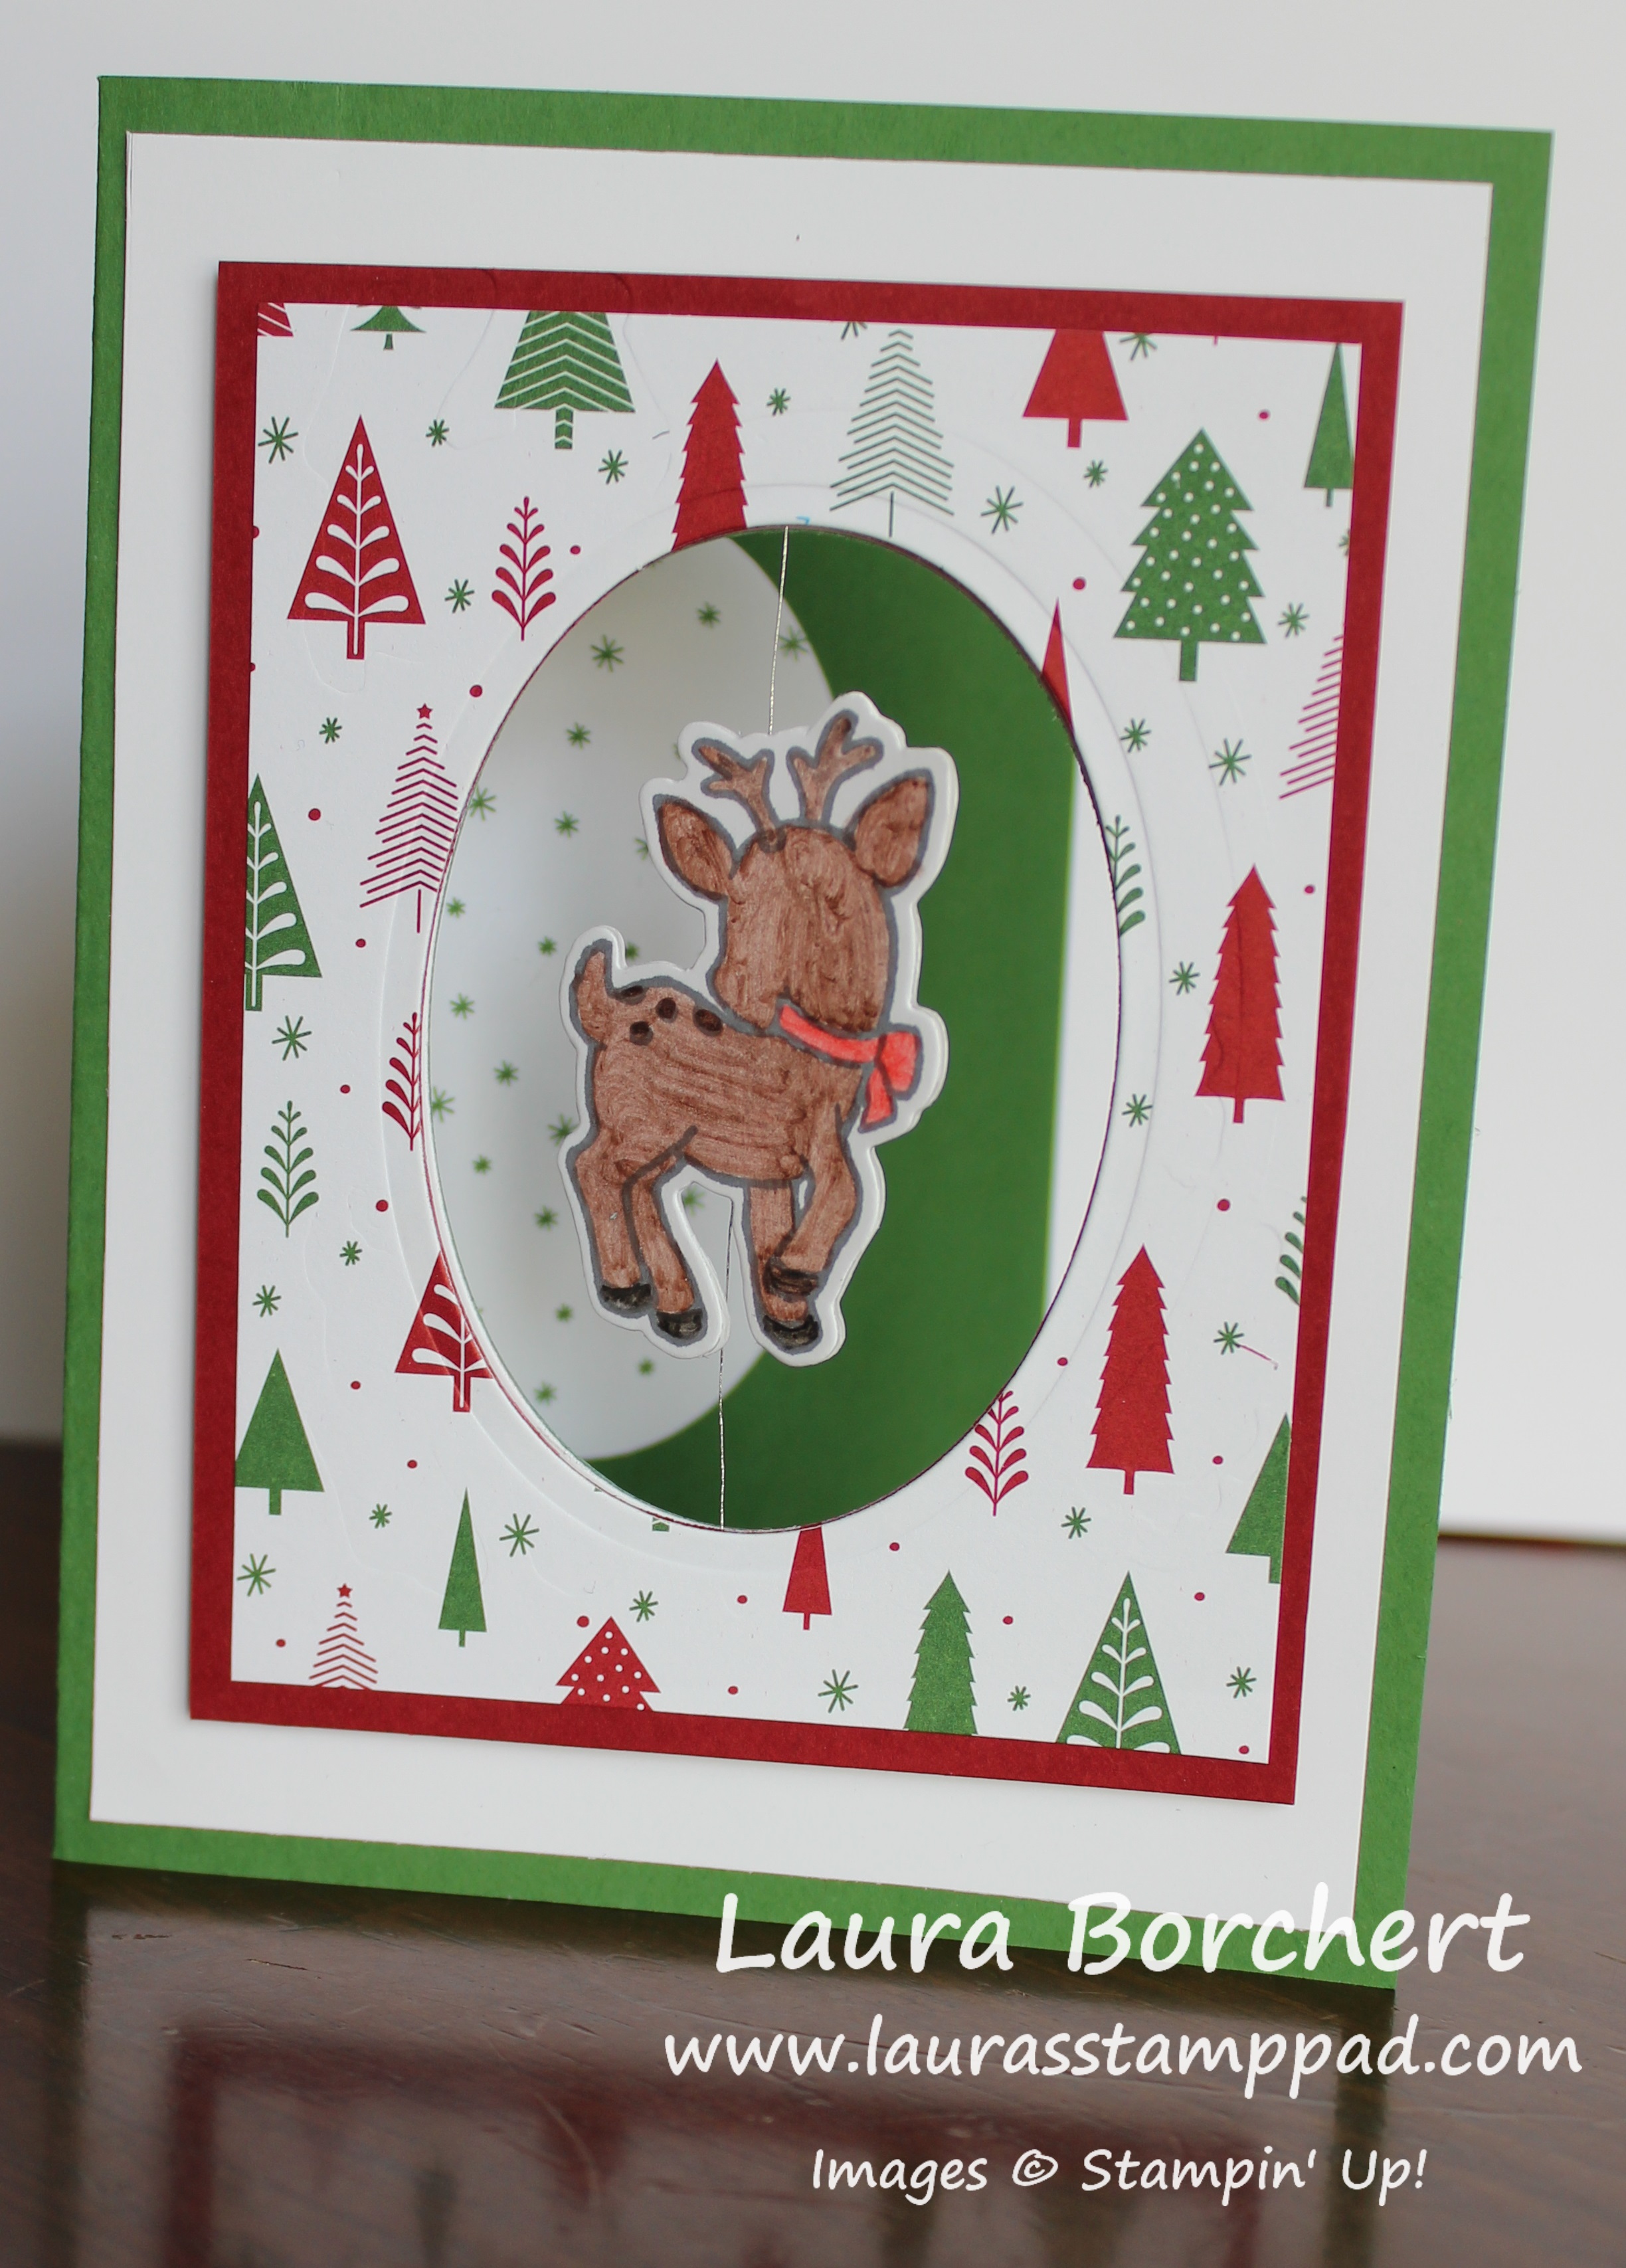
Now to assemble the spinner. I added a small strip of Fast Fuse to the top and bottom of the oval (cherry cobbler layer). Next, I pressed the thread into it, making sure it was nice and tight. (Be sure your reindeer and designer paper are both in the same direction so your trees aren’t upside down.) Then I took some Tear And Tape and placed it over the thread and covering the Fast Fuse strip. Now it is time to assemble the card! I added Stampin’ Dimensionals all around the Cherry Cobbler layer and placed it on the card base, lining up the ovals.

Layering Ovals Framelits, www.LaurasStampPad.com

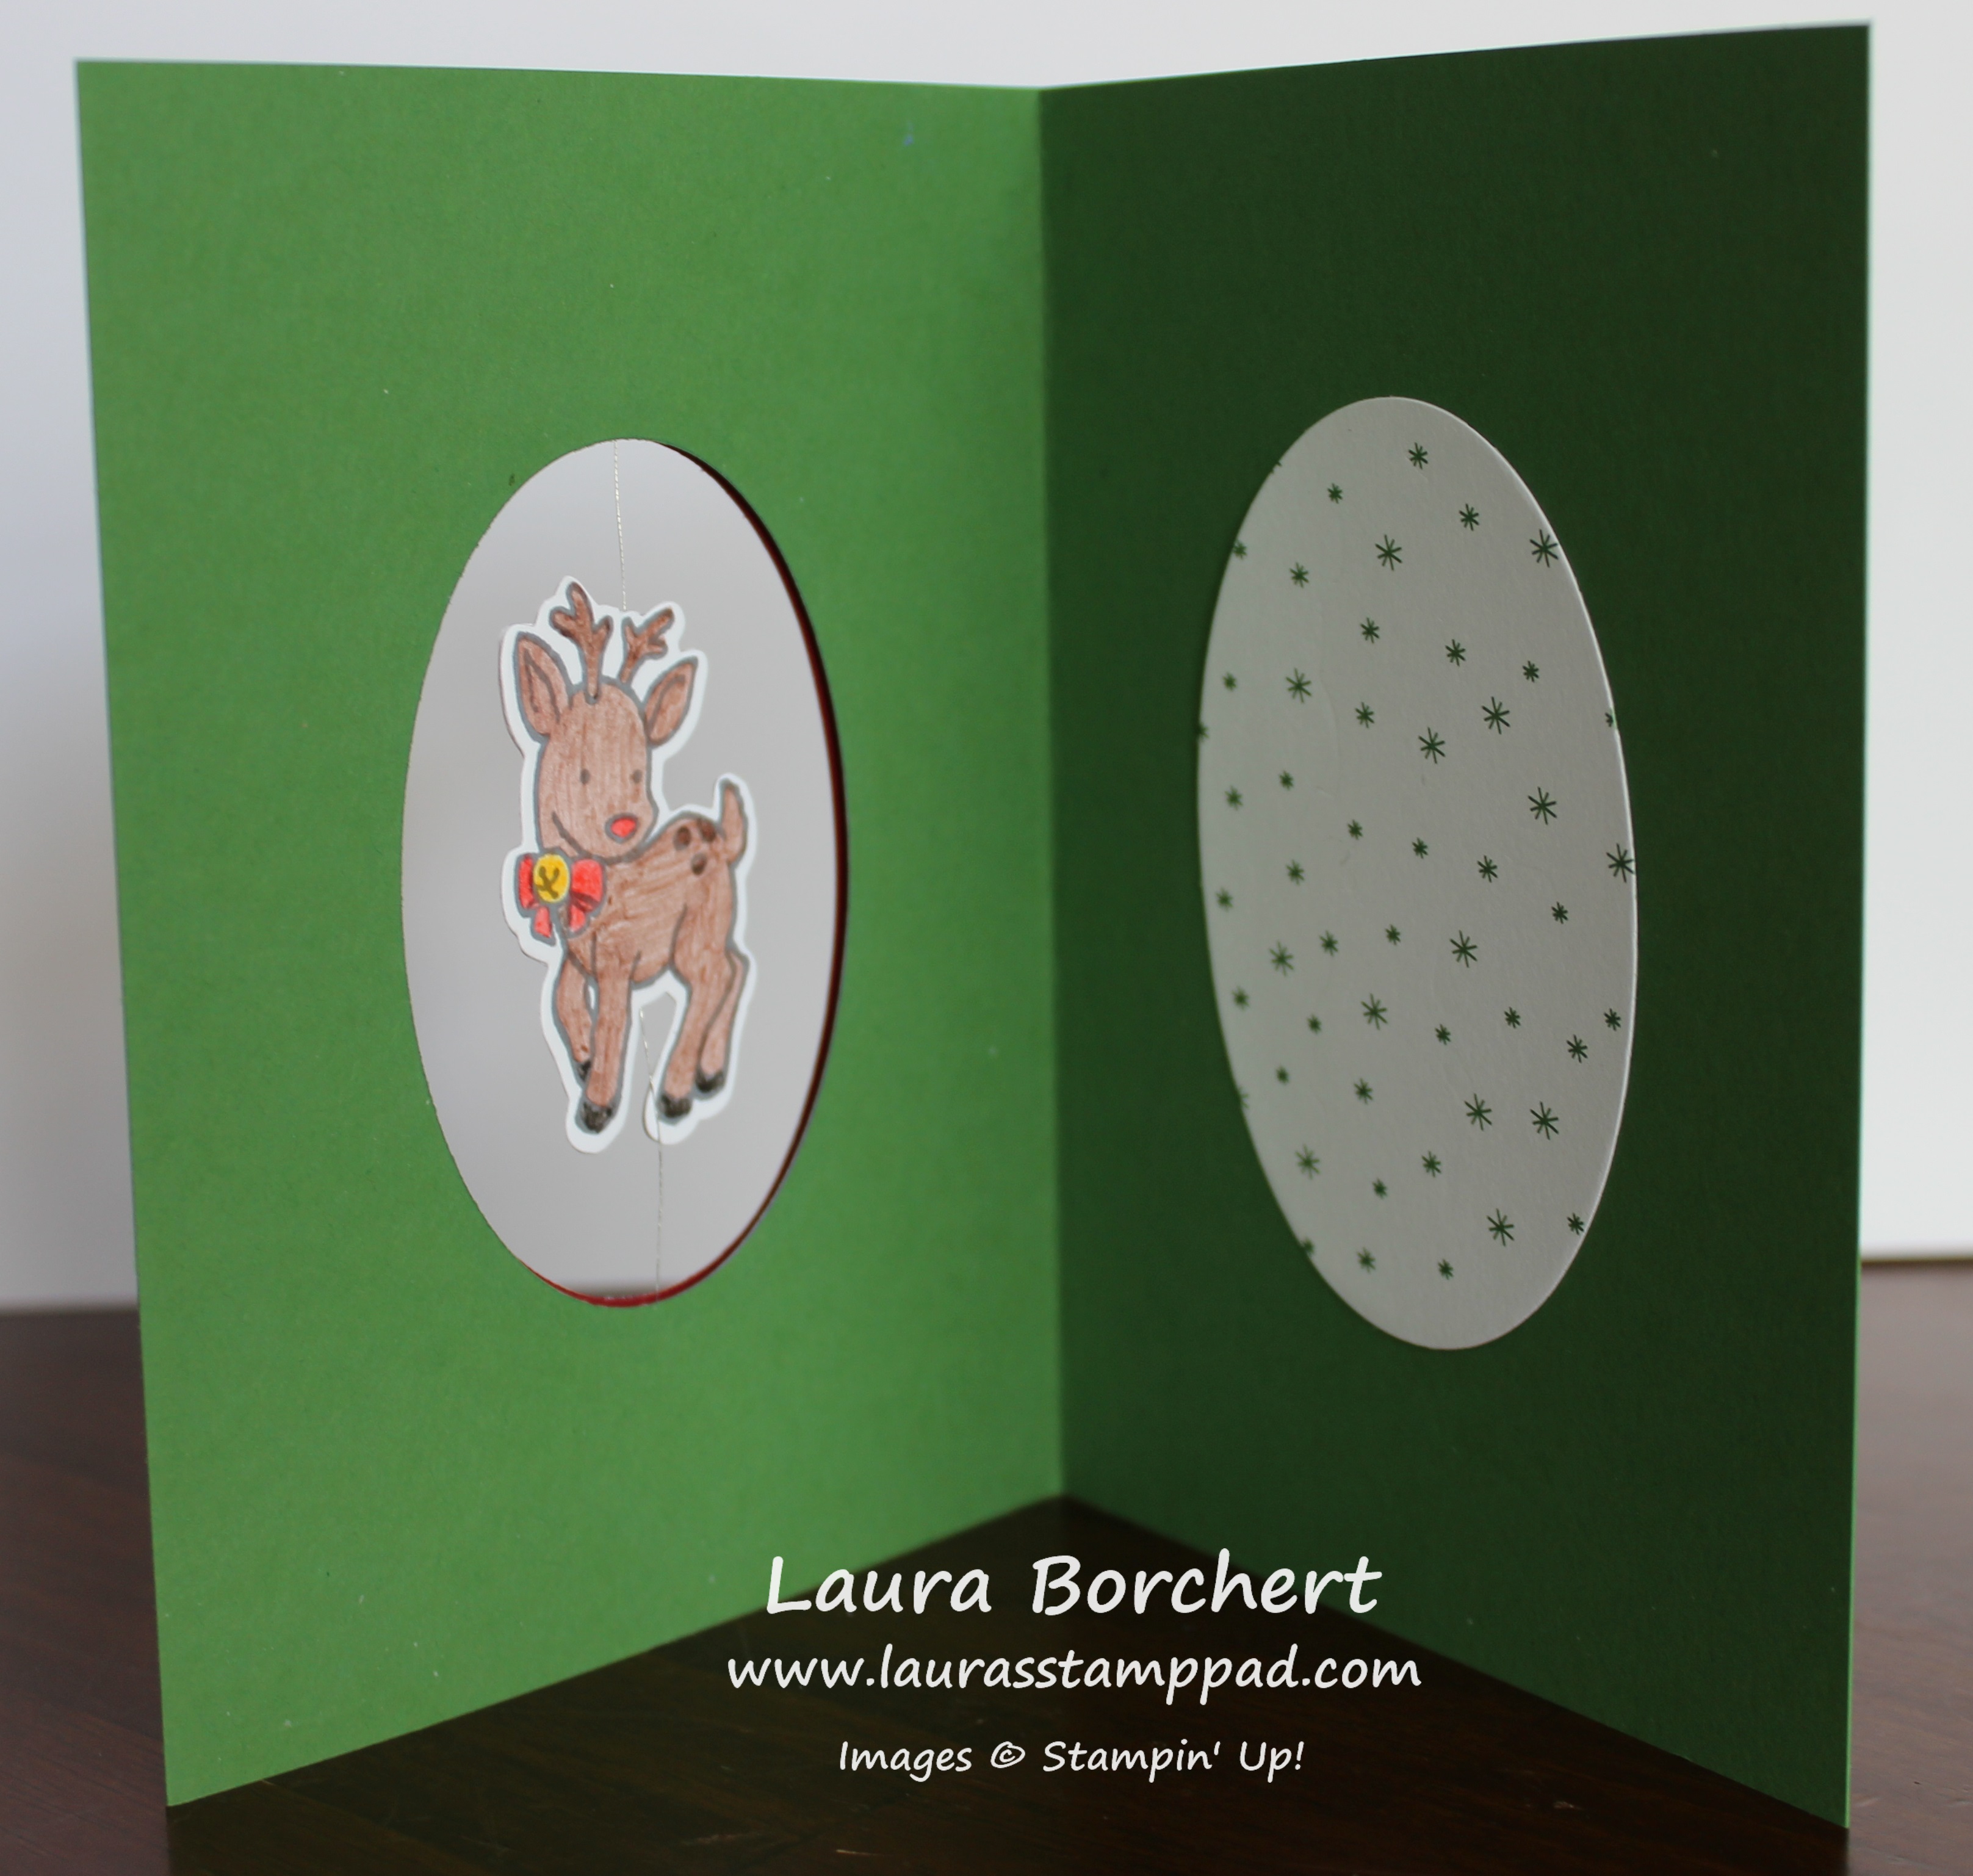
For the inside, I die cut the 2nd largest oval from the Layering Ovals Framelits and placed  it in the center to give a nice background for the reindeer! Now just wind up the reindeer and close the card! When the recipient opens the card, the little reindeer will spin and twirl around!!!

If you would like to see this all in action, check out the Video Tutorial below or click here! Be sure to give the video a thumbs up if you liked it and don’t forget to subscribe if you are new. If you would like a notification when I post a new video, be sure to click the bell right next to the subscribe!!!

Happy Stampin’

~Laura

Product List


July 2017 Paper Pumpkin~Positively Picturesque!!!

Posted on

Happy Monday!!! Today I’m sharing with you the July 2017 Paper Pumpkin Positively Picturesque!!! I love the soft colors and the nature scenes of this kit! Also, I was super surprised with a name like this I was thinking it would be a photo frame or album. I prefer cards so I was excited!

July 2017 Paper Pumpkin Positively Picturesque, www.LaurasStampPad.com

Aren’t these cards just fabulous? There are a total if 8 cards in the kit with adorable lined envelopes. Of course I had tons of Washi Tape left over as well as the stamps and TWO ink spots. Soft Sky and Tranquil Tide were the ink colors this month!


You're The Best, www.LaurasStampPad.com

You all know I love flowers so this one is my favorite. I love how the little scene of flowers peaks through the heart cut out. Also, the heart cut out is used in the other cards. I love when you can use up all of the pieces to create multiple styles of cards. Notice in the card in back, I trimmed my grass to be different heights for a cool look. 🙂

Love You Hearts, www.LaurasStampPad.comWith the heart cut outs, I added some washi tape and the wooden accents to make these two cards. Perfect!

Hello Friend, www.LaurasStampPad.com

The next set has a die cut circle for this amazing mountain scene! Those little clouds in the background are adorable. I didn’t put my mountains down far enough on the one card but that’s okay! The bottom has a strip of Washi Tape to coordinate together and give that front piece a little design.

Washi Circle, www.LaurasStampPad.comThe punched out circles were used for these cards! Do you see them? They are covered in Washi Tape and back the greeting so perfectly. I loved the idea of placing Washi Tape all over the circle to create a whole new look. Love it!

Cut Out Scenes, www.LaurasStampPad.com

 Here’s another photo of those cut out pieces showing a scene through the hole. Isn’t that just fabulous?!?! I love it!

I am super excited about the August Kit because I just don’t know what it might be. Also, it’s my birthday month so I’m hoping its something with flowers and bling! 🙂 Be sure to get signed up before August 10th so you can have fun with me! Click here to sign up! Try it out for a month. Enjoy it for a few months. You can cancel at any time or even place a hold on getting it if you know you have a busy month or just don’t want it one month. My favorite part is the surprise and how it feels like a present each month! I also love doing a product for fun and just stamping rather than having to come up with the idea. Can’t wait for the August Kit!

Happy Stampin’

~Laura


Perfect Purple Rose Fit For A Queen!!!

Posted on

This amazing perfect purple rose fit for a queen was made for my amazing cousin who is a QUEEN! 🙂 Oh I’m so incredibly excited for her to win our local county fair pageant! Small side note: I LOVE pageants so very much…watch them, take notes, take photos with Queens everywhere I go. Yeah, all of that! Now, I’m related to one so of course I made her a fabulous card to congratulate her!

Perfect Purple Rose, www.LaurasStampPad.com

While this card looks fairly simple even with all the extra details…..it took me forever to make. I really struggle when I have something in mind for someone special and try to get it just perfect. I colored 4 different roses for this one! First it was the wrong color, then I fussy cut one out and didn’t like it, and then I ruined one putting Gold Wink of Stella on top. TIP: Gold Wink of Stella comes out rather yellow. I have used the clear and love it. For this card, since I used Gold Foil, I thought I would use Gold Wink of Stella for a gold shimmer (clear with gold shimmer). I was wrong. In the end, it came out amazing and that’s all that matters!!!

I started with a Rich Razzleberry card base. Next, I took a piece of Whisper White (3-3/4″ x 5″) and stamped the rose from the Graceful Garden Stamp Set in Basic Gray Ink. I like to use gray for that softer look! Then I colored the flower in with the Watercolor Pencils and Blender Pens. Once it dried, I went back through with the pencil to highlight the edges for more detail!

Purple Rose Detail, www.LaurasStampPad.com

Next I layered this onto a piece of Gold Foil Paper (4″ x 5-1/4″). Before layering on the gold, I used the Corner Rounder Punch to soften all of the edges. Using the Gold Metallic Edge Ribbon, I placed a piece across the card front and securing the ends to the back with Stampin’ Dimensionals. Before adding the bow, I stamped the greeting from the Happy Birthday Gorgeous Stamp Set in Rich Razzleberry Ink. Then I took another piece to make a bow and secured that on with Mini Glue Dots. This ribbon is stunning! I love it! Try it out in my Ribbon Share! Click here for details!

I adore you, www.LaurasStampPad.com

Now for the inside of the card! Since Rich Razzleberry is such a dark color, I thought I would put a piece of white in there. Well why not decorate that piece too?!?! I stamped the rose and greenery from the Graceful Garden Stamp Set. I decorated the envelope as well to match!

Rose Envelope, www.LaurasStampPad.com

It all turned out so fabulous!! I love it!!! Do you enjoy making special cards for someone or do you tend to make cards and then pick the best one for people? I’m usually the second one but every once in awhile I go all out!!! Let me know which you are in the comments below!

Happy Stampin’

~Laura


April 2017 Paper Pumpkin Kit – A Sara Thing!!!

Posted on

I love the April 2017 Paper Pumpkin Kit – A Sara Thing because I love watercolor pencils and black & which with a pop of color!!!! It was super fun to put this kit together! Look at all of the goodies. You can see the complete unboxing of this kit here!

April 2017 Paper Pumpkin Kit - A Sara Thing, www.LaurasStampPad.com

I love the little mini Colored Pencils and I can always use these for future projects as well! To be honest, I actually used an Aqua Painter rather than a cup of water and the provided brush! Less mess and I tend to make lots of them! 🙂 Here are all of the cards completed!!!

A Sara Thing Card Kit, www.LaurasStampPad.com

Look at all of that beautiful color! This picture just makes me so happy and look at all of those cards from one kit! Amazing! Now let’s focus on each card set!

Diamond Watercolor, www.LaurasStampPad.com

Okay so did you also notice that the envelope have that fabulous label and each set has a different inside pattern! How fabulous?!?!? So this set I had a little problem with it….can you guess? I stamped the greetings on the white panels and didn’t realize it needs to be placed low or high so the diamond doesn’t cover it. Oops! The lower right corner one is a little covered but I think it will be okay! I simply scribbled over each diamond with the pencils and then blended the colors together with the Aqua Painter! Next, I wiped off the top with a napkin to get any excess ink off the embossed portion. The flowers are a little chunky but I loved how they accented the card so I added them on!

Acrylic Flowers, www.LaurasStampPad.com

This pattern was super fun to color with. My favorite one is the lower left corner. I just love it! The Black and White Washi Tape is the perfect accent on the bottom of the watercolor paper! Love it! The flowers add a little bling and texture too!

Watercolor Wash Background, www.LaurasStampPad.com

These were the most fun and my favorite set because it’s so easy to just swish back and forth to watercolor. Blending the blue and yellow to make green was super fun too! I love the little random dot stamp too! Another tip is that there are few greetings that fit on the banner because the “You” doesn’t fit. I just stamped the “You” onto the watercolor paper! It turned  out perfectly!

Leftover April Paper Pumpkin, www.LaurasStampPad.com

Another reason I love Paper Pumpkin is because look at all of these leftovers I have to use on other projects!! I forgot to put the little paint brush in the photo as well! I just love Paper Pumpkin!!!

Which card set is your favorite? Let me know in the comments below! Also, if you get Paper Pumpkin, what is your favorite part of it? I can’t wait to see what you say!

If you would like to join in the fun, be sure to sign up for your Paper Pumpkin Kit before May 10th! Click here to get started! For just $19.95 (plus tax), you get a complete kit with stamps, ink and supplies. Your first kit comes with a clear block! I think it’s worth every penny!!!

Happy Stampin’

~Laura


Friday Updates & Excitement!!!

Posted on

Happy Friday!!! I’m have so many fabulous updates and excitement to share with you that I thought I would make it an entire blog post!!! Are you ready???

Friday Updates & Excitement, www.LaurasStampPad.com

Last Friday, I did the drawing for the Ink Pad Giveaway and it was Sheila!!!! I’m so happy for her and she selected the Subtles Collection. Little funny side note: I took the picture of her name with my ink pads before telling her she won. Yet, somehow I did it in front of the Subltes Collection and that’s what she picked. Hehehe I love little things like that!

Speaking of Giveaways, let me know in the comments below what you would like the new giveaway to be. I have done the Big Shot and now the Ink Pad Collection. Would you like a repeat of those or something different?? Can’t wait to hear your suggestions!

Food Trucks, www.LaurasStampPad.com

So even though Sale-A-Bration is over and you can’t get the adorable Tasty Trucks Stamp Set, I just had to share these. I had some leftover cards already cut so I created them! Coloring with the Watercolor Pencils and Blender Pens is just so much fun!!! Eeee I love them all!

Sun is Setting, www.LaurasStampPad.com

Don’t forget that the Stampin’ Up! Retired List is out and items are selling out fast! You can check out the complete list here:

2017 Retiring List – Excel

2017 Retiring List – PDF

Some of these items are sold out already so you can just start shopping here! Not only do you get to enjoy getting some great products before they are gone (and at a discount for some), you will also be able to earn Laura’s Loyal Stampers Stickers!!!

And another fun announcement……I have handed out my FIRST $40 Gift Certificate for Laura’s Loyal Stampers Stickers!!!! Congratulations Vickey M. for earning the first one!!!! Woot Woot!!! Will you be the next one?!?!?!

I hope you all have an amazing weekend and I’ll see you back here on Monday!!!

Happy Stampin’

~Laura


Happy 13th Anniversary to Me!!!

Posted on

I just can’t believe it is my 13th Anniversary with Stampin’ Up! today! How crazy is that?!?!?! Thirteen years seems like a long time but yet this has been an amazing and fun journey! I have enjoyed every moment of it!!! In celebration (and tradition), I am doing my 13 Favorite Stampin’ Up! items right now today!

13th Anniversary, www.LaurasStampPad.com

My 13 Favorite Stampin’ Up! Items!!!

~Enamel Shapes – I love the shape of these and the little POP of color they add to a project!

~Perfect White Accents – I honestly just found out about these things and I’m in love! They are flat and smooth and perfect for a card!

~Floral Boutique Designer Series Paper – Simple Navy and White look is just stunning for every occasion! Check out this One Sheet Wonder I did!

~Beautiful You Stamp Set – The ladies are beautiful but the greeting are even more amazing! Check out some samples here, here, and here!

~Lift Me Up Stamp Set – I just love these greetings. Sending Smiles Across the Miles is my favorite. You can check out samples here, here, and here!

~Watercolor Pencils – My new favorite coloring tool! These things are amazing. Check out some samples here, here, and here!

~Blender Pens – Since I have been playing with the Watercolor Pencils so much, these work perfectly to blend the colors for the perfect look like in this sample and this one!

~So Detailed Framelits – The details and beauty of these are just AMAZING! Check out my favorite card right now here!

~Brights Collection – I had a stamper tell me she owned the color collection I recommended….I knew exactly which one that was!

~Stitched Shapes Framelits – These are the perfect shape (circles, ovals, squares) with amazing detail!

~Grid Paper – This stuff is amazing to use when stamping for when you stamp off the paper, stamp off for a shade lighter, or just practice stamping!

~Mint Macaron Sheer Linen Ribbon – I love this color and the texture of the ribbon is perfect on so many projects!

~Flirty Flamingo Ruched Ribbon – I love pink and this ribbon has a fabulous texture and it’s easy to use. There isn’t a big knot when you use it on a card!

Are any of these your favorites?? Let me know in the comments below!

If you would like to see this all in action, check out my Video Tutorial below or click here! Don’t forget to give it a thumbs up if you liked it and be sure to subscribe if you are new. I post a new video every Tuesday and Thursday (or when my Anniversary falls on a Wednesday)!!!!

Happy Stampin’

~Laura


Technique Tuesday – Beautiful Reflection!!!

Posted on

Happy Tuesday!!! That means I have a fabulous beautiful reflection technique to share with you today! I am super loving the Beautiful You Stamp Set. Check out more samples here, here, and here!

Beautiful Reflection, www.LaurasStampPad.com

Isn’t this card just stunning? It’s beautiful and peaceful! I just love it so let’s get started!

I started with a piece of Whisper White (4″ x 5-1/4″) cardstock and stamped the greeting from the Beautiful You Stamp Set at the top. I did it after the fact in mine but it helps to do it first! Next, I stamped the girl from the same stamp set in Basic Black Ink onto the cardstock and then onto a piece of Window Sheet. Be careful when you stamp on the Window Sheet because it is slick! Then I flipped the Window Sheet over and placed it on the cardstock, matching it with the black squiggle on the bottom. Press over the window sheet to make sure the ink transfers to the cardstock. I love how it looks foggy and incomplete because that is how it would look as a reflection. Also, it helps make your card still look good when it doesn’t come out perfect! 🙂

For coloring, I used the Watercolor Pencils to color her dress and umbrella (Bermuda Bay & Rich Razzleberry). I used the Blender Pen to blend the color around! Then I went back through and added accents with the pencils. I didn’t trust myself to get the perfect watercolor wash for the puddle so I used the Watercolor Wash Stamp Set and Pool Party Ink. I stamped off once for a lighter look!

I really wanted a piece of Designer Series Paper for the left hand side but didn’t have any that was Rich Razzleberry. Then I realized I could make my own with the Irresistibly Floral Designer Series Paper. Using the Sponge Brayer and Rich Razzleberry Ink, I colored the Designer Paper to match! Be sure to wipe off any excess ink to really make the embossed design pop! I added this piece to the left hand side of the card and tied some Bermuda Bay Stitched Ribbon around it! Next I adhered this piece to a Rich Razzleberry card base! I just love it!!!

If you would like to see this all in action, check out my Video Tutorial below or click here! Don’t forget to give it a thumbs up if you liked it and be sure to subscribe if you are new. I post a new video every Tuesday and Thursday!

Happy Stampin’

~Laura


I Love Bright Spring Flowers!!!

Posted on

These bright Spring flowers on this card scream Spring!!! I just love it! It’s my favorite season for sure! Flowers are always my favorite to stamp on cards!!! This card is just so amazing!

Bright Spring Flowers, www.LaurasStampPad.com

I started with a Daffodil Delight card base. Then I took a piece of Whisper White (4″ x 4″) and stamped the flowers from the Basket Bunch Stamp Set in Basic Gray Ink. I like using gray for the more subtle look! Using the Watercolor Pencils and Blender Pens, I colored in the flowers! After blending the color, I went back in with the pencil and added some accents! I have really been loving the Watercolor Pencils! You can check out so more fun samples here, here, and here!

Now that I have the flowers colored, I layered this onto a piece of Melon Mambo measuring 4-1/8″ x 4-1/8″ and added it to the top of the card base! For the greeting, I stamped it in Basic Gray from the Basket Bunch Stamp Set. Then I punched it out with the Classic Label Punch! I added the greeting with some Stampin’ Dimensionals. Since the greeting is so skinny, I used some of the dimensional border and trimmed it to fit! To finish off the card, I wrapped some Old Olive Baker’s Twine around the card and tied it into a bow. TIP: Tie it into a double knot first so it is nice and tight around the card before tying the bow!

Do you love bright Spring Flower too or do they make your allergies flare up?? Let me know in the comments below!!!

Don’t forget that tomorrow is the last day to get in the Ink Pad Giveaway!!! Click here to learn more and click here to start shopping with the Hostess Code: FCCVREYF. I can’t wait to draw the winners name on Friday!!! I’m so excited!!

Ink Pad Collection Giveaway, www.LaurasStampPad.com

Happy Stampin’

~Laura


It’s an Egg-Stra Special Easter!!!

Posted on

Easter is just around the corner and this card is perfect!!! This is my favorite holiday of the year so to me it is an Egg-Stra Special Easter! 🙂 How cute is that greeting!?!?!? I just love it!!!
Egg-Stra Special Easter, www.LaurasStampPad.com

I don’t typically send a lot of Easter cards but I do send a few and like to make treat bags for my nieces and nephews! The Basket Bunch Bundle is perfect for Easter but I have been making SO MANY OTHERS too. Check out yesterday’s fabulous post! I have even more amazing samples coming soon too!

I started with a Wild  Wasabi card base. Then I took a piece of Whisper White measuring 2″ x 5 1/2″ and stamped the grass from the Basket Bunch Stamp Set in Wild Wasabi Ink all along bottom. I stamped the Easter eggs and bunny in Basic Gray Ink so I could watercolor them and for the softer look. There are lots of great images in the stamp set to decorate your card with! The Watercolor Pencils are super fun for coloring all of these beauties! I used the Blender Pens for a nice even look of color! I just love all the bright colors!

Next, I took a piece of Rich Razzleberry (3-1/2″ x 5-1/2″) and ripped the top and bottom for a little texture. Depending on how much you rip off, you could start with a 3-1/4″ wide piece or smaller.  I added this piece to the card front and tied some Crushed Curry Baker’s Twine around and into a bow! For the greeting, I stamped it from the Basket Bunch  Stamp Set onto Daffodil Delight and punched  it out with the Duet Banner Punch! Of course, I added the greeting to the card with Stampin’ Dimensionals!

Do you like to make Easter Cards or Easter Treats??? Another more important question…..Do you like Peeps? I feel like you either love them (ME) or hate them (my husband)? Which side are you on?? Let me know in the comments below!!

Happy Stampin’

~Laura


Loving this Bushel Basket of Apples!!!

Posted on

Happy Tuesday!!! Today I have a fabulous technique to share with you today! It’s a bit out of the box but super cool! This bushel basket of apples was created with the Basket Bunch Bundle from the Occasions Mini Catalog

Bushel Basket of Apples, www.LaurasStampPad.com

I got the idea for this card from the amazing, Shelli Gardner who showed it at the Stampin’ Up Event last November!! It sold me on this set….the outside the box ways to use the Basket Bunch Stamp Set. This looks like an Easter Stamp Set but I got so many other styles of cards out of  it! These apples, a baby card  with the bunny and many others can be created! Now let’s get started on this one!

I started with a scrap piece of Very Vanilla and stamped lots of leaves and the smaller solid outline Easter egg. All of these come from the Basket Bunch Stamp Set and stamped in Basic Gray Ink! I like the softer look of gray over black. Next, I die cut out each of them using the coordinated Basket Builder Framelits (Bundle & Save 10%). A little tip for die cutting lots of little pieces, use a  post-it note to hold the die to the cardstock! After I had all of the pieces die cut, I colored them with Real Red and Emerald Envy Ink and an Aqua Painter!

Watercolor Apples, www.LaurasStampPad.com

It’s time to assemble!!! I die cut the basket bottom (solid & detailed) in Crumb Cake. I stuck the two basket pieces together with some cut pieces Stampin’ Dimensionals. This gives the basket a bit of a 3D look! Next, I adhered the basket to a piece of Very Vanilla that I die cut with the Stitched Shapes Framelits! I love the rustic look of the stitches! TIP: Be sure to only add adhesive to the basket on the bottom half so that you can tuck in the “apples”! I placed some of the apples on with pieces of Stampin’ Dimensionals. So that I didn’t have to die cut so many of the leaves, I actually stamped a few of the leaves directly onto the vanilla and colored them in! Just be sure to tuck the “apples” in deep enough that they look like apples and not eggs!

After the bushel basket is all complete, I added this  to a layer of Chocolate Chip cardstock and then to the center of a Crumb Cake card base! The greeting from the Basket Bunch Stamp Set is stamped in the lower right corner in Chocolate Chip Ink. To finish off the card, I wrapped some Linen Thread around the card and tied it into a bow! I love it!

If you would like to see this all in action, check out the Video Tutorial below or click here! Be sure to give it a thumbs up if you liked it and don’t forget to subscribe if you are new!!!

Happy Stampin’

~Laura