For the Love of Felt!!!

Posted on

Stampin’ Up does some amazing Project Kits! These are perfect for gift giving because some some all inclusive meaning all you need is scissors. Some are more detailed and some require the purchase of additional supplies like stamps and ink. The awesome thing about the ones that don’t come with stamps and ink is that you can purchase multiples to make for gifts and not end up with 5 stamp sets. All inclusive are good to give the entire thing and the others are perfect for making and gifting or enjoying yourself! The For the Love of Felt Kit is fun to make and give!

For the Love of Felt, www.LaurasStampPad.com

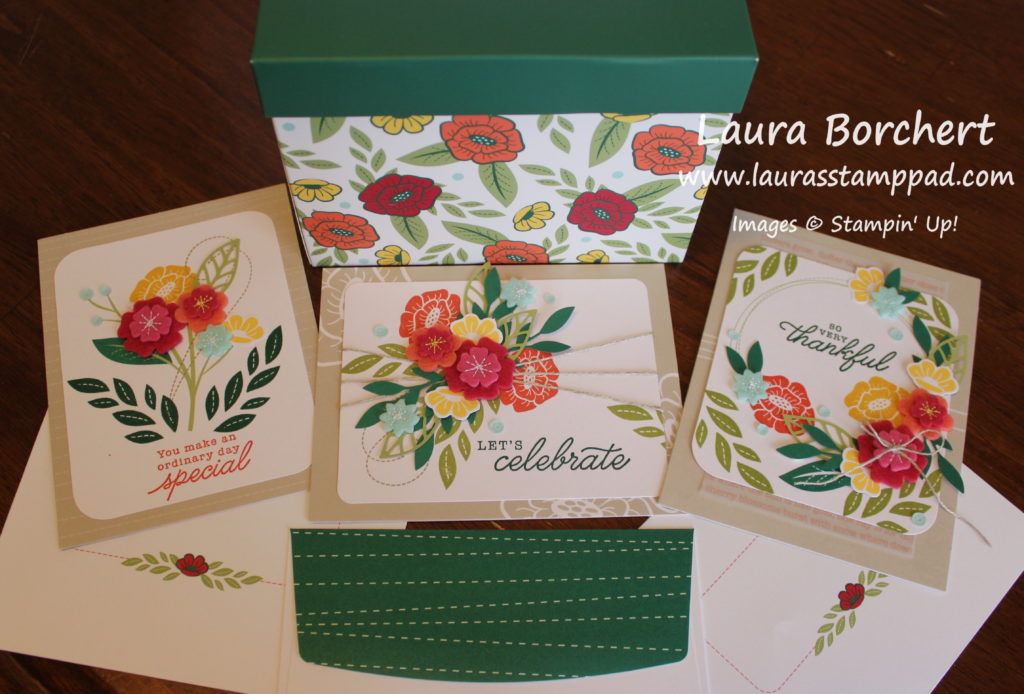
This kit is super cute with 3 designs of cards, 4 each. The envelopes have a pretty green pattern on the back lip and the front has a cute box to write the address or name in! All of this fits into a little card box that coordinates. It scream gift box! Actually I think the box looks like a cute recipe box but either way I love it!

Felt Flowers, www.LaurasStampPad.com

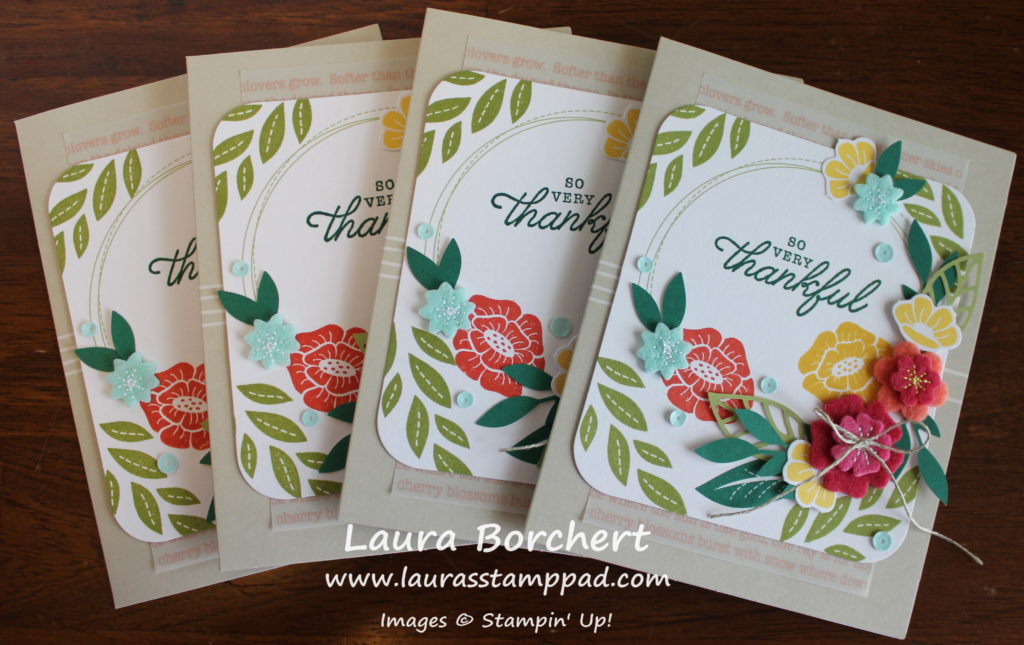
This was the hardest card of the set I think! There are lots of details and layers and flowers! I would almost suggest doing this one last because it also has a ton of pieces. I did it first and was counting out all the pieces to make sure I wasn’t using them all up. If it was the last set, you wouldn’t have to worry about that. First, I stamped the leaves on all 4 corners. Then I built up the outside and worked my way to the big flower in the middle. This means I did the little blue and yellow ones at the top and the coral and blue off to the left and then slowly worked my way to the main focal point. For the leaves, I used Mini Glue Dots to secure them.

Stampin' Up Project Kit, www.LaurasStampPad.com

This card was the easiest one. I whipped these 4 together really fast. Stamp, stamp, glue, glue! For the felt flowers, I used Multipurpose Adhesive Glue.

Bouquet of Flowers, www.LaurasStampPad.com

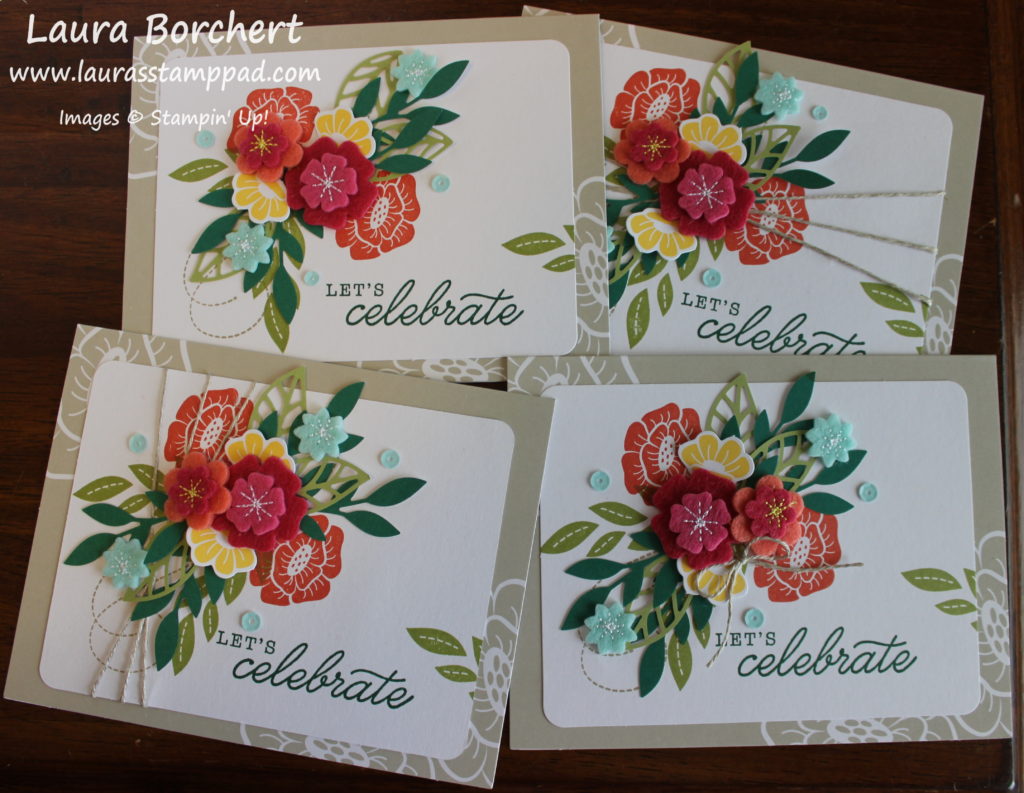
These cards I did a little different for each one….a little on purpose! So, the first card I did (top left), I finished it and realized I forgot the thread. So I nailed it on the second card (top right) and wasn’t so sure I liked it. The thread went right over the coral flower. For the next card, I did the thread vertical (bottom left) and really liked that one. On the last card, I thought I might as well try another option just to see so I went with a little bow. Following the direction is fun but doing your own thing is even more fun!

Which card is your favorite?? Let me know in the comments below. Also, let me know if you like getting handmade greeting cards for a gift or giving handmade greeting card as a gift.

If you would like to see the For the Love of Felt Project Kit, check out the video below or click here! Be sure to give the video a thumbs up if you liked it and don’t forget to subscribe if you are new. If you would like a notification when I post a new video, be sure to click the bell right next to the subscribe!!!

Happy Stampin’

~Laura

Product List

Framed Wiggle Worms!!!

Posted on

Happy Tuesday!! You all know what that means!! I have an adorable card to share with you today. These little framed wiggle worms are super fun and perfect for a kids card (or a kiddult)!!!

Framed Wiggle Worms, www.LaurasStampPad.com

Isn’t this the cutest thing ever?? I love it!

First, I started with a piece of Basic Black (4″ x 5-1/4″) and punched 3 holes in it with a 1-1/2″ Circle Punch. I did these in a “random” pattern which for me is a triangle pattern! 🙂 Next, I made 3 scallop rings for each of the holes. This was done by punching out the colored cardstock with the 1-1/2″ Circle Punch and then layering the scallop circle from the Layering Circle Framelits over it. I used a post-it note to hold it in place. This is much easier than cutting the scallop circle and then trying to line it up in the punch correctly!

Scallop Circle Frames, www.LaurasStampPad.com

Since these little frames are so delicate, I have found this little technique to adhere them on. Of course the Fine Tip Glue Pen would work too! Take a little bit of Multipurpose Glue and put it on the Silicone Mat. Then using a sponge, dab on just a little bit of glue all around the frame. This gives just enough glue to hold but not too much to have it squish out the sides.

Now for the bugs, I simply stamped them in Basic Gray onto Whisper White, added the details and then colored them in with Stampin’ Blends. Once they are all ready to go, I cut them a part from each other and secured them to the back of the black. Be sure to not cut too close to the bug or you won’t have enough white to cover the open circle. I added just a bit of adhesive to the back side of the black and then pressed the bug over it. If you have white hanging over the edge, simply trim it off.

Happy Birthday Little Bug, www.LaurasStampPad.com

For the greeting, I stamped it from the Wiggle Worm Stamp Set. The “happy” and “birthday” were stamped by just inking the word needed on the edge of the ink pad and stamping it down. Then clean it off and do the next word and color. Using the Classic Label Punch, I punched out each one. Some of the words, I placed on the edge with only 1 arrow end and some I placed father in for both arrow ends. This is all up to you! Another option is to add grass like the sample above. The grass if from the coordinating Wiggly Bugs Dies. Of course I stamped a little bug on the inside as well!

If you would like to see this Framed Wiggle Worms card in action, check out the video below or click here! Be sure to give the video a thumbs up if you liked it and don’t forget to subscribe if you are new. If you would like a notification when I post a new video, be sure to click the bell right next to the subscribe!!!

Happy Stampin’

~Laura

Product List

Bird Ballad Laser Cut Cards & Tin!!!

Posted on

I have been seeing these amazing die cut card fronts and wondering where in the world it came from. It is the Bird Ballad Laser Cut Cards & Tin! They are just stunning!!!

Bird Ballad Laser Cut Cards & Tin, www.LaurasStampPad.com

Look at that amazing detail in those laser cut cards!!! That is the front of the card with a solid white card back. There are 12 total. There are so many ways to use these cards. Adding designer paper to behind it or even just cardstock would make it POP. Simply add adhesive along the edge and press in on the back side. Other options are to add color to the doily with a spritzer, sponge brayer, sponge dauber, or even a marker! I love it. Also, did you notice that fun scallop on the envelope?

All of these cards and envelopes come in this cute little tin that is Petal Pink and Gold. Honestly I had to check on the color of the leaves because I thought they looked a bit like Old Olive in some light and Copper other times. Apparently it is Gold. Either way it is gorgeous and can be used for many different things. Create some cards and put them in for a beautiful gift. Enjoy the cards and make a sweet treat to put inside. Another option is to keep it for your craft room or anywhere in the house to hold something and display it. I will be keeping mine in my craft room as I’m a “Stampin’ Up Tin Hoarder.”

If you would like to see the Bird Ballad Laser Cut Cards & Tin, check out the video below or click here! Be sure to give the video a thumbs up if you liked it and don’t forget to subscribe if you are new. If you would like a notification when I post a new video, be sure to click the bell right next to the subscribe!!!

Happy Stampin’

~Laura

Product List
Bird Ballad Laser-Cut Cards & Tin
$18.00

Floating Hot Air Balloon Card!!!

Posted on

Happy Tuesday!! You know what that means! I have a fabulous technique to share with you today!!! Check out this fun floating Hot Air Balloon Card!!! I love how Window Sheets can create so much illusion on a card!!!

Floating Hot Air Balloon Card, www.LaurasStampPad.com

All the beautiful Hot Air Balloons floating in the sky. I have been to St. Louis to the Hot Air Balloon Race and it was amazing. I would love to go to the one in Arizona!

This card has a Seaside Spray card base measuring 4-1/4″ x 11. I started by stamping the clouds and small hot air balloons all over the center of the card front. I used the stamps from the Above the Clouds Stamp Set. The clouds were stamped in Seaside Spray and the balloons in Basic Gray. Be sure to stay in the middle of the so that your images aren’t coming out the sides from your frame. I placed a scrap piece over the edge if I wanted an image near the edge.

Stitched Rectangle Frame, www.LaurasStampPad.com

Next, I die cut the Stitched Rectangle frame by placing the 2 framelits down and securing them with a Post It Note so I could create multiples and they would stay in place. I added a piece of Window Sheet to the back of the frame and then added it to the card front with Stampin’ Dimensionals!

Rainbow Hot Air Balloon, www.LaurasStampPad.com

To finish off the front of the card, I added a Hot Air Balloon flat on the Window Sheet for that floating Hot Air Balloon look. There are 2 different styles of balloons in the Above the Clouds Stamp Set as you can see in the photos above. Using Stampin’ Blends, I colored them in and punched them out with the coordinating Hot Air Balloon Punch. The baskets were both stamped onto Basic Gray and punched out. I thought the border needed a little something so I tied a little bow with some Whisper White Baker’s Twine and secured it with a Mini Glue Dot.

Let Your Dreams Sore, www.LaurasStampPad.com

Of course, I had to stamp on the inside with a few clouds and balloons and that fabulous greeting! I think this will be a perfect card for my nieces and nephews!

If you would like to see this all in action, check out the video below or click here! Be sure to give the video a thumbs up if you liked it and don’t forget to subscribe if you are new. If you would like a notification when I post a new video, be sure to click the bell right next to the subscribe!!!

Happy Stampin’

~Laura

Product List
Stitched Rectangle Dies
$35.00
Above The Clouds Bundle
$36.00
Whisper White Solid Baker's Twine
$3.50
Window Sheets
$5.00
Stampin' Dimensionals
$4.00

Laura’s Quick Tip: Punch It!!!

Posted on

Did you know that the gray, nude, and white images in the Stampin’ Up! Catalog actually mean something??? The stamp images that have a nude looking outline behind them mean that there is a coordinating Punch that matches that image. If it is gray or white behind the image, there is a coordinating die cut. Super fabulous, right! Did you know that there are tons of images that can be punched or die cut even though they don’t have that little labeling?? That what today’s Laura’s Quick Tip is all about. There are so many images that you can punch!!!

Laura's Quick Tip, www.LaurasStampPad.com

Check out this super cute card that used lots of punches for various images! There are so many fun ways to use your punches for different images for a super cool look!

I started with a So Saffron card base. Next, I took a piece of Pool Party measuring 4″ x 5-1/4″ and ran it through the Mosaic Embossing Folder. Then I added it to the card front. For the decorations, I stamped the little flower in So Saffron and the mosaic flower in Terracotta Tile. Using the 1/2″ Circle Punch and 3/4″ Circle Punch, I punched them out and added them to the card. Some of them I used Stampin’ Dimensionals and others I glued on flat. This gives more texture and dimension to the card!

Layered Punches, www.LaurasStampPad.com

For the greeting, I stamped it in Pool Party. All of these images are from the Memorable Mosaic Stamp Set. Using the Timeless Label Punch, I punched it out of Whisper White. Then I layered a piece of Terracotta Tile that was punched out with the Everyday Label Punch. Those layer so well together! Using the Silver Metallic Thread to make some loops, I added those to the back of the greeting and added it to the card front. I finished it off with a Flower Faceted Gem!

Mosaic Card Insert, www.LaurasStampPad.com

For the inside of the card, I stamped a few of the same images on the corners to really pull it all together! It’s perfect! I hope you enjoyed this Laura’s Quick Tip and have fun with your punches! Remember you can punch it with any image!

If you would like to see this all in action and how it looks in the catalog, check out the video below or click here! Be sure to give the video a thumbs up if you liked it and don’t forget to subscribe if you are new. If you would like a notification when I post a new video, be sure to click the bell right next to the subscribe!!!

Happy Stampin’

~Laura

Product List
Memorable Mosaic Bundle
$36.00
Everyday Label Punch
$18.00
1/2" (1.3 Cm) Circle Punch
$6.00
Mosaic 3D Embossing Folder
$10.00
Flower Faceted Gems
$8.00
Silver Metallic Thread
$3.50

Technique Tuesday: Masking Technique!!

Posted on

Happy Tuesday!! You know what that means! I have a fabulous technique to share with you today and that is the Masking Technique! Super easy to do but really gives a fabulous scenery look to your project which is major WOW factor.

Technique Tuesday: Masking Technique, www.LaurasStampPad.com

Doesn’t that Hot Air Balloon look like it is floating in the clouds? Isn’t it super fabulous? Let’s get started on how I did this masking technique!

I started with a Terracotta Tile card base. Next, I layered on a piece of Pretty Peacock (4″ x 5-1/4″). Then I stamped the greeting from the Above the Clouds Stamp Set along the left hand side on Very Vanilla (3-3/4″ x 5″). I did this part with one of the bigger greetings and it looked too wordy. A few stampers at class actually stamped the bigger greeting just once in the upper left corner. There are lots of different options for the greeting! After stamping the greeting, I layered on a piece of the Woven Threads Designer Paper (2″ x 3-3/4″) across the lower half.

Now for that fabulous focal point and masking technique! First, I die cut the circle and scallop circle with the Layering Circle Framelits. On the Very Vanilla circle, I stamped the large hot air balloon from the Above the Clouds Stamp Set. I stamped the outline in full strength Terracotta Tile and then the solid background in the same ink but stamped off once. The balloon looks so lonely so it needs some clouds. Using the Hot Air Balloon Punch, I punched out a scrap balloon and placed it over the stamped one. Then I inked up the clouds in Pretty Peacock and stamped off once and then right over the top of the balloon. This gives that fabulous cloud look without it stamping over the balloon. Once I finished stamping, I added this to the scallop circle and then to the card front with Stampin’ Dimensionals!

Hot Air Balloon, www.LaurasStampPad.com

For the inside of the card, I stamped another balloons and a few clouds. Oh yeah….the basket of the balloon was stamped in Early Espresso! What color combination would you use for your Hot Air Balloon card and this masking technique!

If you would like to see this all in action, check out the video below or click here! Be sure to give the video a thumbs up if you liked it and don’t forget to subscribe if you are new. If you would like a notification when I post a new video, be sure to click the bell right next to the subscribe!!!

Happy Stampin’

~Laura

Product List
Above The Clouds Bundle
$36.00
Woven Threads Designer Series Paper
$11.50
Terracotta Tile Classic Stampin’ Pad
$7.50
Pretty Peacock Classic Stampin’ Pad
$7.50
Layering Circles Dies
$35.00

Noble Peacock Designer Paper!!!

Posted on

I finally got my hands on the fabulous Noble Peacock Designer Paper and boy am I excited!!! This paper is stunning and there is no debating which side to use. It is all single sided!

Noble Peacock Designer Paper, www.LaurasStampPad.com

This paper is just stunning with it’s bright colors in Blueberry Bushel, Old Olive, Pretty Peacock. It is single sided and there are 4 each of the 3 designs in the pack. That makes a total of 12 sheets of the 12″ x 12″ Paper.

There is also a coordinating Noble Peacock Foil Paper Pack with sold foil sheets of Blueberry Bushel, Old Olive and Pretty Peacock! Eeee It’s super exciting and fun! Does anyone else see a man’s silk tie in that sheet on the far left?? I totally do and think it would make a great masculine card. I can’t wait to start playing with this paper!

Don’t forget to check out some of the other Paper Reveals here, here, and here!

If you would like to see each sheet of this paper check out the video below or click here! Be sure to give the video a thumbs up if you liked it and don’t forget to subscribe if you are new. If you would like a notification when I post a new video, be sure to click the bell right next to the subscribe!!!

Happy Stampin’

~Laura


Coloring Like An Artist!!!

Posted on

Happy Tuesday!!! It is Tuesday. I feel like I need a giant neon sign telling me the day of the week as I am soooo off after last week. Tuesday means I have a fabulous technique to share with you! Woot Woot! I totally don’t feel like an artist but today I’m going to show you how easy it is to do! This card makes coloring like an artist possible and easy!!!

Coloring Like An Artist, www.LaurasStampPad.com

Isn’t this card just stunning?!?! I can’t believe I DID IT! Like that was colored and created by me. It still amazes me. I just love how Stampin’ Blends make me feel….like an artist!

I started with a Pool Party card base measuring 4-1/4″ x 11″. After folding it in half for my card, I cut off 2″ from the bottom. This allows a little peekaboo to see the inside of the card! On the inside, I added a piece of So Saffron (4″ x 5-1/4″). Using the Free As A Bird Stamp Set, I stamped the greeting in Basic Gray and the flowers in So Saffron. On the upper front flap of the card, I layered Bird Ballad Designer Series Paper (3-1/4″ x 4″) to some Calypso Coral (3-3/8″ x 4-1/8″).

Birds in a Bird Cage, www.LaurasStampPad.com

Using the Free As a Bird Stamp Set and coordinating Stitched Nested Labels, I created that fabulous focal point. I stamped the birds in Basic Gray because I like that lighter look for coloring rather than black!

Using various Stampin’ Blends, I started coloring. Pool Party was used for the flowers and Old Olive for the leaves. The branches were colored in Soft Suede. Now for the birdies, I colored the beaks in Dark Soft Suede. Next, I colored the top of the head to that little line at the eye in Soft Suede. Then I colored the belly and bottom most part in Dark Calypso Coral. I slowly moved my way to the center. Using Light Calypso Coral, I colored over the dark coral and up a little higher. Then using the Crumb Cake, I colored the Soft Suede and down into the coral. To finish it off, I went back over the coral and crumb cake with the Light Calypso Coral to blend it all together.

A couple tips when doing this is to give it time. After going over the colors to blend them, give it a bit to blend and dry because after a minute or so it will look better. This is better than coloring over and over and over again. I tend to color each one and then go back over each one. Another tip is sometimes I need to set it aside or walk away and then I come back and I’m like oh wow, look at that! It’s fabulous then! Just have fun coloring like an artist!

I added this piece to the card front by applying Tear And Tape just on the top half and sticking it on the bottom edge of the card front! Perfect!

If you would like to see all of this in action, check out the video below or click here! I will say that I did different colors….on accident but it still looks fabulous so just have fun with it! Be sure to give the video a thumbs up if you liked it and don’t forget to subscribe if you are new. If you would like a notification when I post a new video, be sure to click the bell right next to the subscribe!!!

Happy Stampin’

~Laura

Product List
Free As A Bird Bundle
$51.25
Calypso Coral Stampin' Blends Markers Combo Pack
$9.00
Pool Party Stampin' Blends Markers Combo Pack
$9.00
Soft Suede Stampin' Blends Markers Combo Pack
$9.00
Crumb Cake Stampin' Blends Markers Combo Pack
$9.00
Old Olive Stampin' Blends Markers Combo Pack
$9.00

Laura’s Quick Tip: Punch Your DSP!!!

Posted on

I’m back with another one of Laura’s Quick Tips!!! This one might sound obvious but I know I tend to forget!!! Punch your DSP (Designer Series Paper)….or die cut or fussy cut!!! Stampin’ Up creates beautiful paper and there are so many ways to use it!!!

Punch Your DSP, www.LaurasStampPad.com

I tend to use Designer Series Paper for backgrounds, layering, or a decorative piece along the side. Stampin’ Up creates so gorgeous paper with images that are so hard to cut into pieces. So instead, punch your DSP!!! Get out those punches, die cuts, or even scissors. I’m not a huge fan of fussy cutting…except for this card!!!! I do love grabbing a punch quickly and going to town creating beautiful focal points for my cards.

These birdies are from the Bird Ballad Designer Series Paper and the 2-1/4″ Circle Punch is perfect. You can punch out blue, yellow, or gray birdies for your project. The ones on the edge can be punched/die cut with a label for the edge of your card too! There are so many possibilities!!! Check out the supplies below to get your hands on these and have fun punching out DSP!!!

If you would like to see all of this in action as well as a fun sample using these birds, check out the video below or click here! Be sure to give the video a thumbs up if you liked it and don’t forget to subscribe if you are new. If you would like a notification when I post a new video, be sure to click the bell right next to the subscribe!!!

Happy Stampin’

~Laura

Product List

Creating a Double Fold Card!!!

Posted on

Happy Tuesday!!! You know what that means! I have a fabulous technique to share with you today!!! We are creating a double fold card and it is beautiful!!!

Creating a Double Fold Card, www.LaurasStampPad.com

I used the Perennial Essence Suite and I love how it turned out. The little flower piece opens to the right and then the designer paper piece opens to the left! It’s super fun! Also, the flower is all blingy with Wink of Stella. This photo just doesn’t show how amazing this card is!

I started with a card base of Purple Posy measuring 5-1/2 x 7-1/4. So this is like a normal card base but with a little 1-1/4″ piece taken off the front. Next, I layered on the Blackberry Bliss (5-1/4″ x 2-3/4″) and Perennial Essence Designer Series Paper (5″ x 2-1/2″). For the inside piece, I stamped 3 flowers from the Floral Essence Stamp Set along the left hand side of a piece of Whisper White (4″ x 5-1/4″). I found that stamping the middle flower first and then the two side ones worked best for spacing!

For the 2nd fold out piece, I started with a piece of Purple Posy measuring 3″ x 6″ and I folded it in half. Next, I layered on a piece of Blackberry Bliss measuring 2-3/4″ x 2-3/4″. On the 2-1/2″ square of Whisper White, I stamped another one of those big flowers and colored it with Stampin’ Blends. I used the Blackberry Bliss Dark Marker for all of the lines and accents on the flower. Then I went over it and filled in with the Blackberry Bliss Light Marker. For the center and greeting, I stamped them with Crushed Curry Ink. To finish it off, I added Wink of Stella all over it. #SafeGlitter 🙂

Floral Essence Stamp Set, www.LaurasStampPad.com

Next, I layered the flower onto the Blackberry Bliss square and stamped the greeting inside the mini card. Make sure the crease of the card is on the right hand side. Then I added adhesive to the back and placed like a sandwich around the left side flap. Making sure it was centered up and down and in far enough on the side so it wasn’t hanging off, I pressed it down! Now you are done creating a double fold card.

Check out more samples using the Perennial Essence Suite here and here. Also, if you would like to make these cards, click the supply list below!

If you would like to see all of this in action, check out the video below or click here! Be sure to give the video a thumbs up if you liked it and don’t forget to subscribe if you are new. If you would like a notification when I post a new video, be sure to click the bell right next to the subscribe!!!

Happy Stampin’

~Laura

Product List