Technique Tuesday – Perfect Plaid!

Posted on

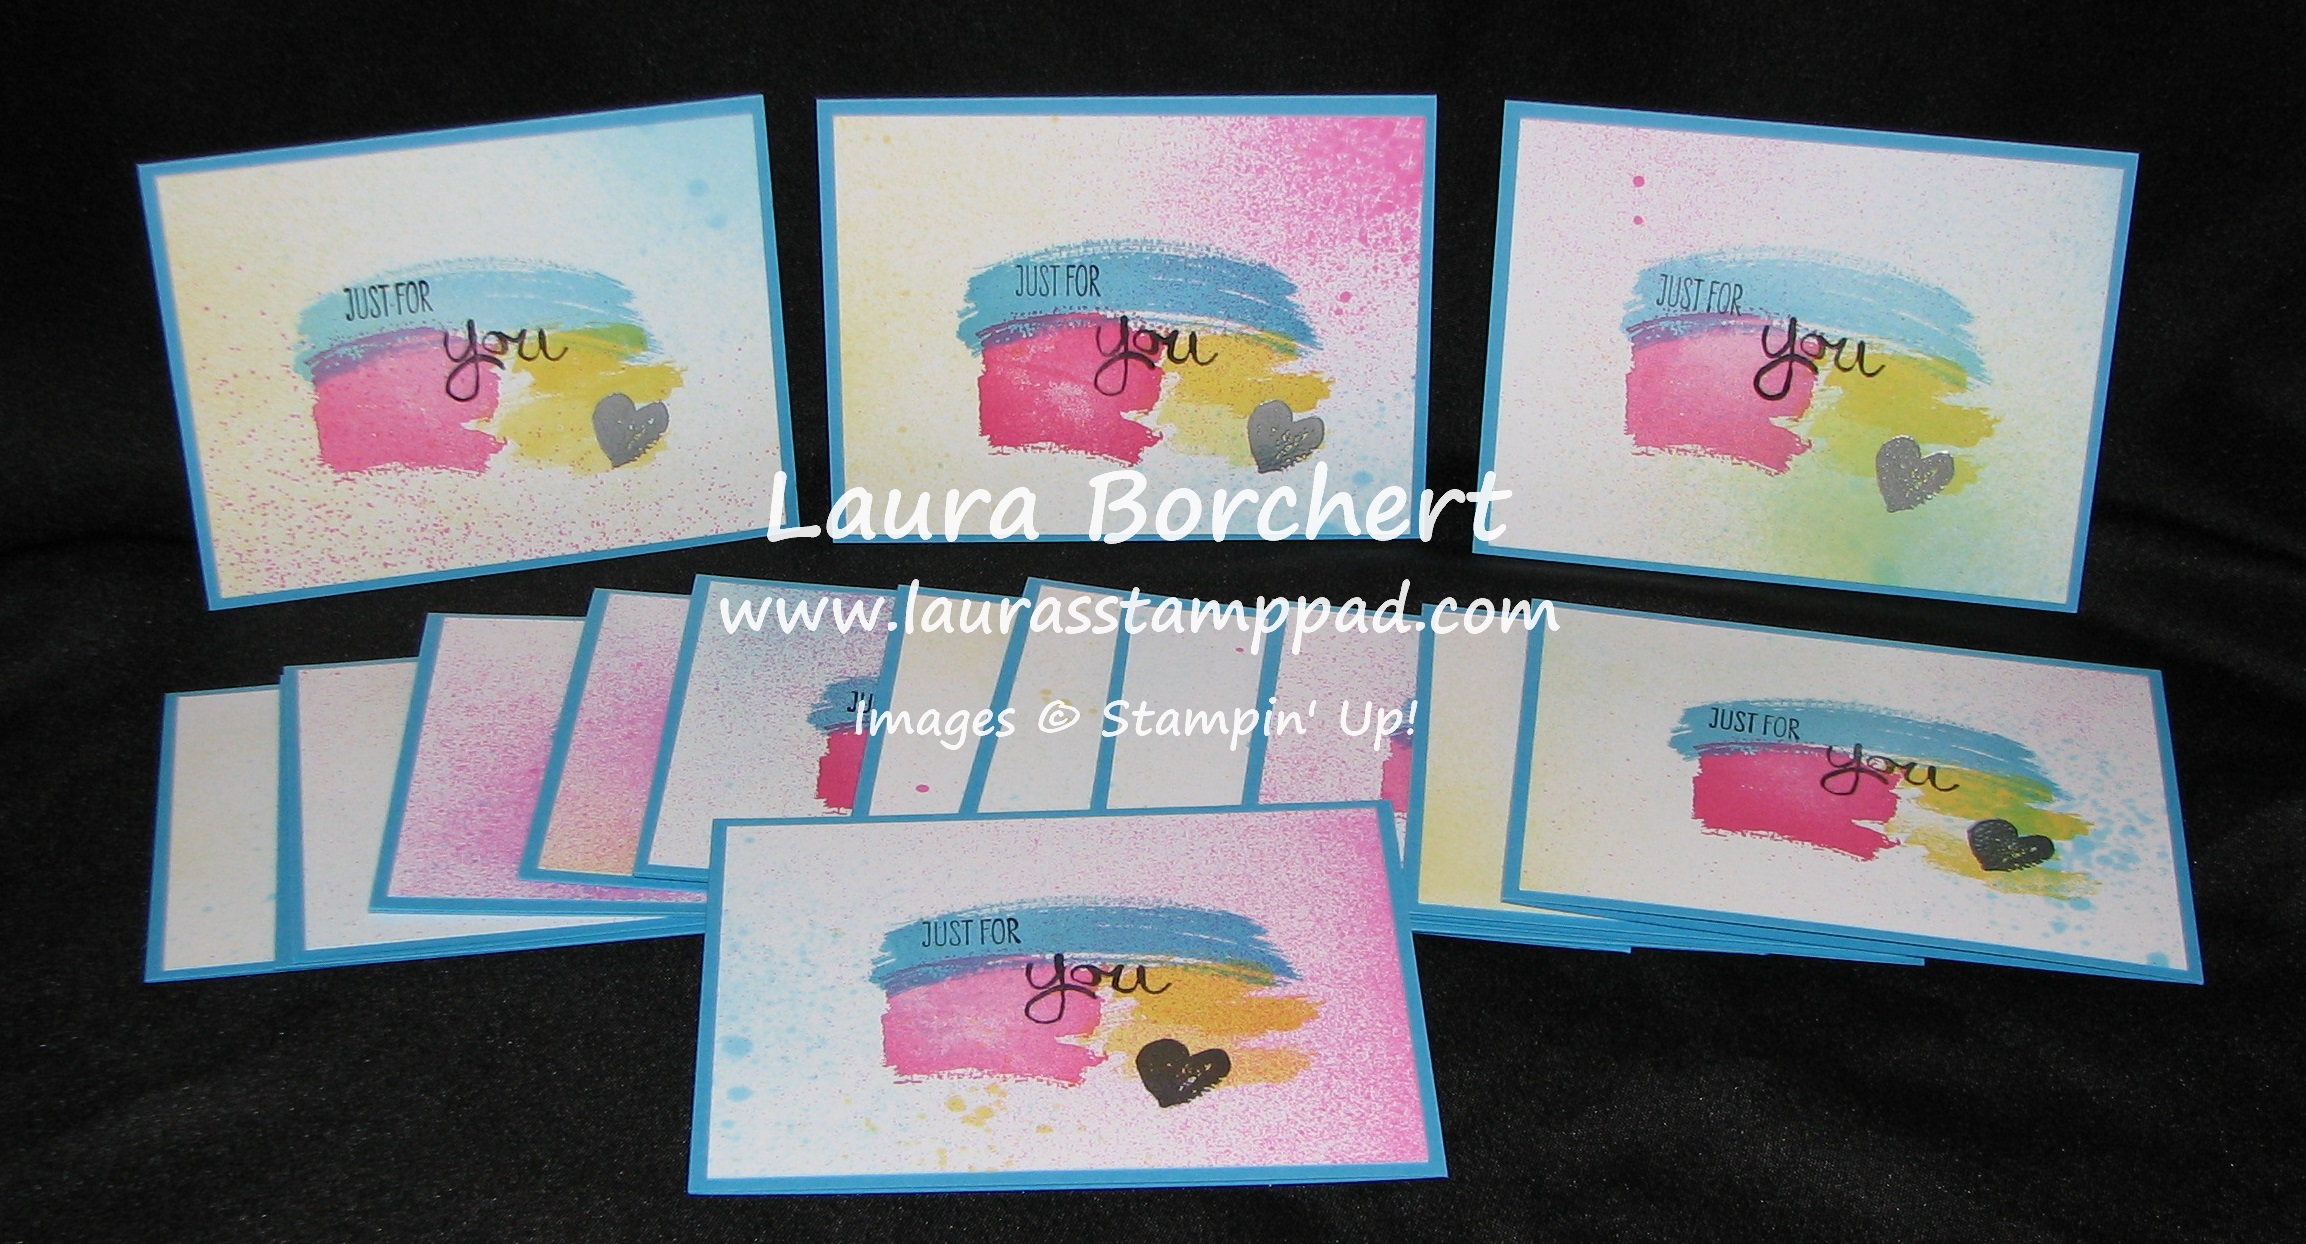
Happy Tuesday!!! You know what that means……I have a fabulous technique to share with you today! This one is super fun and really rather easy! The best part….you can mix and mingle a million different colors and come out with something different each time! I love that!

Work of Art Plaid, www.LaurasStampPad.com

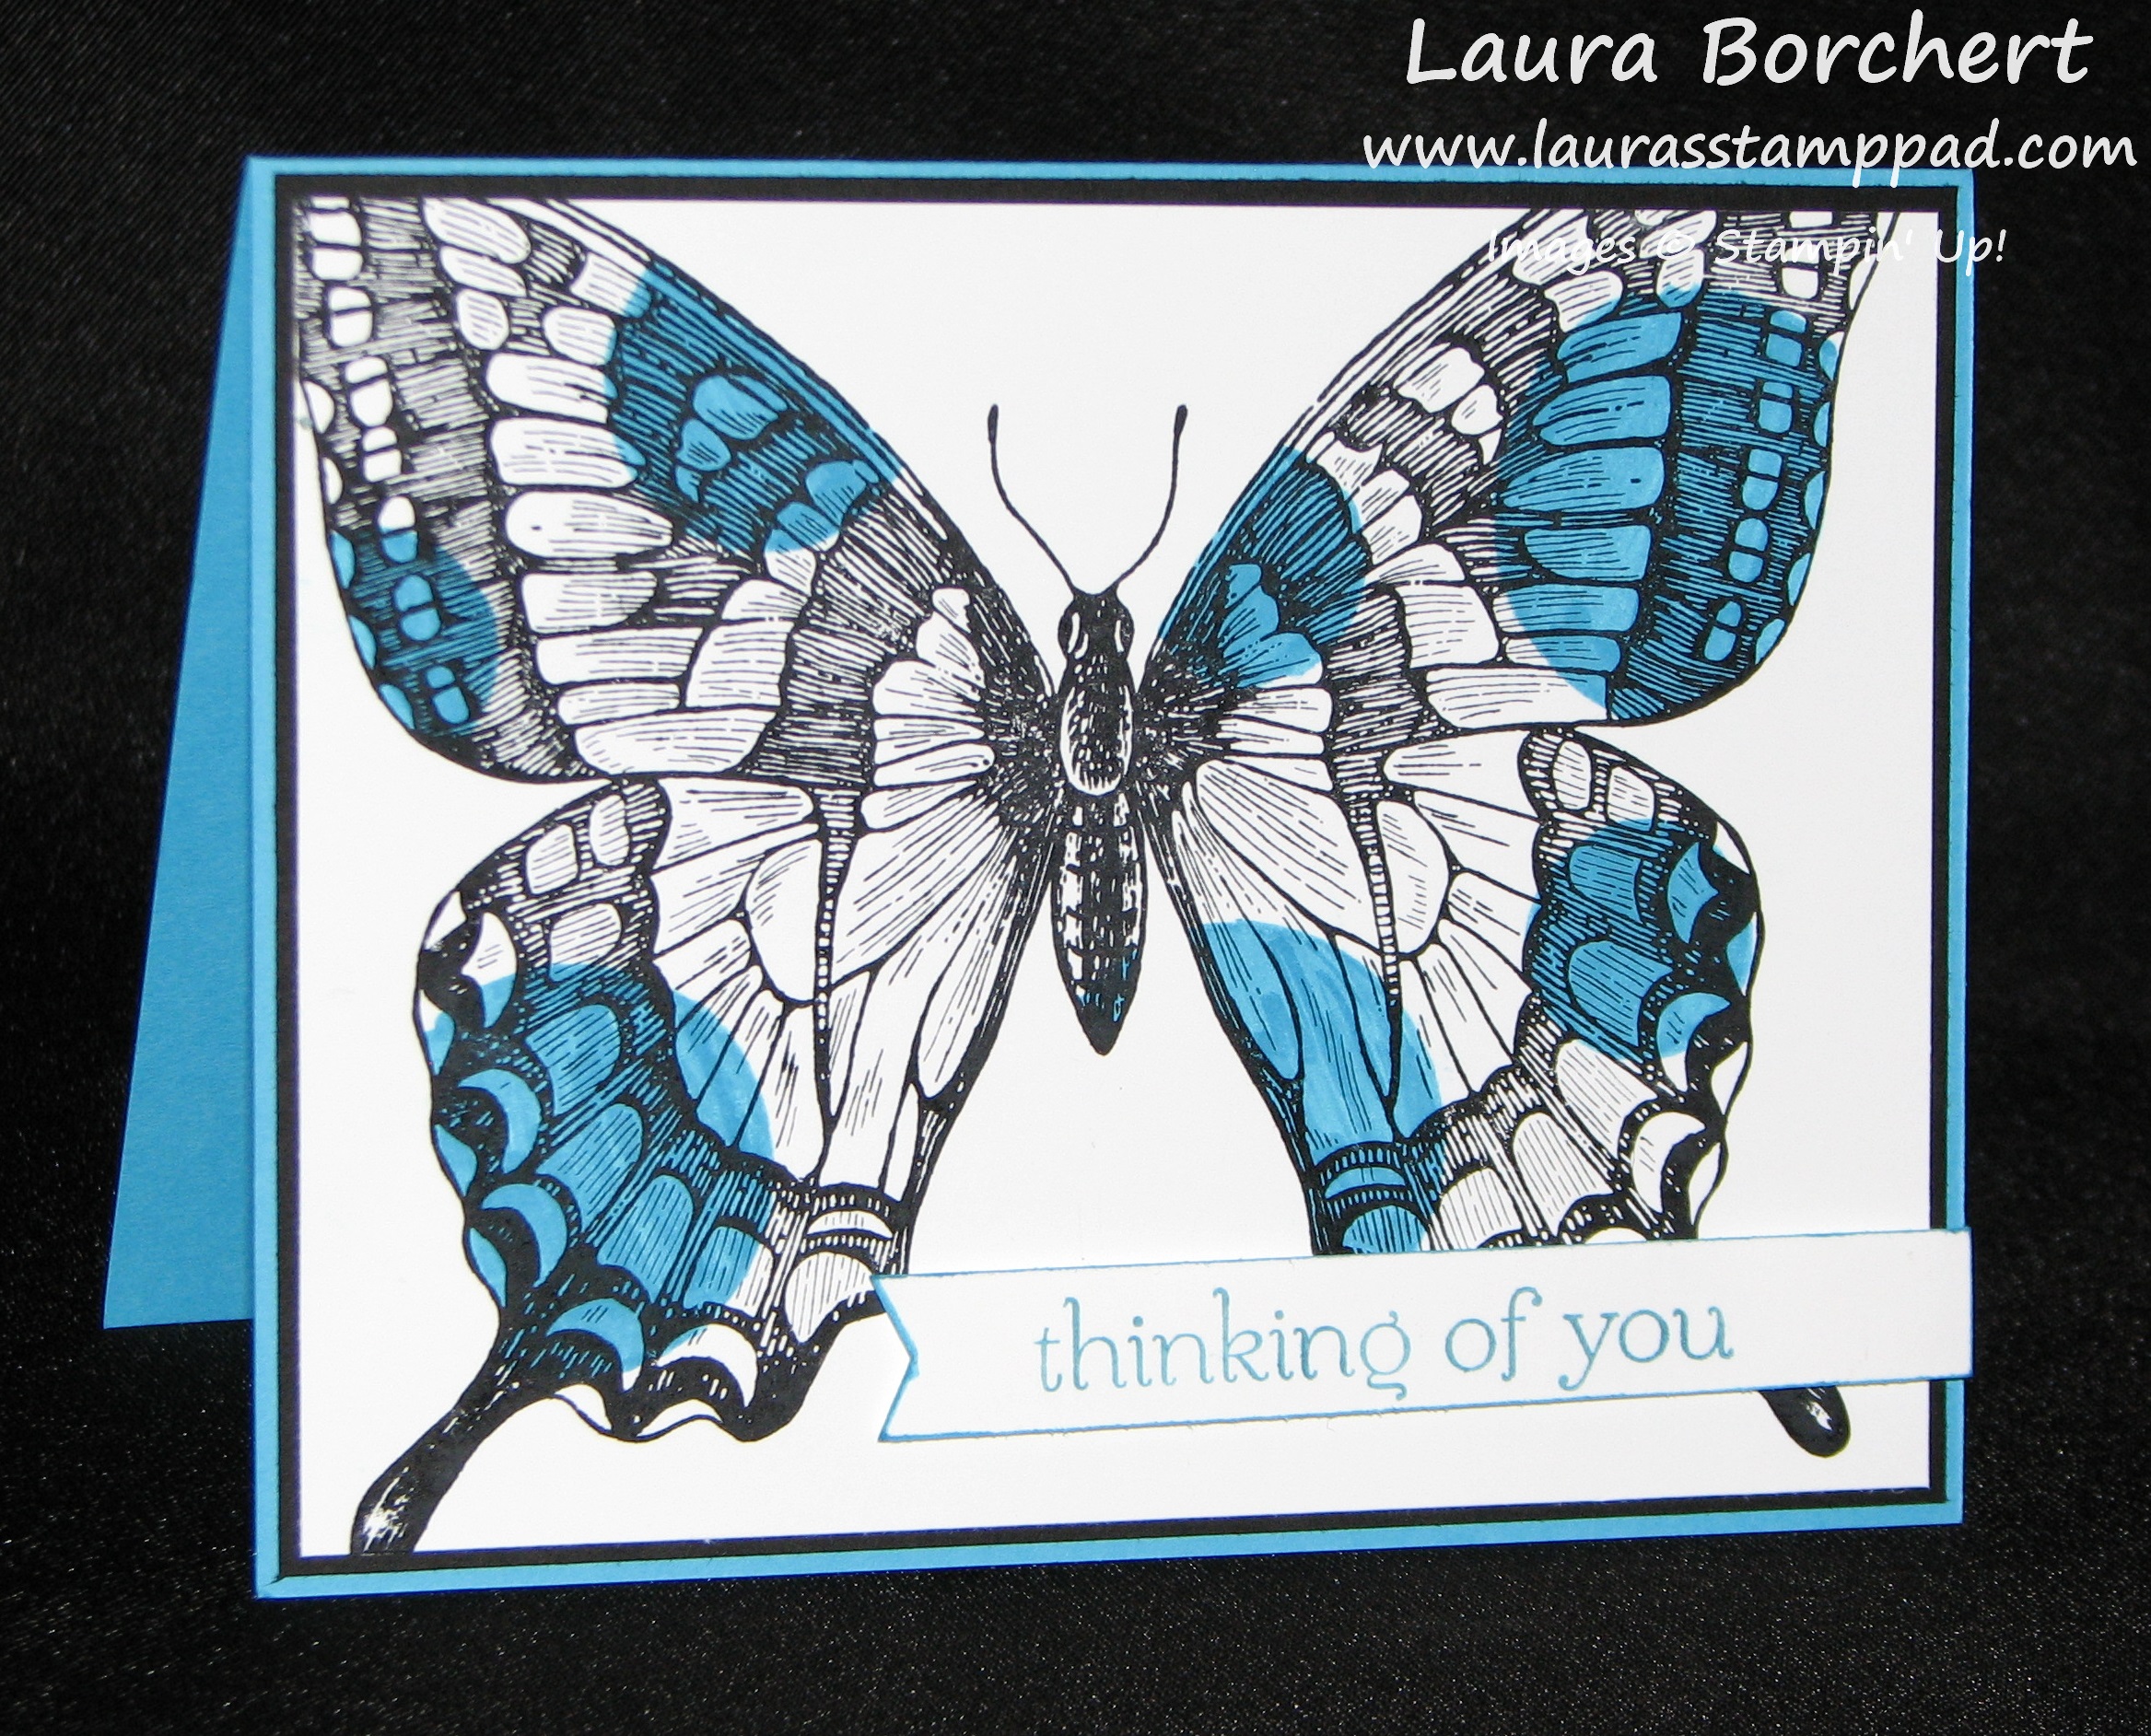
How cute is that? I mean masculine! 😉 I used the Work of Art Stamp Set! This is by far my favorite stamp set right now. You can see more samples using this set here and here!

Supplies Needed:  Work of Art Stamp Set, 2-3 Ink Pads, Cardstock

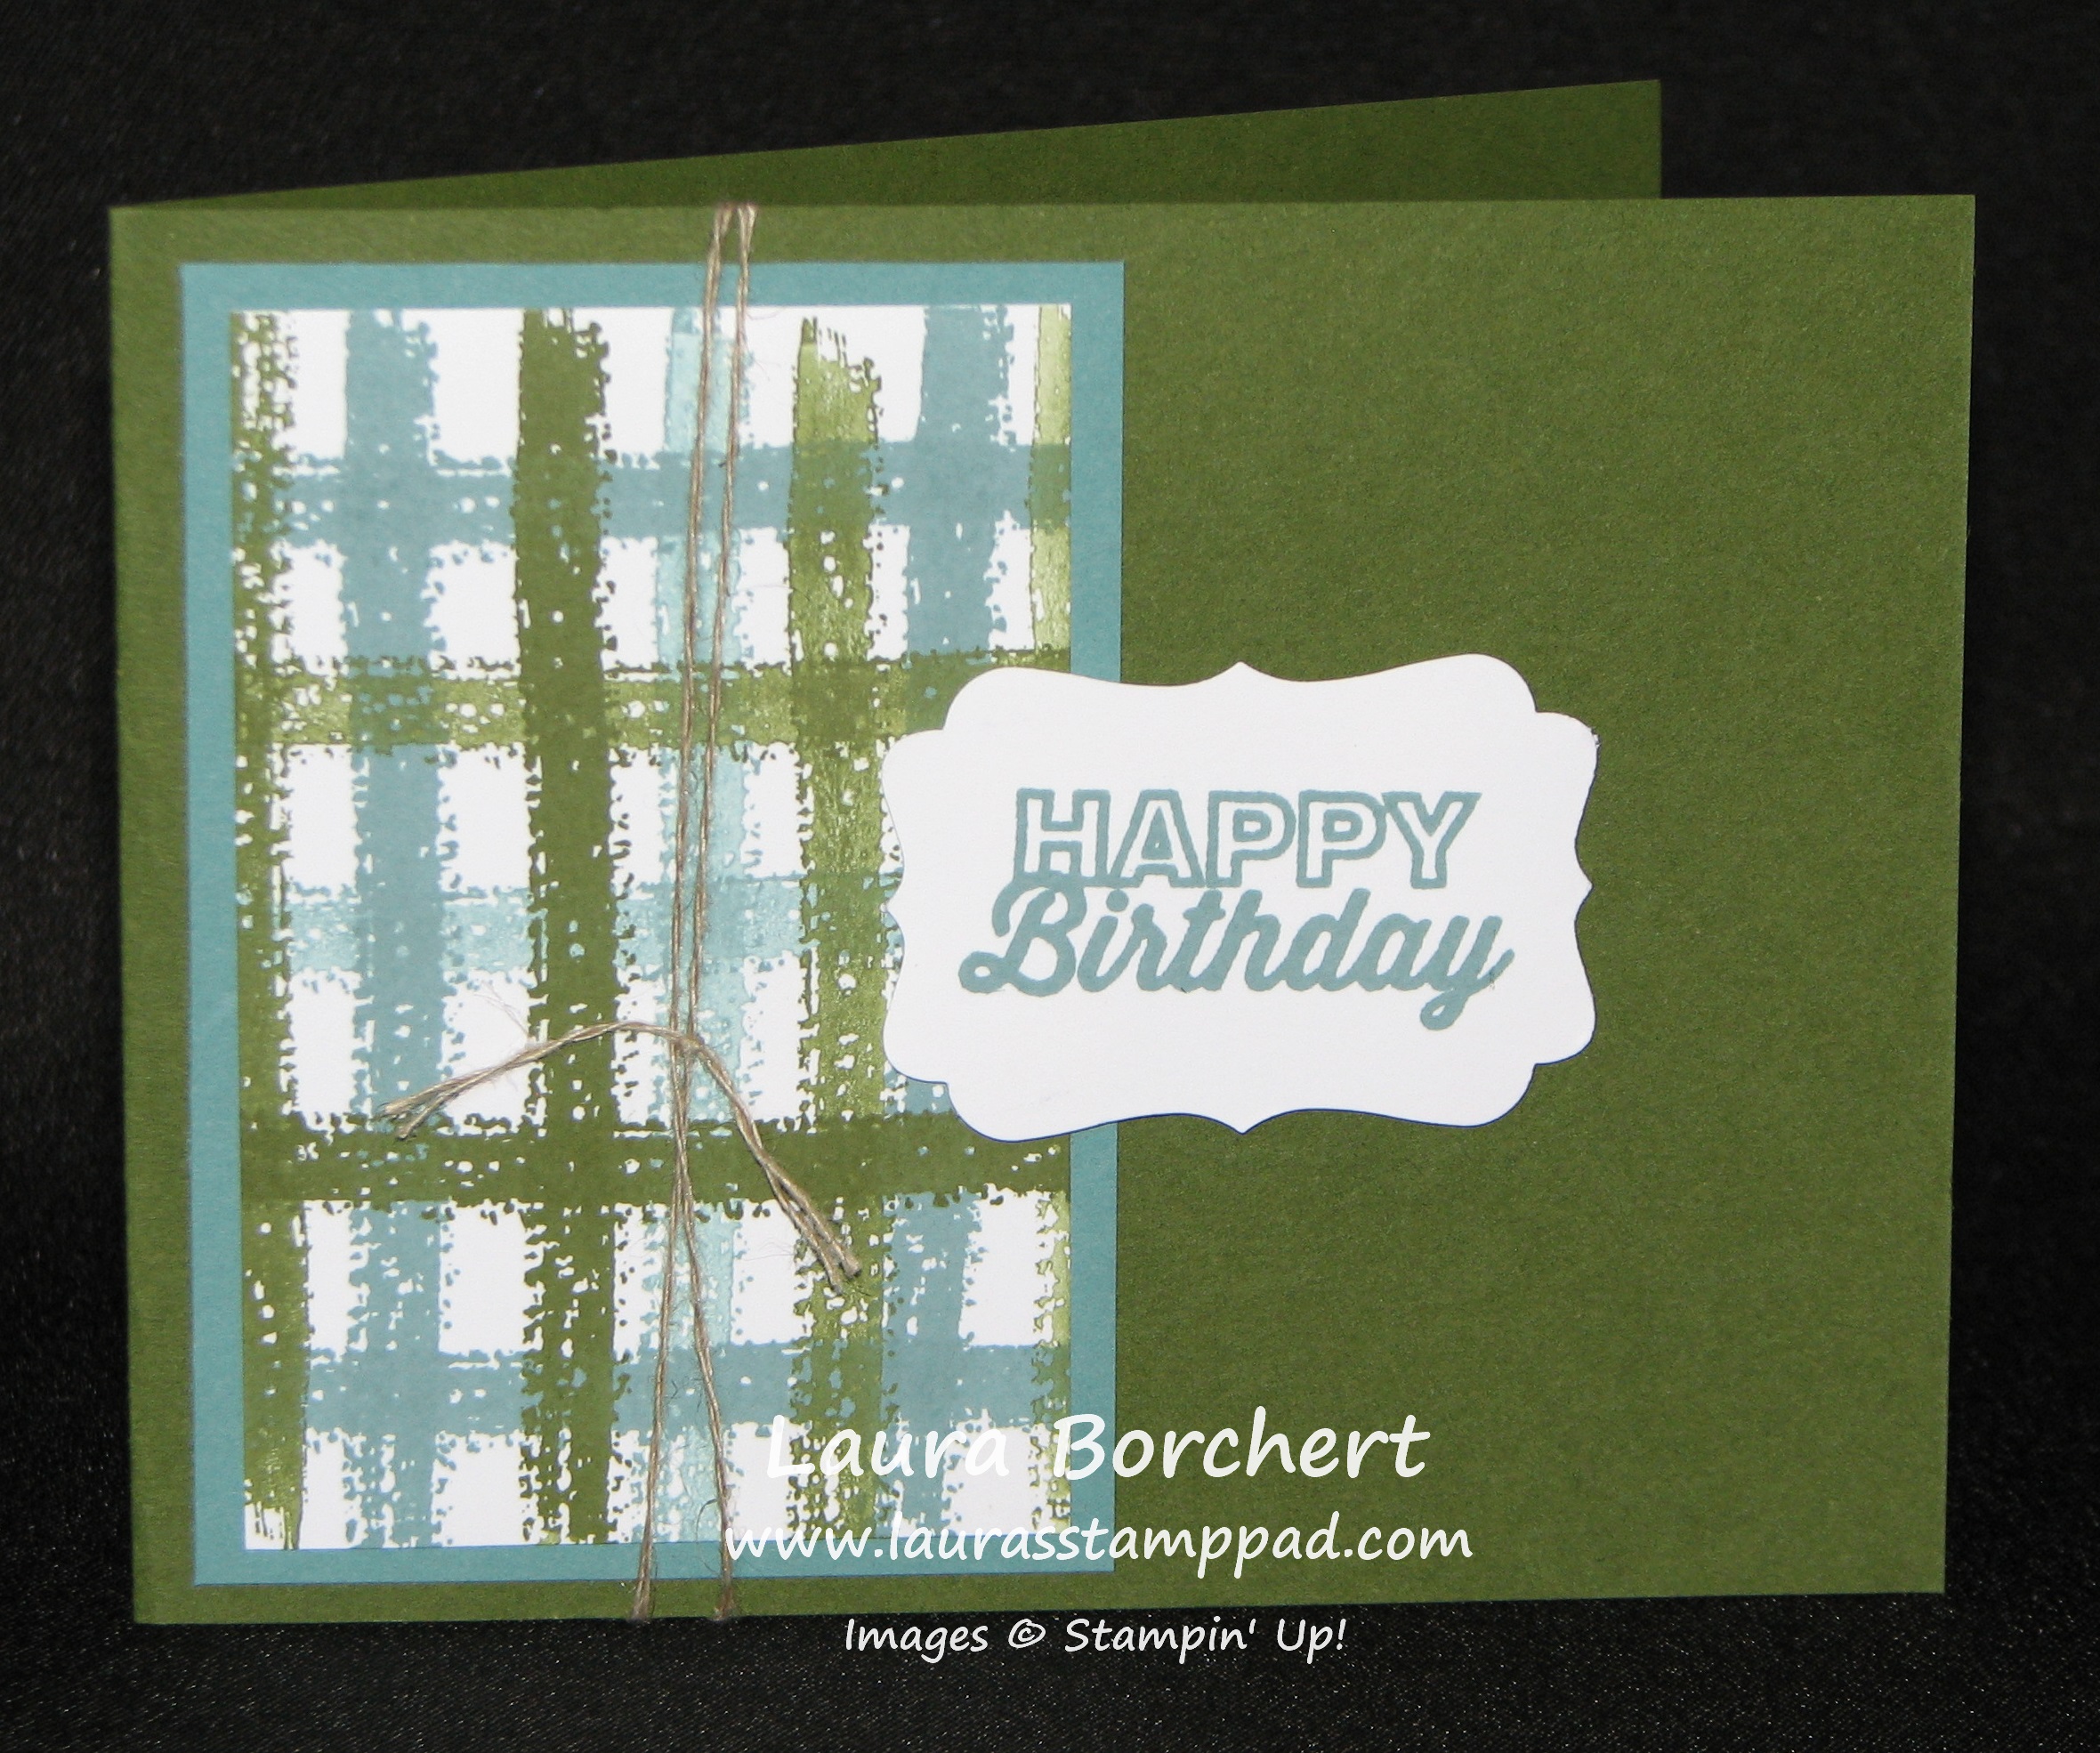
I used the long straight image from the Work of Art Set to create this look. You can use 2-3 different colors. I found when I used a 3rd color, I always felt it was off because I either didn’t have enough of that 3rd color or it was just a mess of too many colors but I’m crazy like that. My piece of cardstock measures 3-3/4″ x 2-1/2″. I decided to use this size because it fits the stamp. You could go big and have it layer the entire card (4″ x 5-1/4″) but you would need to stamp twice to create the line all the way across. I used the NEW In-Colors – Lost Lagoon and Mossy Meadow for the card pictured above. You will ink up one of the colors and stamp down, moved about 1/4″ and stamp again without re-inking. Ink up with that color and keep doing that all the way across. Then turn your piece 90 degrees and with the 2nd color do the same thing, stamp, move up a little and stamp again without re-inking. You could also do all dark (inking and stamping) along one side and all light stamping (stamping off once) along the other side. You can mix it up to however you wish….endless possibilities! Here is a Video Tutorial for you to watch this technique in action! Be sure to like and subscribe to the video so you never miss out!

Click here to check out more videos of mine! I hope you enjoyed this technique and try it out yourself. Let me know in the comments below what you think and if you try it out, send me a photo of your project! I love seeing what you all come up with!

Happy Stampin’

~Laura


Technique Tuesday – Punch Art

Posted on

Happy Tuesday!!! You know what that means……I have a fabulous technique to show you today!!!! It is super cute and can be used as a Man Card!!!! I KNOW! I’m excited because you all know how difficult it is for me to come up with man cards since pinks and purples, bling, and flowers are my favorite things!!!! (Also, voting is still taking place on my New Catalog Giveaway, click here to vote!)

Pac Man Punch Art, www.LaurasStampPad.com

Supplies Needed: Owl Builder Punch, 1/8″ Handheld Circle Punch, 1-3/4″ Circle Punch, 1″ Square Punch, Cardstock

I love how you can create just about anything with a few punches! Eeeeee So fun and exciting! I created the yellow dots (Daffodil Delight) with the eyes in the Owl Punch. The enemies were created from the owl and I just snipped off the feet. I found that Real Red is good for Blinky, Blushing Bride for Pinky, Coastal Cabana for Inky, and Pumpkin Pie for Clyde. For Pac-Man, I used Daffodil Delight and punched a 1-3/4″ Circle and then slide the circle half way into the Square Punch in order to punch out his mouth. To get that little bitty eye, I used my 1/8″ Handheld Punch to punch out the eye and allow the black background to show through!!!! How simple is that? To see this in action, check out my Video Tutorial here. If you love it, be sure to give it a thumbs up! And don’t forget to Subscribe to my Channel so that you don’t miss out on any of my videos! 🙂

Happy Stampin’

~Laura


Technique Tuesday – Spotlight Technique

Posted on

Good Morning and Happy Tuesday!!!! Have you checked out the NEW Catalog! It came out yesterday and it is AMAZING! There are so many new stamps and products and fabulous ideas! After all the catalog is a great source for coming up with project ideas! Okay, now that you have seen that, lets show you an amazing technique – the Spotlight Technique!!!

lowtail Spotlight Technique, www.LaurasStampPad.com

This technique spotlights a certain section on your image with color. As you can see in the card above, I added pops of color to different areas of the butterfly. It isn’t that easy to see but each of those pops of color are actually punched out circles to there is a bit of texture and dimension to the card as well.

Swallowtail Spotlight Technique, www.LaurasStampPad.com

Now this one looks the same but it is just a bit different. This one I used my Markers and a template to add pops of color.

Supplies Needed: Line image stamp (something you can color in), Stazon Ink, Various Circle Punches, Markers, Cardstock

To create both of these cards at the same time, I took 3 pieces of Whisper White Cardstock measuring 4″ x 5-1/4″. You will then stamp the Swallowtail Butterfly on each of the pieces in Stazon Ink. It doesn’t matter if they are straight or diagonal and each one can be different. Then you will color in one of the butterflies completely with a marker. Using your various Circle Punches, punch portions of the butterfly out. You can punch near the edge or right in the center of the butterfly. You will then puzzle piece these punches circles onto one of your other stamped butterflies. I suggest punching and then finding the matching spot and adhering it down before moving to the next punch. This way it won’t be as hard to find out where the piece should go. Once you have punched and assembled your desired pieces, you can layer that on a card base and add a greeting!

For the second card, you will take your punched butterfly piece and lay it over the other Stazon stamped butterfly and color in the butterfly in the open areas. You don’t have to line it up perfectly, you can move the circles around as you wish! Again once you have the desired amount of color, you can layer that on a card base and add a greeting! Check out my Video Tutorial below to see it done in action! Be sure to “like” and “subscribe” to my videos so you don’t miss any of them!

I hope you enjoyed this technique and try it out! I would love to see some of your creations or variations of this technique so feel free to share them in the comments below or you can email me photos of your project. I would love to see them!

Happy Stampin’

~Laura


THE NEW CATALOG IS HERE!!!!

Posted on

NEW Stampin' Up Catalog, www.LaurasStampPad.com

What a way to start off your Monday!?!?!?! The New 2014-2015 Stampin’ Up Catalog is officially here!!! I am soooo excited because I love this NEW catalog. I love the new stamps – Age Awareness is fabulous. I love the new embellishments and ribbon – Stitched Satin Ribbon is beautiful! I love the new Designer Series Paper – Sweet Taffy says LAURA all over it but Back to Black looks amazing too. I love my black and white!!!! I love love love all of the kits for stamping, gift giving, treats, treats, and more treats. LOVE IT! Also, there is an index for the Accessories this year! Even better….there is an index for greeting and alphabet stamps WITH A PHOTO! How amazing is that!?! Oh I could go on and on….which I will do at my New Catalog Girls Night Out Event which is June 10th!!!!! You are all invited!!

Work of Art, www.LaurasStampPad.com

This is using the NEW Work of Art Stamp Set which is amazing!!! Thank You to Stampin’ Up for giving it to me for FREE because I don’t think I would have looked twice at this set! Check out my Video Tutorial on this card!!!

Happy Shoppin’

~Laura


How Many Cards Can You Get from One Sheet???

Posted on

I did another set of One Sheet Wonder cards!!! I can’t help myself! It is so much fun and so simple to make a lot of cards in a little amount of time! I was able to get 15 cards out of this One Sheet of 12″ x 12″ piece of Birthday Basics Designer Series Paper (retiring soon)!!!!

One Sheet Wonder Cards, www.LaurasStampPad.com

Aren’t these just AMAZING! For this set, I used a lot of both sides of the paper! I just love this paper! My card bases were Bermuda Bay, Primrose Petal, Summer Starfruit, and one Crisp Cantaloupe!!! I used greetings from Label Love and Lots of Thanks! Of course I used the coordinating punch, the Artisan Label Punch too! Here is a more up-close look at most of them!

One Sheet Wonder Technique, www.laurasstamppad.com

Of course you can check out other One Sheet Wonder Samples here, here and here! And if you would like to see the Video Tutorial for dimensions and how-to, then click here!!!!

Happy Stampin’

~Laura


Technique Tuesday – Double Slider Card!

Posted on

Happy Tuesday!!! That means I have a fabulous technique to share with you, right? RIGHT!!!! I love this card because the colors are so rich and bright and the WOW factor is like a 12 (scale 1-10)!!!! So let’s get started!!!

Double Slider Card, www.LaurasStampPad.com

Isn’t that just fabulous? I think so too so I’ll just stop there! What’s that? You want more? OF COURSE YOU DO!!!!

Supplies Needed: Cardstock, Scoring Tool (Stampin’ Trimmer Score Blade, Simply Score, Bone Folder), Stamp Set of your choice (Secret Garden), Ribbon, Brad, Word Window Punch, Circle or Oval Punch, Corner Rounder Punch, Plastic Bag or Cellophane Bag

  1. Starting with a 5-1/4” x 11 piece of cardstock, SCORE at 2-1/2”, 6-1/2” and 10-1/2”.
  2. Cut a slight notch (to help hide place bag) on each end of the 2-1/2” section using your Word Window Punch. Wrap a 1-1/2” x 10” strip of plastic bag around the two notches and seal together on the right side, trimming off extra. This is the sliding mechanism so it needs to be tight yet moveable.
  3. Cut two panel inserts 3-3/4” x 4”. It is best to decorate these before assembling them into your card. Attach first panel to place bad on the INSIDE (with 2-1/2” flap closed). Attach the second panel to the plastic (with 2-1/2” flap closed) ON THE TOP.
  4. Apply Sticky Strip along the ½” flap and tuck it in behind the moving pieces and seal the card closed.
  5. You can add a 5-1/2” x 4-1/4” base to the back of the card for writing and decorating on.
  6. Decorate the front panel!

Here is a Video Tutorial for you to watch and follow along! Be sure to LIKE the video and SUBSCRIBE to my Channel because that would be fabulous! Also, wanted to throw a shout out to my stamper friend Rachel Chamberlain for this amazing idea! She is amazing!

Happy Stampin’

~Laura


More Wonderful One Sheet Wonder!!!!

Posted on

There was just too many amazing cards to make just one post about these amazing One Sheet Wonder cards so I am sharing more with you today!!!!

One Sheet Wonder Designer Series Paper, www.LaurasStampPad.com

The card on the right is the only one that I used the other side of the paper! I just LOVE those blue and green flowers and could hardly bare to cover them up even though the polka dots are fun too!!!

One Sheet Wonder Designer Series Paper, www.LaurasStampPad.com

I am loving the ripped paper look on these cards! See how they are all similar but just a bit different!!!

One Sheet Wonder Designer Series Paper, www.LaurasStampPad.com

It’s like a puzzle! I love how the image matches up and has just a bit of spacing between the pieces of Designer Series Paper!

One Sheet Wonder Designer Series Paper, www.LaurasStampPad.com

This card is so simple yet elegant – perfect for a Wedding, Bridal Shower or Engagement (I like how I went backwards with that one.) 🙂

I used Island Indigo, Gumball Green and Smoky Slate!!!! I used greetings from Label Love, Lots of Thanks, and Bring On The Cake (retiring)! Then I used my Artisan Label Punch and Decorative Label Punch!!! Click here to check out the Video Tutorial which has all the dimensions and information in it!!! Be sure to “LIKE” and “SUSCRIBE” to my videos to show some love!!!

You can check yesterday’s post for more samples!!!! You can also check out a One Sheet Wonder Stamped Sheet by clicking here and here!!!

Happy Stampin’

~Laura


Technique Tuesday – The Wonderful One Sheet Wonder!!!!

Posted on

Happy Tuesday!!!! You know what that means…..I am sharing a fabulous technique with you!!!! Every time I have had a One Sheet Wonder Class, everyone goes crazy for it!!!! I mean look at these fabulous cards!!!

One Sheet Wonder Designer Series Paper, www.LaurasStampPad.com

The reason it is called One Sheet Wonder is because you only use One Sheet!!! I used one sheet out of the Watercolor Wonder Designer Series Paper Pack (You can only get this for 12 more days, click here to order NOW!) I will be so sad when this paper is gone because I LOVE IT!!!! I created 12 cards with my One Sheet of Designer Series Paper but there are some leftover pieces so you could probably get about 14 or more out of the one sheet!

One Sheet Wonder Designer Series Paper, www.LaurasStampPad.com

After you cut your Designer Series Paper, pick one or more colors of solid cardstock for your card bases and start assembling!!! It is that easy!!! I used various greetings for all of my upcoming occasions!!!

One Sheet Wonder Designer Series Paper, www.LaurasStampPad.com

I used Island Indigo, Gumball Green and Smoky Slate!!!! I used greetings from Label Love, Lots of Thanks, and Bring On The Cake (retiring)! Then I used my Artisan Label Punch and Decorative Label Punch!!! For more on these cards and the dimensions, check out this Video Tutorial!!!

Be sure to check back tomorrow for more samples!!!! You can also check out a One Sheet Wonder Stamped Sheet by clicking here and here!!!

Happy Stampin’

~Laura


Tags and Bags!!!!

Posted on

There are so many times that you need a fabulous treat bag – school treats, teacher gifts, neighbor gifts, goodies for the Holidays, party favors, and gatherings!!! It is a must that it looks super cute, right? YES! And that it is super simple? YES! I’m here to save the day for all of your upcoming occasions or treat bag needs!!!

Watercolor Wonder Washi Tape Bag & Tag, www.LaurasStampPad.com

Boom…Problem Solved!!! How amazing is this treat bag!?!?!

All you need are some 4″ x 6″ Cellophane Bags, Washi Tape (I used Watercolor Wonder Washi Tape) and a tag! The Washi Tape on the bag is super simple because it tears so you don’t even need scissors and I just overlap mine on the back side! For the tag, I used my Chalk Talk Framelits, a strip of Washi Tape, and stamped Sweet Treats from the Teeny Tiny Wishes Stamp Set! I love how the Chalk Talk Tag is notched so you don’t need to attach it with ribbon but just notch it around the top of the bag!!! To close the bag, I used my Gold Baker’s Twine and then took a needle to the ends to fray it and make it look fuller!

Tag Topper Treat Bag, www.LaurasStampPad.com

Here is another fabulous treat bag! This one is decorated with an adorable tag using the Scallop Tag Topper Punch! I then decorated the tag with my Papillion Potpourri Stamp Set and greeting from my Perfect Pennants Stamp Set! I closed this bag with some Whisper White Baker’s Twine in a double knot. Then I added the tag with the ends of the Baker’s Twine in a loop! These fabulous treat bags were made for a Mother/Daughter Banquet! See….cute treat bags are needed everywhere!!!

Here is a video showing how to make these fabulous treat bags! Be sure to “Like” and “Subscribe” to the video because that would be fabulous!!! Also, leave a comment down below and let me know what you would like to see next!!!

Happy Stampin’

~Laura


Technique Tuesday – Pull Out Card!!!

Posted on

Happy Tuesday!!! You know what that means…..I have a fabulous technique to show you!!!! I love this technique because there is a major WOW factor and it still fits into a regular sized Medium Envelope (A2 sized card)!!! Also, I think this card would be super fun and cute for kids but also for adults! I know I love it!!!

Pull Out Card Papillion Potpourri, www.LaurasStampPad.com

See this card looks like a normal card….but it is not!!! 🙂 It isn’t super easy to see in the photo but when you pull on the left side, the card opens up!!!! (Check out the video below to really see how amazing this is!) This idea came from a fellow stamper friend, Julie Davison! You can check here out here!

Supplies Needed: Cardstock, Stampin’ Trimmer, and stamps and embellishments to decorate

  1. Starting with a 4” x 9-3/4” piece of Whisper White Cardstock and the 4” at the top of your Stampin’ Trimmer, line the cardstock up at 1-1/2” and CUT from 3” to 7-1/2”.
  2. Turn the cardstock 90 degrees. Line up the cardstock at 3” and SCORE to the cut line at 2-1/2”.
  3. Move the cardstock over to 5-1/4” and SCORE all the way.
  4. Move the cardstock over to 7-1/2” and SCORE from the 2-1/2” score line to the edge.
  5. Fold on all score lines. From left to right, the first score line will be folded “mountain” style and second score line will be folded “valley” style.
  6. Now you can decorate as you wish with Stamps, Designer Series Paper, etc. The DSP on the bottom measures 1” x 5-1/4”. I used some of the Birthday Basics Designer Series Paper! I also stamped with the Papillion Potpourri Stamp Set! For the greeting, I used the border image from the Label Love Stamp Set in Summer Starfruit and then “Sending Many Thanks” came from the Petite Pairs Stamp Set! I love this stamp set because it has coordinating greetings. When you pull open the card, it says “for everything you are to me.” 🙂
  7. Fold the card. Apply adhesive on the very back (not the part that will pull out) and adhere to the card backing (4-1/4” x 5-1/2”).

Pull Out Card Papillion Potpourri, www.LaurasStampPad.com

Also, be sure to check out this Video Tutorial on this Pull Out Card Technique! Like and Subscribe to the video because that would be amazing!!!

Happy Stampin’

~Laura