Technique Tuesday – Rounding Your Pillows!!!

Posted on

Happy Tuesday everyone!!! You know what that means….I have an amazing technique to share with you! Today we are playing with watercolor and I’m going to show your how to create a rounded out pillow! It’s super fun and easy and looks amazing on your comfy porch swing!

Sitting Here Thinking of You, www.LaurasStampPad.com

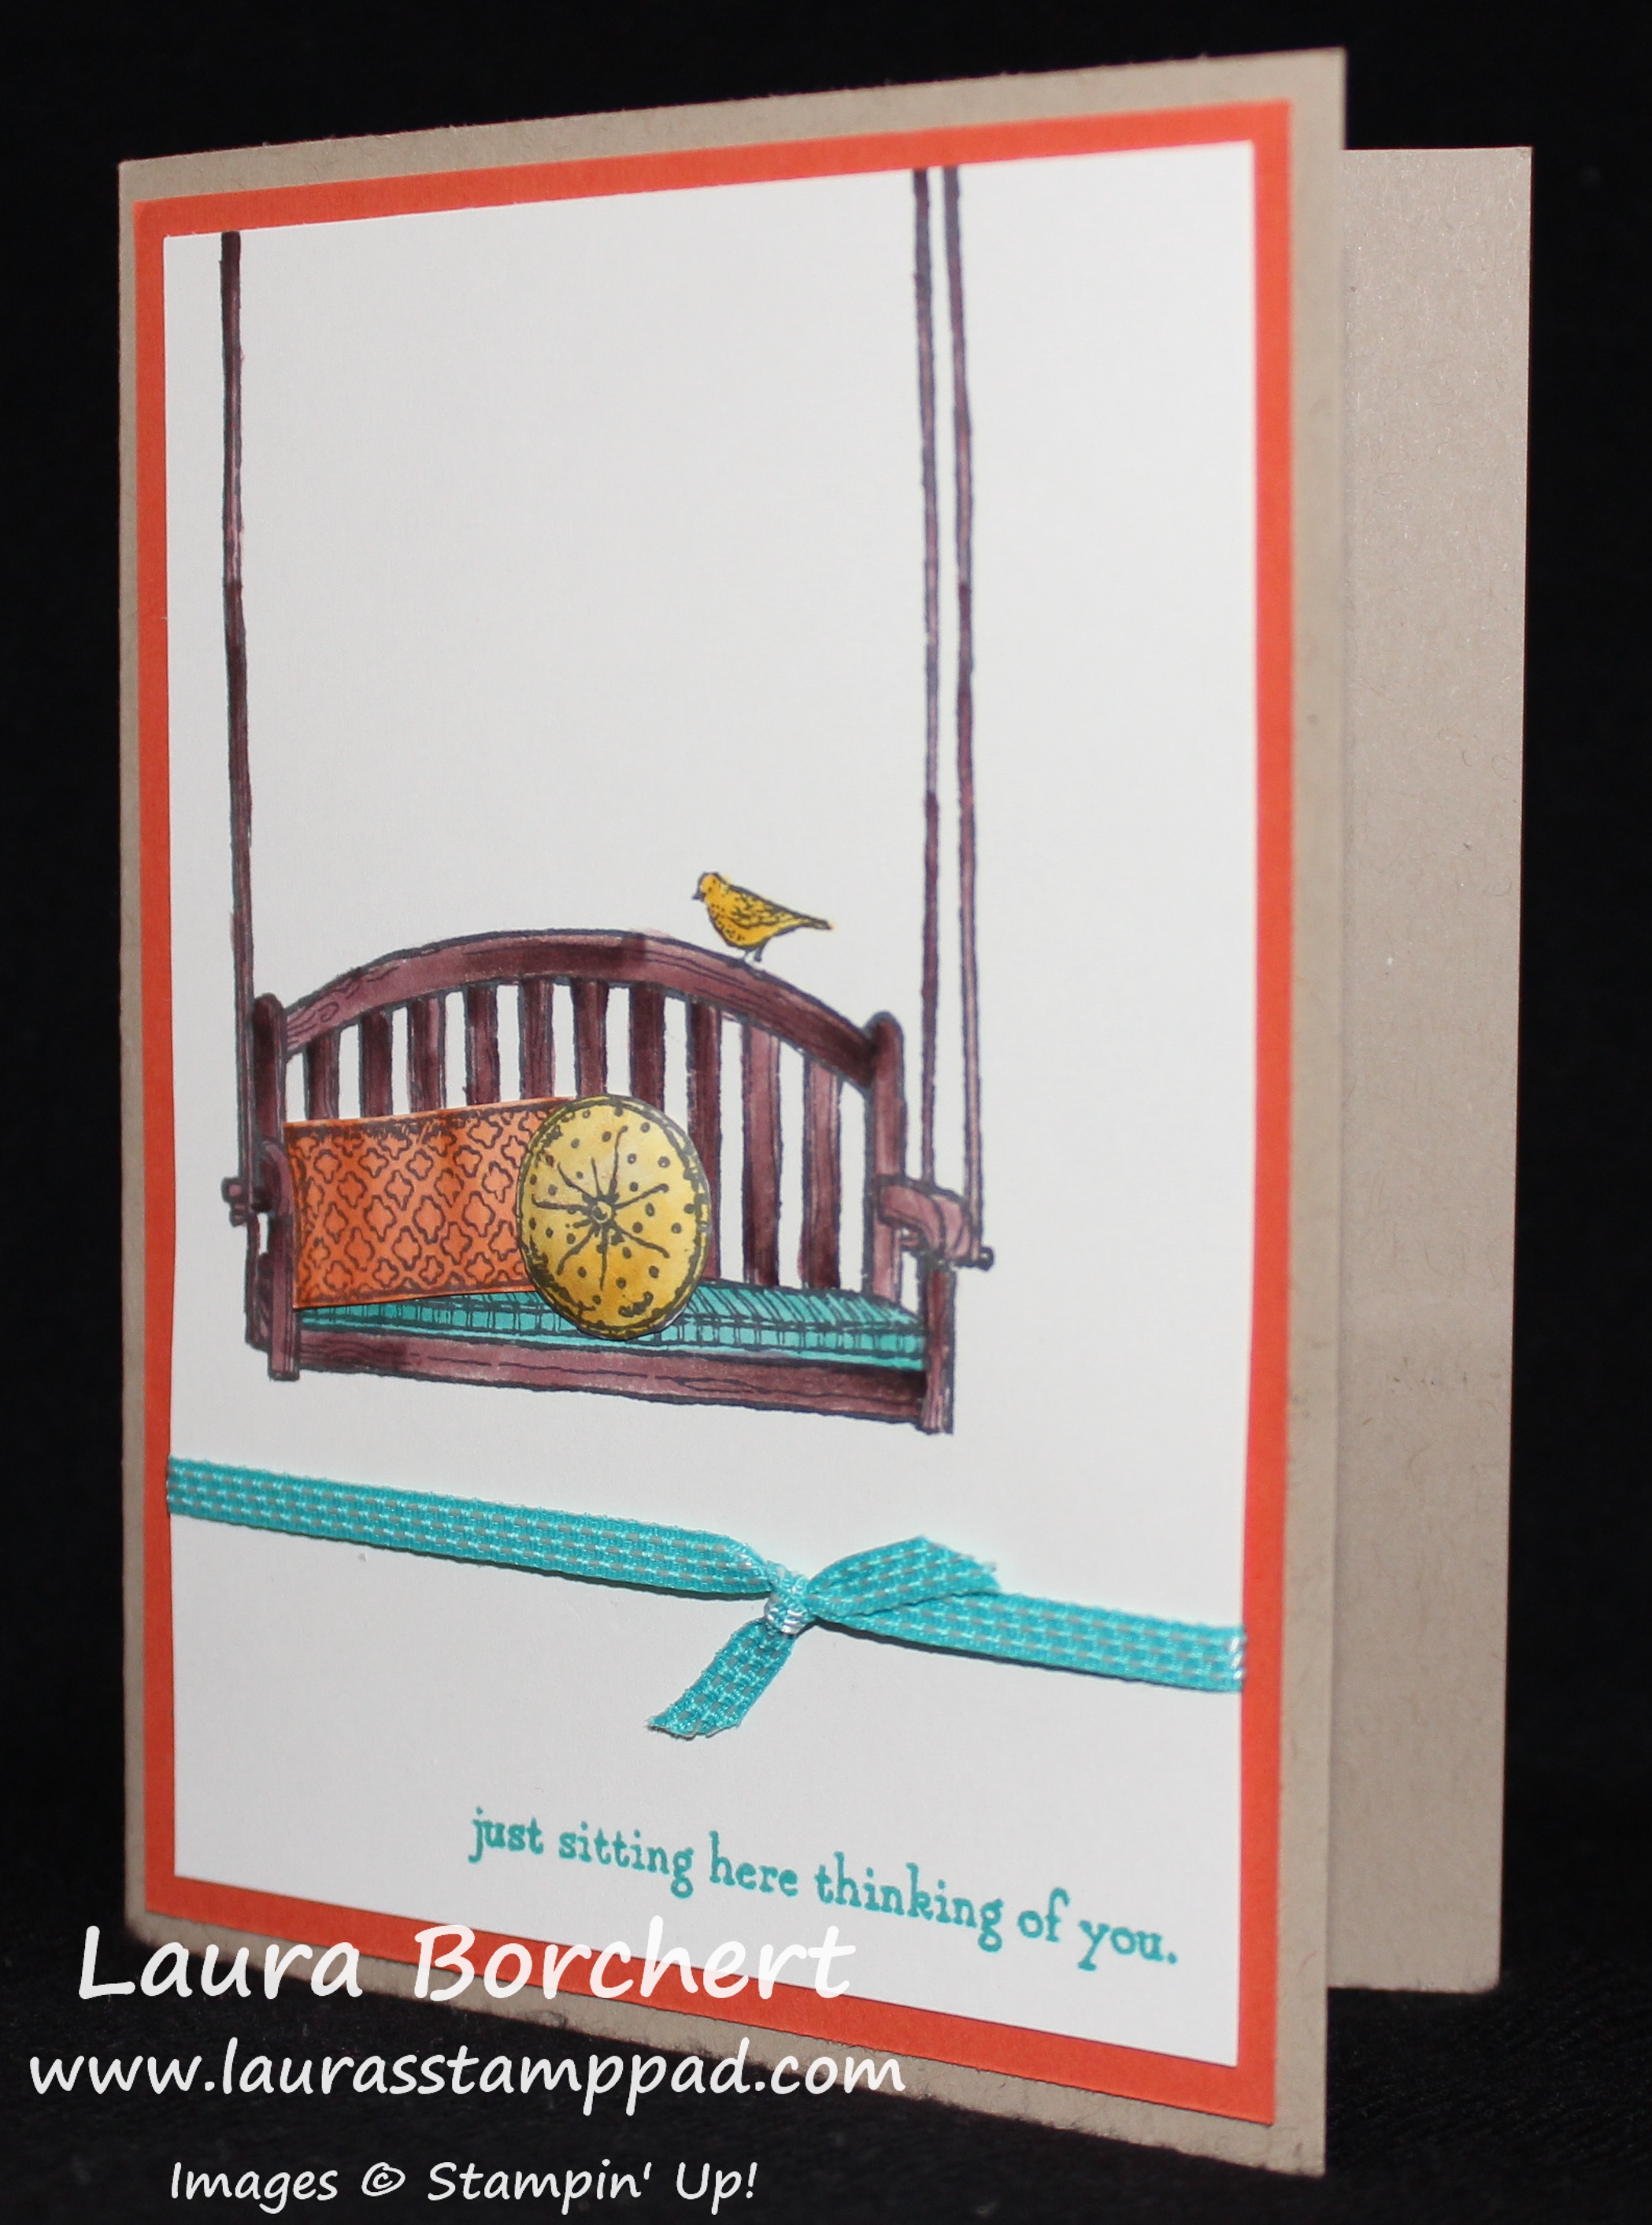
Isn’t this card so calming and peaceful? I love it! Those bright colors in the pillows and cushion look comfy and I can feel the cool summer breeze just looking at it. Can’t you????

SUPPLIES NEEDED: Sitting Here Stamp Set, Basic Gray Archival Ink, Inks of Choice, and Aqua Painter

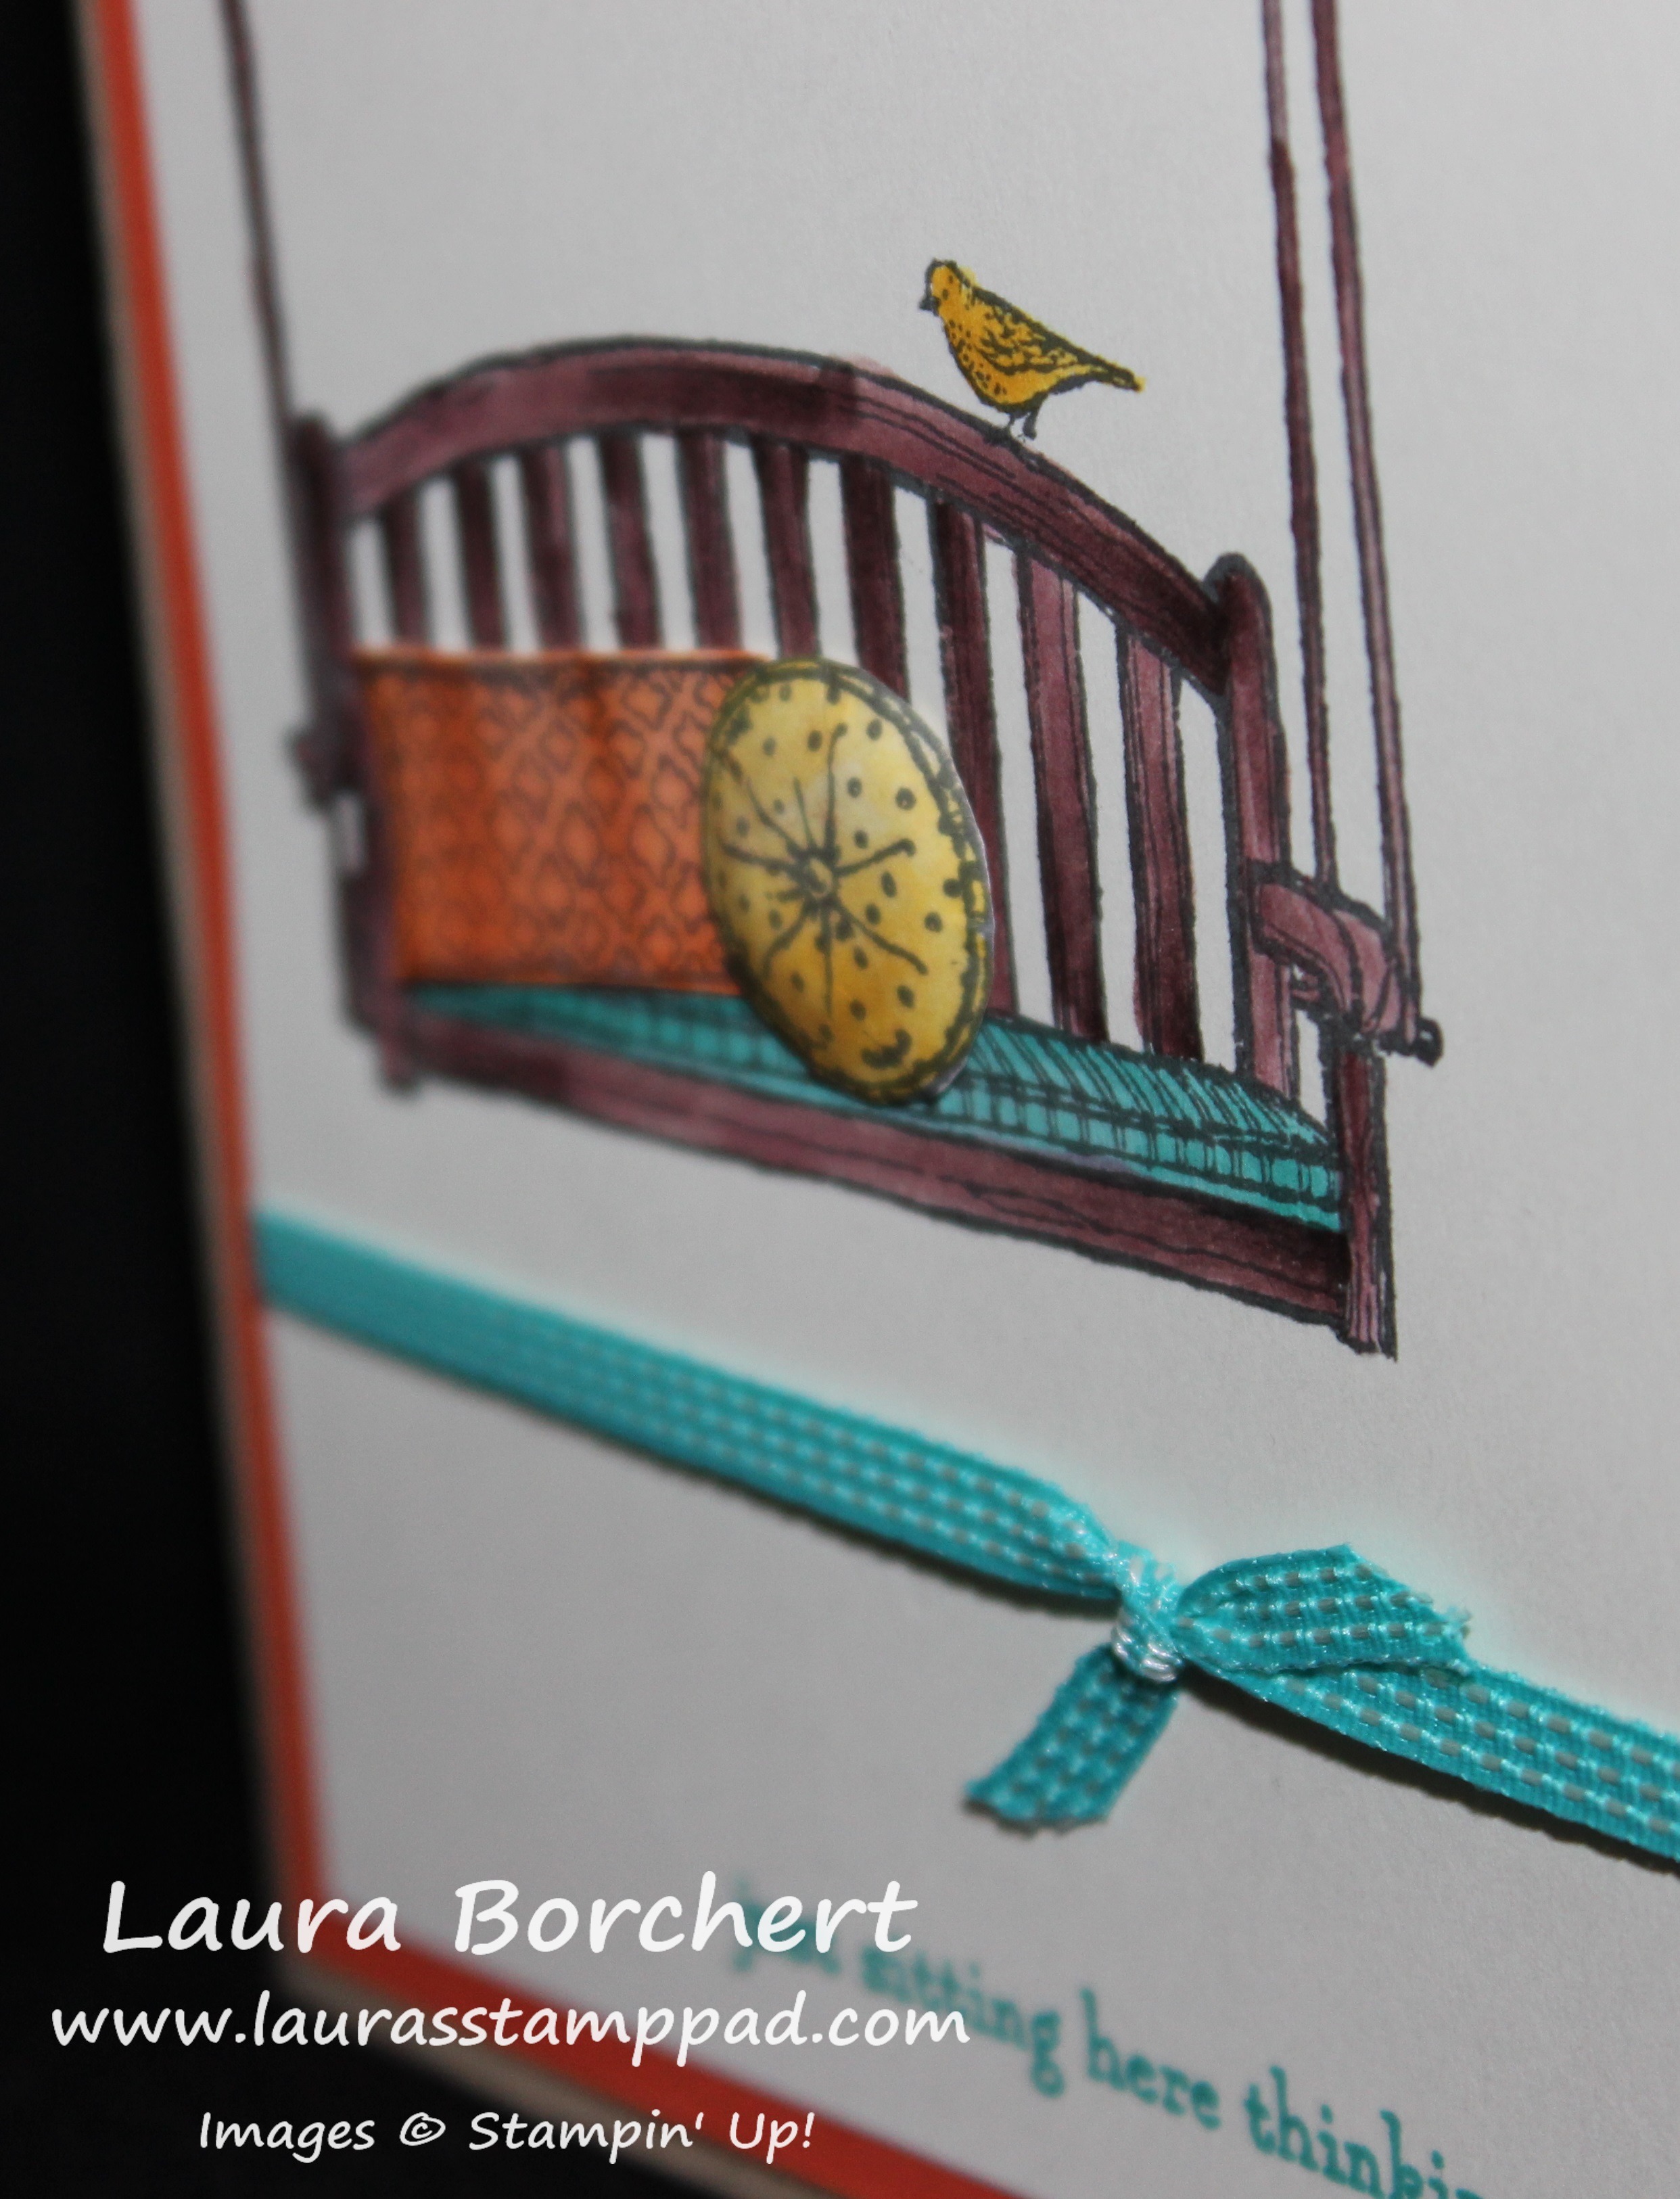
Let’s start with the focal point first. I got a piece of Very Vanilla cardstock (3-3/4″ x 5″) and stamped the swing and birdie from the Sitting Here Stamp Set with Basic Gray Archival Ink. You will want to use an Archival Ink so that the color doesn’t run when you start watercoloring! I went with gray because it is a little softer than black. Using an Aqua Painter, I colored the swing with Chocolate Chip, birdie in Crushed Curry, and the bench cushion in Bermuda Bay. Remember you never need to squeeze additional water in your Aqua Painter unless you are cleaning out the color to move to another one. You also want to focus on using just the tip of the pen….that very small point. If you press harder the brush will fan out and go all over and it will release more water then. When you are ready to change colors, just brush onto a scrap piece of paper or paper towel till the brush is clean and then move to the next color. I stamped the other 2 pillows in Basic Gray onto scrap cardstock and colored them as well. I used Tangerine Tango and Crushed Curry. Then I cut out the pillows. I added the orange pillow to the card with regular Snail Adhesive. For the round pillow, I took the other end (not the brush tip) of my Aqua Painter and ran it around the edge of my round pillow. The rounded end of the Aqua Painter presses on the cardstock and makes it curl in like a bottle cap. This is how you get that fabulous rounded pillow. Then I adhered the pillow to my card with a Stampin’ Dimensional. I love how it looks so real and amazing. Those rounded edges cover up the dimensional and make it look so real. Thank you to Glenda Travelstead for that amazing technique! I love it! I stamped the greeting from the Sitting Here Stamp Set on the bottom in Bermuda Bay. Now it is time to assemble. I tied some Bermuda Bay Stitched Ribbon around the vanilla piece and then layered this onto a piece of Tangerine Tango (4″ x 5-1/4″). I added this all to a Crumb Cake card base!

Pillows Popped Out, www.LaurasStampPad.com

If you want to see this all in action, check out my Video Tutorial below or click here. Don’t forget to give it a thumbs up if you liked it and be sure to subscribe if you are new! I post every Tuesday and Thursday!

Happy Stampin’

~Laura


Technique Tuesday – Ombre Butterfly!!!

Posted on

Happy Tuesday!!! You know what that means! I have a fabulous technique to share with you today. Creating an ombre butterfly, adding some splatters to your card and adding a hint of glitter with Wink of Stella! I love it all!!

Ombre Butterfly, www.LaurasStampPad.com

Isn’t this card just beautiful?!?!?! It is so much better in person so be sure to check out the video tutorial below to take it all in! Let’s get started on this amazing card!

SUPPLIES NEEDED: Butterflies Thinlits, Gold Metallic Thread, Wink of Stella, Aqua Painter

So remember last week when we die cut the white butterfly out for that beautiful card? Today we are using that white butterfly that was created with the Butterflies Thinlits! Using your Aqua Painter, you will color the butterfly with Watermelon Wonder. I started in the middle and worked my way to the tips of the wings. I got this amazing ombre look and LOVE IT!!! Just remember that each time you grab some ink, start in the middle and work your way out! Then I brushed the butterfly with the Wink Of Stella for that perfect shine! For the card, I used Tip Top Taupe for the base and added a layer of Mint Macaron (4″ x 5-1/4″). Then I took a piece of Whisper White (3-3/4″ x 5″) and added the splatter. I did this by squeezing the Aqua Painter a bit (just a bit) and picked up some Tip Top Taupe. I tapped the pen against my finger so it would splatter on the card. This is one of those techniques that isn’t going to be perfect. If you think you want a little more or some in a specific spot, don’t do it! 🙂 It might end up dripping too much water or just never hitting that spot. After all it is suppose to look messy! After your splatters, you are ready to add your washi tape. I used the It’s My Party Washi Tape and added some on the top left and bottom right. Then I stamped the greeting from the Greatest Greetings Stamp Set in Tip Top Taupe. Now you can add this piece to your card base. For the butterfly, I added Mini Glue Dots to the back down the middle. I wrapped some Gold Metallic Thread around 4 fingers about 10-15 times (up to you as to how much you want). I slide the thread off my fingers and twisted it in the middle into an 8 and then placed it on the Mini Glue Dots. You can add more Mini Glue Dots to the top of the thread if you need to or just add the butterfly like that to your card! LOVE IT!

Wink of Stella, www.LaurasStampPad.com

To see this all in action, check out the Video Tutorial below or click here! Be sure to give it a thumbs up if you liked it and don’t forget to subscribe if you are new!

Happy Stampin’

~Laura

Button Retire

TODAY IS THE LAST DAY!!! Click here to get those Retiring Items!


Technique Tuesday – One Sheet Wonder Flower Bouquet!!!

Posted on

Happy Tuesday!!! You know what that means…..I have a fabulous technique to share with you today! This isn’t a new one but it is with a new look! I know how much you all love my One Sheet Wonder Techniques so I am sharing another fabulous one!

Flower OSW, www.LaurasStampPad.com

Look at these beauties!!! You all know I love flowers and this paper from the Birthday Bouquet Designer Series Paper Stack is amazing!!! What better way to use this amazing paper than with a One Sheet Wonder Technique so you can use every bit of it and both sides!! I made 14 cards with this ONE piece of 12″ x 12″ paper. Here is the template!

12 x 12 One Sheet Wonder Template

I have modified it a little bit but cutting 2 pieces of 2″ x 5-1/2″ with that leftover gray piece on top. Also, I don’t always cut those little bits off in the second row either. You can do whatever you want to create these amazing cards!

Birthday Bouquet OSW, www.LaurasStampPad.com

These 6 cards were created with most of the bottom row on the template and those 2 pieces cut from the top gray portion. Quick and simple cards. I looked at the list of colors that are printed on the Designer Series Paper Pack for card bases – Blushing Bride, Mint Macaron, and Pool Party. I pulled out some scraps of each of those colors as well to use for layering and the greetings.

Diagonal Designer Paper, www.LaurasStampPad.com

Here are the 2 samples using that far right corner. I just ripped it corner to corner and added it to my card base. I stamped the greeting from the Rose Wonder Stamp Set and added some ribbon – Whisper White Cotton Ribbon and Venetian Trim.

One Sheet Wonder Squares, www.LaurasStampPad.com

You can always leave the square pieces as strips if you don’t like this look. Here I took the little squares and backed them with cardstock for a little extra pop of color. I added some Linen Thread to the one in the middle.

Quick and Simple OSW, www.LaurasStampPad.com

Here I used some of the strips from the 2nd row on the template. You will notice that the Thoughts & Prayers image doesn’t fit in the Decorative Label Punch so I used that greeting when I could stamp it directly onto the card. I love how you can mix and match and create so many amazing cards so quickly!

If you would like to see this all in action, check out the Video Tutorial below or click here! Be sure to give it a thumbs up if you liked it and don’t forget to subscribe if you are new! I post every Tuesday and Thursday!

If you would like to see other One Sheet Wonder samples, click here, here and here! This technique is perfect for whipping up lots of cards quickly and beautifully!

Happy Stampin’

~Laura


Technique Tuesday – Collage Stamping!!!

Posted on

Happy Tuesday!!! That means I have a fabulous technique to share with you today! We are stamping all kinds of images and lots of different colors and adding texture. It is (was) not really my style but I think I’m starting to love it and I have figured it out!!!

Collage Stamping, www.LaurasStampPad.com

Isn’t this beautiful??? My favorite is that amazing background!!! Let’s get started on this amazing card!

SUPPLIES NEEDED: Timeless Textures Stamp Set, Lots of Labels Framelits, lots of ink pads

I started with a Pool Party card base and stamped the floral image from Timeless Textures all over in Whisper White Craft Ink. You want to do this first so you can set it aside to dry. I didn’t go in any specific pattern, just stamped all over. Then I die cut one of the labels from the Lots of Labels Framelits and cut off the top bubble piece. This created a beautiful banner or tag. It is a super fun way to use the larger framelits on a card as well! Love it! I started with the greeting which is from One Big Meaning Stamp Set. I used my markers to color in the words – Bermuda Bay and Delightful Dijon. I stamped that down and then stamped the floral image right on top of it in Pool Party (stamped off once for a lighter look). Next, I took the tea cup stain image and inked it up in Crumb Cake Ink but then stamped off twice before stamping on my label. Collage stamping is all about the balance of colors and images. If everything was loud and bright it would look like a mess so you need those layers of colors and images. The final image I used is the little dots, again from the Timeless Textures Stamp Set and Tangerine Tango Ink. I stamped a few all around in the full strength. You could always stamp off a bit or even stamp a few times on your project for even more color variation.

Thanks Kindly, www.LaurasStampPad.com

Now your greeting piece is all done and it is time to add texture. I added a little piece of the White Tea Lace Doily to the top of the label and I added strips of Pool Party Cotton Ribbon to the back. I added it to my card front with Stampin’ Dimensionals. Of course, I thought a little bling would be perfect so I placed a few pearls randomly around the greeting as well! I love it!

Do you like collage stamping? Do you think it looks messy or crowded? It’s okay I do too a bit but it’s super fun too!!! Have you tried it out? I challenge you to play around with a few images and try it out. If you would like to see this all in action, you can check out my Video Tutorial below or click here! Be sure to give it a thumbs up if you liked it and don’t forget to subscribe if your new!

Happy Stampin’

~Laura

Button Retire

Be sure to check out the Retiring Items before they are gone at the end of May!


Technique Tuesday – Decorative Corner Card!!!

Posted on

Happy Tuesday!!! That means I have a fabulous technique to share with you today! This one is super fun because it’s a Box and a Card and it still fits into a regular Medium Envelope! I think this one is super simple and fun! You can check out another box card here!

Birthday Box Card, www.LaurasStampPad.com

Look how fabulous it is? It is so hard to show 3D in a photo so I have a few and of course a Video Tutorial!!! 🙂 I got this idea from a fellow demonstrator – Linda Yearsley at one of our Team Meetings. Linda got the idea from Debbie! A big Thank You to both ladies for the fabulous idea! Now let’s get started!

SUPPLIES NEEDED: Stampin’ Trimmer, 1″ Circle Punch, Designer Paper of your Choice

There aren’t a lots of tools needed for this fun card! You will start with a normal card base measuring 5-1/2″ 8-1/2″ and you will want to score it along the 8-1/2″ side at the following measurements – 2-1/8″, 4-1/4″, 6-3/8″. This will create 4 panels of the exact same size. You will fold on all of the score lines and be sure to use a Bone Folder for a nice strong crease! Now you will need your layers to decorate your panels. You will need four solid cardstock panels measuring 5-1/4″ x 1-7/8″. I used Marina Mist in this sample! Then I used some of the It’s My Party Designer Series Paper for the next layer on the panels. You only need three panels of Designer Series Paper and one Whisper White all measuring 5″ x 1-5/8″. The white panel will be on the back side for you to write on. This is like the “inside of the card.” Once all of these pieces are on your card base, it is time to seal it into a box! You will need a piece of cardstock in the same color as the card base measuring 1″ x 5-1/2″ and you will score it or fold it in half at the 1/2″ mark. Add adhesive to both panels (same side) of this small piece. You can use Tear & Tape or Fast Fuse. I used both on mine and they held together really well so it is all up to you! Now you will add one side of the strip to one end of the card base. Then lay your card flat and press the other end of the card base to the other side of the strip. I always like to lay it down and press it because then I know it will lay flat when I go to mail it.

Back of Box Card, www.LaurasStampPad.com

Now that you have your box, it’s time for the decoration. To get it to POP out on the corner, you will need two circles using the 1″ Circle Punch in the same color as your card base! Fold the circles in half. Add a Stampin’ Dimensional to one of the halves of the circle and then use Fast Fuse on the half. With the Fast Fuse side, place it with the crease (fold) right next to the corner fold of the card. You will do both circles like this on either sides from each other and on either side of the crease on the box card.

Pop Out Box Card, www.LaurasStampPad.com

Then you will peel off the backs of the Stampin’ Dimensionals and place your greeting on top! For the greeting, I punched out a Basic Black 2-3/8″ Scallop Circle and a Marina Mist 2″ Circle! I stamped the greeting from the Tin of Cards Stamp Set in Mint Macaron and punched it out with the 1-3/4″ Circle Punch! I also used the star from the Tin of Cards Set to stamp the back panel as well. You could use all kinds of Punches or Framelits for your greeting piece! I love it!!

If you would like to see this all in action because I have you totally confused, check out the Video Tutorial below or click here! I hope you aren’t confused after this! If so, remember you can always ask me for tips or suggestions if you need help! I am happy to help! Don’t forget to give this video a thumbs up if you liked it and be sure to subscribe!

Happy Stampin’

~Laura

Ribbon Retire

Be sure to check out the Retiring Items before they are gone at the end of May!


Technique Tuesday – Baby Block Card!!!

Posted on

Happy Tuesday!!! You know what that means….I have a fabulous technique to share with you today!! Check out this cute baby card that can be made for a boy, girl, or gender neutral!!! Love it!!

Baby Block Card, www.LaurasStampPad.com

Simple and adorable! You could always change it to be the name of the baby as well! When I first started this card, I didn’t intend on it being a baby card but after I did the first few layers, it screamed baby girl!

Baby Girl, www.LaurasStampPad.com

Doesn’t that scream baby girl??? Come on now!

SUPPLIES NEEDED: Layered Letters Alphabet Stamp Set, VersaMark Pad, Heat Tool, White Embossing Powder, ink colors of your choice 

I started with a Whisper White card base and stamped the background with the “X” from the Layered Letters Stamp Set in Blushing Bride. I stamped a few times before going back to the ink to get a variation of color. Then I took some of the Neutrals Designer Series Paper and die cut a star using the Stars Framelits. I added that to the card front as well as the strip of Blushing Bride with the banner tips. You can use the Banner Triple Punch or this trick – cut straight up in the middle and then from each corner to that center cut. I hope that makes sense. Both the star and the banner were added to the card with Snail Adhesive and not Dimensionals. Now for the letters, I took a piece of scrap white cardstock and stamped the rectangle image from the Layered Letters Alphabet Set. For the card above, I used Watermelon Wonder, Calypso Coral, and Blushing Bride (watermelon on both ends). Before cutting them out, stamp the letters in VersaMark and then add your White Embossing Powder. With your Heat Tool, you will set the powder and then you can cut out your letters. I didn’t cut them out first because it was easier to hold onto the piece of paper while using the Heat Tool. When I cut them out, I did a loose cut, not sure close and perfect around the rectangle. I added the letters to the card with Stampin’ Dimensionals! 🙂

Baby Boy Block, www.LaurasStampPad.com

Here I made a Baby Boy card using Island Indigo, Bermuda Bay and Pool Party! Just precious!!! I had a stamper who didn’t need a baby card so she made it into a Graduation Card! There are so many different types of cards you could create with this technique!

Grad Block Card, www.LaurasStampPad.com

If you would like to see this in action, you can check out the Video Tutorial below or by clicking here! Don’t forget to give it a thumbs up if you liked it and be sure to subscribe so you don’t miss the video on Thursday!

Happy Stampin’

~Laura

Button Retire

Be sure to check out the Retiring Items before they are gone at the end of May!


Technique Tuesday – Puzzle Pieced Roses!!!

Posted on

Happy Tuesday everyone!!! We are back at it with another Technique after last week’s celebration!! This technique uses my favorite Framelits – Rose Garden and some bling!!!! Check this out!

Glimmer Roses, www.LaurasStampPad.com

Aren’t those roses just stunning? I am still on the fence as to whether this card is a bit much or just fabulous! My husband says its a bit much and only one rose was needed. Let me know in the comments below what you think. Be honest!!!

SUPPLIED NEEDED: Rose Garden Framelits, Big Shot, Snail Adhesive, Paper of Your Choice

I used the Silver Foil Paper and Blushing Bride Glimmer Paper for these roses! I die cut the rose with the Big Shot once in the Silver Foil and once in the Blushing Bride Glimmer Paper. Then I popped out all of the pieces with the Big Shot Die Brush. Be very gentle with the Glimmer Paper. It could brush off a little glitter and we want all the bling!!! Be sure to keep track of all of the little pieces that you pop out. Then I took a piece of Blushing Bride cardstock measuring 4″ x 5-1/4″ and placed one of the rose frames in the corner where I wanted it. I took a pen and marked little dotted lines around the INSIDE of the rose frame. This was my guide for adding Snail Adhesive to the area. I took away the rose frame and filled the entire area with adhesive. Then I placed the Glimmer Rose down and started putting together the rose with the Silver Foil pieces inside. It really is like a puzzle!

Blush Rose, www.LaurasStampPad.com

You will repeat the same thing in the opposite corner with the Silver Foil Rose frame and glimmer puzzle pieces. If for some reason you don’t have enough adhesive, you can always add a dab of glue from the Fine Tip Glue Pen. I just found it to be much easier and less messy to use the Snail Adhesive for the majority of it, rather than gluing each piece in. Once I had my roses complete, I added some Whisper White Organza Ribbon around the middle and stamped my greeting. The greeting is from the Number of Years Stamp Set and I stamped it in Rose Red (stamp off once). I added this to a Whisper White Card base and Viola!!! Love it!!!

Silver Rose, www.LaurasStampPad.com

I played around with a few other looks as well. Here is a Black Glimmer Paper (ops….retired from the Holiday Mini Catalog) and Real Red Cardstock. You could always do Real Red Foil Paper or all cardstock!! I think this one is amazing!!!

Red Rose, www.LaurasStampPad.com

And then I just had to do a Pink Rose!!!! I used one of the other Framelits in the Rose Garden Set. The border is Dazzling Diamonds Glimmer Paper and the puzzle pieces are Melon Mambo and Pear Pizzazz cardstock! I LOVE IT!!!!

Pink Roses, www.LaurasStampPad.com

If you would like to see this all in action, check out my Video Tutorial below or click here! Don’t forget to give it a thumbs up if you liked it and be sure to subscribe so you don’t miss out on any future videos!

Let me know in the comments below which one your favorite is!!! I’m between the Red and Melon Mambo one….they are both amazing!!!

Happy Puzzle Piecin’

~Laura

Going Going Gone, www.LaurasStampPad.com

Be sure to check out the Retiring Items before they are gone at the end of May!


Technique Tuesday – Drapery Fold!!!

Posted on

Happy Tuesday!!! That means I have a fabulous technique to share with you today!!! This one is super fun because you can use every bit of the Designer Series Paper AND you can see both sides of this fabulous stuff!!! No worries on deciding which side to use!!!

Drapery Fold Cards, www.LaurasStampPad.com

Look how fabulous these cards are!!! You can see both sides of the It’s My Party Designer Series Paper and you can create 2 cards from each piece!!! I got the idea for these cards from fellow demonstrator Margo Richardson at the last Team Meeting! I love sharing ideas with others! Let’s get started!

SUPPLIES NEEDED: Designer Series Paper, Stampin’ Trimmer, Simply Score Tool

You will start with a piece of Designer Series Paper measuring 4″ x 11-1/2″. I used the It’s My Party Designer Series Paper from the Occasions Mini Catalog. Then using either the Score Blade on your Stampin’ Trimmer or the Simply Score Tool, you will score at 3″, 4 “, 6″, 7″, 9″, and 10″ along the long side. Then on the right short side, you will make a mark 1” down from the top. Then using a ruler and scissors or your Stampin’ Trimmer, you will cut a diagonal line from the 1″ down mark to the 3″ score line you created. Now you have your two pieces for the cards above!

It's My Party Drapery Fold, www.LaurasStampPad.com

Now you will fold the Designer Series Paper in a zigzag pattern so that you can see both sides of the paper. I placed this larger piece on a Melon Mambo card base. I added adhesive on the back and on a few of the folds. The top and left side are right to the edge of the card. I stamped the greeting from the Tin of Cards Stamp Set in Basic Black in the right corner. I added some Crushed Curry Baker’s Twine around the top and as the balloon strings. The balloons were punched out from the Balloon Bouquet Punch and I put them on with Stampin’ Dimensionals. I added the little white mark for a glossy look on the balloons with the Chalk Marker! I added a few of the It’s My Party Enamel Dots for a little POP!!

Balloon and Candles, www.LaurasStampPad.com

With the other piece that you cut off, you can create another fabulous card! I used a Mint Macaron card base for this one. When I punched out the balloons for the last card, I punched all three colors with both sizes of balloons. I used one big and two smalls for the Melon Mambo Card and I used the two big ones and one small for the Mint Macaron Card. I stamped the greeting from the Party Wishes Stamp Set in Basic Black and finished it off with a few It’s My Party Enamel Dots!

If you would like to see this technique in action, check out the Video Tutorial below or click here!! Be sure to give it a thumbs up if you liked it and be sure to subscribe so you don’t miss any future videos!

Happy Stampin’

~Laura


Technique Tuesday – Painting Roses!!!

Posted on

Happy Tuesday!!! That means I have a fabulous technique to share with you!! This one is super fun, simple, and mistakes are okay!!! How fabulous is that? Check out this beauty!!!

Painted Rose, www.LaurasStampPad.com

How lovely is that rose??? Of course I used the Rose Wonder Bundle from the Occasions Mini Catalog!!! I am loving that set. You can see more samples here and here and here! Let’s get started on the beauty!

SUPPLIES NEEDED: Rose Wonder Stamp Set, Rose Garden Framelits, Aqua Painter, Ink and Cardstock

Don’t forget that you can Bundle & Save 15% when you purchase the stamp set and framelits together! Trust me you totally want them! I am loving them! So I die-cut the large rose framelit with some cardboard/thick cardstock. I used the piece that comes in the Designer Series Paper Pack on the back. It is that thicker cardboard type stuff that holds the paper stiff. I ran that through the Big Shot a couple times to ensure a nice cut on this thicker material. Then I popped out all of the pieces with the Big Shot Die Brush. I then laid the die onto a piece of Whisper White measuring 3-3/4″ x 5″. You can lay it on there with parts falling off or with the entire piece. Either way it will look fabulous. You will need to pick a color for your rose and for the leaves. I used Daffodil Delight and Old Olive. Then using a Aqua Painter, pick up some color and then paint in the holes of the framelit. It doesn’t need to be delicate and perfect. It just a little swish swish over the top of the template and into the holes. Some might be dark and some might be light. Sometimes your Aqua Painter will slide under the template and sometimes the template might move on you a bit. It’s all good. It will still come out fabulous!!! Once you have done both colors, you can stamp your greeting in the corner. I used a greeting from the Rose Wonder Stamp Set. I stamped it in Old Olive. You might want to set it aside to dry a little before assembling. I layered mine onto a piece of Daffodil Delight measuring 4″ x 5-1/4″ and then Old Olive measuring 4-1/8″ x 5-3/8″. I placed it onto a card base of Whisper White. I really like how colorful and POPy all of those layers make it. I love it and think it would be fabulous in purple or orange or pink. Oh I’m getting excited for doing more. You could even cut Black and White layers and then make them any color. Oh the options! This card would be perfect for lots of occasions as well!

If you would like to see this in action, check out my Video Tutorial below or click here! Don’t forget to give it a thumbs up if you liked it and be sure to subscribe so you don’t miss future videos. I posted them every Tuesday and Thursday!!!

Happy Stampin’

~Laura


Technique Tuesday – Vine Cut Out!!!

Posted on

Happy Tuesday everyone! You all know what that means….I have a fabulous technique to share with you today!!! We are playing with the Botanical Bundle and creating a fabulous cut-out!!! Check this out!!!
Vine Pop Out, www.LaurasStampPad.com

Isn’t this card just beautiful??? I love it!!! I can not take credit for this idea though. I got it from another fabulous demonstrator – Wendy Weixler. Thanks Wendy for the amazing idea!!! Let’s get started!

For this card, I used all 3 products from the Botanical BundleBotanical Blooms Stamp Set, Botanical Garden Designer Series Paper, and Botanical Builder Framelits. I started with a piece of Whisper White cardstock measuring 4-1/4″ x 11″ and I folded it in half for my card base! I laid this piece of cardstock onto the Precision Base Plate on my Big Shot and placed the vine framelit from the Botanical Builder Set on the left hand side, solid leaves on the outside, and a little diagonal. You will want to place it falling off your cardstock in the top left corner near your fold. Run it through the Big Shot and there you have that fabulous vine cut-out. I love using the Big Shot Die Brush to pop out the cardstock from the Framelit and get rid of all of those little paper hairs. Now you can decorate as you wish. I used a piece of the Botanical Garden Designer Series Paper measuring 2″ x 5-1/2″. You can make your piece smaller or larger, just make sure it is enough to back the vine cut-out. This piece of DSP will go on the inside left of your card. On the front, I used the little flowers stamp and stamped all up and down the card in Blackberry Bliss. For the other flowers, I used the Botanical Builder Framelits and 3 shades of Purple – Blackberry Bliss, Perfect Plum, and Wisteria Wonder! I added some Crushed Curry Candy Dots to the center of the flowers for a little POP! The greeting is from the Botanicals For You Sale-A-Bration Stamp Set. I used my markers to only ink up the “You’re Awesome” and omit the “…because”. I love this card!!!

If you would like to see this in action, check out my Video Tutorial below or by clicking here! Don’t forget to give it a thumbs up if you liked it!! Also, be sure to subscribe so you don’t miss out on future videos. I post every Tuesday and Thursday!

Happy Stampin’

~Laura