Stampin’ Up really makes some amazing Designer Series Paper. It steals the show and makes simple cards like these stunning!!! The color combination in the Petals and Paisleys Designer Series Paper is making me work outside the box but I am loving it. I never cared for Delightful Dijon until now!
I started with a Mint Macaron card base. Then I layered some of the Petals & Paisleys Designer Series Paper (3-3/4″ x 5″) onto Delightful Dijon cardstock and added some Mint Macaron Ribbon from the Trio Pack. I just laid the ribbon across the front and secured the ends on the back side and adhered it to the card base. For the greeting, I die cut one of the labels from the Lots of Labels Framelits. I stamped the greeting from the Paisleys & Posies Stamp Set in Rich Razzleberry Ink. I thought it needed a little bit more so I stamped the leaf from the same set in Mint Macaron on the top and bottom! It is the perfect accent. I added the greeting to the card front with Stampin’ Dimensionals. Simple and fabulous!!!
I am loving this card and the super fun technique!!! I saw it at a Demonstrator Team Event and couldn’t wait to try it out! Thank you Kim Peck for sharing it with all of us! I was totally going for a winter snowy look here and love how it turned out. You could always do it larger and add a tree from Lovely As A Tree or another favorite set of yours!
I started with a piece of Whisper White (3-3/4″ x 5″) and masked off a rectangle. You can either cut out a rectangle from a piece of scrap paper like printer paper or this Post-It Note Tape which is super fun and easy. I tried to do it with Painter’s Tape and it was too sticky and ripped when I pulled it back off. You will want to use a thin mask and not cardboard because you will want the ink from the Sponge Brayer to go to the edge. Once you have your rectangle masked off, you will add Marina Mist to the entire section with a Sponge Brayer. Continue to roll over it until you get the shade that you would like. Remember that the harder you press, doesn’t mean the darker the color. Jut lightly roll over the ink pad and then over the cardstock and repeat as many times till you get the preferred color. Next, you will need to die cut the swirly image from the Swirly Scribbles Framelits. Place this over your rectangle and secure it on both ends so it won’t move on you while you are adding more ink. I rolled over this mask with Night of Navy Ink. Again, continue to go over the mask until you have the desired look. Once you are all done, you can take all of the masks off and decorate! You could do this same technique on a full piece of paper as a background as well…..so many possibilities!
For the decoration, I stamped the greeting in Night of Navy from the Flurry of Wishes Stamp Set. I also stamped the snowflakes in both Marina Mist and Night of Navy and punched them out with the coordinating Snow Flurry Punch. I punched another set of snowflakes in Silver Foil Paper and off-set them with the stamped snowflakes. I wrapped some Silver Metallic Thread around the masked background portion of the card for a little bit of texture and bling. Then I added the snowflakes to the card with Stampin’ Dimensionals. I layered this piece onto Night of Navy cardstock and then a card base of Marina Mist. This card is perfect for the Holidays and throughout the entire winter season! You could always change up the colors for lots of different looks!
If you would like to see this in action, check out the Video Tutorial below or click here. Don’t forget to give the video a thumbs up if you liked it and be sure to subscribe if you are new!
To see more masking techniques, check out this one here!
This card is super fabulous because I love the greeting. It is perfect for Thankgiving but for all year long as well. There is so much to be thankful for. I am so blessed each and every day. I just love it!!!
I started with a Very Vanilla card base. Then I took a piece of Mint Macaron measuring 4-1/8″ x 5-3/8″ and added a piece of the Petals & Paisleys Specialty Designer Series Paper (4″ x 4″) to the bottom portion. I love using my Designer Series Paper in sizes that are divisible by 12 so that I can use every inch of the 12″ x 12″ sheet with no leftovers. I stamped the greetings from the Paisleys & Posies Stamp Set onto a piece of Very Vanilla (5-1/4″ x 4″) in Cajun Craze Ink. I thought it needed a little bit more on the sides of the greeting so I took one of the leaves from the same set and stamped it in Mint Macaron Ink. I stamped once in full strength and then turned it a bit and stamped again for a lighter shade. I added this piece to the top of the Mint Macaron. You will have a little bit of overlap between the vanilla and the designer paper and that is where you will tie your ribbon. I used the Mint Macaron Ribbon from the coordinating Ribbon Trio Pack. Add this to the card base and then you are all done!!!
This is not a color combination I would normally think to use so I’m excited to stamp outside the box and try something new! I’m loving the Paisley Suite for the color combinations, the images, and the copper!!! 🙂 Stay tuned as I will be posting a lot more samples using these products!
Happy Stampin’
~Laura
Don’t forget about the Paper Pumpkin BOGO Sale for new subscribers!!! Click here to get started and be sure to enter the Promo Code: BOGO
The moment I saw the Stitched With Cheer Kit in the Holiday Mini Catalog I just knew I had to have it. I always love getting the kits to see what they are all about but this one had me really excited. I’m not the best as sewing as I tend to do it while watching TV and sometimes I miss a hole but it turned out amazing!!! I got this kit in my pre-order and did all of these cards while watching the Olympics last month!!! 🙂 The kit makes 18 cards – 6 each of the 3 designs.
This one is my favorite!!! I love the snowflake and it was pretty easy!!! You will stitch the star with the gold baker’s twine and stamp the greeting from the coordinating Stitched with Cheer Stamp Set in Basic Black Ink. The kit even comes with backs so you can attach them to the inside of the card and no one sees your stitching. I love that and even stamped a little inside greeting on that panel. I added the loops of Gold Metallic Thread (provided in the kit) to the back of the greeting and placed it on the card!!! Just wrap the thread around your fingers and then slide them off, twist in the middle and place on the back of your greeting and secure with Stampin’ Dimensionals like the photo below!
Yes I probably use way to many dimensionals but I love them and I always know where I can find more! 😉
This is my second favorite but the trees don’t look as cute flat so I just hope the people I send this card to pop those trees out for the full beauty!!! 🙂 TIP: Be sure to fold your trees in half before stitching them to the card. I didn’t fold the first set and pulling them forward didn’t work as well. I love the little pearls that add some texture and shine to this stunning card. Again, I used the greeting from the Stitched with Cheer Stamp Set.
Here is what the inside of the card looks like after the stitching is done. I used a little bit of Tear Tape to secure the ends of the thread. The kit comes with inserts to add to the inside of the card so that you can cover up your stitching! I love that they thought of everything for you! I also stamped a little greeting on the insert for a little decoration on the inside!!
Okay so you are all probably thinking I don’t like this one….that’s not completely true. I love the look. I love the stitched star and the holly…..but that greeting….oh my! Luckily they give you 8 banners to stamp in hopes to get 6 right. That was tough. I mean I consider myself a good stamper….until now! Lining it up was step 1 but then I kept getting ink on the banner ends that collected inside the banner so then I stamped lighter and it wasn’t stamped well. Oh I thought I was going to go insane. So I just have to say…..good luck! There is also a complete extra set of banners that you could always use instead too. See the “extras” photo at the bottom.
Here are some variations of the card that I did to cover some boo boos. For the middle card, I accidentally adhered the burlap to the bottom of the card…it was upside down when I did it. (I was watching the Olympics, remember.) 🙂 So for that one, I added one of my messed up stamped greetings and added the holly over the mistake. See you would have never known if I didn’t tell you!
And then we have all the leftovers. There are tons of holly leaves left and an entire sheet of labels. I thought about stamping the labels as gift tags and added some holly. Super cute, right??? These are also the banners that you could substitute for the card above if you have issues matching up the greeting as well! 🙂 I love it!!! Now I have 16 cards done already and they are super cute and fun! I love the coordinating envelopes with liners too! They just make me so happy!
To see all of the goodies in the kit, check out my Reveal of the Stitched With Cheer Kit below or click here! Don’t forget to give this video a thumbs up if you liked it and be sure to subscribe if you are new!
Do you like making your own Holiday cards or using a kit??? Let me know in the comments below!
Happy Monday everyone!!! Are you still in a Christmas coma with all the presents, food, family, and chaos?? Now that Christmas is over, it is time to get into that craft room and enjoy some time for you!!! I had leftover Designer Series Paper from the Holiday Mini Catalog and so I came up with a few simple cards to create for all occasion!!!
I used Melon Mambo for the card base – my favorite color! I added the pieces of gold and white Designer Series Paper from the Winter Wonderland Pack. I got out my ribbon scraps and some were long enough to tie a knot and the others were shorter so I just wrapped. I hid the ends under the greetings. For the greeting, I used the Blessed By God and Decorative Label Punch! I thought these would make great wedding or anniversary cards!!!
Merry Christmas Eve!!! I think this is probably the final Christmas Card I will post this year! I can’t believe all of the ideas I had this year and I am still sharing them up till the day before! Next week will be ways to use up your holiday-themed paper for all occasion cards! YEAH!
This card uses a Crumb Cake card base and I stamped the greeting from the Peaceful Pines on the bottom in Tip Top Taupe! Then taking a piece of Pool Party cardstock, I rounded the corners with the Corner Rounder Punch and brushed the edges with a Sponge Dauber to add a little color and dimension to the card! I added this piece to the card front with Stampin’ Dimensionals! I stamped the tree from the Peaceful Pines Stamp Set in Mossy Meadow onto Mossy Meadow cardstock and die cut it with the coordinating Perfect Pines Framelits! Bundle & Save 15%! After cutting out the tree, I used another framelit in the set to create that feathering. This is a super cool look and really gives the tree some life. I stamped the little pot in Tip Top Taupe onto Crumb Cake and used the framelits to cut it out as well! The little star was punched out with the Itty Bitty Accents star and some Gold Glimmer Paper! The tree and star are adhered on with Snail Adhesive but the pot is adhered with a Stampin’ Dimensional! This is a very simple tree card with a little bit of elegance! I love it!!!
You can see this Bundle in action on this Video Tutorial! Don’t forget that the Holiday Mini Catalog ends on January 4th and the Occasions Mini and Sale-A-Bration Promotion begins on January 5th!!! If you would like to see a Sneak Peak of one of the Kits in the Occasions Mini Catalog, check that out below or by clicking here! Don’t forget to Subscribe so you don’t miss any more revealing videos or techniques!
Here it is…finally! This is the Christmas Card that my Mom decided she wanted to do this year. It is almost exactly like the card featured in the Holiday Mini Catalog on page 11. When my Mom picked that as her card, I was blown away. She is usually a simple, rustic, forest/pinecone style look and this was not the card I thought she would pick. In fact, I saw the Wonderland Stamp Set and thought that has her written all over it. Instead, I was in love with that set as you can see here, here and here! So let’s get started on how we created this card!!!
I used a Crumb Cake card base and stamped the snow pieces from the Happy Scenes Stamp Set in Whisper White Craft Ink. I also used the coordinating Hearth & Home Framelits so you can Bundle and Save 15%! For the layers, I started with a piece of striped paper from the Home For Christmas Designer Series Paper. We stamped the tree and birdie scene in Chocolate Chip and then colored in the birdies with a Cherry Cobbler Marker. To add a little sparkle to the snow, I took some Dazzling Details and ran it along the ground! We cut out the window frame in Whisper White and the window box in Bermuda Bay. I added Stampin’ Dimensionals to the back of the window frame to add it to the scene so that it would have some dimension and look more like a window scene! We cut a Tea Lace Doily into 3 pieces so we could get the most out of them. Some of the pieces were longer and some were shorter but they all looked great! We adhered the doily to the window box and then to the window all with Snail Adhesive! I stamped the Noel greeting from the Happy Scenes Stamp Set in Cherry Cobbler onto scrap pieces of Whisper White! Then we punched it out with the Word Window Punch and cut off one end! This is your chance to use those really little scraps that you have been saving! 🙂 Then we punched a hole with the 1/8″ Handheld Circle Punch and added some Gold Cord Trim into a bow. We added the greeting with Stampin’ Dimensionals and that’s it!!!
This was the most detailed card I created all season I think! She loved it and we had a wonderful putting it together so that’s all that matters!!! My heart is full! 🙂
The Hearth and Home Framelits will be in the Occasions Mini Catalog as well! Woot Woot! The Occasions Mini begins on January 5th as well as Sale-A-Bration!
Happy Tuesday, everyone! That means I have a fabulous technique to share with you today! It is super cute and fun to make for all occasions. I honestly think it is one of my favorite boxes to make!
There is a little box inside that adorable decoration and you don’t have to ruin it in order to get the goodies inside!!! Let’s get started so you can see the inside!!!!
First you will start with a piece of cardstock color of your choice measuring 4″ x 11″. You can get 2 boxes out of one sheet of cardstock! I used the Simply Score Tool for the next few steps! Along the 11″ side, you will score at 3-1/2″, 5-1/4″, 8-3/4″, and 10-1/2″. You will also want to make a little mark with your stylus, bone folder, or a pencil at 4-3/8″ and 9-5/8″. These will be the marks that you will use to line up your ruler and make a diagonal score line. Turn your cardstock 90 degrees to the 4″ side and score at 2-3/4″. Now you will need a ruler or straight edge and score from your mark that you created to the 2-3/4″ score line. This triangle that you are creating is for the sides of the box to pop in so it fits in the Designer Series Paper Tent.
Now you will fold on all of your score lines. Be sure to fold your triangle opposite of the way you are folding the sides. You can see in the photo below that the triangles pop up/in while the sides are folded the other way. Once it is all scored, you will cut off the little tab on the bottom left side. You will also cut up to the score line on each of the tabs along the bottom. These tabs will fold in to create the bottom!
Apply Fast Fuse Adhesive along the left side tab to create your box. The best way to get your box to line up correctly is to lay it flat and allow the adhesive to grab ahold of the inside. When you try to line it up in your hand, it can sometimes stick before you are ready and be unforgiving. For the bottom, you will place the side tabs in first, then one of the long tabs. Place some Fast Fuse along the final long tab and seal it shut!
Once it is all together. It should look like this!!!
I was able to put like 5 mini candy bars in there or lots of mint. It would be perfect for jewelry, sweets, a giftcard, and much more. Now for the outside decoration, you will need a piece of Designer Series Paper measuring 3-1/2″ x 8″. I didn’t actually score this piece of paper. I just place one end in the middle of the bottom and wrapped it around the box lightly. Then I took it back off and folded stronger on those wrapped folds. This makes for a good fit on each one individually. I used Fast Fuse to adhere the bottom together and then you will slip the box inside the tent!
This box is my favorite I think! I love the shiny Gold! I used Gold Foil Paper on this one!
You can always go simple with a To:/From: for all of those special people in your lives!
I got this idea from Sam Donald (Aka Pootles) and she created a Video Tutorial so you can check out her’s here! Since I didn’t do a video on this box, I thought I would share with you a video on the Stampin’ Trimmer! This is such a handy tool that is always used for all of my projects but always behind the scenes. I thought I would bring it out and show you all of the benefits and features of this amazing product! Check that out here! Don’t forget to give it a thumbs up if you liked it!
Happy Monday everyone! This week is Christmas so I’m sure many of you are scrambling to get those cookies made, presents wrapped, groceries bought, and everything else. I just wanted to say May Your Days Be Merry through it all! Stop and take a deep breath and enjoy the site of your tree lights glistening. Enjoy the sounds of laughter from your children or those at a party! Try to enjoy the little things this week!!!
Today I’m sharing with you a quick and simple card that uses up a few scraps that I had laying around! I used a Whisper White card base measuring 4-1/4″ x 11″. When I am using ribbon, I liked this size/style because it uses less ribbon around than a 5-1/2″ x 8-1/2″ style. I had some strips of Silver Foil Paper left over so I added a strip of that. It can be 2″ wide or a 1/2″ wide, whichever you prefer or whichever you have scraps of! Then I took a piece of the Winter Wonderland Designer Series Paper which was also leftover. If you are cutting your Designer Series Paper into 4″ x 5-1/4″ which is the perfect layering size for a card front then you have a strip leftover that is 1-1/2″ x 4″. That is perfect for a card like this! I tried the Real Red Cotton Ribbon around the card right over the overlap of the two stripes of paper! For the greeting, I stamped it in Real Red on some scrap white with the Berry Merry Stamp Set! I punched it out with the 2″ Circle Punch and brushed the edges with a Sponge Dauber for a pop of color! I added the greeting to the card with Stampin’ Dimensionals and finished it off with a few Rhinestones! Everything needs a little bling! 🙂
I had some leftover pieces for this card but didn’t need any more holiday cards. Switch up the greeting and it makes a fabulous Birthday card! I love that!!!
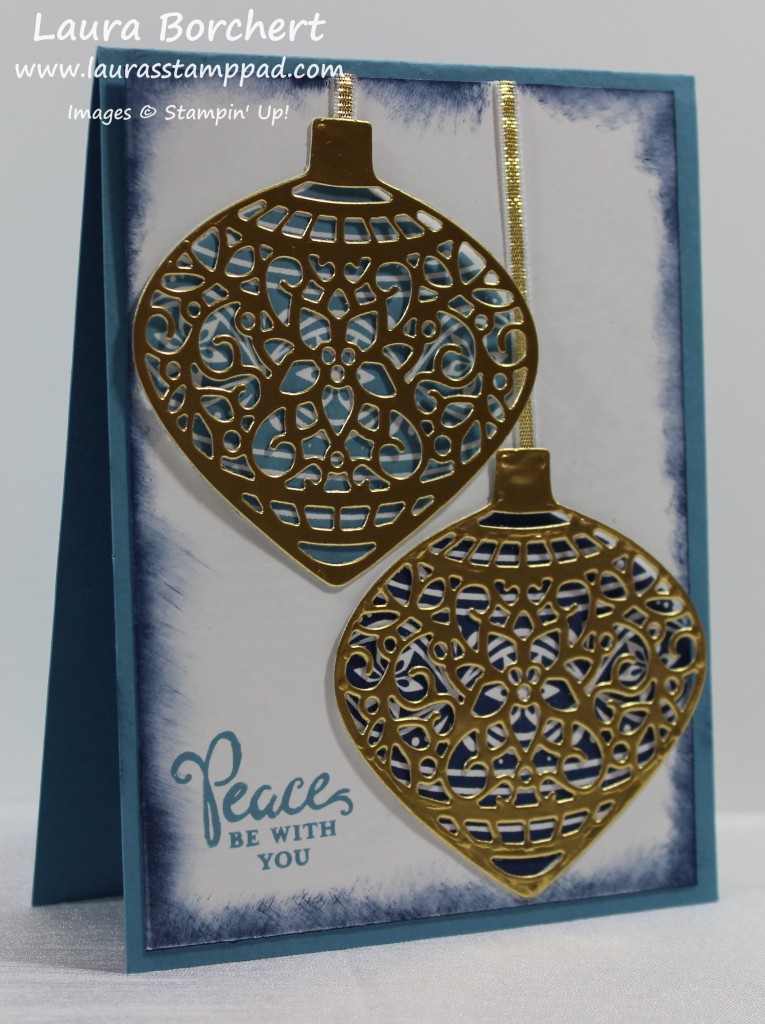
Shades of blue with some gold shine…….AMAZING!!!! I love this card and don’t know why I didn’t share it with you much sooner! Are you all done with your Christmas Cards? Do you have them sent out yet? Let me know in the comments below! I will be honest and say mine are complete, sent out and my stamp room is ready for Spring!!! I have all of the new Occasions Mini and Sale-A-Bration items all over and I can’t wait to share it with you! You can check out my Haul of Products here! Okay but back to this gorgeous card!
I started with a Marina Mist card base measuring 4-1/4″ x 11″. I really like this size/style of card. I stamped the greeting in the corner of the Whisper White (4″ x 5-1/4″) in Marina Mist. The greeting and the ornaments are all from the Embellished Ornaments Stamp Set in the Holiday Mini Catalog. You will also need the Delicate Ornament Thinlits for the gold overlay. You can Bundle and Save 15% when you purchase them together! When you stamp the ornaments on the Whisper White be sure bottom one is super close to the right side and bottom and not on your greeting. For the upper ornament, be sure it is close to the top but still room for your ribbon to hang and super close to the left hand side. Don’t worry if it doesn’t come out perfect…..made with love, not perfection! Also, it took me 3 times to get it placed correctly! 🙂 I stamped one ornament in Marina Mist and one in Night of Navy! I also brushed the edges of the cardstock in Night of Navy with a Sponge Dauber! Using Gold Foil Paper, I cut out two of the delicate ornament overlays.
TIPS: Run it through the Big Shot 2-3 times before taking it out. This will make sure it hit every nook of that piece of paper. When you use the Precision Plate, you won’t have any of those little holes pressed into your image. The upper ornament looks pretty clean, but on the lower ornament cap at the top, you can see little pressed dots from the die. That one I didn’t use the Precision Plate! I adhered the little piece of Gold Ribbon to that top cap section with Snail Adhesive and then placed a few Mini Glue Dots on the ornament in the larger sections. You could also use the Fine Tip Glue Pen! Then I placed it over the top of the stamped ornament and wrapped the end of the ribbon over the edge of the Whisper White cardstock. Now you can adhere your Whisper White to your card front and you are all done!!! It is a little bit more intricate and takes a little longer than some of the other Holiday cards I have created but it sure is stunning!
Happy Stampin’
~Laura
Don’t forget about the Year End Sale!!! Click here to check it out!
 Stampin’ Up really makes some amazing Designer Series Paper. It steals the show and makes simple cards like these stunning!!! The color combination in the Petals and Paisleys Designer Series Paper is making me work outside the box but I am loving it. I never cared for Delightful Dijon until now!