Freaky Friday!!!

Posted on

Freaky Friday, www.LaurasStampPad.com

Stampin’ Up! Designer Series Paper is so beautiful and does all of the work making simple cards like this one so easy!!! This is the Halloween Night Specialty Designer Series Paper which has great pieces for Halloween and other patterns to use for any occasion. You can check out more samples I did using of this paper here!

I took a piece of Whisper White cardstock to create a card base. Then I took the piece of Halloween Night Designer Series Paper that has the rows of houses on it and cut it into strips based on the pattern. I just cut each of the rows out and then cut those strips into 5-1/2″ long pieces to fit on my card front. I ripped a strip of Pumpkin Pie cardstock and adhered it to the top of the Designer Paper and added it to the card front. You don’t need a complete piece of Pumpkin Pie to cover the entire back since it would be covered by the beautiful Designer Paper so use up those small scraps we all keep for that one project…..THIS ONE!!! For the greeting, I stamped it in Pumpkin Pie from the Teeny Tiny Wishes Stamp Set and then punched it out with the Classic Label Punch. I layered that onto a Basic Black Decorative Label Punch. I added the greeting to the card front with Stampin’ Dimensionals! 🙂 Of course!

spooky-houses, www.LaurasStampPad.com

Then I thought it needed just a little something else….Rhinestones!!! What do you think??? With Rhinestones or not? Let me know in the comments below!!!

If you love Designer Paper as much as me, now is the time to stock up with the Stampin’ Up! Buy 3, Get 1 Free Special this month!!! Click here to start shopping!!!

dsp-special, www.LaurasStampPad.com

Happy Stampin’

~Laura

Seasonal Offer, www.LaurasStampPad.com

Check out this fabulous offer for the Holiday Season!!!


All Things Candy Cane Lane!!!

Posted on

Candy Cane Lane, www.LaurasStampPad.com

Look at these adorable cards!!! Can you tell the difference between the 2??? Let me know in the comments below if you found it before reading on!!!

I started with a Whisper White card base. Then I took a piece of the Candy Cane Lane Designer Series Paper (3-3/4″ x 5″) and layered it onto Real Red cardstock (4″ x 5-1/4″). Now for the fun part….adding ribbon! For the card on the left side, I added some White Organza Ribbon and tied it into a knot. Then I had this fabulous idea to add some of the Candy Cane Lane Designer Washi Tape down the center of the ribbon.

Peppermint Washi Tape Ribbon, www.LaurasStampPad.com

It totally fits and looks amazing as you can see in the card on the right. How fabulous is that?!?! It really wasn’t that difficult to tie but it is a smidge chunkier of a knot! Just be sure to press it down well and I think you will be fine for mailing it out. For the greeting, I used the 2″ Circle Punch and 1-3/4″ Circle Punch. I stamped the greeting from the Candy Cane Christmas Stamp Set in Real Red and Crumb Cake Ink. I layered the punches and added them to the card with Stampin’ Dimensionals!!!

washi-tape-ribbon, www.LaurasStampPad.com

These samples are quick, simple and yet super fabulous! I am in love with the Candy Cane Lane Suite from the Holiday Mini Catalog! Do you love it too??? If you would like to see lots of the products from the suite and samples using the product, check out the Video Tutorial below or click here!!! Be sure to give it a thumbs up if you liked it and don’t forget to subscribe if you are new!

Happy Stampin’

~Laura

sharable8_b3g1dsp_naspuk

Purchase the Candy Cane Lane Designer Series Paper as part of the Buy 3, Get 1 Free October Special!!! Click here to get started!


Razzle Dazzle!!!

Posted on

Copper Designer Paper, www.LaurasStampPad.com

This color combination is AMAZING!!!!! Oh my goodness, the Paisley Suite is bringing out a whole new Laura and I am loving. The colors in this suite are ones I don’t like and ones I would never think to put together but they are just stunning!!! Here are a few other samples using this suite, check them out here, here, and here!

For this card, I started with a Rich Razzleberry card base. I cut a piece of Very Vanilla (4″ x 5-1/4″) and Petals & Paisley’s Specialty Designer Series Paper (1-1/2″ x 5-1/4″). I stamped the images from the Paisleys & Posies Stamp Set. The greeting was stamped in Night of Navy and the flowers in Rich Razzleberry. I added the designer paper to the top of the vanilla and added the Rich Razzleberry Ribbon along the line of the 2 papers. I added this to the card base and thought it needed a little bit more. Enamel Shapes are the perfect little accents and pops of color to finish off a card. I love it! These colors are so rich and beautiful!!!

Do you like the Paisley Suite from the Holiday Mini Catalog as much as me?? What is your favorite suite? Let me know in the comments below!!!

Happy Stampin’

~Laura

Don’t forget to stock up on Designer Series Paper this month with the Buy 3, Get 1 Free Special!!! Click here to start shopping!

dsp-special, www.LaurasStampPad.com


Cut For Christmas!!!

Posted on

I’m soooo excited to share with you this fabulous new seasonal offer – Cut For Christmas!!! We all know that this time of year can be busy as can be but yet we still want to get crafty, send out cards, and enjoy some “me time.” I am offering 6 different kits that you can purchase to speed all of that up!!!

Cut For Christmas, www.LaurasStampPad.com

Seasonal Offer, www.LaurasStampPad.com

I do all of the cutting and all you need to do is fold, stamp, and assemble! This is a great way to get those cards done quickly during such a busy time of the year! All cards will be sold in increments of 20. The packet will include all of the pre-cut pieces you will need for the card, envelopes, a color photo, and instructions. You will need the stamps, ink, clear blocks, and adhesive.

For all the details for each kit, click here – Cut For Christmas!

How To Order!

To place an order, message me the following information:

Name, Address, Email Address to send Invoice, Card Style Name & Number, Number of Cards Desired (in increments of 20)

If you would like to purchase the additional items (stamps, ink, and adhesive) needed for the cards, list the additional items you would like to order.

~Shipping is flat rate of $6.95, if ordering more than 100, it is $8.95

~All payments will be done through PayPal. Once the order is placed, I will send an invoice.

I can’t wait to help others with their Holiday crafts!!! 🙂

Happy Stampin’

~Laura


Technique Tuesday – Creating a Snowy Scene!!!

Posted on

Happy Tuesday everyone!!! That means I have a fabulous technique to share with you all!!! DISCLAIMER: I don’t mind stamping/creating a snowy scene but let’s not make it happen in real life for a few months….or never would be fine! 🙂

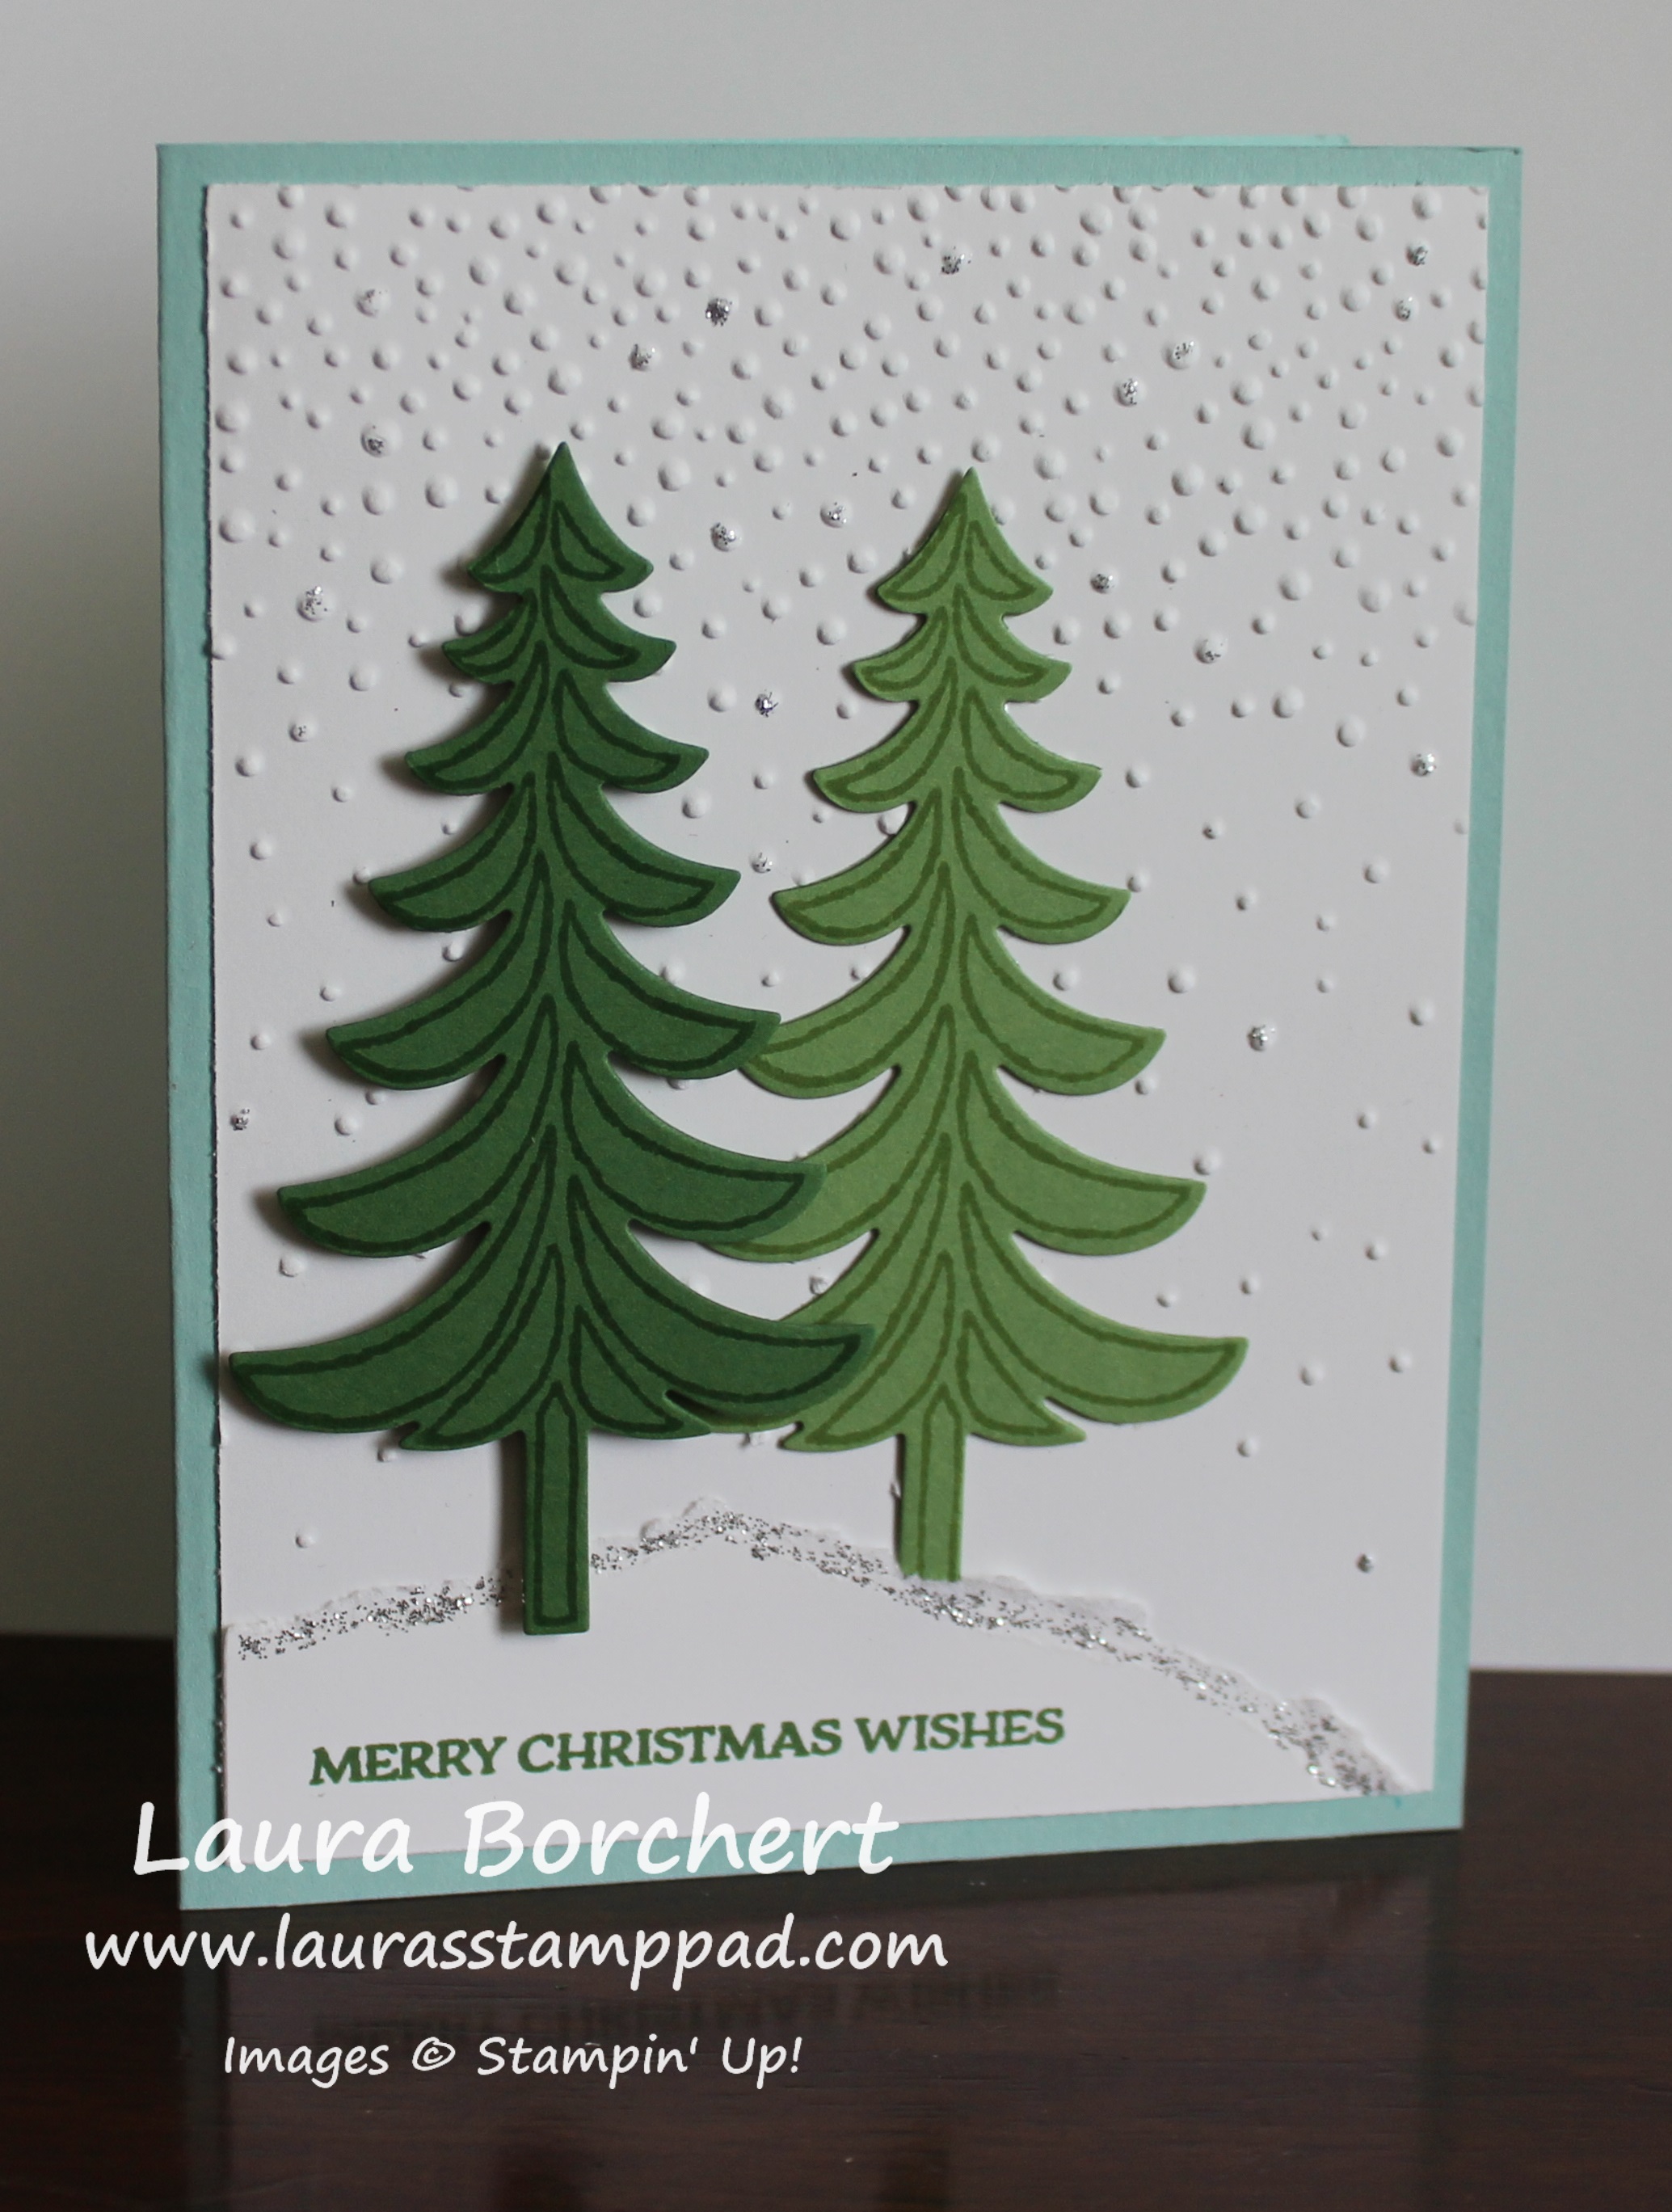
Evergreen Trees in Snow, www.LaurasStampPad.comI just love this card for the simple trees, the textured background, and the pop of glittery snow!!!! This card is perfect for Christmas but also for any winter occasion as well. Also, I would say it is fairly simple although it does need some drying time for the glitter! Let’s get started!!!

I started with a Pool Party card base and then took a piece of Whisper White (4″ x 5-1/4″) and ran it through the Big Shot in the Softly Falling Embossing Folder. There are technically 2 ways you could do this card – concentration of dots on the top or on the bottom. I did mine with the majority of the dots at the top but I also put the cardstock in the folder closest to the fewer dots end. I wanted that gradual look a lot more but you could do it any way you wish!!! I added this piece to the card base! For the trees, I stamped them from the Santa’s Sleigh Stamp Set in Garden Green and Wild Wasabi onto the same cardstock color. Then I used the coordinating Santa’s Sleigh Thinlits (Bundle & Save 10%) to die cut them out! I added the wasabi tree to the card with Snail Adhesive and I added the garden green one with Stampin’ Dimensionals. Before you place your trees down, we need to make the snow. Take a piece of scrap white cardstock and rip it across the top. You can rip it all bumpy or angled down or just straight across. That is all up to you or just how the paper rips! 🙂 Place this piece onto your card front so you know where to place the wasabi tree. Then stamp the greeting from the Santa’s Sleigh Stamp Set in Garden Green Ink and adhere it to the bottom of your white embossed piece. Now you can place the Garden Green tree on top. I like using the dimensionals to over course give dimension but to also make it look like one tree is set back and the other one is closer. To finish it off and add a little bling, I used Silver Dazzling Details along the top of the ripped cardstock (snow hill) and a few random dots of the embossing. I thought it added a little shine and made the snow look more…..real? Come on your all know how snow can look glittery, right??? I love it!!!

If you would like to see this all in action, check out my Video Tutorial below or click here! Be sure to give it a thumbs up if you liked it and don’t forget to subscribe if you are new! I posted videos every Tuesday and Thursday and sometimes here and there in between! Also, if you have something you would like me to showcase, do a tutorial, or chat about let me know in the comments below! I would love your feedback!!!

Happy Stampin’

~Laura

DSP Sale, www.LaurasStampPad.com

Click here to stock up!!!


Technique Tuesday – Fall Sunrise!!!

Posted on

Happy Tuesday!!! I hope you are all having a wonderful week so far! Today I’m going to brighten it with a fabulous sunrise! Check out this beautiful card!!!

fall-sunrise, www.LaurasStampPad.com

This card gives me all the feels – cool crisp air, dew on the grass, beautiful leaves in every color, cuddling up in a hoodie, and pumpkin pie everything!!! 🙂 Hopefully you too! Let’s get started!

I started with a Crumb Cake card base and layered on a piece of Cajun Craze (5-1/2″ x 2″). The Petals & Paisley Designer Series Paper has the perfect fall colors and patterns for any project! I layered a piece of that over the Cajun Craze. It measures 5-1/4″ x 1-3/4″). I stamped the greeting from the Garden in Bloom Stamp Set in the upper left corner in Chocolate Chip Ink. Now it is time to work on the focal point. I took a piece of Very Vanilla cardstock (2-1/4″ x 3″) and started by stamping the grass along the bottom. I used the Totally Trees Stamp Set from the Holiday Mini Catalog. The long snake like image was inked in Garden Green, stamped off once and stamped on the bottom of the vanilla cardstock. I did it three times. Then I took the small circle and the sun rays and stamped them in Crushed Curry. Make sure to place a little piece of paper along the green grass to mask the bottom of the circle so it doesn’t stamp onto the grass and instead look like it’s coming up over the horizon. For the tree, I stamped it in Chocolate Chip Ink. Then I took the leaves and stamped them once in Crushed Curry and then again a little off set in Cajun Craze. You could also ink up the leaves in Crushed Curry and then use a Sponge Dauber to add a little Cajun Craze in a few spots. This gives that beautiful array of fall colors to the leaves! I layered this piece onto Garden Green cardstock (2-1/2″ x 3-1/4″) and added it to the card front with Stampin’ Dimensionals. Isn’t it stunning for all of your fall occasions!?!?!

If you would like to see this all in action, check out the Video Tutorial below or click here! Be sure to give it a thumbs up if you liked it and don’t forget to subscribe if you are new! The Totally Trees Stamp Set is lots of fun for all seasons and occasions but also you can use the images to create fun backgrounds!

Happy Stampin’

~Laura


Part 2: Double Z Fold Frenzy

Posted on

Yesterday I posted the fabulous Fall Single Z Fold Card and today I am going to show you a Double Z Fold Card!!! I just love the pop out piece and the Candy Cane Suite with the little Gingerbread Men!!! LOVE IT!!!

Double Z Fold Card, www.LaurasStampPad.com

Isn’t it precious??? I love love love this card!!! Also, my sample has the blank white rectangle but during Club the ladies stamped the greeting from the Cookie-Cutter Christmas Stamp Set “Warm Heartfelt Greetings For a Very Merry Christmas” and it fits perfectly. Precious!!!! Now let’s get started!!!

So this card starts off the same as the Single Z Fold from yesterday. Start with a Real Red card base measuring 11″ x 4-1/4″ and scored it at 2-3/4″ and 5-1/2″. These are the measurements of folding the card base in half for a normal card and then folding the front of the card back (in half) to create the “Z”. Now it is time to decorate. The front panel has a Whisper White layer measuring 2-5/8″ x 4-1/8″ and I added some of the Candy Cane Lane Designer Washi Tape to the top and bottom. The greeting is from the Candy Cane Christmas Stamp Set and I stamped it in Crumb Cake Ink towards the top so it wouldn’t be covered up by the second Z fold. Adhere this piece to the front panel. On the inside, I layered some of the Candy Cane Lane Designer Series Paper (4″ x 5-1/4″) onto Whisper White (4-1/8″ x 5-3/8″) and adhered it down.

Candy Cane Lane, www.LaurasStampPad.com

Now it is time for the second Z. All you need to do is take a strip of cardstock, score it the same as above and add it to your card opposite folds as the base. I used Real Red cardstock measuring 11″ x 1-1/4″ (you can go as wide as you wish) and scored it at 2-3/4″ and 5-1/2″. Fold it like a Z and the long panel will go across the front (sticking to the left side) and the short panel will adhere to the back right hand side. I added some of the Candy Cane Lane Washi Tape down the center of the strip and added a little white rectangle on the end which you can stamp on or leave blank to write on it. The little gingerbread men were stamped from the Cookie-Cutter Christmas Stamp Set and punched with the coordinating Cookie-Cutter Builder Punch (Bundle & Save 10%). Be sure that when you adhere them to your strip, you only add adhesive in the middle of his body. Otherwise you will have them stick to the back of you card and it won’t open. For the little red hearts, you can either use Enamel Shapes or you can punch out a red heart with the Cookie-Cutter Builder Punch. So precious!!!

Gingerbread Men, www.LaurasStampPad.com

You can check out the Video Tutorial that went up yesterday with the Single Z Fold by clicking here!!! Let me know in the comments which one you like more – the Single or the Double? The Fall or the Christmas? I would love to hear from you!!!

Happy Stampin’

~Laura

Don’t forget about the Paper Pumpkin BOGO Sale for new subscribers!!! Click here to get started and be sure to enter the Promo Code: BOGO  Offer ends on October 10th!

PP_BOGO_Facebook_US, www.LaurasStampPad.com


Technique Tuesday – Z Fold Frenzy!!!

Posted on

Happy Tuesday!!! Can you believe it? The last Tuesday of September is here already but that also means I have a fabulous technique to share with you today. This one is super fun with a very high wow factor and it is super simple!!! Today I am showing the simple Z Fold Card and tomorrow I will be showing the Double Z fold card!!!

Single Z Fold, www.LaurasStampPad.com

Perfect for Fall and super fun!!! Let’s get started!

I started with a Crumb Cake card base measuring 11″ x 4-1/4″ and scored it at 2-3/4″ and 5-1/2″. These are the measurements of folding the card base in half for a normal card and then folding the front of the card back (in half) to create the “Z”. Now it is time to decorate. The front panel has a layer of Cajun Craze cardstock measuring 2-1/2″ x 4″ and Very Vanilla measuring 2-1/4″ x 3-3/4″.

Totally Trees, www.LaurasStampPad.com

The inside panel has a layer of Cajun Craze cardstock measuring 5-1/4″ x 4″ and Very Vanilla measuring 5″ x 3-3/4″. I stamped with the Totally Tree Stamp Set from the Holiday Mini Catalog. For the grass, I stamped the snake looking image in Garden Green (stamped off once) and went 3 layers high. For the inside panel, you will need to stamp the majority on the left and then just fill in on the right. Overlapping is fine because it just adds more color variation. Once you have your base green, take the grass stamp and stamp in full strength Garden Green Ink all over to fill in. This gives great texture to the yard. I stamped the trees in Crumb Cake Ink. Then for the leaves, I took the full tree leaf image and inked it up in Delightful Dijon and then pounced on the stamp with a Cajun Craze Sponge Dauber. Just pounce in 3-4 spots on the stamp and then stamp it down over the trees. This will give that variation of color for the leaves without having to stamp a few times. After stamping the base leaves, I took the small 4 leaf stamp and added in leaves falling and on the ground in Delightful Dijon, Cajun Craze, and Cherry Cobbler. The greeting is from the Tin of Cards Stamp Set and I stamped it in Delightful Dijon Ink. Now you have a fabulous fall card for any occasion!

Fall Leaves, www.LaurasStampPad.com

If you would like to see the Z Fold and Double Z Fold in action, check out the Video Tutorial below or click here. Don’t forget to give it a thumbs up if you liked it and be sure to subscribe if you are new. Subscribe to my blog here as well so you don’t miss the Double Z Fold card tomorrow!

Happy Stampin’

~Laura


Perfect Paisleys!!!

Posted on

Paisleys & Petals, www.LaurasStampPad.com

I just couldn’t help myself with this card! You all know I love Melon Mambo and Bermuda Bay and now the new Paisleys & Posies Stamp Set from the Holiday Mini Catalog. I love how you can use this stamp set with dark rustic colors for a fall look, bright colors for fun and flirty look, and subtles for a spring or baby look! Paisley print is so in right now and there are endless ways to use it!

I started with a Melon Mambo card base. Then I took a piece of Whisper White measuring 3-3/4″ x 5″ and placed it onto my work surface. I placed a strip of Post-It Note Tape 1/4″ from the left side edge and about an 1″ to an 1-1/2″ from that strip. This tape is perfect for masking because it is lightly sticky and it is thin. You could always use a piece of scrap paper but be sure to secure your cardstock and the mask down so they don’t move on your while you are stamping. Then I stamped in this open space with the Paisleys & Posies Stamp Set. I did 3 images in Melon Mambo Ink and 3 images in Bermuda Bay Ink. Be sure to start with your larger images first and then fill in with the smaller ones. Make sure that you are stamping over onto you mask because you want the pattern to look like it continues on. Once you are all done, you can remove your mask and finish the card. I stamped the greeting from the Tin of Cards Stamp Set. Also, I added a little circle in the lower right corner and placed an Enamel Shape in the middle of it. I love that little pop!!!! I wrapped some Bermuda Bay Stitched Ribbon around the cardstock and tied it into a knot. Now it is time to assemble. I added this layer to some Bermuda Bay cardstock and then to the card front!

I have been having lots of fun with masking and with the Paisleys Suite! Check out more samples here, here, and here!

Happy Stampin’

~Laura

Don’t forget about the Paper Pumpkin BOGO Sale for new subscribers!!! Click here to get started and be sure to enter the Promo Code: BOGO

PP_BOGO_Facebook_US, www.LaurasStampPad.com


Copper Craziness!!!

Posted on

Copper Foil, www.LaurasStampPad.com

Okay so when I first saw the Copper, I thought well that’s nice and I might start using it. Now that I have started using it, I’m in LOVE!!! It is like the perfect shade for anything! It isn’t yellowy like gold and it isn’t white like silver, it’s Copper! It looks amazing with the Regals Collection or typical fall colors. I say typical because lets be honest, any color can be used for any occasion or season.

For this card, I started with a Very Vanilla card base. I added a piece of Night of Navy cardstock (4″ x 5-1/4″) to the front. Then I took some Copper Foil Paper and die cut the floral images from the Paisley Framelits. I added each of them to the card front with the Fine Tip Glue Pen. This is the best adhesive because of the super fine tip and clear glue. I love it. For the greeting, I stamped it from the Number of Years Stamp Set in Night of Navy Ink onto Very Vanilla cardstock. I layered the greeting onto some more Copper Foil and added it to the card front with Stampin’ Dimensionals for a little texture and depth! Simple and yet fabulous! You could use this style for any occasion!

If you would like to see more samples using the Paisleys Suite, check out the samples here, here, and here!

Do you love Copper, Silver, or Gold? Or all 3? Let me know in the comments below! I have always been a silver girl and still wear silver jewelry but I have been crafting a lot with gold because it’s so “in”. Now we have copper so that might be my new favorite!

Happy Stampin’

~Laura

Don’t forget about the Paper Pumpkin BOGO Sale for new subscribers!!! Click here to get started and be sure to enter the Promo Code: BOGO  Offer ends on October 10th!

PP_BOGO_Facebook_US, www.LaurasStampPad.com