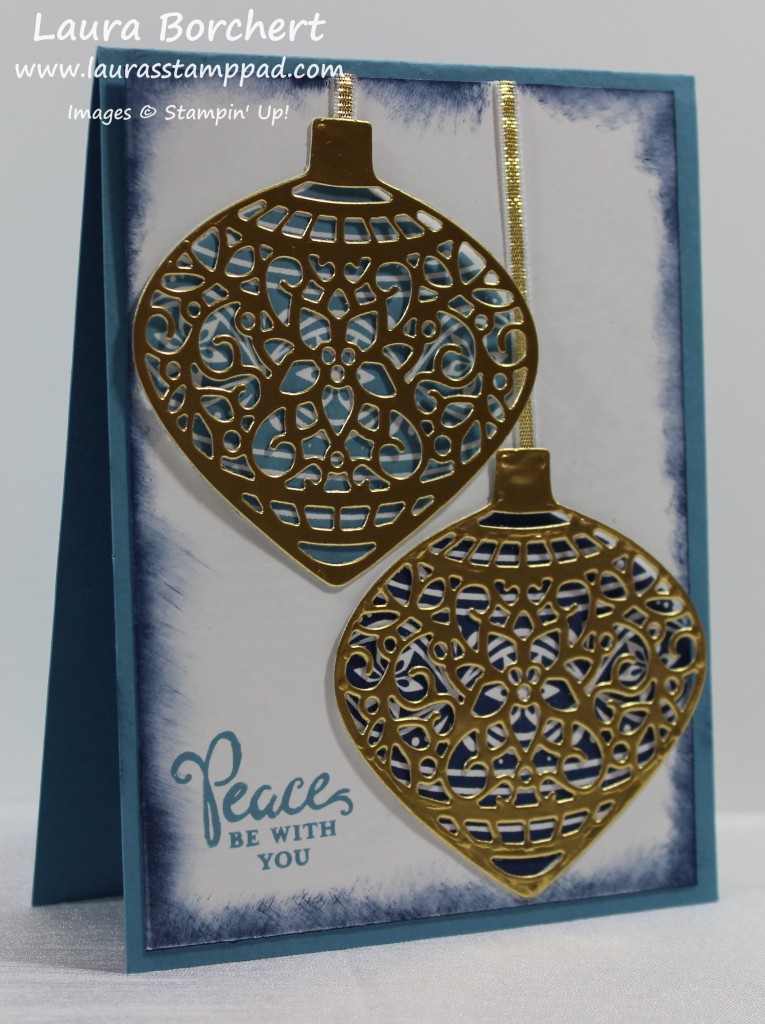
Shades of blue with some gold shine…….AMAZING!!!! I love this card and don’t know why I didn’t share it with you much sooner! Are you all done with your Christmas Cards? Do you have them sent out yet? Let me know in the comments below! I will be honest and say mine are complete, sent out and my stamp room is ready for Spring!!! I have all of the new Occasions Mini and Sale-A-Bration items all over and I can’t wait to share it with you! You can check out my Haul of Products here! Okay but back to this gorgeous card!
I started with a Marina Mist card base measuring 4-1/4″ x 11″. I really like this size/style of card. I stamped the greeting in the corner of the Whisper White (4″ x 5-1/4″) in Marina Mist. The greeting and the ornaments are all from the Embellished Ornaments Stamp Set in the Holiday Mini Catalog. You will also need the Delicate Ornament Thinlits for the gold overlay. You can Bundle and Save 15% when you purchase them together! When you stamp the ornaments on the Whisper White be sure bottom one is super close to the right side and bottom and not on your greeting. For the upper ornament, be sure it is close to the top but still room for your ribbon to hang and super close to the left hand side. Don’t worry if it doesn’t come out perfect…..made with love, not perfection! Also, it took me 3 times to get it placed correctly! 🙂 I stamped one ornament in Marina Mist and one in Night of Navy! I also brushed the edges of the cardstock in Night of Navy with a Sponge Dauber! Using Gold Foil Paper, I cut out two of the delicate ornament overlays.

TIPS: Run it through the Big Shot 2-3 times before taking it out. This will make sure it hit every nook of that piece of paper. When you use the Precision Plate, you won’t have any of those little holes pressed into your image. The upper ornament looks pretty clean, but on the lower ornament cap at the top, you can see little pressed dots from the die. That one I didn’t use the Precision Plate! I adhered the little piece of Gold Ribbon to that top cap section with Snail Adhesive and then placed a few Mini Glue Dots on the ornament in the larger sections. You could also use the Fine Tip Glue Pen! Then I placed it over the top of the stamped ornament and wrapped the end of the ribbon over the edge of the Whisper White cardstock. Now you can adhere your Whisper White to your card front and you are all done!!! It is a little bit more intricate and takes a little longer than some of the other Holiday cards I have created but it sure is stunning!
Happy Stampin’
~Laura
Don’t forget about the Year End Sale!!! Click here to check it out!

I love the large gold ornaments! So pretty. I ended up taking a year off from making my cards this year and bought some but I will probably make some for my boys and husband. I do enjoy cardmaking but found making 50 to be quite overwhelming this year.
It can be rather overwhelming! I always try to start early and work it in! 🙂 ~Laura