Happy Thursday! This week is flying by it seems. Today I’m sharing with you my ribbon storage. I recently changed it up to this style and I love it!!!
I have all of my ribbons in one of these little show box plastic containers. The awesome thing about these is that they are cheap. I can typically get them from $89-$1.00. They can be found at a big box store (Wal-Mart, Target, etc.) so they are easy to find! They hold a decent amount of spools in each container and stack well. One of the things I love the most is that they are clear on the bottom!
I can flip it over and look to see if I have a specific ribbon or to see which container it is in. They are fairly tight in there so it’s not like shaking it around will make a mess. (PS: It’s already a mess. I do have pins to put in the ribbon to keep them neat but I don’t always put them on there and sometimes the hole it creates makes it not worth the neatness.)
I have a little label on each of my containers so I know what is inside each…..not that I can’t tell. The labels are just so pretty though! My other container has baggies of the threads and baker’s twines as well. These containers fit so much stuff! I LOVE THEM!!!
If you would like to see this all in action, check out the Video Tutorial below or click here! Be sure to give the video a thumbs up if you liked it and don’t forget to subscribe if you are new. If you would like a notification when I post a new video, be sure to click the bell right next to the subscribe!!! Let me know if you have any tip and tricks to share in the comments below!
Happy Stampin’
~Laura
Don’t forget Stampin’ Up! Gift Certificates make great gifts…..even last minute!!! Click here to reach out and get a gift certificate!
Happy Wednesday!!! Here in Illinois you never know what the temperature is going to be for Christmas….it could be cold or warm. Either way this card makes it cozy with the warmth of Christmas!!!
I started with a Night of Navy card base. Then I cut to pieces of Whisper White measuring 4″ x 5-1/4″ (one for the inside and one for the outside). Next, I stamped the larger snowflake from the Snowflake Sentiments Stamp Set in Night of Navy Ink on the corners. The smaller snowflakes are from the coordinating Swirly Snowflakes Framelits (Bundle & Save 10%). I used the Fine Tip Glue Pen to adhere them to the card.
For the greeting, I stamped it from the Snowflake Sentiments Stamp Set in Night of Navy Ink. This stamp set has some amazing greetings! I love it! Next, I die cut the circle with the Layering Circles Framelits. Then I layered it onto a circle die cut from the Stitched Shapes Framelits! I added the loops of Silver Metallic Thread to the back for a little texture and bling. To do this, I wrapped it around my four fingers 8-12 times, slid the loops off my fingers and twisted them into a figure eight. Then I placed the loops on the back of the greeting and secured them with Stampin’ Dimensionals. Just place a dimension in the spot you want the thread loop to be! I added the greeting to the middle of the card and finished it off with a few Rhinestones!
This card would be perfect for winter as well, just change up the greeting!!! Do you make winter birthday cards with a winter theme or similar to cards all year long?? Let me know in the comments below!
Happy Tuesday!!! That means I have a fabulous technique to share with you today! With Christmas less than a week away, it’s all about gift packaging and last minute gifts! These boxes and boughs are sure to make things merry and bright!
These acetate boxes are super fun to decorate and I have put lots of different items in there as gifts – cards, Stampin’ Dimensionals, and gift certificates!
I started by popping up the Acetate Box. It’s already scored and all so just fold on the score lines and pop it up! Next, I took some Real Red cardstock and created a belly band. I have found that scoring the cardstock doesn’t work very well because the lines sometimes aren’t exact so it fits weird. What I do is just wrap it around, slide it off and press on the fold lines. This just seems to work best for me. Then I layered on a piece of Merry Little Christmas Designer Series Paper (retiring). The paper is black and white but I sponged on some green very lightly for a little more color! I used Tear And Tape to secure the ends of the belly band together.
Now for the decoration, I used a hot glue gun! First, I added the little Green Sprig and pressed it into the glue. Next, I created 2 loops with the Striped Ribbon and tied the center tight using the Black Baker’s Twine. This is much easier that tying it into a knot and it allows for the stripes to show. If you do a knot, it will make the one side backwards. This ribbon does have wire in it so you can mold it as needed! The Mini Ornament is secured to the bow with the Black Baker’s Twine as well. I hot glued this to the front as well. Be sure it is all on the belly band so it can still slide off. The tag was created with the Merry Little Labels Stamp Set (retiring) and coordinating Everyday Label Punch! Cute and simple gift packaging!
What would you put in this box to give to a friend or family member? Let me know in the comments below!
Today, I’m sharing a sneak peak to the 2018 Occasions Mini Catalog. Check out the Video Tutorial below or click here! Be sure to give the video a thumbs up if you liked it and don’t forget to subscribe if you are new. If you would like a notification when I post a new video, be sure to click the bell right next to the subscribe!!! Let me know if you have any tip and tricks to share in the comments below!
Happy Monday!!! It’s the week before Christmas and some may be saying Oh Joy!!! That might be an exclamation or a sarcastic remark, either way, this card is super fabulous and the Holidays are here! Whether you are ready or not, it’s here!!
I love the bling on this card the most and that greeting is so simple and yet powerful!
I started with a Whisper White card base. Then I added a piece of the Year of Cheer Designer Series Paper (retiring) measuring 4-1/4″ x 5″! After, placing the designer paper down, I added some gold washi tape on either end from the Year of Cheer Washi Tape pack. There is silver and gold in the pack so you could pick either one! Next, I added some Whisper White Baker’s Twine around the top of the card and tied it into a bow. Before the final bow, I slide on one of the Year of Cheer Embellishments!
Now for that fabulous greeting! I took a piece of Whisper White 1-1/2″ wide and punched the end with the Banner Triple Punch. I stamped the greeting in Basic Gray Ink from the Watercolor Christmas Stamp Set. The little snowflakes are from the Snowflake Sentiments Stamp Set and I stamped off once before stamping on my project for a lighter look! Then I took a piece of Gold Foil Paper 2″ wide and punched it with the Banner Triple Punch too! Before, layering these together I added 3 little bumps from the Foil Snowflake (retiring) to the bottom! Then I added this all to the card front. I love the little bits of bling and how that washi tape looks just as fabulous as foil paper but much cheaper and thinner! Perfect!!!
Don’t forget that many of these items are retiring on January 2nd. Some of these are on sale which is super fabulous! Get them before they are gone. Start shopping here!
Happy Friday everyone! I thought I would do a little update and show off this cute little jar I made for everyone to guess the gender of our little one (Ziggy). Isn’t it adorable?!?!?! He or She? What will Ziggy be?
Isn’t this jar just the cutest?? I took a regular mason jar and decorated it all up. First, I added some Year of Cheer Designer Series Paper (retiring) around the jar. My piece didn’t go all the way around but like just about perfectly lined up with itself. So I took Tear & Tape and added it to both ends of the paper. Then I stuck it on the jar. This worked perfectly! The little gold stickers are from the Eastern Gold Vinyl Stickers Set.
Now for the focal point!! I added a Gold Foil Snowflake (retiring) to the center, right over the spot where the designer paper meets together. I used Tear & Tape for all of these to make sure it had a nice strong hold! Then I printed the wording onto Whisper White cardstock and die cut it out with the Stitched Shapes Framelits. I layered the greeting onto Soft Sky and Powder Pink scallop circles. These were cut out with the Layering Circles Framelits. Some of the layers have Stampin’ Dimensionals while the others are flat with Tear & Tape!
Now for the ribbons, I took a piece of the Whisper White Metallic Edge Ribbon long enough to go around the jar and tie. Then using Powder Pink Shimmer Ribbon and Soft Sky Classic Weave Ribbon, I tied knots around it. I actually did this part before I did the greeting and at that time I was thinking I would use gold, silver, and different shades of pink and blue. Then I changed my mind and decided to stick to these colors. Well then I needed to cover up the silver on the edge of the ribbon on the jar so I added enough knots around to do so! There was no way I was re-stringing those knots! 🙂 I added it to the lip of the jar!
Using the Pretty Label Punch, I punched out Soft Sky, Powder Pink and So Saffron. I will have everyone guess what they think Ziggy will be and write there name on the coordinating color. If someone just can’t decide but wants to wish us well, they can do a yellow one! 🙂 I’m thinking these will go in the baby album and be super cute! If you would like to make a guess or send well wishes, leave it in the comments below and I will write out the coordinating label for you to put in the jar!!!
Here are my weekly belly shots for Week 14-17!!! I’m 17.5 today!!! Can’t wait to see little Ziggy, hear little Ziggy, and find out whether Ziggy is a boy or girl!
I hope you all have a wonderful weekend! See you back here on Monday!
Hello Stampers! We all love to craft. We all go through times where we want to throw something away because it’s frustrating! Today, I’m sharing some Craft Room Tips and Tricks of mine to help you with a few frustrations you might have! I hope you find these useful!!!
My first one is with the Fine Tip Glue Pen. This stuff is amazing for adhering small objects or delicate die cuts! It can be frustrating trying to put the needle back in it though. I have found that placing your find behind the tip and using that as a guide to slide the needle down into the tip helps. If you hold it up in the air and try to get it in, it takes much longer trying to get things lined up!
When you need some color to use with the Blender Pen or Aqua Painter, just press a clear block into the ink pad! Then you have some color. Many like to press the ink pad into the lid but I find that messy. Also, sometimes I don’t want the ink pad open for the entire time I’m coloring. This way I have my color and I can add drips of water to dilute the color or not. Once I’m done with the color palette, I simply run it under water to clean, use a baby wipe, or wipe it with rubbing alcohol and a paper towel!
The next tip is about cleaning your cleaning pad!!! I know that might sound odd but it’s true. After using the Stampin’ Scrub for a while, you might notice that cleaning your stamps on there is making them dirtier than before. That means it is time to clean the Stampin’ Scrub! Red really seems to stick to the pad so after using red a lot, it’s a good idea to clean it! Simply run it under water until the water runs clean. Sometimes I’ll add a little squirt of hand soap but it’s not really necessary! After rinsing all the color out, let it dry and it’s good as new again!
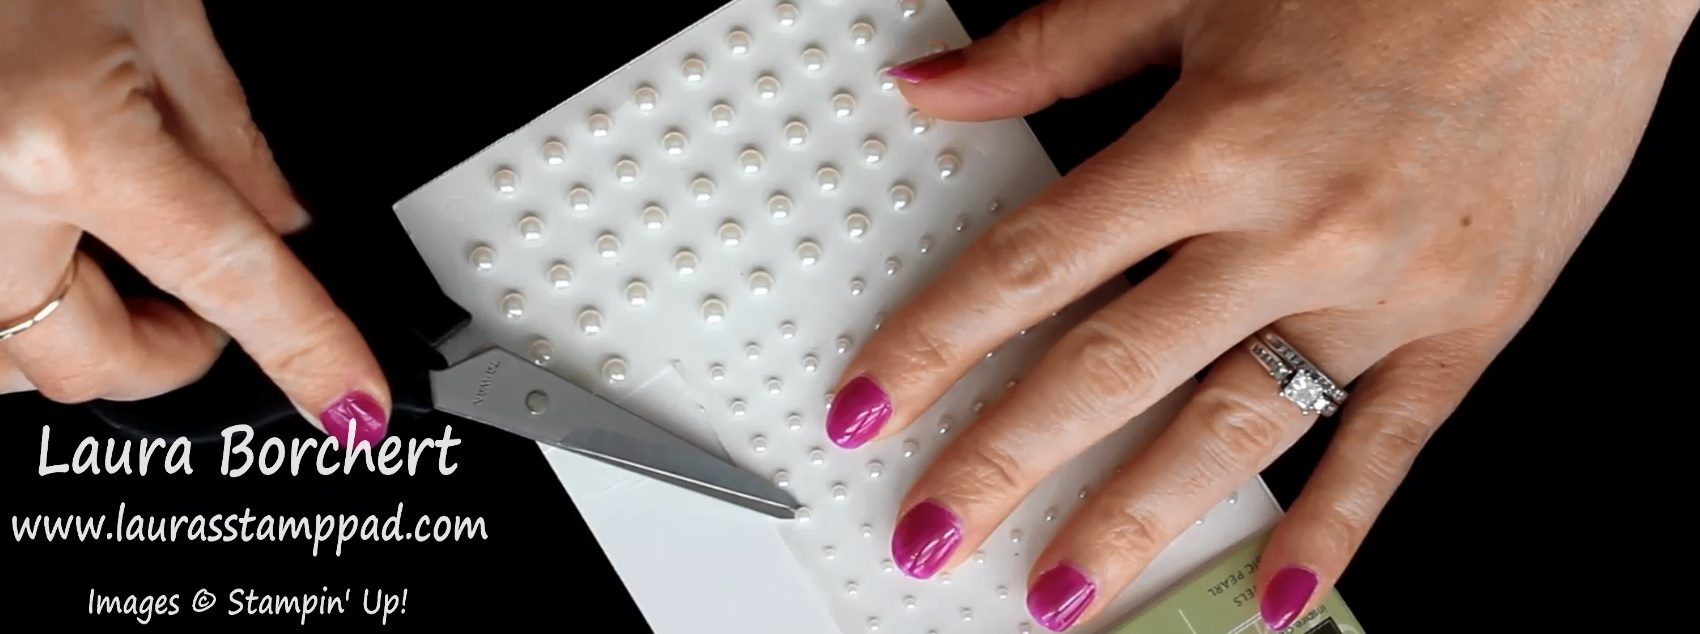
This tip is one that I use a lot. Sometimes it’s hard to get those little Rhinestones and Pearls on your project and perfectly placed (cough cough on that ink spot that somehow appeared). I have found that using Paper Snips as little tweezers really helps. Simply snip under the rhinestone or pearl, lift up and place it exactly where you want it on your project. Then put your finger on the top to hold it there and slide the scissors out. Of course, you could use tweezers but the bonus to this is that the Paper Snips have multiple uses and they are always on my craft table where as I have tweezers in my craft room…..couldn’t tell you where though!
It happens….no worries! The tip of the Blender Pen smooshes down into the barrel. It is not a lost cause! Simply take a pair of tweezers and pinch the end and lightly pull. This will bring the marker tip back out of the barrel and you can use the pen like normal again. I’m not sure if it’s the same pen or 2 different ones but I have had this happen twice now and this trick works perfectly!
Post It Notes or Post It Note Tape is your best friend with die cutting! This stuff is sticky enough to hold the die in place but not so sticky that it will rip your cardstock. I use this to hold framelits in place. It’s always super frustrating to stamp an image and then have it cut wrong. Then you have to start all over again. Another way I use it is for lining things up. For example, the quilt die was centered on my card and rather than measuring each time, I added the Post It Note Tape to either side and put a pen mark for the edge of the paper. Then I added this to each card to die cut and knew it was lined up! I can usually get 5+ cranks through the Big Shot before the piece starts to fall apart or not be sticky.
If you would like to see this all in action, check out the Video Tutorial below or click here! Be sure to give the video a thumbs up if you liked it and don’t forget to subscribe if you are new. If you would like a notification when I post a new video, be sure to click the bell right next to the subscribe!!! Let me know if you have any tip and tricks to share in the comments below!
I am not a fan of snow so while some may say let it snow……I am not saying that! 🙂 While it’s super pretty and I enjoy it coming down, I wish it would melt and be gone quickly! Do you love snow? Let me know in the comments below!
I started with a Soft Sky card base. Then I placed a piece of the Merry Little Christmas Designer Series Paper (4″ x 5-1/4″) in the middle. I actually used some from this pack and some from the Merry Music Designer Series Paper Pack as well. Any black snowflake design will work! Next, I took a piece of Silver Foil Paper (1-1/2″ x 5-1/4″) and added a piece of Soft Sky Classic Weave Ribbon down the center. I just wrapped the ends to the back side of the foil paper and then added it to front of the card!
For the greeting, I used the Merry Little Labels Stamp Set and coordinating Everyday Label Punch (Bundle & Save 10%). I stamped the greeting in Basic Black Ink onto Whisper White cardstock. Then I punched it out. Remember it is always best to stamp first and then punch it out because it is easier to line up the image in the punch than it is to line up the stamp on a small punched image. Of course, I used Stampin’ Dimensionals to add the greeting to the card front. You all know I love those things but I also like how it looks smooth over the ribbon and all as well.
So then I had a thought……is this card good or does it need a little more? A few Enamel Shapes in Soft Sky or another color? The struggle was real and I finally just did 2 cards, one with and one without. In my classes, some used them and some did not!
This card is great for Christmas but also for any Winter occasions! Let me know what you would use it for in the comments below!
Happy Tuesday!!! That means I have a fabulous technique to share with you and it’s a One Sheet Wonder! I know how much you all love these!!!
I created these 6 cards using various pieces from the Petal Garden Designer Series Paper Stack. I’m going to show you how I cut and created these as well as how you can make a lot more from this one stack! Let’s get started!
You can always use the front and back of one sheet for a card like this but I went with 2 different sheets! The smaller floral piece is 3″ x 2″ and you can get 6 pieces from a full sheet of the paper with no waste!!! I layered that onto a piece of Calypso Coral measuring 3-1/4″ x 2-1/4″ and I tied a piece of Calypso Coral Sheer Ribbon. The striped piece measures 5″ x 2″ and you can get 3 of these pieces from one sheet with a small leftover piece. I layered this piece onto Pool Party (5-1/4″ x 2-1/4″). The greeting was from the Special Occasions Mini Catalog Stamp Set and I used the Everyday Label Punch for the words and the background piece! I finished off the card with a few Enamel Shapes!
The top card was created with the floral piece measuring 2″ x 5-1/2″ and the green stripes measuring 1-2″ x 5-1/2″. You can get 2 cards from each sheet with this style. I added some Rich Razzleberry Sheer Ribbon. Then I used the greeting from the Specials Occasions Stamp Set and I used the Classic Label Punch.
The lower card uses a piece of designer paper measuring 2″ x 5-1/4″. You can get 3 pieces of the designer paper from each sheet with this style! I used the Scallop Squares Framelits for this greeting and the same Special Occasions Stamp Set. I love the Silver Foil scallop and those little Metallic Enamel Shapes!
Next up, the card on the top, I used a piece measuring 4″ x 5-1/4″. While I love this big piece, you can only get 1 piece from each sheet. The 2 leftover pieces can be used in other styles! I added some Whisper White Classic Weave Ribbon. I added a little Old Olive Mini Chevron bow that I created using the Fork Bow technique! The greeting was stamped from the Beautiful Bouquet Stamp Set onto an oval from the Stitched Shapes Framelits!
The lower card uses a piece of designer paper measuring 2″ x 5-1/2″. You can get 3 pieces from each sheet. I layered this onto Pool Party (2-1/4″ x 5-1/2″). The greeting is from the Special Occasions Stamp Set on an oval from the Stitched Shapes Framelits. I finished off the card with a few White Perfect Accents!
This is another card that you could use the same sheet for both pieces. I went with 2 different sheets. If you use the same sheet, cut a piece measuring 5-1/4″ x 4″ and then cut it in the middle (or off if you wish for a larger piece on top or bottom). I cut the bottom piece into a 3″ x 4″ piece which you can get 2 pieces for a card like this and have leftovers. The upper piece measures 2-1/4″ x 4″. You can get 2 pieces like this from one sheet with leftovers as well. I used the Beautiful Bouquet Stamp Set for the greeting. The greeting uses the Stitched Shapes Framelits, Scallop Circle Framelits and a Water Tea Lace Doily. I added a little ribbon using the Old Olive Sheer Ribbon. This helps to cover up the over lap of the 2 papers!
Since there are 4 sheets of each paper in the stack, you can get over 50 cards using these patterns. There are also a few sheets in the stack that I didn’t use so you could use those to create even more! How fabulous is that?!?!?! I love One Sheet Wonders because they are quick and simple and require very little supplies. I used 2 stamp sets, 5 colors of ink pads, and only a few colors of cardstock! That’s why these are my fabulous!
If you would like to see this all in action, check out the Video Tutorial below or click here! Be sure to give the video a thumbs up if you liked it and don’t forget to subscribe if you are new. If you would like a notification when I post a new video, be sure to click the bell right next to the subscribe!!!
Happy Monday!!! Awhile back I showed you this simple, all stamping card with the Night in Bethlehem Stamp Set! Today, I’m showing this City of Bethlehem “stepped up” card using the coordinating Bethlehem Framelits!!!
This card is just stunning with that double layer of the city but does require a little bit more work with using the Big Shot.
I started with a Night of Navy card base. Next, I cut two pieces of Whisper White measuring 4″ x 5-1/4″. One piece is for the front and the other is for the inside since Night of Navy is such a dark color so writing on white is better! Before adding the white to the front, I did all of the stamping. This way if I make a mistake I can flip it over or grab another piece. First, I die cut the two villages with the Bethlehem Framelits; one in Night of Navy and the other in Silver Foil Paper. I adhered the two together and then added Stampin’ Dimensionals on the back to add it to the card front.
Now for the stamping!! First, I stamped the star in Crushed Curry Ink and then the greeting in Night of Navy Ink. If you wish to stamp before adding the city, you can place it there as a guide, stamp, and then add it. Just go with whatever you are more comfortable with. Be sure that the greeting is low enough to add the ribbon! Next, I added this piece to the card front and tied the Night of Navy Crinkled Seam Binding around the card. To finish it off, I added some Rhinestones for a little more bling!!!
I did play around with this one for a while wondering what to add and my spacing. Mary and Joseph just looked so big in front of the city but I was trying to get them in there. I could have put the city up higher and it would have looked more “in the background” but I was happy with what I came up with. Do you ever have that where you spend forever trying to get the placement and idea to all come together?? Let me know in the comments below! Also, let me know if you prefer the simple stamped one or this stepped up version!!!
Happy Friday everyone!! I hope you had a fabulous week! Mine has been super busy with Holiday prep as well as all the regular stuff! Our tree and decorations are up and my cards are in the mail!!! I’m feeling accomplished!
I sent out 193 Christmas Cards this year to Friends, Family, and all of those that ordered from me this year!!! I love spreading holiday cheer with happy mail in the mail box! It felt great to have all of these all out and in the mail! I hope they arrive well. If you would like a card from me, send me your address and I’ll get one in the mail to you!!! Click here to send your address. I wish you all the most amazing Christmas, Hanukkah, Kwanzaa, or December. However you wish to celebrate, I wish you all the best! I can’t believe that 2017 is coming to an end soon but I am so excited for a fabulous 2018!
Don’t forget that I have Gift Certificates available if you need a gift at the last minute. Just let me know what you need and I can send a Paypal invoice and mail the certificate to you! Let your family and friends know too! Just pass my information along to them! You can also fill out the MY CHRISTMAS WISH LIST and pass that out to family and friends.
Every order this month of $75.00 or more (before shipping) will earn My Free Stamp Set of the Month which is Little One!!! It won’t come with your order but instead it will be sent separately.
I hope you all have a wonderful weekend! I’ll see you back here on Monday!