Technique Tuesday – Tent Boxes

Posted on

Happy Tuesday, everyone! That means I have a fabulous technique to share with you today! It is super cute and fun to make for all occasions. I honestly think it is one of my favorite boxes to make!

Tent Box, www.LaurasStampPad.com

There is a little box inside that adorable decoration and you don’t have to ruin it in order to get the goodies inside!!! Let’s get started so you can see the inside!!!!

First you will start with a piece of cardstock color of your choice measuring 4″ x 11″. You can get 2 boxes out of one sheet of cardstock! I used the Simply Score Tool for the next few steps! Along the 11″ side, you will score at 3-1/2″, 5-1/4″, 8-3/4″, and 10-1/2″. You will also want to make a little mark with your stylus, bone folder, or a pencil at 4-3/8″ and 9-5/8″. These will be the marks that you will use to line up your ruler and make a diagonal score line. Turn your cardstock 90 degrees to the 4″ side and score at 2-3/4″.  Now you will need a ruler or straight edge and score from your mark that you created to the 2-3/4″ score line. This triangle that you are creating is for the sides of the box to pop in so it fits in the Designer Series Paper Tent.


Score Tips, www.LaurasStampPad.com

Now you will fold on all of your score lines. Be sure to fold your triangle opposite of the way you are folding the sides. You can see in the photo below that the triangles pop up/in while the sides are folded the other way. Once it is all scored, you will cut off the little tab on the bottom left side. You will also cut up to the score line on each of the tabs along the bottom. These tabs will fold in to create the bottom!

Scored Box, www.LaurasStampPad.com

Apply Fast Fuse Adhesive along the left side tab to create your box. The best way to get your box to line up correctly is to lay it flat and allow the adhesive to grab ahold of the inside. When you try to line it up in your hand, it can sometimes stick before you are ready and be unforgiving. For the bottom, you will place the side tabs in first, then one of the long tabs. Place some Fast Fuse along the final long tab and seal it shut!

Fast Fuse, www.LaurasStampPad.com

Once it is all together. It should look like this!!!

Tent Bag, www.LaurasStampPad.com

I was able to put like 5 mini candy bars in there or lots of mint. It would be perfect for jewelry, sweets, a giftcard, and much more. Now for the outside decoration, you will need a piece of Designer Series Paper measuring 3-1/2″ x 8″. I didn’t actually score this piece of paper. I just place one end in the middle of the bottom and wrapped it around the box lightly. Then I took it back off and folded stronger on those wrapped folds. This makes for a good fit on each one individually. I used Fast Fuse to adhere the bottom together and then you will slip the box inside the tent!

Snowflake Box, www.LaurasStampPad.com

All of these boxes use the Winter Wonderland Specialty Designer Series Paper. I used Lots of Labels Framelits for all of the greetings! The greetings are from the Berry Merry Stamp Set, Peaceful Pines Stamp Set, and the Flurry of Wishes Stamp Set. The Snowflake Punch punches out the snowflakes and I used Stampin’ Dimensionals to add them to the box with a little Rhinestone in the center. Also, I added a few Home for Christmas Enamel Dots for a little POP!

Golden Box, www.LaurasStampPad.com

This box is my favorite I think! I love the shiny Gold! I used Gold Foil Paper on this one!

Gift Box, www.LaurasStampPad.com

You can always go simple with a To:/From: for all of those special people in your lives!

I got this idea from Sam Donald (Aka Pootles) and she created a Video Tutorial so you can check out her’s here! Since I didn’t do a video on this box, I thought I would share with you a video on the Stampin’ Trimmer! This is such a handy tool that is always used for all of my projects but always behind the scenes. I thought I would bring it out and show you all of the benefits and features of this amazing product! Check that out here! Don’t forget to give it a thumbs up if you liked it!

Happy Stampin’

~Laura


May Your Days Be Merry!!!

Posted on

Days Be Merry, www.LaurasStampPad.com

Happy Monday everyone! This week is Christmas so I’m sure many of you are scrambling to get those cookies made, presents wrapped, groceries bought, and everything else. I just wanted to say May Your Days Be Merry through it all! Stop and take a deep breath and enjoy the site of your tree lights glistening. Enjoy the sounds of laughter from your children or those at a party! Try to enjoy the little things this week!!!

Today I’m sharing with you a quick and simple card that uses up a few scraps that I had laying around! I used a Whisper White card base measuring 4-1/4″ x 11″. When I am using ribbon, I liked this size/style because it uses less ribbon around than a 5-1/2″ x 8-1/2″ style. I had some strips of Silver Foil Paper left over so I added a strip of that. It can be 2″ wide or a 1/2″ wide, whichever you prefer or whichever you have scraps of! Then I took a piece of the Winter Wonderland Designer Series Paper which was also leftover. If you are cutting your Designer Series Paper into 4″ x 5-1/4″ which is the perfect layering size for a card front then you have a strip leftover that is 1-1/2″ x 4″. That is perfect for a card like this! I tried the Real Red Cotton Ribbon around the card right over the overlap of the two stripes of paper! For the greeting, I stamped it in Real Red on some scrap white with the Berry Merry Stamp Set! I punched it out with the 2″ Circle Punch and brushed the edges with a Sponge Dauber for a pop of color! I added the greeting to the card with Stampin’ Dimensionals and finished it off with a few Rhinestones! Everything needs a little bling! 🙂

Birthday Card, www.LaurasStampPad.com

I had some leftover pieces for this card but didn’t need any more holiday cards. Switch up the greeting and it makes a fabulous Birthday card! I love that!!!

Happy Stampin’

~Laura


Fabulous Friday!!!

Posted on

Happy Friday everyone!!! Yet another week has gone by! It is crazy to think 2015 is coming to a close and that it is actually almost Winter (officially next Tuesday). It so feels like Spring is near and I’m loving every minute of it! First we must get through the Holiday Season!

Monogram Notepads, www.LaurasStampPad.com

These personalized Notepads make a wonderful gift or stocking stuffer! I used the Clear Mount Cases and slipped in a piece of Designer Series Paper and a little decoration specific to the recipient! On the inside, I added a Jr. Legal Pad of paper! NOTE: You do have to cut about an inch off the bottom of the Jr. Legal Pad. You could always add some post-it notes or other organizational items in there! I love!!!

Silver Necklace, www.LaurasStampPad.com

Speaking of things that I love, check out this gorgeous necklace! This is from Stampin’ Up for my title as a Silver Demonstrator! The bling on this necklace shines brights like a diamond and it is stunning. I also love the little Stampin’ Up tag! I would like to thank all of you for your support and helping me achieve this amazing piece of jewelry. If you would like to earn this fabulous bling, get a discount on your Stampin’ Up Product, and have lots of fun, you should join my Stampin’ Up Team! Click here for more information or reach out. I am always happy to answer any questions you might have!

Weekly Deals 12.15

Of course, it isn’t a Friday without the Weekly Deals!!! I’m telling you all right now, you must get the Pretty Petals Designer Series Paper Stack. That is a steal and check out this post and this one on all of the cards that you can create with it. That is a lot of cards for very little money! Love it!!!!

Yesterday I posted a Video unboxing and revealing one of the Project Kits from the Occasions Mini Catalog! Click here to check it out! Don’t forget to subscribe so you don’t miss out on more reveals and tutorials!

I hope you all have a wonderful weekend! Tomorrow is our big family Christmas with about 80 people there and the youngest is just 18 days new!!! Eeeee I’m so excited to get the festivities started! I will see you back here on Monday!

Happy Stampin’

~Laura


Golden Ornaments!!!

Posted on

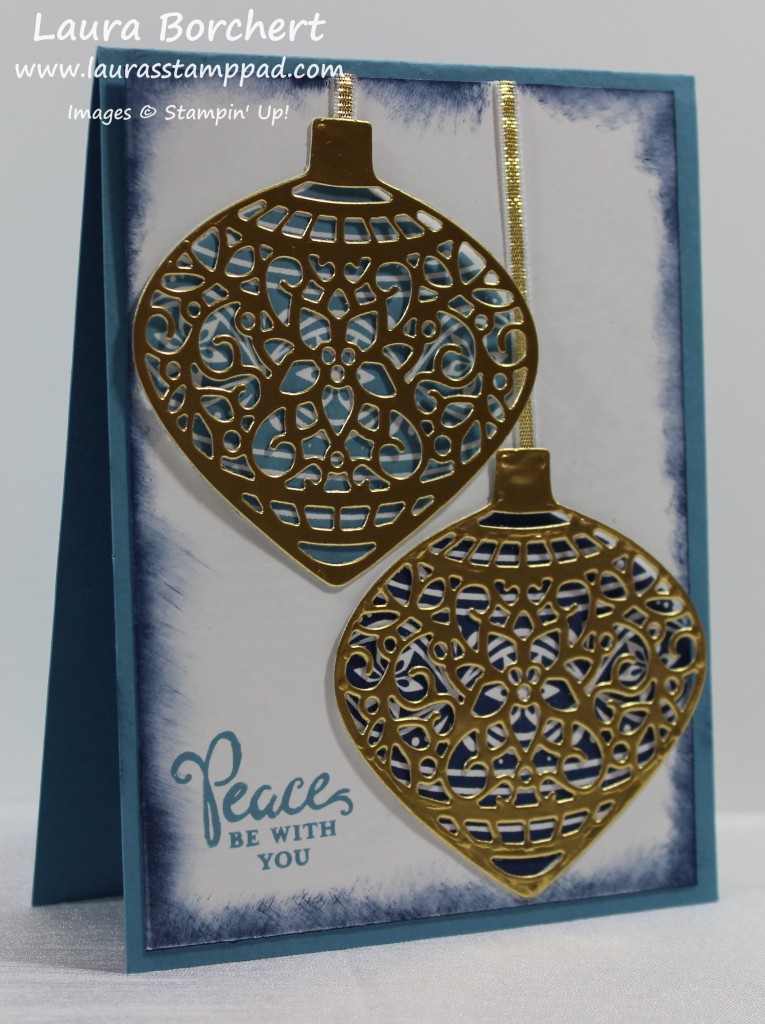
Golden Ornaments, www.LaurasStampPad.com

Shades of blue with some gold shine…….AMAZING!!!! I love this card and don’t know why I didn’t share it with you much sooner! Are you all done with your Christmas Cards? Do you have them sent out yet? Let me know in the comments below! I will be honest and say mine are complete, sent out and my stamp room is ready for Spring!!! I have all of the new Occasions Mini and Sale-A-Bration items all over and I can’t wait to share it with you! You can check out my Haul of Products here! Okay but back to this gorgeous card!

I started with a Marina Mist card base measuring 4-1/4″ x 11″. I really like this size/style of card. I stamped the greeting in the corner of the Whisper White (4″ x 5-1/4″) in Marina Mist. The greeting and the ornaments are all from the Embellished Ornaments Stamp Set in the Holiday Mini Catalog. You will also need the Delicate Ornament Thinlits for the gold overlay. You can Bundle and Save 15% when you purchase them together! When you stamp the ornaments on the Whisper White be sure bottom one is super close to the right side and bottom and not on your greeting. For the upper ornament, be sure it is close to the top but still room for your ribbon to hang and super close to the left hand side. Don’t worry if it doesn’t come out perfect…..made with love, not perfection! Also, it took me 3 times to get it placed correctly! 🙂 I stamped one ornament in Marina Mist and one in Night of Navy! I also brushed the edges of the cardstock in Night of Navy with a Sponge Dauber! Using Gold Foil Paper, I cut out two of the delicate ornament overlays.

Delicate Ornaments, www.LaurasStampPad.com

TIPS: Run it through the Big Shot 2-3 times before taking it out. This will make sure it hit every nook of that piece of paper. When you use the Precision Plate, you won’t have any of those little holes pressed into your image. The upper ornament looks pretty clean, but on the lower ornament cap at the top, you can see little pressed dots from the die. That one I didn’t use the Precision Plate! I adhered the little piece of Gold Ribbon to that top cap section with Snail Adhesive and then placed a few Mini Glue Dots on the ornament in the larger sections. You could also use the Fine Tip Glue Pen! Then I placed it over the top of the stamped ornament and wrapped the end of the ribbon over the edge of the Whisper White cardstock. Now you can adhere your Whisper White to your card front and you are all done!!! It is a little bit more intricate and takes a little longer than some of the other Holiday cards I have created but it sure is stunning!

Happy Stampin’

~Laura

Don’t forget about the Year End Sale!!! Click here to check it out!

Year End Sale


Christmas Spirit!!!

Posted on

Softly Falling Snow, www.LaurasStampPad.com

The Peaceful Pines Stamp Set was begging to be stamped in a beautiful shade of blue!!! I used the Peaceful Pines Stamp Set and coordinating Perfect Pines Framelits (Bundle & Save 15%) to create these beautiful trees! After stamping the first tree in Lost Lagoon and die cutting it out, I layered it onto a Silver Foil tree! I love how the Perfect Pines Framelits have 3 different sizes of trees the set so you can layer them! Love it!!! I added the trees with Stampin’ Dimensionals to a piece of Whisper White that I ran through the Big Shot with the Softly Falling Embossing Folder. I actually used the de-bossed side rather than the embossed side. That means that all of my little dots actually go in rather than pop out! This is layered onto a piece of Lost Lagoon cardstock. I stamped another greeting from the Peaceful Pines Stamp Set onto the Whisper White card base.

I really enjoy shades of blue for Christmas and Winter cards! You can see another sample here and a Video Tutorial here! What are you favorite colors to use on Holiday cards? Let me know in the comments below!

Happy Stampin’

~Laura


Technique Tuesday – Animal Owl Punch Art!!!

Posted on

Happy Tuesday!!! That means I have a fabulous technique to share with you! I am doing 4 more animals using the Owl Builder Punch!!! You can see the Punch Art samples from the past months here, here and here! I hope you are enjoying all of these fabulous creations as much as I am!

Penguin, Chicken, Mouse, and Fish, www.LaurasStampPad.com

Aren’t these adorable?!?!?! The penguin is perfect for Christmas and Winter cards. They are all super cute for kid’s cards, birthday party decor and so much more! You can see the wet glue in my photos so it looks like I will need to be a little bit more precise on glue use next time! It really isn’t that noticeable in person but the camera really made it shine!

Chicken Punch Art, www.LaurasStampPad.com

For the Chicken, I used the Owl Builder Punch and 1-3/4″ Scallop Circle Punch! You will need Real Red, Pumpkin Pie and Whisper White cardstock. I punched out one owl body and a half of the scallop circle in Whisper White. I punched out a half of owl body with the feet in Pumpkin Pie and one heart. I punched out to Real Red hearts. You will snip off the white feet and the owl ears/horns. Just round out the top of the owl body and adhere the Pumpkin Pie feet to the back. Adhere the owl body on the scallop circle and then place the hearts and googly eyes on. I used the new Fine Tip Glue Pen for adding the hearts! It was super easy since the tip is very precise…..but I think I can use a lot less than I did. 🙂

Fish Punch Art, www.LaurasStampPad.com

For the fishy, I used just the Owl Builder Punch and some Pumpkin Pie and Pacific Point cardstock. You will need 1 Owl Body, 2 Breast Pieces, 1 Heart, and 1 Circle (the one above the owl body). Snip off the owl feet and place the heart there for the lips. The breast pieces peak out on the top and bottom as fins. I attached the googly eye to the blue circle and then to the fishy! For this one, I used the Fine Tip Glue Pen and again I used a little bit too much! Once it was dry, it didn’t shine as much as it did in the photos!

Mouse Punch Art, www.LaurasStampPad.com

For the little mousy, I used the Owl Builder Punch and some Basic Gray, Whisper White, and Pink Pirouette cardstock. You will need an owl body, heart, 2 white circles (the smaller ones above the body), 2 pink small circles, and 2 gray larger circles. Then for the tail you will line up the punch with the already punched owl body and just allow a little sliver to be punched out. Don’t worry I show it in action in the video tutorial below! 🙂 I layered the gray and pink circles together and placed those on the owl body after cutting off the owl ears/horns and rounding it out! I added the white circles for the eyes and with a Basic Black Marker added a little beady eye. After adding the pink heart as a nose, I drew a few whiskers on there as well! You could always use googly eyes as well! I used the Fine Tip Glue Pen for all of the adhering but again less is better!

Penguin Punch Art, www.LaurasStampPad.com

For the Penguin, I used the Owl Builder Punch and some Basic Black, Whisper White, and Pumpkin Pie cardstock. You will need an owl body, breast piece, partial body with the feet, a heart, and 2 white circles (the smaller ones above the body). I started out by cutting off the owl ears/horns and rounding it out like those above! I snipped off the black feet and adhered the orange feet to the penguin. I placed the breast piece on pretty low on the owl body and then the white circle up higher for the eyes. You can always draw them in with a marker or add googly eyes! I really love googly eyes because they really make him come to life. For the little beak, I just cut it out of the heart. I used the Fine Tip Glue Pen on all of the little pieces which made it super easy but I need to use less next time!

To see all of these in action, check out my Video Tutorial below or by clicking here! Don’t forget to give it a thumbs up if you liked it and be sure to subscribe so you don’t miss out on any more of these and other fabulous videos!

Let me know in the comments below which is your favorite??? I like the Mouse the best! 🙂

Happy Punchin’

~Laura


Home for Christmas!!!

Posted on

Home For Christmas, www.LaurasStampPad.com

The Home For Christmas Designer Series Paper Pack has a lot of classic images – houses, Santa, Rudolph, ornaments, and poinsettias. I was looking for a quick and simple card and I needed to create a lot of them. I cut the 12″ x 12″ sheets into 3″ x 4″ pieces so I was able to get 12 pieces from each sheet! Since there are 12 sheets in the pack, that’s 144 pieces or cards that you can create! Fabulous!!!! I used a Pool Party card base measuring 4-1/4″ x 11″ and adhered the Home For Christmas Designer Series Paper! I added the greeting directly to the card front. The greeting is from the Reason For the Season Stamp Set but you could use any of your favorite greetings! It is stamped in Chocolate Chip! I finished it off with a piece of Real Red Cotton Ribbon tied into a knot! You could always change up the greeting or pop it up on a punched or die cut piece of cardstock. You can change up the ribbon or add some Dazzling Details to make the snow sparkle!!!

Flat Santa, www.LaurasStampPad.com

Here is another sample using a different piece of paper from the Home For Christmas Designer Series Paper. My husband told me I needed a Santa card and I pulled out this paper. He said, “Flat Santa!” Now every time I see this card, that’s all I can think of! 🙂 I think that’s hilarious – Flat Santa!!!

Which is your favorite Designer Series Paper from the Holiday Mini Catalog??? Home For Christmas, Winter Wonderland, Merry Moments, Seasons of Cheer? Let me know in the comments below!

Happy Stampin’

~Laura


Fabulous Friday!!!

Posted on

Happy Friday everyone! This has been an exciting week! My Occasions Mini Catalog and Sale-A-Bration pre-order has arrived and I can’t think about anything else but digging in that!!! I think I am caught up on everything else that I’m going to just play this afternoon with all of the goodies! You can check out my Haul Video here! Eeee I’m so excited for bright colors and flowers….come on Spring……or at least January 5th when it all starts! 🙂 If you would like to get your hands on these fabulous products early like me, you can join Stampin’ Up and order them in your Kit! Click here for more information or send me a message!

Year End Sale

Stampin’ Up! started their Year-End Sale yesterday to clear some items out and prepare for the new! You check out all of the Year End Sale items as well as further discounted Clearance Items all right here! Stock up on items to finish up your Holiday Projects, get some goodies for next year, stocking stuffers for those crafters in your life or a little something special for yourself!

Weekly Deals 12.8

Of course it wouldn’t be a Friday without the Weekly Deals!!! Woot Woot! Bring on the Bling!

I hope you all have a wonderful weekend! I’ll be stamping, relaxing and getting ready for all of the upcoming holiday fun. This is the last weekend with nothing planned and I’m going to enjoy it! 🙂 See you back here on Monday!!!

Happy Stampin’

~Laura


Corner Flip Card!!!

Posted on

Corner Flip Card, www.LaurasStampPad.com

I am really loving the Black, White and touch of Gold this season! This card only enhances that feeling. Check out this card for my other favorite card! This card was created with the Corner Flip Technique which I learned from fellow stamper – Julie! Let’s get started!

For this cool technique, you will start with a piece of cardstock measuring 5-1/2″ x 8-1/2″ which is a regular card size! Using your Stampin’ Trimmer with the Score Blade, score the card in half at 4-1/4″! This is what creates a regular sized card. You can always just fold the card in half and use your Bone Folder. Now move the cardstock over the 3” mark and using the cutting blade cut from 2-1/2″ down to 4-7/8”. Then turn the cardstock 90 degrees and line it up at 3” mark again and using the Cutting Blade cut from 3” line up to the 5/8” line. This will look like an L-Shape cut! Now you are all done and you will just press on the corner of the L-Shape and flip the corners over! You can secure the corner down with a Mini Glue Dot! If you would like to see a Video Tutorial, check out Julie’s here! Now it is time to decorate! I used a piece of Gold Foil Paper measuring 2-3/4″ x 2-3/4″. Then on a piece of Whisper White measuring 2-1/2 x 2-1/2″, I stamped the greeting from the Peaceful Pines Stamp Set and the pine cones from the Wonderland Stamp Set! Both of these were stamped in Basic Black. I did go back to this card and added a little bit of Gold Dazzling Details to the pine cone! I love it! The Winter Wonderland Designer Series Paper at the bottom measures 4-1/4″ x 1-1/2″!

Corner Fold Card, www.LaurasStampPad.com

I did add a piece of Whisper White to the inside of the card so you can write on it and to have the fabulous white border! I really love all the pops of gold and the simplicity! This would also make a cute kids card!

Happy Stampin’

~Laura

Click here to shop the Year-End Sale!

Year End Sale


Rudolph The Red Nosed Reindeer!!!

Posted on

Rudolph The Red Nosed Reindeer, www.LaurasStampPad.com

Little Rudolph is so precious!!! He was created with the Owl Builder Punch and Bird Builder Punch! You can see a Video Tutorial on how he was created here! I added the Reindeer to a piece of Merry Moments Designer Series Paper. I thought he needed a little something under his chin as well so I added a knot of Real Red Cotton Ribbon and attached it with a Mini Glue Dot! I added the Reindeer to a piece of Whisper White measuring 4″ x 5-1/4″ and stamped the greeting from the Snow Place Stamp Set in Real Red. This was all added to a Mossy Meadow card base! This card is super cute and would be perfect for the little ones on your list and everyone else!!!

What is your favorite image for Holiday Cards – Snowflakes, Rudolph, Santa, Nativity Scene, Ornaments, Trees, etc?? Let me know in the comments below!

Happy Stampin’

~Laura