All the Texture and Layers on a Card!!!

Posted on

Do you like to add texture and layers to your cards? I sure do! I feel like it makes the card come to life and have more POP!!! Check out this beauty!

Texture Layers Card, www.LaurasStampPad.com

This card is really simple to make as most of it is just layers of cardstock but it’s those layers and added texture that make it such a WOW! Embossing folders are so much fun for adding texture. They add so much to a card with a simple crank through the Big Shot.

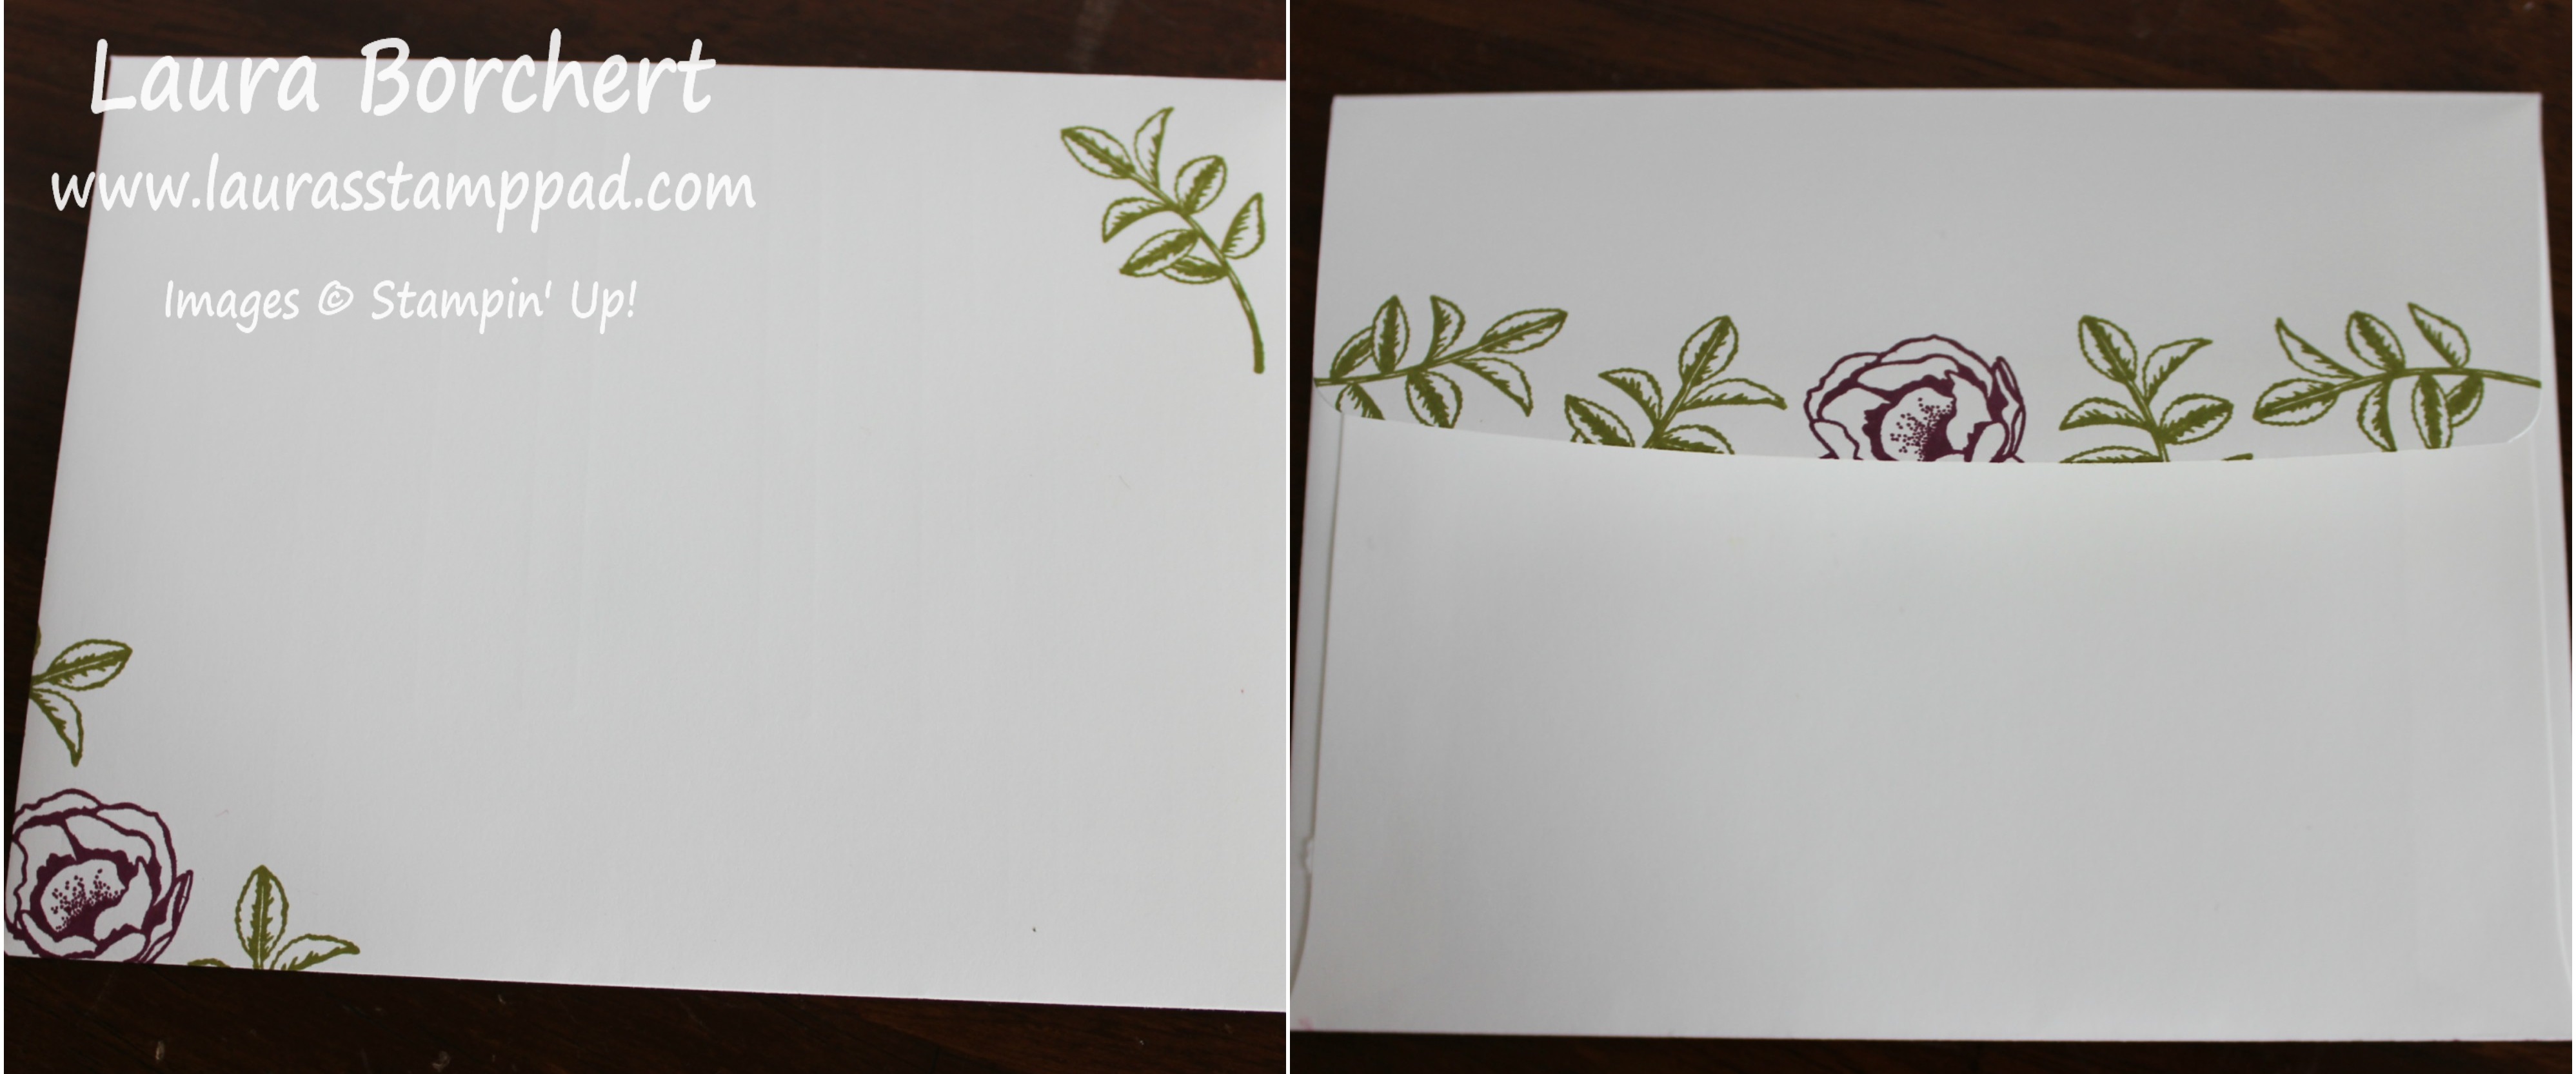
For this card, I started  with a Fresh Fig card base. Next I added a layer of Emerald Envy (5″ x 3-3/4″) after running it through the Big Shot in the Garden Trellis Embossing Folder. Now for the focal point, I die cut the scallop square using the Layering Squares Framelits. Then I layered a piece of Crushed Curry (2-3/4″ x 2-3/4″) and added these to the card front with Stampin’ Dimensionals. Texture on a Card, www.LaurasStampPad.comNext, I took a 2-1/4″ square and stamped on it with the Happy Birthday Gorgeous Stamp Set. I love these little 2 step stamping flowers. It’s easiest to stamp the outline first in full strength and then stamp the solid image second after stamping off once. I used Fresh Fig Ink and Emerald Envy Ink. After stamping, I layered this onto the Crushed Curry square. I finished off the card with an adorable Bitty Bow in the corner.

Flowers on the Inside, www.LaurasStampPad.com

Now you can’t forget about the inside of the card. Since the card base is so dark, I added a piece of Whisper White (4″ x 5-1/4″) to the inside. I couldn’t just leave it blank so I stamped a few flowers in the lower left corner! I love it!!!

You can check out more samples using the Happy Birthday Gorgeous Bundle by clicking here and here! I have been having so much fun with this bundle!!!

Don’t forget about Bonus Bucks this month! Every $50 order earns you $5 to spend in August! Woot Woot! Click here to start shopping and earning your Bonus Bucks…..and Laura’s Loyal Stampers Stickers!!

Happy Stampin’

~Laura


Technique Tuesday – 2-Step Tranquil Tulips!!!

Posted on

Happy Tuesday!!! You all know that means I have a fabulous technique to share with you! Today, I am playing with the 2-Step Tranquil Tulips Hostess Stamp Set! Aren’t these flowers amazing?!?!?!

Tranquil Tulips Hostess Set, www.LaurasStampPad.com

Aren’t these flowers so amazing and real looking?? The best part is I got this stamp set for FREE with Hostess Benefits! The other best part is they are super simple to 2-step stamp. There is no remembering to stamp off or lining up every side and curve. It’s amazing!!!

I started with a Pool Party card base (11″ x 4-1/4″). Then I took a piece of Whisper White (4″ x 3-1/4″) to stamp the tulips on. I used the Tranquil Tulips Hostess Stamp Set with Berry Burst Ink and Old Olive Ink. Starting with the stems, I stamped those around the middle of my paper so that my tulips weren’t falling off the top. Next, I stamped the leaves. Then it was time for the tulips and I did the large solid image first. Next I did the more detailed smaller image right on top.

Both of these images are in full strength ink so no worries on remembering to stamp off. Since the second image is smaller, all you have to look for when stamping it is that it is close to the bottom of the solid stamped image. If it’s not, that’s okay too! The variation in color on these stamps is the texture in the stamp. How cool is that?!?! So don’t worry that your image isn’t coming out smooth or dark and solid, it’s suppose to look like this. There are 2 different sizes of flowers to play with! I love it! There are also little dot images for the center of the flower. I stamped those in Basic Gray Ink for a softer look than black.

Now that I am done with the focal point, I added it to the card base on the left side. Next I tied some Berry Burst Finely Woven Ribbon around the card, right over the edge of the cardstock. For the greeting, I used the Label Me Pretty Stamp Set and coordinating Pretty Label Punch. (Bundle & Save 10%) First, I stamped the decorative edge in Pool Party Ink and then the greeting in Berry Burst Ink. Next, I punched it out and added to the card with Stampin’ Dimensionals! 🙂

I love this set so much because there are 22 images in there for just $10 in Hostess Dollars which is earned with a $150 order or party! It’s fabulous!!! Also, the ease of not having to remember to stamp off is super amazing!! Don’t forget about Bonus Bucks this month for every $50 you spend too!!! It’s a great time to order and have a party (in home, virtual, or catalog).

If you would like to see this all in action, check out the Video Tutorial below or click here! Be sure to give the video a thumbs up if you liked it and don’t forget to subscribe if you are new. If you would like a notification when I post a new video, be sure to click the bell right next to the subscribe!!!

Happy Stampin’

~Laura


Perfect Purple Rose Fit For A Queen!!!

Posted on

This amazing perfect purple rose fit for a queen was made for my amazing cousin who is a QUEEN! 🙂 Oh I’m so incredibly excited for her to win our local county fair pageant! Small side note: I LOVE pageants so very much…watch them, take notes, take photos with Queens everywhere I go. Yeah, all of that! Now, I’m related to one so of course I made her a fabulous card to congratulate her!

Perfect Purple Rose, www.LaurasStampPad.com

While this card looks fairly simple even with all the extra details…..it took me forever to make. I really struggle when I have something in mind for someone special and try to get it just perfect. I colored 4 different roses for this one! First it was the wrong color, then I fussy cut one out and didn’t like it, and then I ruined one putting Gold Wink of Stella on top. TIP: Gold Wink of Stella comes out rather yellow. I have used the clear and love it. For this card, since I used Gold Foil, I thought I would use Gold Wink of Stella for a gold shimmer (clear with gold shimmer). I was wrong. In the end, it came out amazing and that’s all that matters!!!

I started with a Rich Razzleberry card base. Next, I took a piece of Whisper White (3-3/4″ x 5″) and stamped the rose from the Graceful Garden Stamp Set in Basic Gray Ink. I like to use gray for that softer look! Then I colored the flower in with the Watercolor Pencils and Blender Pens. Once it dried, I went back through with the pencil to highlight the edges for more detail!

Purple Rose Detail, www.LaurasStampPad.com

Next I layered this onto a piece of Gold Foil Paper (4″ x 5-1/4″). Before layering on the gold, I used the Corner Rounder Punch to soften all of the edges. Using the Gold Metallic Edge Ribbon, I placed a piece across the card front and securing the ends to the back with Stampin’ Dimensionals. Before adding the bow, I stamped the greeting from the Happy Birthday Gorgeous Stamp Set in Rich Razzleberry Ink. Then I took another piece to make a bow and secured that on with Mini Glue Dots. This ribbon is stunning! I love it! Try it out in my Ribbon Share! Click here for details!

I adore you, www.LaurasStampPad.com

Now for the inside of the card! Since Rich Razzleberry is such a dark color, I thought I would put a piece of white in there. Well why not decorate that piece too?!?! I stamped the rose and greenery from the Graceful Garden Stamp Set. I decorated the envelope as well to match!

Rose Envelope, www.LaurasStampPad.com

It all turned out so fabulous!! I love it!!! Do you enjoy making special cards for someone or do you tend to make cards and then pick the best one for people? I’m usually the second one but every once in awhile I go all out!!! Let me know which you are in the comments below!

Happy Stampin’

~Laura


Christmas in July!!!

Posted on

Happy Friday!!! It’s time to celebrate Christmas in July! Stampin’ Up has so many fabulous offers this month so let’s celebrate!!!

Bonus Days, www.LaurasStampPad.com

Every order placed in July $50 or more, will earn $5.00 in Bonus Bucks to spend in August. You can earn these all month long in July and spend any time in August! Earn as many as you wish with every $50 increment! Have you been wanting the Big Shot??? Purchase it this month and then earn Bonus Bucks to spend in August on an embossing folder or framelits!!! Don’t forget you will also be earning Laura’s Loyal Stampers Stickers too!!!

Christmas In July, www.LaurasStampPad.com

If you want it all then now is the time to get it all!!! When you join Stampin’ Up in July, you will get a FREE Essentials Gift Pack including Paper Snips, SNAIL Adhesive, Grid Paper, two D Blocks, and a Bone Folder. These are all the goodies I have right next to me at my stamp desk because I use them each time I stamp! That’s an added value of $52! Even if you have all of these items, they are great to have extras for classes and events or you could give them away as Hostess Goodies!

That’s not all though, you will also get the NEW Carols of Christmas Stamp Set from the Holiday Catalog coming out in September! Woot Woot!!! That’s another $20 value! So an extra $72 in goodies on top of the $125 you get to pick out. All of this for just $99 plus tax. There is always free shipping on your kit! As always, there is no obligation to have parties or classes. You can be any type of demonstrator that you wish! You can enjoy the discount, share with friends, have parties, or do anything. It’s all about you and what you want to do!!! Let me know if you have any questions!!! I am always happy to answer anything! My Team – Fabulous Friends would love to have you join us!!! 🙂

Have a wonderful weekend and Happy Stampin’

~Laura


Check Out My Ribbon Share & In Color Share!!!

Posted on
I have some fabulous product share offerings for you today!! Check out my Ribbon share and In Color Share for your chance to try out fabulous product without buying a full pack!!! There are 3 different shares that you can purchase!!! Check out all of the detail below!
My Ribbon Share, www.LaurasStampPad.com
There are 2 different ribbon shares with the same styles of ribbons in both but different colors. This allows you to sign up for both without getting duplicates! There are 10 types of ribbon in each share and you will get a total of 5 yards of each ribbon! The shares are $40.00 each or both for $70.00! There is a $4.00 charge for shipping!

SHARE #1
3/8″ Mini Chevron Ribbon ~ Bermuda Bay
3/8″ Striped Grossgrain Ribbon ~ Peekaboo Peach
1/2″ Gingham Ribbon ~ Night of Navy
1/4″ Double Stitched Ribbon ~ Cherry Cobbler
1/4″ Ombre Ribbon ~ Island Indigo
3/8″ Classic Weave Ribbon ~ Whisper White
1/4″ Stitched Edge Ribbon ~ Old Olive
1/2″ Finely Woven Ribbon ~ Fresh Fig
3/8″ Shimmer Ribbon ~ Powder Pink
3/8″ Metallic Edge Ribbon ~ Silver

SHARE #2 
3/8″ Mini Chevron Ribbon ~ Old Olive
3/8″ Striped Grossgrain Ribbon ~ Dapper Denim
1/2″ Gingham Ribbon ~ Smokey Slate
1/4″ Double Stitched Ribbon ~ Daffodil Delight
1/4″ Ombre Ribbon ~ Calypso Coral
3/8″ Classic Weave Ribbon ~ Soft Sky
1/4″ Stitched Edge Ribbon ~ Rich Razzleberry
1/2″ Finely Woven Ribbon ~ Berry Burst
3/8″ Shimmer Ribbon ~ Basic Black
3/8″ Metallic Edge Ribbon ~ Gold

In-Color Product Share, www.LaurasStampPad.com

 For the In Color Share, I have the amazing Fresh Florals Designer Series Paper, Finely Woven Ribbon and Mini Bows! The share includes 80 (6″ x 6″) squares of Fresh Florals Designer Series Paper (8 pieces each double sided pattern). There are 5 yards of each color in the Ribbon and 2 bows in each color! These bows are just precious and even have adhesive on the backs already for you to use! The In Color Share is $35.00. There will be a $4.00 shipping charge.
To sign up, please email me at Laura@LaurasStampPad.com with the following information to reserve your share spot:
1. Name
2. Email Address
3. Mailing Address (U.S. only)
4. Which share(s) you would like to reserve – In Color Share, Ribbon Share #1, Ribbon Share #2
I will place orders as each share fills and send you a Paypal invoice when I place the order. Please allow two weeks for delivery since I need to order the product, cut and divide it up and then send it to you.

If you would like to see this all in action, check out the Video below or click here! Be sure to give the video a thumbs up if you liked it and don’t forget to subscribe if you are new. If you would like a notification when I post a new video, be sure to click the bell right next to the subscribe!!!

Happy Stampin’

~Laura


June 2017 Paper Pumpkin-One in a Melon!!!

Posted on

The June 2017 Paper Pumpkin – One in a Melon is super adorable and I loved making it!! The colors Melon Mambo and Emerald Envy are a beautiful combination! I super love the stamp images as well!!! Check out all the goodies!

June 2017 Paper Pumpkin, www.LaurasStampPad.com

Look at all of these goodies! I thought I was going to create other cards with one of the gift bags but I loved them too much to cut one up. I plan on using them for giveaways or Hostess Gifts! 🙂

Watermelon Bag, www.LaurasStampPad.com  These bags are just AMAZING! The fact that the bag is like the rind and the tissue paper has seeds on it. I just love it so very much. The stamps have these cute greetings and watermelon images. I actually omitted the sweet on the scroll-y greeting since I used the sweet watermelon greeting. Just precious!

Hooray Cards, www.LaurasStampPad.com

Stampin’ Up always gives so much product in their kits so I decided to use the Melon Mambo Baker’s Twine more than the instructions say. I wrapped it around the cards and tied it into bows. Some of the cards were created horizontally instead of vertical. I really had fun with these. You can check out my Facebook Live Video that I did while creating these here! It was so much fun crafting with you all that afternoon!

Watermelon Envelopes, www.LaurasStampPad.com

Okay so when I first saw this greeting, I thought I would never use it. I don’t normally have my treats delivered. Then I realized I could stamp that right above the address on an envelope and I got super excited! How fun is that?!?!? Next I added a little watermelon in the corner!

A little something sweet, www.LaurasStampPad.com

Of course there were leftovers from the kit. I had these 2 tags and some sticker leaves left over. The stamps and ink are always an added bonus to keep as well!

Paper Pumpkin is just so much fun! My favorite part is opening it up and seeing what it is each month. I love the surprise of it and you can tell in my unboxing video here! What is your favorite part about Paper Pumpkin? Let me know in the comments below! If you aren’t a subscriber, you totally should try it out for a month or two. It is super fun and after all you will end up with a clear block, at least 2 ink spots, and 2 sets of stamps even if you don’t like the projects. Trust me you will love them and there are always alternative ways to use the kit too! Click here to sign up for the July Kit and join in the fun! Paper Pumpkin is a great gift as well. My nieces got it for their birthdays and they are loving it. Check out Paper Pumpkin Subscriptions here!

Happy Stampin’

~Laura


Technique Tuesday-Golden Happy Birthday!!!

Posted on

Happy Tuesday!!! Happy 4th of July!!! Today I have a fabulous technique to share with you. This golden happy birthday with roses all over is just stunning! You know how I love bling with flowers and pink!!! Amazing!

Golden Happy Birthday, www.LaurasStampPad.com

Isn’t this card just stunning with that glimmer wording?? I love it! It was fairly simple to create as well!!

I started with a Sweet Sugarplum card base. Next I layered on a piece of Berry Burst (4″ x 5-1/4″) with Stampin’ Dimensionals. Since this card didn’t have a lot of dimension, I thought I would pop up a layer! Also, Berry Burst and Sweet Sugarplum look amazing together! Finally for the top layer, I used a piece of Whisper White measuring 3-3/4″ x 5″. The first step is to die cut the greeting in Gold Glimmer Paper with the Happy Birthday Framelit. I added the greeting to the card with a Sponge and Multi Purpose Liquid Glue but the Fine Tip Glue Pen works too!

Now for the beautiful roses, I used the Happy Birthday Gorgeous Stamp Set (Bundle & Save 10%)! For the bigger rose, I used Sweet Sugarplum Ink and stamped off once for the solid image. I used full strength ink for the outline image. For the smaller rose, I used Berry Burst and the same technique! Be sure to fall off the cardstock and stamp all around so it looks like the pattern is continuous. I used Old Olive Ink for the leaves. The mini leaves, I stamped twice before going back to the ink to get that variation in color. Once I was done with the flowers, I added this to the card base!

Birthday Roses All Over, www.LaurasStampPad.com

So I thought I would share with you the first card I made which I stamped all over the background first. Then I placed the greeting on top and it just didn’t POP like I wanted. I tried again by adding the greeting first and stamping around the greeting and it worked out so much better! Just thought I would share my boo boo card as well so you could see it doesn’t always come out right the first time but we keep on trying! 🙂

If you would like to see this all in action, check out the Video Tutorial below or click here! Be sure to give the video a thumbs up if you liked it and don’t forget to subscribe if you are new. If you would like a notification when I post a new video, be sure to click the bell right next to the subscribe!!!

Happy Stampin’

~Laura


Life Is A Beautiful Thing!!!

Posted on

Life Is A Beautiful Thing!!! It sure is and that is something we should remember every single day. This card is perfect to send to anyone. Just to let them know you are thinking of them. To brighten there day on a normal Thursday. For a special occasion that is totally worth celebrating!!!

Life is a beautiful thing, www.LaurasStampPad.com

The hardest part about this card is die cutting all those flowers but I used all 3 styles of flowers each time I cranked it through the Big Shot so it went fairly quickly!! With that amazing background, you could use any color combination for the flowers!!!

I started with a Dapper Denim card base. Next I layered on a piece of the Color Theory Designer Series Paper measuring 4″ x 5-1/4″! I picked this color for a more neutral color so the flowers would pop but now I totally think it looks like water! Then I die cut out a circle with the Layering Circles Framelits and stamped the greeting from the Colorful Seasons Stamp Set. I made sure to stamp the greeting to the right side of the circle so I could layer the flowers on the left side. For all of the little flowers, I used Crushed Curry, Berry Burst, and Powder Pink. I die cut them with the Seasonal Layers Framelits (Bundle & Save 10%)! I used Mini Glue Dots to adhere all of the flowers, making sure to overlap top of them. Next, I tied a bow with the Mini Chevron Crushed Curry Ribbon and stuck it in the mix with some Mini Glue Dots as well. To finish off the card, I added a few Glitter Enamel Dots! I just love how these things shine!

The Colorful Seasons Bundle is so much fun and I have made a lot of cards with it. You can check them out here, here, and here!

Happy Stampin’

~Laura


Extending the Life on Big Shot Cutting Pads!!!

Posted on

Happy Friday!!! Today, I’m sharing a tip on extending the life on Big Shot Cutting Pads! If you are like me, you go through these things like crazy. My husband makes fun of me because I tend to use them way past their prime. He thinks I could eat cereal out of them because they are so curved! So I have tried out a few ways to extend the life!!!

Extending the Life on Big Shot Cutting Pads, www.LaurasStampPad.com

I have tried this a few different times and ways and the way I’m sharing today seems to get the best results most often! To me they are no longer usable anyway so it’s worth a shot to try this. If it works that’s great and if it doesn’t I’m not really out anything since it was bad already.

Extending the Life on Big Shot Cutting Pads!

  1. Place aluminum foil in a glass Pyrex Baking Dish with one Cutting Pad placed inside curved up. This helps because as it heats up it will flatten to the original form rather than into a lump.
  2. Put it into a cold oven and turn the oven on to 350 degree.
  3. Set the time for 10 minutes and it should be done. There were a few that needed a minute longer or so. When you take it out, it’s all flattened out and no more creases from all the die cutting. Allow it to cool before touching or moving it.

Sometimes they come out crazy and aren’t usable afterwords but I did a total of 6 pads this weekend and all but 2 came out perfect! One of them didn’t come out correctly because I put it into a warm oven after doing the first one. This made it melt too fast and it looked like this.

Failed at melting, www.LaurasStampPad.comAnother option that I tried was to place foil on top of it with another pan to press it down but that wasn’t necessary. It came out with impressions of the crinkled foil.

A few disclaimers to this technique – it won’t always come out perfect! Please be very careful with using the oven and dealing with hot materials. This is just an option for extending the life of your cutting pads and not necessary. You can always just buy new ones by clicking here.

I hope you all have an amazing weekend!!! See you back here on Monday!

Happy Stampin’

~Laura


Paper Pumpkin FLASH SALE!!!!

Posted on

Stampin’ Up! is having a Paper Pumpkin Flash Sale TODAY only!!! New subscribers can try out Paper Pumpkin for just $5.00!!!!

Paper Pumpkin Flash Sale, www.LaurasStampPad.com

If you have been wondering what Paper Pumpkin is all about or would like to get started, TODAY is the day!!! It’s just $5.00 for your first month! That is a major steal because your first kit comes with a clear block to use on all future kits or any clear mount or photopolymer stamp set. It comes with stamps, ink, and supplies for the project inside. That’s a lot of goodie for just $5.00!!! Click here to get signed up!

You can cancel at any time or continue getting the kits each month afterwards! It is normally $19.95 (plus tax) each month! Of course, you also get a card from me each month as well! 🙂 Remember it is today only! Also, send this to a friend if you think they would be interested. Let me know about your referral and when the friend signs up, you will both get a gift from me!!! 🙂

Have a wonderful Friday!! Happy Stampin’

~Laura