Happy Houseplants!!!

Posted on

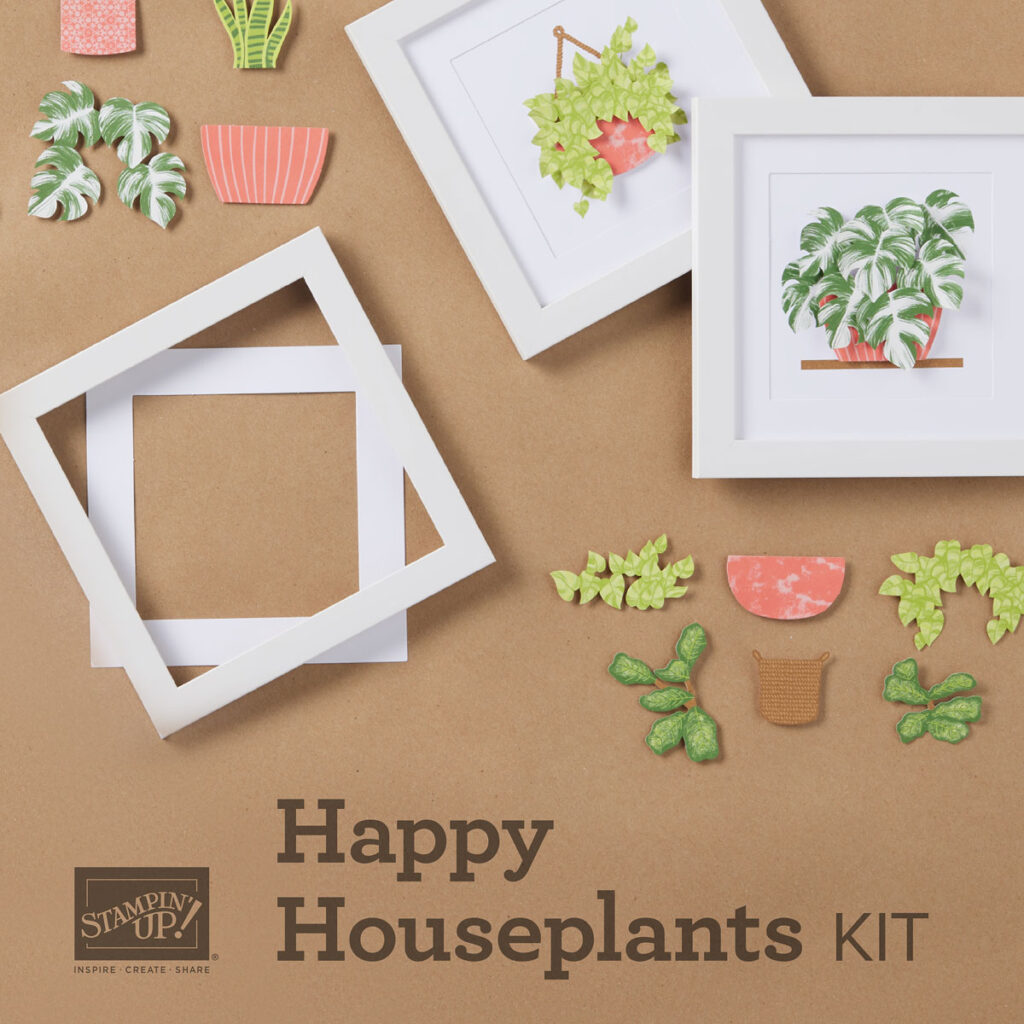
I….We recently did some upgrades to our downstairs bathroom! This is the one off Laura’s Stamp Pad! Years ago we painted it and now we redid the flooring and trim! We used a peel and stick which I’m not sure I would recommend. I also painted all of the trim and the door white which I love! It was also time to add something to walls! The Happy Houseplants Kit came out while we were doing all of this and it’s PERFECT!!!

Happy Houseplants Kit, www.LaurasStampPad.com

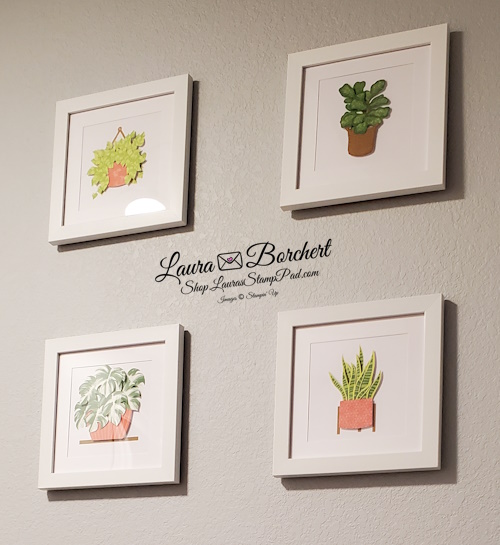
I was so excited when this Kit Collection came out in January! Normally I stick to card kits but this one was perfect for the bathroom walls! It’s basic so it matches any decor. It’s really simple and quick to creates especially if you remember to put the mat in while assembling! LOL

Home Decor Succulent Frames, www.LaurasStampPad.com

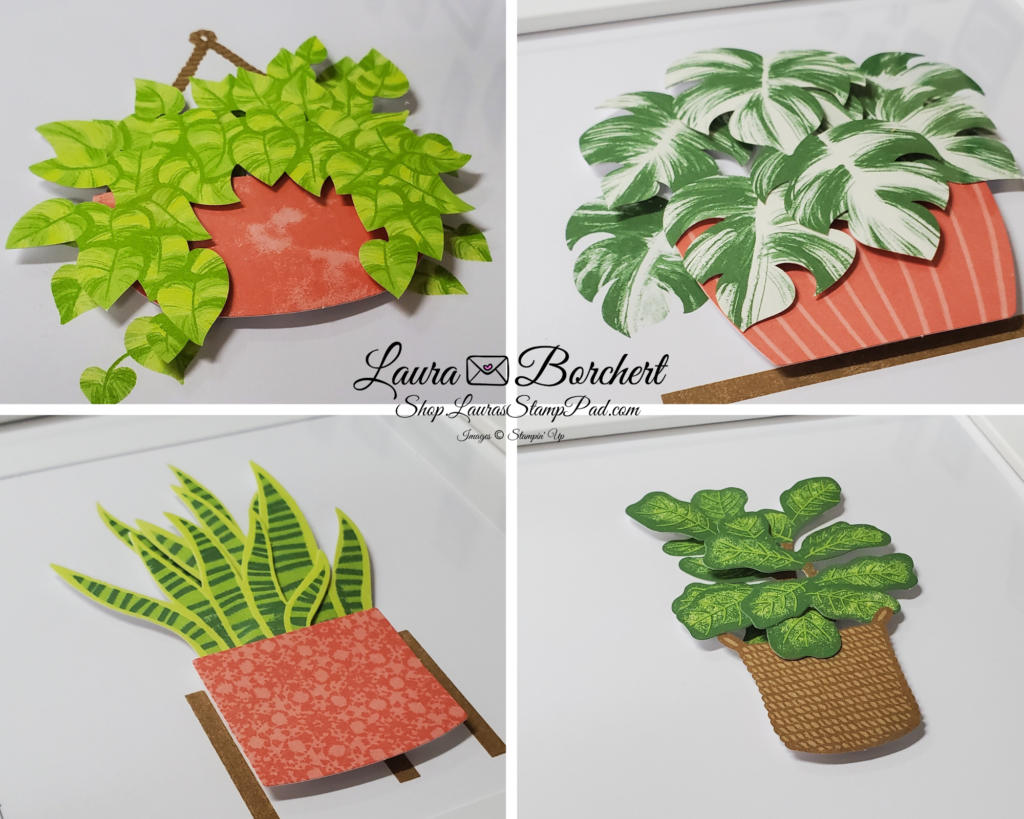
Each of these plants is created with Stampin’ Dimensionals so you all know how excited I felt about that. 🙂 I love Stampin’ Dimensionals and the way they make these plants look so real is just amazing! TIP: Don’t be a Stampin’ Dimensional over-user like I am! If you use too many they overlap each other and it pops up too much! Also, be sure to put the basket or pot down first. I added the leaves first on one of them and realized it was wider than the pop and I had to pull them back off. Opps!

Also, MAKE SURE TO ADD YOUR MAT! This kit took me longer because I had to pull all the little tabs back up again and add the mats in after they were finished! Otherwise I would say it took me like 15-20 minutes so very quick!! I love it!

Click the link below to get this Happy Houseplants Kit or click here to check out all of the kits!

If you wish to see this kit and all of the supplies, check out this video!

Happy Stampin’

~Laura

Product List

2 NEW Kit Collections!

Posted on

Check out the 2 NEW Kit Collections that Stampin’ Up! launched this month!! A perfect classic birthday kit and a fun home decor kit that is perfect for any home!

NEW Kit Collections, www.LaurasStampPad.com

I love this Birthday Sparkle Kit because I feel like the gold and craft look are just so classic and perfect for both masculine and feminine birthdays!!! The hint of glimmer is just the icing on the cake!!!

Happy Houseplants Kit, www.LaurasStampPad.com

This kit has me super intrigued and stay tuned because I have ordered it and will show it off. I think these framed plants are perfect to match any home decor and colors. We are actually redoing the bathroom next to Laura’s Stamp Pad and I realized we needed something for the walls. Then a few days later, Stampin’ Up launched this kit and I thought it would be perfect. Stay tuned! Be sure to follow me on Facebook for all of the updates!

If you picked one of the NEW Kit Collections Kits, which one would you pick?!? Let me know in the comments below!

Also, don’t forget that Stampin’ Up has LOTS of other Kit Collection options too. These are perfect for beginner stampers or stamping on the go or just any crafter who loves a project! Check out a few of my favorites below!

You can also earn Sale-A-Bration free items when you purchase these kits! Grab an extra one to do with a friend for even more fun! Sale-A-Bration ends at the end of February!

Happy Stampin’

~Laura

Product List

This Is No April Fools!!!

Posted on

Happy April!!!! This is no April Fools joke……Stampin’ Up released a NEW Storage option for your supplies!!! Woot Woot!!!

This Is No April Fools, www.LaurasStampPad.com

This storage option is perfect for any craft room, closet, desk, or corner. The ink pad/marker layers are sold in increments of 5 so buy one or by a few. They can be stacked high or across. It is whatever fits in your space.

I am super excited about the Stampin’ Blends storage shelves because I currently have mine in a Paper Pumpkin box. Each shelf for the Blends holds 6 markers so that is 3 color sets of light and dark. Now I won’t have to dig through the box to find the light marker to go with dark one. I’m all about organization so I’m pumped about this!

storage options, www.LaurasStampPad.com

There are 3 different styles of tops for the ink pad stacks and Stampin’ Blends stacks. One of the options is just a plain flat top like those shown in the left side photo above. Then there is an option for a little tray to hold Ink Pad Refills (or whatever you would like) as shown in the far right stack above. The third option is a front open box to hold ribbons (shown above), adhesive, half size clear mount stamp cases, and more!

All of these items are available to purchase NOW!!! Woot Woot! Click here to see a fabulous configuration chart to determine what and how many of each you need! Click here to start shopping to get these fabulous new organizational pieces in your craft area now!!!

Happy Organizin’!

~Laura


New Stamp Set & Paper Storage!!!

Posted on

Happy Friday everyone!!! Today I’m sharing with your my NEW Stamp Set & Paper Storage. I had mentioned about 2 months ago getting 2 new pieces of furniture for my stamp room. You can see the first one here and today I’m sharing the second one.

New Stamp Set Paper Storage, www.LaurasStampPad.com

Here it is!!! I can’t believe how much the white brightens up the room! There is a window directly to the right of this photo so these pictures have a bit of a shadow from that light. The room in general is so much brighter from these 2 pieces of white furniture. It’s crazy! My stamp table is to the left of the photo and I sit right in front of this while stamping. I love having everything so close to grab and go. I will say that the middle section that looks all cleaned off right now….it’s not normally like that! 🙂

Stamp Set Shelf, www.LaurasStampPad.com

Here is the top section which holds my Stamp Sets! I only have 2 Stamp Sets in the old clam shell cases (Teeny Tiny Wishes & Thoughts & Prayers). I have already filled the shelf of stamps so I might have to make another row below next to my ribbons. We shall see. I have my inspiration/loves/reason for doing what I love in the photos at the top! <3 The shoe boxes on the right side have all of my ribbons in them. Finally my Enamel Shapes, Thread, and some of the Baker’s Twine is on the left side.

Drawer For Tools, www.LaurasStampPad.comThe little drawer in the middle has some of my tools in it – Stampin’ Scrub, Stampin’ Trimmer, Embossing Paste, Embossing Knives, and Watercolor Pencils! By the way, I am loving the embossing paste so stay tuned to lots of samples and tutorials using it! 🙂

Stamp N Storage Paper Storage, www.LaurasStampPad.com

Next up is the bottom section of paper storage! There are actually doors to this bottom section. We decided to leave them off since opening them would be hard with me sitting so close by. I purchase Stamp N Storage Paper Storage for all of my cardstock. You can check them out and get 10% off by clicking here! I love these things. They are super sturdy and allow me to really see what I have. While they are pricey, I know that they aren’t going to break or sag like some of my past paper storage has. I think these are about my 3rd or 4th piece of paper storage and these are AMAZING!

I have each color in a tray and a cellophane bag with scraps in there as well. This helps me use my scraps and clean up really quickly. See that little box on the floor on the right….that’s what I use to put scraps in. It would get out of hand and I would hate to dig so I just tossed pieces in there and it was a mess. I still have a few colors in there while I wait for more cellophane bags to arrive! I just love it! The drawers on the left side hold my embellishments like Pearls, Rhinestones, Doilies, and Washi Tape.

I hope you enjoyed this little post on how I store my craft supplies close to me for easy use. It’s probably time I do another Stamp Room Tour now that I have these 2 new pieces of furniture. You can check out the latest one here!

Have a wonderful weekend and see you back here on Monday!

Happy Stampin’

~Laura


My New Big Shot Station!!!

Posted on

I got a new piece of furniture for my Stamp Pad and now I have a new Big Shot station!!! I am loving it. The white seem to have really lightened up the room and I love that I can have both of my Big Shots available to use! I can do embossing on one and framelits on the other or 2 sets of framelits.

New Big Shot Station, www.LaurasStampPad.com

I moved out 3 pieces of furniture and replaced it with this one piece! It’s the perfect fit!

Big Shot Station, www.LaurasStampPad.com

On the top, I have my 2 Big Shots as well as all of the Embossing Folders and Dies. It is so nice to have plenty of room to use the Big Shot without having to move it side to side to allow the placed to slide through. On the shelf below, I have the Simply Scored Tool and the Big Shot Plates! Did you notice the catalogs on that shelf too??? It’s the NEW Catalog!!!

Cabinet Storage, www.LaurasStampPad.com

In the cabinet below, I have all of the supplies that were in the old cabinets. One the left side, I have 12″ x 12″ containers holding Heat Embossing Tools, Re-Inkers, and miscellaneous tools. On the bottom is various creations and table clothes. My greeting card containers are on the right side as well as a container with my business cards, paper pads and Paper Pumpkin Stamp Sets. My trusty label maker has it’s own spot on the shelf as well! The Cameo Silhouette is on the bottom shelf. Everything fits perfectly!

Before & After, www.LaurasStampPad.com

Here is a before and after photo! I am loving my new buffet cabinet in my stamp room! You can see an entire room tour with the piece before here!

Let me know in the comments below what you favorite part of your stamp/craft room is!

Happy Stampin’

~Laura


My Succulent Garden Home Decor Piece!!!

Posted on

Succulents are so in right now as home decor, greeting cards, and so much more! So when I thought of how to decorate my Cake Dome for Spring, I instantly thought of a little Succulent Garden Home Decor piece!!! I love how it turned out!!!

Succulent Garden Home Decor, www.LaurasStampPad.com

My cake dome just makes me so happy as it is! Now it’s even more fabulous with these flowers as it sits on the counter in my kitchen! I just love it!!!! Let’s get started on how I created it because it was rather easy!

For the Succulent Garden Home Decor piece, I die cut the 6 layers of flowers from the Succulent Framelits! The colors I used were Garden Green, Pool Party, Calypso Coral, Elegant Eggplant and Old Olive. The large flowers are all 6 layers and I brushed the edges of the flowers with my Sponge Dauber! To get the petals to curl, I just ran it over my Bone Folder like curling ribbon. Here are the color combinations I used:

~Pool Party Cardstock with Elegant Eggplant brushed on the edges

~Garden Green & Old Olive Cardstock with Elegant Eggplant brushed on the edges

~Old Olive Cardstock with Whisper White brushed on the edges

Big Succulents, www.LaurasStampPad.com

I made the large flowers and  realized I needed filler or moss! I reached out on Facebook and everyone suggested moss from the dollar store. So off I went to the store and got some moss and some green covered “rocks”. Perfect. I kept the rock sponge that I had from the beach and placed it in the middle with moss under it. Then I placed all of the “green rocks” all around. Next I tucked in the big succulents and die cut a few of the smaller 3 flowers in Elegant Eggplant and Calypso Coral. I added a Pearl to the center and attached them to the display with a Mini Glue Dot!

Succulent Garden, www.LaurasStampPad.com

If  you would like to see this all in action and up close, check out my Video Tutorial below or click here! Be sure to give it a thumbs up if you like it and don’t forget to subscribe if you are new! I post a new video every Tuesday and Thursday!

Purchase the Oh So Succulent Bundle and some Pearls (or other item for $1.50), save 10% with the bundle and you get to pick a Sale-A-Bration item!!! Tomorrow is the last day of Sale-A-Bration so stock up now. Use the Hostess Code: FCCVREYF and your name will be entered into a drawing for an entire Color Family of Ink Pads!!! Click here to start shopping!

Happy Stampin’

~Laura