Technique Tuesday – Beautiful Bokeh!!!

Posted on

Happy Tuesday!!! That means I have a fabulous technique to share with you and this one is exactly that….fabulous!!! I’m sure you have heard of or see the Bokeh look before. It is those shiny blotches of light in a photograph. So the real definition is the visual quality of the out-of-focus areas of a photographic image, especially as rendered by a particular lens. See you know what I mean, right?

Bokeh Technique, www.LaurasStampPad.com

Isn’t this just gorgeous??? I used Tempting Turquoise and Rich Razzleberry for the background and the greeting is from the Feel Goods Stamp Set! This style I got from a fellow demonstrator Mary Ellen! You can check her out here and see her tutorial on this technique here! I love the idea of using Painter’s Tape to hold down your Watercolor Paper and it gives that perfect trim!!!

Bokeh Technique, www.LaurasStampPad.com

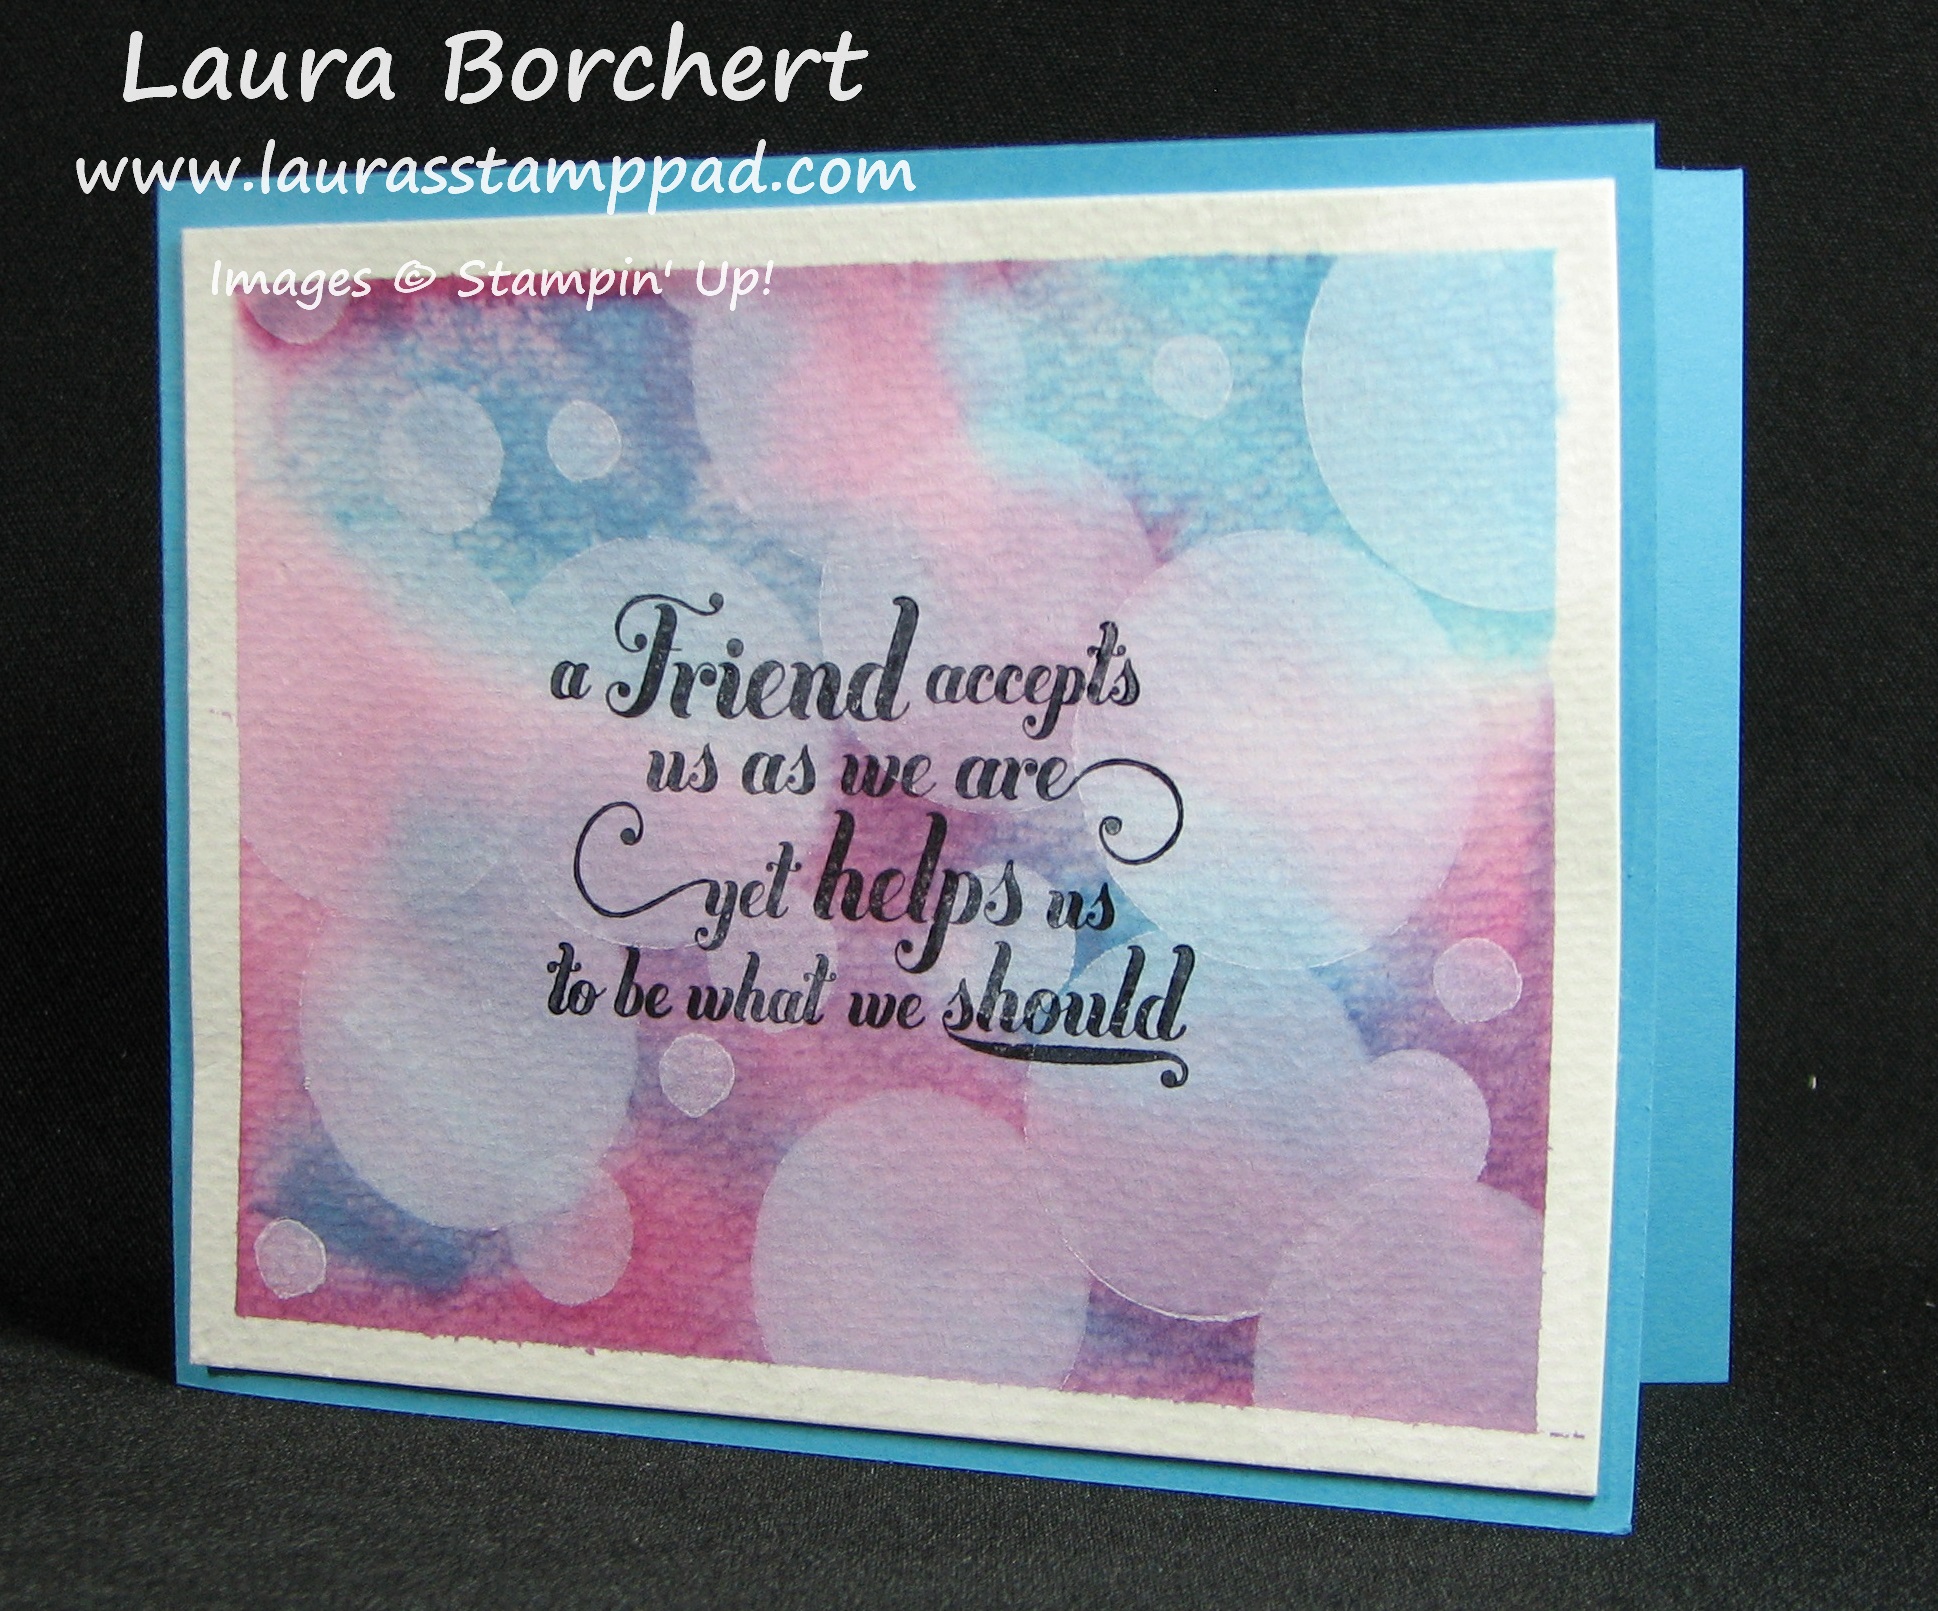
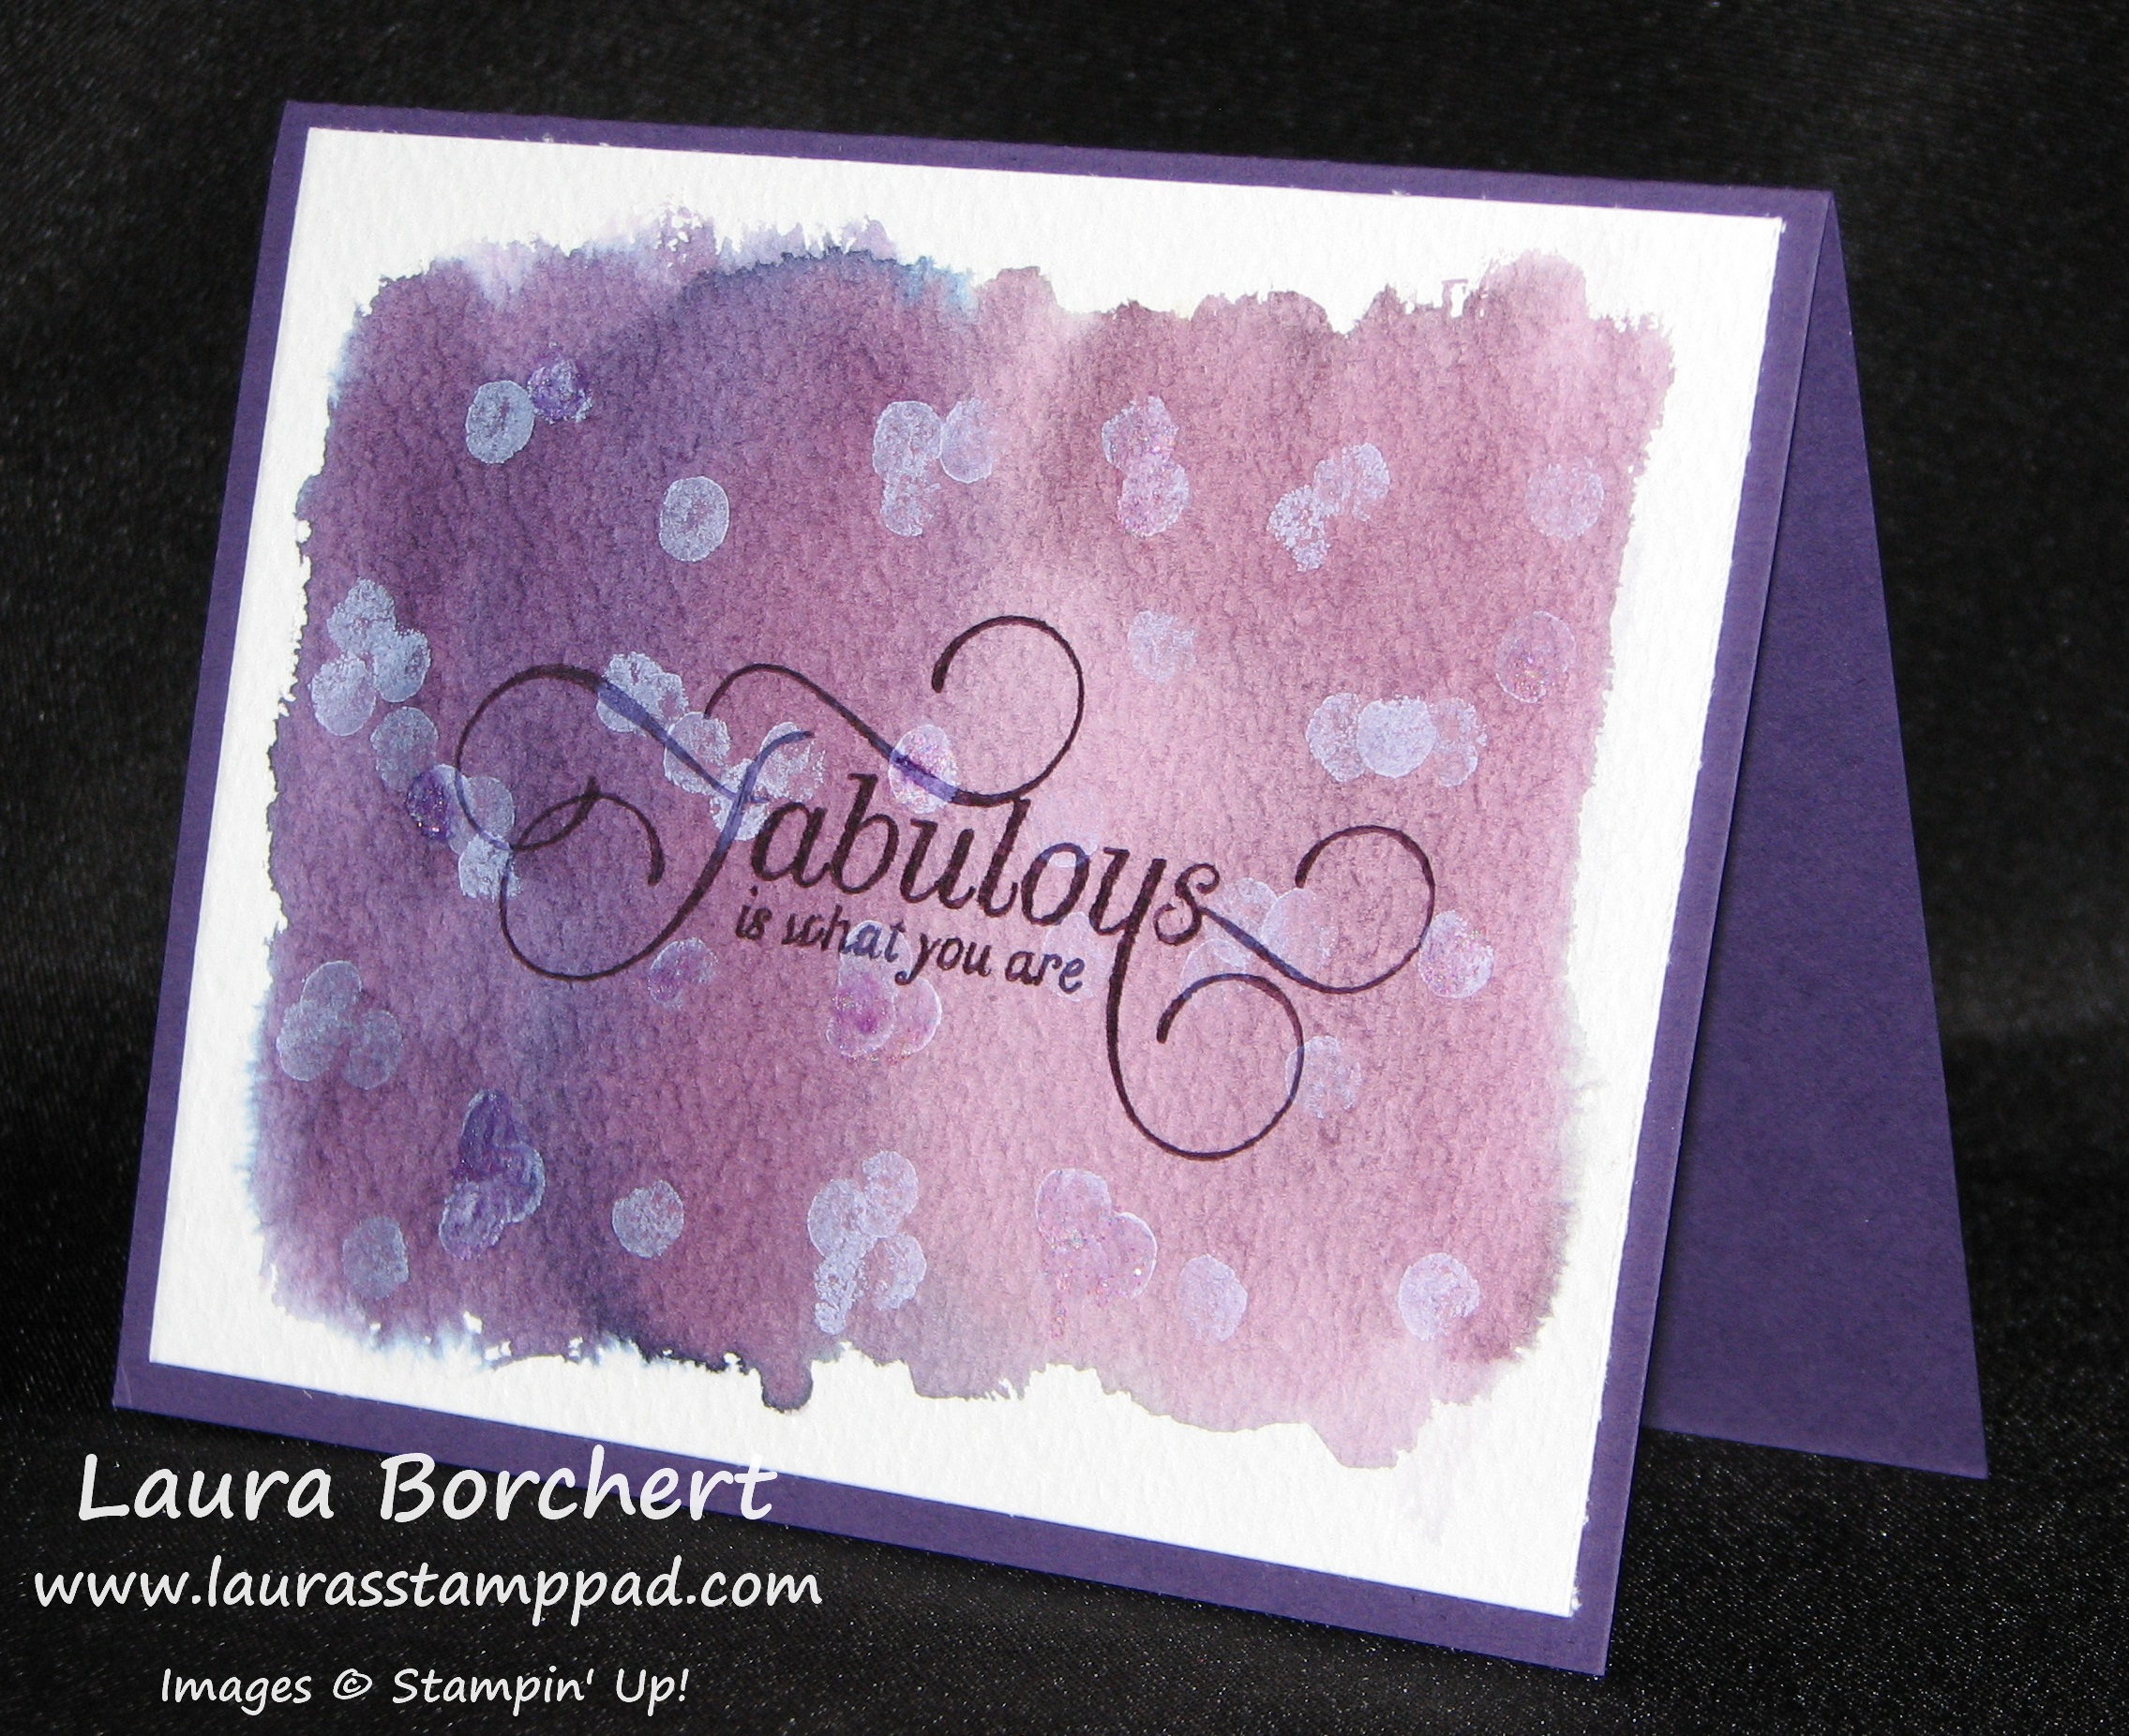
Here is another look at this technique!!! With this one, I just added a few brush strokes of ink (Island Indigo and Pool Party) to some Watercolor Paper with my Aqua Painter. After it dried, I used the Wondrous Wreath Berry Stamp to create the dots. I added the dots with Whisper White Craft Ink! How fabulous?!?! The greeting is from the A Dozen Thoughts Stamp Set! I layered it with the Oval Punch and Scallop Oval Punch! Here is another sample using Perfect Plum and Elegant Eggplant. I added some Dazzling Details and the dots were created with Whisper White Ink and my pencil eraser!!!

Bokeh Technique, www.LaurasStampPad.com

Want to see this in action?? Check out my Video Tutorial below! Be sure to give it a thumbs up if you like it!!!

I hope you try out this technique and let me know how it goes. I would love to see your creations. You could do this technique in a million different colors and get a different look with each! Love it!

Happy Bokehin’

~Laura


Technique Tuesday – No DSP Waste!!!

Posted on

Happy Tuesday!!!! You know what that means…..I have a fabulous technique to share with you today! Today, I’m going to show you how to get the most out of your Designer Series Paper (DSP). After all when it is this gorgeous, you can bear to think some might go to waste. Have no fear, I’m here to cheer you on to USE that Designer Series Paper and use it ALL!

Painted Blooms

This is the Painted Blooms Designer Series Paper from the Occasions Mini Catalog! It is so amazing and beautiful….of course I would say that being a flower fanatic and all but still it is just fabulous! Well thanks to a fellow stamper friend of mine – Patty Bennett who showed off the perfect way to create 6 cards using the sheet of paper on the far left which is a field of flowers. Even Stampin’ Up didn’t want to cut this paper up and so they framed it!!!

Framed Blooms

So lets see how to create 8 cards with this one sheet of Painted Blooms Designer Series Paper!!!! First you will start with the top of the Designer Series Paper and measure 5-1/4″ down and cut all the way across. Then to the same again….measure from the cut line you just did 5-1/4″ down and cut all the way across. You will be left with a strip of flower stems that measures 1-1/2 inches wide. Now taking those two pieces that are 12″ x 5-1/4″, you will cut along the 12″ side at 4″. This will create 6 pieces measuring 4″ x 5-1/4″. With that bottom strip that is 1-1/2″, cut that along the 12″ side at 5-1/2 creating two pieces that measure 5-1/2″ x 1/1/2″. Those are your 8 pieces and you are only giving up that little corner piece but you could always find a use for that as well. Now you can adhere your Designer Series Paper to the card base color of your choice. I used Blackberry Bliss, Rose Red, Pool Party, & Whisper White!

Painted Blooms, www.LaurasStampPad.com

As you can see in the photo, the piece of paper was all used up! After you adhere the Designer Series Paper to your card base, you can decorate and embellish as you wish! I used the Million & One Stamp Set, Label Love Stamp Set and Lots of Thanks Stamp Set for my greetings. I used the Butterfly Thinlits on a few of them and thought that no greeting was necessary! I love how they turned out! Just beautiful!

Painted Blooms, www.LaurasStampPad.com

To see these cards in action and maybe understand the cutting a little bit better, I created a Video Tutorial for you! Be sure to give it a thumbs up if you enjoy it!

Don’t worry if you use up all of your Painted Blooms Designer Series Paper….I know where you can get more! 🙂 Want to see other ways to get lots of cards out of one sheet of Designer Series Paper? Check out this post!

Happy Stampin’

~Laura


Blooming with Hope!!!

Posted on

Blooming with Hope, www.LaurasStampPad.com

Simple and Beautiful! Notice I did not say quick…hehe! It could be quick if you are fast at coloring! This card is very simple though as I just took a half sheet of Whisper White cardstock, folded it in half and stamped various flowers from the Blooming with Hope Hostess Stamp Set with my Memento Ink Pad! Then I got started coloring with my Blendabilities! I will say it now….I am NOT an Artist. That was my Grandfather who could paint with any tool and he was amazing!!! This is the latest painting that I have gotten and plan on having it framed! 🙂

Grandpa

I don’t think I have the patience for being an artist like this but I do enjoy stamping and coloring with my Blendabilities. I really love using stamp sets that make shading on the image super easy. Take a look at the flowers in the card above and you will see those extra lines….I use those lines as my guide. I usually color in the flower with the lightest Blendabilities Marker and then go back with either the Medium or Dark Marker and color around the edges and in those extra lines on the image. Works for me! If you want to see more on how to use your Blendabilities, you can check out this video that Stampin’ Up created! If you want to see some more samples using Blendabilities, check out this one and this one!

Do you enjoy coloring? Do you prefer to color with stamped images like this one or do your own shading? Leave me a comment down below. Also, if you have any tips or tricks, I would love to hear them!!!

Happy Stampin’

~Laura


Technique Tuesday – Rainbow Resist!!!!

Posted on

Happy Tuesday all! I hope you all had a wonderful weekend celebrating Valentine’s Day, Mardi Gras or just a nice weekend relaxing!!! Now it is time to get out those crafty supplies and create this amazing rainbow card because today is Technique Tuesday!!!

Rainbow Irresistibly Yours, www.LaurasStampPad.com

LOVE THIS! I think I like the stars better than the scallop but either way these cards are AMAZING!!!! Now let’s get started!

SUPPLIES NEEDED: Irresistibly Yours Designer Series Paper, Sponge Daubers, Ink Pads, Paper Towel, Greeting Stamp

You will start with a piece of Irresistibly Yours Designer Series Paper (Sale-A-Bration) measuring 4″ x 5-1/4″. Get out your ink pads and Sponge Daubers. I used Bermuda Bay, Tempting Turquoise, Mossy Meadow, Daffodil Delight, Pumpkin Pie, Melon Mambo, and Elegant Eggplant. Starting on one corner start with your Bermuda and go diagonal. Just add enough color for the look you want and you don’t need to go really wide. Take your next color and overlap it a little with the previous color so they blend together really well. I was able to use each color twice but as you can see in the two samples above, some colors are wider and my angles are different. That is okay!!!! Love it! Once you are all done adding your rainbow colors, you will take the paper towel to wipe off access ink that is sitting on top of those embossed images. You will really start to see your white embossed image POP right now! Now you can layer this onto your card front. I used Whisper White Cardstock. For my greetings, I used the Label Love Stamp Set and coordinating Artisan Label Punch (Bundle & Save!). The card on the left I used Pumpkin Pie Ink and for the card on the right, I used my markers in the same colors as the rainbow to color the stamp! LOVE IT!

If you would like to see this in action, check out my Video Tutorial! Be sure to give it a Thumbs Up if you liked it! 🙂 Also, if you would like to see more samples using the Irresistibly Yours Designer Series Paper, check those out here, here and here!

Happy Spongin’

~Laura


Technique Tuesday – Elegant Butterfly!!!

Posted on

Happy Tuesday!!! That means I have a fabulous technique to share with you today!!! Today I am sharing the Butterfly Thinlits with you from the Occasions Mini Catalog! It is super fabulous and elegant! Also, butterflies make me think of Spring so I’m all about them right now! 🙂 How amazing are these cards?

Butterfly Thinlit, Elegant, www.LaurasStamppad.com

My mom asked me for some elegant, simple cards that she could use for occasions such as Baptism, 1st Communion, Confirmation, and Weddings! This is what I came up with and she loved them!!!!

SUPPLIES NEEDED: Butterfly Thinlits, Oval Framelits, Fancy Fan Embossing Folder, Big Shot, Pearls, Very Vanilla Cardstock

I started with a Very Vanilla card base. Then I took a piece of Very Vanilla (4″ x 5-1/4″) and using my Oval Framelit I cut an oval out of the center. The size I used was the 4th one (middle one)! After cutting out the oval, I placed the piece of cardstock into the Fancy Fan Embossing Folder and ran that through the Big Shot. I adhered this piece to my card front using Stampin’ Dimensionals. You know how I love those things and I really liked how it can dimension to the card. NOTE: I placed the embossed paper onto my card front with the embossed image down, so it doesn’t pop up on my card but is smooth. I just thought this made it smooth and elegant! Then I ran a piece of Very Vanilla through the Big Shot with my Butterfly Thinlits from the Occasions Mini Catalog! LOVE these! The best way to do it to layer your Clear Cutting Pad, Dryer Sheet, Cardstock, Wax Paper, Thinlit, and Clear Cutting Pad. The Dryer Sheet and Wax Paper make it super easy to pop it out of the die and so you don’t spend hours popping out each of those butterfly details!!! I adhered the Butterfly with Mini Glue Dots and stamped the greeting in Chocolate Chip from the Crazy About You Stamp Set which is also in the Occasions Mini Catalog! Perfect! I added some Pearls to one of them! Also, I created this one as well with the Bird Builder Punch!

Bird Elegance, www.LaurasStampPad.com

Of course when I showed these to my Mom she loved them and wanted lots of them to have on hand! 🙂

Here is a Video Tutorial shows you how to make this card and showing you how to die cut using your Thinlits! I hope you enjoy it and if so be sure to give it a Thumbs Up!

Happy Stampin’

~Laura


Technique Tuesday – Sponging Backgrounds!!!

Posted on

Happy Tuesday!!! You know what that means……I have a fabulous technique to share with you today and this one uses my favorite tool – SPONGE DAUBERS!!!! Love love love them!!! Without further ado…

Hello Life, Sponge background, www.LaurasStampPad.com

I took this fabulous sample right from the Stampin’ Success magazine that I receive as a Demonstrator (another fabulous perk) and I added my own flare to it! Here is the sample from the magazine which you can see I left off the Pom Pom Twine and Epoxy Heart and their background was done a little differently as well.

Happy Card

SUPPLIES NEEDED: Sponge Daubers, Ink Pads, Stacked with Love Washi Tape, Baker’s Twine, Hello Life Stamp Set

I started off with a card base of Whisper White and I stamped the heart outline image from the Hello Life all over the background. I did the bottom two rows in Calypso Coral, then the next row up in stamped off Calypso Coral. Then I moved to Pink Pirouette and continued with that all the way up! Then I stamped the Love image in Calypso Coral on the bottom right and with Pink Pirouette in the top left. This just adds a little fun to your background! Now you can add a strip of Washi Tape to the bottom in your choice of color and pattern. Then with a 3-1/2″ square of Whisper White you will create your sponged background. Using Pink Pirouette, Crisp Cantaloupe, and Calypso Coral, you will sponge along your piece of paper making sure to overlap the colors a little bit so you have that nice smooth transition of colors rather that strips of color. Then stamp the greeting on the sponged cardstock in Basic Black and adhere to your card with Stampin’ Dimensionals! I added a bow with the Blushing Bride Baker’s Twine to finish it off! Perfect for Valentine’s Day or any occasion!

I have created a Video Tutorial for you to showcase that sponged background! Be sure to give it a thumbs up if you liked it and don’t forget to subscribe to my Channel as well!

Happy Stampin’

~Laura


Cake or Cupcakes???

Posted on

Cake One Tag Fits All, www.LaurasStampPad.com

Which do you prefer – cake or cupcakes? Cupcakes all the way right here!!!! I love them!!! Either way this card is super cute and festive! I started off with a Tangelo Twist card base and added a piece of Basic Black (4″ x 5-1/4″)! Then I took a piece of Whisper White (3-3/4″ x 5″) and ran it through the Big Shot with my Decorative Dots Embossing Folder. I punched out a few Banner Punches with the Birthday Bash Designer Series Paper. I took some Linen Thread and went from the left side to the top middle, adhering it to the back with Stampin’ Dimensionals. I then attached the banner with Stampin Dimensionals as well, making sure to have the dimensional go over Linen Thread to hold it in place! Now you will need to stamp the tag border and the eat cake greeting with a Memento Pad on a scrap piece of Whisper White (use your Stazon Ink if you are using Markers to color in). Then color in as much or as little as you wish with your Blendabilities (Bermuda Bay & Daffodil Delight)! You won’t be punching this piece out but instead using the Note Tag Punch to punch out the image from your embossed Whisper White. I lined it up so that the bottom of the paper was all the way in the punch and you will want to be on the right side of your paper. Now you can add Stampin’ Dimensionals to the rest of the back of the embossed Whisper White. Before you go to lay it down you will want to add adhesive to your colored greeting and line it up in the punched hole and place that down first, just right before you place the embossed piece. Now you have that window effect where the greeting is set in! Super cute and fun! Here is another photo of this sample straight on!

Cake One Tag Fits All, www.LaurasStampPad.com

You can check out this Video Tutorial that I created using this stamp set for this card and a few others! Be sure to subscribe to my blog in the upper right corner so you don’t miss out on the rest of these samples which will be posted next week! Don’t forget to leave me a comment below on whether you prefer cake or cupcake!!!!

Happy Stampin’

~Laura


Technique Tuesday – One Tag Fits All!!!

Posted on

Happy Tuesday!!! That means I have a fabulous technique to share with you today and I do!!!! I received the One Tag Fits All Stamp Set for free from Stampin’ Up when I attended the New Catalog Premiere! It was super fabulous and a great perk of being a demonstrator is getting to see the new catalog items before everyone else….and free stamps! If you would like to join me for these events, you can sign up to be a demonstrator now and earn a FREE kit from the Occasions Mini Catalog! Woot Woot!!!

One Tag Fits All Baby, www.LaurasStampPad.com

Okay so lets get started on this fabulous technique I have to share with you today! Actually there are a few techniques….multiple uses of 1 stamp set and some cool ways to use your punches!!!! Isn’t this baby card just precious? It is very simple to make and since it is light blue and yellow, it isn’t gender specific so you can make a few of these up to have on hand. Love it!!!

SUPPLIES NEEDED: Embossing Folder, Decorative Label Punch, One Tag Fits All Stamp Set, Memento or Stazon Ink, Blendabilities or Markers, and Ribbon

I started with a piece of Soft Sky cardstock measuring 4-1/4″ x 11″. I folded the card in half and then stuck the front of the card in my Polka Dot Embossing Folder and ran it through the Big Shot! Then I stamped the New Baby image, from the One Tag Fits All Stamp Set which is in the new Occasions Mini Catalog, with the Memento Ink onto a scrap piece of Whisper White Cardstock. If you are coloring the duck in with Markers, you will want to use Stazon Ink. If you are coloring the duck in with Blendabilities, you will want to use Memento Ink. This is so the ink won’t bleed when you are coloring. After stamping it down, I colored it in with my Pumpkin Pie Blendabilities and Daffodil Delight Blendabilities! Then I lined up this image in my Decorative Label Punch and punched it out. I then took my Decorative Label Punch and put my card front in the punch towards the right side and all the way into the punch so that I knew it was straight/even. I punched! Then I added Stampin’ Dimensionals to my stamped, colored, and punched piece and placed it in the punched hole on my card front. The best way to line it up is to have the card folded shut and just lay it in that punched hole. This is adhering the piece to the inside of the card which makes a fabulous front and inside to the card! Precious! Then I added some Daffodil Delight Cotton Ribbon around the side of the card and through that punched hole! Quick and simple and fabulous!!!!

One Tag Fits All Baby, www.LaurasStampPad.com

Here is another photo showing the image on the inside! If you want to see this in action, check out my Video Tutorial on this card and others that you can create with this amazing One Tag Fits All Stamp Set! Don’t forget to subscribe here so you don’t miss out on those cards that will be posted later this week and next week. At the top right of my page – www.LaurasStampPad.com you can enter your email address and then you will get an email every time I post something new!

Get your One Tag Fit All Stamp Set today!!!

Happy Stampin’

~Laura


Fabulous Friday!!!

Posted on

Happy Friday! This has been a busy week so I’m excited for the weekend to finally be here! Woot Woot! But first we must check out the following fabulous deals!!! The Weekly Deals this week are super fabulous again!

Weekly Deals 1.20

I love Baker’s Twine because it is super cheap ($0.0038/per inch regularly, even cheaper now)! Also, it is not bulky so you don’t have to worry about your card being to thick to mail! LOVE IT!!! The Skin Tone Blendabilities….WHAT? I gave in and purchased those just a week or 2 ago. You know I’m not a big fan of the browns but the more I play with my Blendabilities, the more I was needing those colors….especially for the From the Herd Stamp Set. Check out this post! See I need the browns and tans! Get your set now!!!! Don’t forget that if you order is $50 or more, you qualify for a free Sale-A-Bration item and you can get Blendabilities as your FREE item! Woot Woot!

January Paper Pumpkin, www.LaurasStampPad.com

My January Paper Pumpkin Kit arrived in the mail this week and it was SUPER fabulous! Of course, Stampin’ Up knows how to prepare us for all of the upcoming holidays so this one is for Valentine’s Day! This kit comes with 24 treat bags which are perfect for kid’s classroom/daycare, your grandkids, nieces/nephews, neighbors, and even complete strangers. Am I the only one that likes to randomly give the person at the Post Office or Grocery Store a little treat to make their day?!?!?! Surely not! 🙂 Even if all of those options don’t sound like something you would do, you can save these for a Birthday Party, Baby or Bridal Shower, Graduation, or another event! I have a fellow stamper who is using this kit for a Twins Baby Shower! How precious! Even though I am a silver girl, I love the shiny gold in this kit. Super gorgeous! You can check out all the contents of the kit here in my Reveal Video!

If you aren’t a My Paper Pumpkin subscriber, you will want to get signed up so you don’t miss out on any future kits! You can sign up by clicking here! You can also purchase Subscriptions in 1,3,6 and 12 months! Right now you can purchase the 3 month at a $5 discount and still earn a FREE Sale-A-Bration item! Woot Woot! A subscription is a great gift to give as well! 😉

I hope you have an amazing weekend!

Happy Stampin’

~Laura


Technique Tuesday – Crazy About You!!!

Posted on

Happy Tuesday!!!! That means I have a fabulous technique to share with you today!!! I’m sharing the Crazy About You Stamp and coordinating Hello You Thinlit Die! I love this stamp set because it has some fabulous greetings and flowers!!!! Double Win!!!

Crazy About You Thinlits, www.LaurasStampPad.com

How fabulous is that? I am loving that color combo too – Strawberry Slush, Calypso Coral, and Crisp Cantaloupe!!! Let’s get started!

SUPPLIED NEEDED: Cardstock, Crazy About You Stamp Set, Hello You Thinlit, Big Shot, 1-3/4″ Scallop Circle Punch, Wax Paper, and Embellishments

I started off with a card base of Pistachio Pudding (4-1/4″ x 11) and I stamped the leaf image from the Crazy About You Stamp Set from the Occasions Mini Catalog with Pistachio Pudding ink on the bottom! Then I stamped the flower in Strawberry Slush, Calypso Coral, and Crisp Cantaloupe Ink onto scrap paper and punched them out with my 1-3/4″ Scallop Circle Punch! I adhered one of the flowers right to the paper and popped the other two up with Stampin’ Dimensionals! Now comes the fun part – picking out a fabulous greeting! The Crazy About You Stamp Set has greetings that coordinate with the Hello You Thinlits as you can see above! There are so many mix and match options!

Crazy About You

When you are using your Thinlits to cut out the greetings I have the following tips it goes smooth! 🙂

~Use Wax Paper on top of the cardstock when cutting out the words! This will help it pop right out of the die much easier. Your layers will go…Magnetic Plate or Multi-Purpose Platform / Clear Cutting Pad / Cardstock / Wax Paper / Thinlit / Clear Cutting Pad

~If your words don’t pop out right away, you can use the back of a straight pin or even Paper Snip tips to push it from the backside through those little holes in the Thinlit!

~If it seems that your Thinlit is not cutting through the cardstock, you may need to add a shim (I use a little piece of the cardstock that comes in the back of Designer Series Paper packs)! This adds a little bit of thickness so the die is pressed nice and tight!

Once you have your words cut out you can attach them to your card and stamp the coordinating greeting of your choice! I stamped “So Much” in Pistachio Pudding! Super fabulous! I hope you enjoyed this and if you want to see it in action, check out my Video Tutorial below! Be sure to give it a Thumbs Up if you liked it and don’t forget to subscribe to my Channel so you don’t miss any future videos!

If you want to see the other sample shown in the video, click here!!!

Happy Stampin’

~Laura