I’m Here For You!!!

Posted on

Happy Monday!!! This card may not be practicing social distancing but always know I’m here for you!!! Now is the best time to send happy mail to friends and family to stay connected and make someone’s day!!!

I'm here for you, www.LaurasStampPad.com

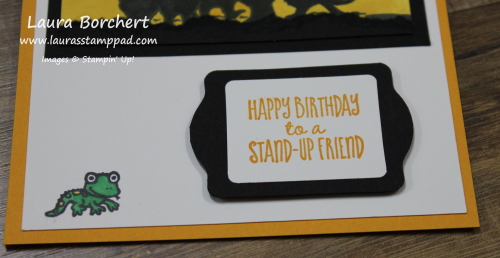
The Gangs All Meer is a Sale-A-Bration stamp set that you can earn for Free with a $50 order. This set is just adorable with the little meerkats and lizard. I love it!

I started with a Crumb Cake card base. Next, I took a piece of Seaside Spray and embossed it with the Coastal Weave Embossing Folder. Then I took a piece of Very Vanilla measuring 3″ x 3-3/4″ and stamped the meerkats up top and the greeting down low in Soft Suede Ink. Using the Soft Suede Light Stampin’ Blends Marker, I colored in the meerkats. They are just so adorable!!!

Gangs All Meer, www.LaurasStampPad.com

Next, I layered this piece onto some Crumb Cake. Using the Seaside Spray Scalloped Linen Ribbon, I added some across to separate the greeting and the focal image. This also gives a little bit of texture. Then I added this piece to the card front with Stampin’ Dimensionals. To finish it off, I added a few Seaside Spray Faceted Dots!

Little Lizard, www.LaurasStampPad.com

On the inside, I added a piece of Very Vanilla measuring 4″ x 5-1/4″. Down in the corner, I stamped the little lizard in Soft Suede Ink. Using Soft Suede and Mossy Meadow, I colored him in. For the “All of Us” greeting, I actually stamped that and masked the “for”. I wanted it to read that we are all here for you….all of us!

Don’t forget that Sale-A-Bration ends next Tuesday! Now is the time to stock up on your supplies so you can earn FREE stuff too. All of the products used on this We’re Here For You card are listed below! Also, our kits are awesome to get for yourself or mail to a friend for fun project to pass the time and also happy mail to send out! Click here to see all of the kits!

Happy Stampin’

~Laura

Product List

Berry Sweet & Simple!!!

Posted on

This card style is perfect for any occasion! The basic colors make it easy to swap a color in or out for your liking. It’s just so berry sweet and simple!!!

Berry Sweet & Simple, www.LaurasStampPad.com

I am just loving this layout and how interchangeable it is!! I used the Witty-cisms Stamp Set which has lots of greeting/image variety!

For the card base, I used Smoky Slate cardstock. Next, I took 3 strips of scrap paper in Basic Black (1″), Whisper White (1″), and Silver Glimmer Paper (3/4″) and punched them with the Banner Triple Punch. This is a great way to use up scraps. Also, you can snip off the length you need, punch it again and keep going to make lots of this card style.

For the focal point, I used the Stitched So Sweetly Dies for those adorable scallop stitched rectangles. You can use whichever size fits your image. I went with Real Red and Whisper White for this one to match the berry. I stamped the image from Witty-cisms in Memento Black Ink and then colors it with Stampin’ Blends. Then I layered these together and then added them to the card front over the ends of the banner strips with Stampin’ Dimensionals! This gives a smooth look but also some texture to the card!

Strawberry, www.LaurasStampPad.com

For the inside of the card, I used the Stampin’ Write Markers to color just the strawberry image. Then I stamped it in the corner of a piece of Whisper White (4″ x 5-1/4″) for the inside of the card!

To this this berry sweet and simple card in action as well as a graduation card using the same style, check out the video tutorial below or click here. Be sure to give the video a thumbs up if you liked it and don’t forget to subscribe if you are new. If you would like a notification when I post a new video, be sure to click the bell right next to the subscribe!!!

Happy Stampin’

~Laura

Product List

Meerkat Silhouette Sunset Card!!!

Posted on

The cuteness factor: HIGH! The amazing view factor: HIGH! Fun technique factor: HIGH! This Meerkat Silhouette Sunset card is just adorable and I’m going to share with you how to make it!!!

Meerkat Silhouette Sunset Card, www.LaurasStampPad.com

I started with a Mango Melody card base. Next, I took a piece of Whisper White (4″ x 5-1/4″) and stamped the lizard in the corner and added it to the card front. I just had to add him to the card because he’s adorable!

Sunset, www.LaurasStampPad.com

Next, I took a piece of Whisper White and stamped the meerkats on there in Memento Black Ink. Then using the Dark Basic Black Stampin’ Blends Marker, I colored them all in. Then I placed a 1-1/2″ scrap circle over the center of the card. It should cover up some of the meerkats. Starting with Mango Melody, I sponged the color around the circle making sure it didn’t move. Next, I took a Daffodil Delight Sponge Dauber and colored the rest of the way out, making sure to blend the colors together. Be sure to go over the meerkats so the color gets everywhere. Now you have that fabulous sunset and silhouette look.

In order to make the meerkats not look like they were floating, I took a scrap piece of Basic Black and ripped it along the top. Then I placed this under the meerkats and trimmed off the excess. This layer was added to a Basic Black piece of cardstock before adding it to the card front. This makes the image pop more!!

Happy Birthday To A Stand-Up Friend, www.LaurasStampPad.com

For the greeting, I stamped it in Mango Melody Ink. All of these images are from the Sale-A-Bration Gangs All Meer Stamp Set. Woot Woot for free stamps! Using the Label Me Lovely Punch, I layered these images today. I just trimmed off pieces of the punched image to get a different look. Check out this video on that! I’m still debating on where I want to add a few rhinestones either above the lizard or on either sides of the greeting. The yellow/orange ones in the Holiday Basics Rhinestone Pack would work perfectly!

To see the Meerkat Silhouette Sunset all in action, check out the the video tutorial below or click here. Be sure to give the video a thumbs up if you liked it and don’t forget to subscribe if you are new. If you would like a notification when I post a new video, be sure to click the bell right next to the subscribe!!!

Happy Stampin’

~Laura

Product List

Painted Poppies!!!

Posted on

This card is so simple and yet feels so amazing. Sometimes it’s the little things that mean the most in our lives and this card is that. Check out this amazing painted poppies card!

Painted Poppies, www.LaurasStampPad.com

This card was made with the Note Cards & Envelopes Pack. I simply stamped the flowers and greeting in Memento Black Ink. Next, I colored in the flowers with Stampin’ Blends. Then I finished it off with some Crushed Curry Seam Binding tied around the entire card front. It’s that easy!!!

I used the Painted Poppies Stamp Set for the flowers and the greeting is from the Itty Bitty Greetings Stamp Set. This is even a card that you could leave off the greeting completely or wait till you need the card and then stamp one. It’s just the classic card! Check out this card which is another great classic card option!

Coloring with Stampin' Blends, www.LaurasStampPad.com

I just love bright colors so I went with an array of Stampin’ Blends. Check out all of the colors I used in the photo as well as the supply list below. What colors would you use for this painted poppies card?? Let me know in the comments!

Happy Stampin’

~Laura

Product List

Fields of Lavender!!!

Posted on

Soft Spring breeze! Warm sun kissing your face! Birds chipping sweetly! Are you feeling amazing and relaxed?? I know I am and that’s why this fields of lavender card makes me so happy!!!

Fields of Lavender, www.LaurasStampPad.com

While this card is super simple, it’s just so amazing! The stamp set is called Beautiful Moments and there are 3 images with people in them as well as a few decorative images and greetings! It’s perfect! I’m in love!

I started with a Whisper White card base and stamped the greeting in Basic Gray in the lower right corner! Next, I added a strip of Highlight Heather that I ran through the Curls & Swirls Embossing Folder. Then for the focal point, I die cut out a Stitched Rectangle! This added a little more texture to the card!

Beautiful Moments Stamp Set, www.LaurasStampPad.com

I stamped this image in Basic Gray because I like that softer look! Then using Stampin’ Blends, I colored everything in!!! You could always use different colors. Heck, I don’t even know if that is lavender but that’s what I’m going with! Is it lavender? Let me know in the comments below!

Stampin' Blends Markers, www.LaurasStampPad.com

For the inside of the card, I added a little sprig of lavender!!! I feel like I could make lots of these with various greetings because it’s just so pretty! If you would like to recreate this fields of lavender card, check out the supply list below!

Happy Stampin

~Laura

Product List

What Do You Stamp With When Coloring???

Posted on

Today, I have another one of Laura’s Quick Tips to share with you! This came from a question I got from my Facebook Page. The question was what do you stamp with when coloring??

What Do You Stamp With, www.LaurasStampPad.com

My answer this question is Basic Gray! That is what I prefer to use when I am coloring with Stampin’ Blends or Watercoloring. I find that Basic Gray has a soft subtle look verses a bold black look. This is just my opinion so you can use what you would like. Check out these photos to see both options! Let me know which you prefer in the comments below!

Black or Gray, www.LaurasStampPad.com

If you would like to watch me show off the options of “What Do You Stamp With”, check out the video below or click here! Be sure to give the video a thumbs up if you liked it and don’t forget to subscribe if you are new. If you would like a notification when I post a new video, be sure to click the bell right next to the subscribe!!!

Happy Stampin’

~Laura

Don’t forget about the Christmastime is Here Suite!!! These items are while supplies last so don’t wait long or they will be gone!

Product List
Artfully Aware Cling Stamp Set
$23.00
Tuxedo Black Memento Ink Pad
$6.00
Basic Gray Classic Stampin' Pad
$7.50
Highland Heather Stampin' Blends Markers Combo Pack
$9.00
Ivory Stampin' Blends Marker
$4.50
Daffodil Delight Stampin' Blends Markers Combo Pack
$9.00
Soft Suede Stampin' Blends Markers Combo Pack
$9.00
Bronze Stampin' Blends Marker
$4.50

Warmth & Love!!!

Posted on

That’s what we all need this time of year – warmth & love! Am I right??? Well I hope this card brings it to all of you!!!

warmth & love, www.LaurasStampPad.com

I’m so in love with the Christmastime is Here Suite. All of the amazing products are used in this card. The Stamps, coordinating Framelits, Gold Ribbon, Designer Paper, and Gold Enamel Embellishments are all part of it!

Here I started with a Whisper White card base measuring 4-1/4″ x 11″. Then I layered on a piece of the Christmastime is Here Designer Series Paper (4″ x 4″). This means that you can get 9 cards from 1 sheet of the paper. Next, I stamped the greeting in Cherry Cobbler at the top from the Christmas Rose Stamp Set and tied some of the ribbon around the card front.

Red Roses, www.LaurasStampPad.com

For the roses, I stamped them in Basic Gray and colored them with Stampin’ Blends. Cherry Cobbler, Mossy Meadow, Poppy Parade, Soft Suede and Old Olive were the colors I used! After die cutting it out, I added it to the card front and just trimmed off the part hanging over. To finish it off, I added some of the Gold Glittered Enamel Embellishments! STUNNING!!!

Be sure to check out this post and this one for more on this amazing bundle full of warmth & love. It is while supplies last so don’t delay. Click the supply list below to get yours today!

Happy Stampin’

~Laura

Product List
Christmastime Is Here Suite Bundle (English)
$112.50
Basic Gray Classic Stampin' Pad
$7.50
Cherry Cobbler Stampin' Blends Markers Combo Pack
$9.00
Mossy Meadow Stampin' Blends Combo Pack
$9.00
Soft Suede Stampin' Blends Markers Combo Pack
$9.00
Poppy Parade Stampin' Blends Markers Combo Pack
$9.00
Old Olive Stampin' Blends Markers Combo Pack
$9.00

Christmas Roses!!!

Posted on

Happy Tuesday!!! Today’s technique is a bit tricky…..stamping or coloring! Can you guess which one I did on these Christmas Roses?? Which one do you prefer??

Christmas Roses, www.LaurasStampPad.com

I am just loving the Christmas Roses Stamp Set that just came out this month! The image is stunning and so fun to color! The card above is actually colored rather than stamped with all of the coordinating images. While stamping was easy to do as the images are photopolymer, I found coloring to be more fun!

This card was created super quickly as I just stamped in the image in Basic Gray and then colored it with Stampin’ Blends. Next, I die cut it with the coordinating Roses Dies. After that, I added it to the card. The card base is Mossy Meadow with a piece of the Christmastime Is Here Designer Series Paper!!! While the Suite has a lot of gold in it, I decided to branch out and use some silver for the card.

Coloring Roses, www.LaurasStampPad.com

Meanwhile, stay tuned for tomorrow’s card where I show more fabulous samples using the Christmastime is Here Bundle. Remember it is while supplies last so get these fun products before they are gone!

If you would like to watch me show off these Christmas Roses, check out the video below or click here! Be sure to give the video a thumbs up if you liked it and don’t forget to subscribe if you are new. If you would like a notification when I post a new video, be sure to click the bell right next to the subscribe!!!

Happy Stampin’

~Laura

Product List
Christmastime Is Here Suite Bundle (English)
$112.50
Christmas Rose Stamp Set (English)
$38.00

Boo To You!!!

Posted on

Halloween is right around the corner so now is the time to start working on your Halloween Projects. That might be treat bags, cards, tags, or home decor. Today, I’m sharing with you a cute Boo To You card with little monsters!!! Thank you to Tamra Davis for the inspiration for this card!

Boo To You, www.LaurasStampPad.com

Just a little scary….and hairy…but also super cute!!! There are 3 monsters in the Boo To You Stamp Set so you can really have lots of fun with this card!

I started with a Terracotta Tile card base. Using the Boo To You greeting and the Terracotta Tile Marker, I inked up just the word “Boo” and stamped it all over the background. You could also stamp the entire image if you wish. Next, I die cut out a square Stitched Shape in Smoky Slate. Then I stamped the monster in Basic Gray and colored him with Stampin’ Blends Markers. I used Highland Heather and Pumpkin Pie but you can do any color!

Creepy Monster, www.LaurasStampPad.com

Per my husband since I’m not a monster aficionado, I left the finger tips white and then added some Glitter Crystal Effects. Also, I added some to the eyeballs and teeth! Once complete, I layered this piece onto Black Foil Paper measuring 3″ x 4″. Next, I took a piece of Terracotta Tile Scallop Trim Ribbon and colored down the center with a Black Stampin’ Blends. This changes the ribbon completely for a fun spooky look. I love it. TIP: The color does bleed on the ribbon so be gentle and swipe close to the scallop trim and allow it to bleed to fill in. I added this to the bottom of the foil paper securing the ends of the ribbon on the back side with Stampin’ Dimensionals. Then I added it to the card front.

For the greeting, I stamped it from the Boo To You Stamp Set and punched it out with the 1″ Circle Punch. Next, I layered it onto a Scallop Circle of Smoky Slate and added it to the card front.

Monster Card Insert, www.LaurasStampPad.com

For the inside of the card, I stamped another cute monster and stamped the other greeting in the set. Aren’t they just precious?!?!?! If you would like to make a Boo To You card for the little monsters in your life, click the supplies listed below. Also, check out this fun sample too!

Don’t forget that orders of $75 or more will earn the Beauty & Joy Stamp Set for FREE as a special offer through me!

Happy Stampin’

~Laura

Product List

Little Miracle!!!

Posted on

Last week, I posted this sweet card for our neighbor. Oddly enough we just found out she is having a girl and I went with Rococo Rose for her card. 🙂 I have another little miracle baby card to share with you today! I’m just loving this set and the sweet images!

Little Miracle, www.LaurasStampPad.com

While this card does have coloring, it is still a very quick card to create! Changing the colors a bit based on the gender or the recipient’s favorite color would be sure easy to do!

I started with a Whisper White card base. Next, I took a piece of Balmy Blue and stamped the dots from the Wonderful Moments Stamp Set all around the edge. I stamped the dots in Balmy Blue for that subtle background look.

Then taking a piece of Whisper White, I stamped the pregnant girl in Basic Gray. I like using gray when I color because it’s a more subtle look rather than a bold outline. Using Stampin’ Blends, I colored her in. Balmy Blue was used for her dress. Ivory for her skin tone and Bronze for her hair. The greeting was also stamped in Basic Gray. I layered this piece onto Soft Sea foam and added it to the card front with Stampin’ Dimensionals. I finished off the card with some Basic Sequins!

If you would like to make this card, check out the supplies below. Also, let me know some fabulous color combinations that would be perfect for this card!

Happy Stampin’

~Laura

Product List