Tempting Techniques – Sponged Roses!!!

Posted on

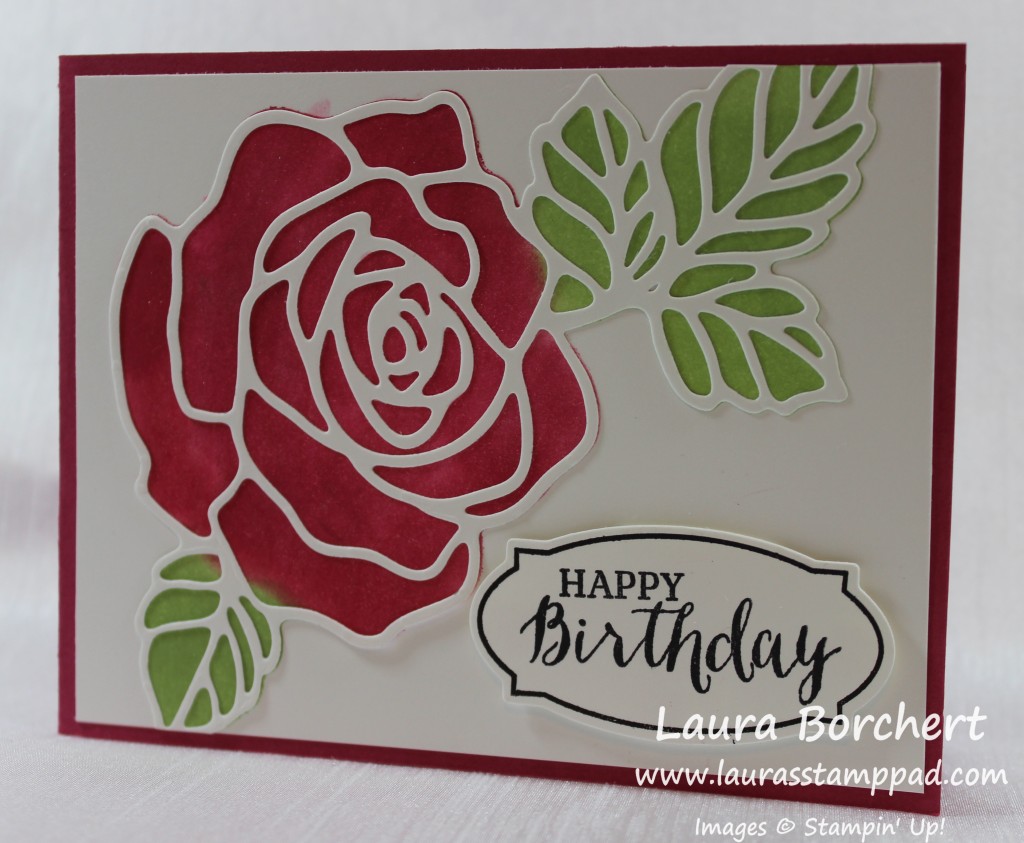
Happy Tuesday!!! You know what that means! I have a fabulous technique to share with you today! It is super fabulous because it combines lots of things I love – flowers, bling, and sponge daubers!!! Woot Woot!

Sponged Rose, www.LaurasStampPad.com

Look at this beauty!!! You can do this technique in any color you wish for that stunning look! Let’s get started!

SUPPLIES NEEDED: Sponge Dauber, Rose Garden Framelits, Big Shot, Die Brush, Fine Tip Glue Pen, Rose Wonder Stamp Set

To get started, you will need to take a piece of scrap Whisper White cardstock and run it through the Big Shot with the rose image from the Rose Garden Framelits. Once that is die cut, you can use the Die Brush to pop it out of the framelit, pop out all the little pieces and get all the little “hairs” off. Now using the leftover outline of the image as a template, place it on a piece of Whisper White measuring 4″ x 5-1/4″. You can place it on there half off or in any corner. It is all up to you. Then with a Sponge Dauber and your color choice, POUNCE the ink onto your card. You won’t want to rub or brush because it could make your template move. For this sample, I used Wild Wasabi for the leaves and Rose Red for the flower. Just add the color all around and stop at the breaking point of the leaves and flower. It is okay if some spots look darker than others. The variation in color really looks fabulous once it is all complete. Now that you are done adding color to the cardstock, I then took the Wink of Stella Brush and added glitter to the entire rose.

Wink of Stella Rose, www.LaurasStampPad.com

Then you can add the die cut rose. I used the Fine Tip Glue Pen to adhere the rose on. This is the perfect glue!! Now you can add any greeting that you would like. I really think this card is perfect for all occasions! I used the Rose Wonder Stamp Set (Bundle & Save 15%). I stamped the frame and greeting in Basic Black and die cut it with the Rose Garden Framelits! I added it to the card front with Stampin’ Dimensionals. Love it!!!

If you would like to see this in action, check out my Video Tutorial below or click here! Don’t forget to give it a thumbs up if you liked it!!!

What color would you make your rose??? I think I want to do a Melon Mambo one next or maybe Elegant Eggplant!!!

Happy Stampin’

~Laura

Memories In The Making!!!

Posted on

Awesome Emboss Resist, www.LaurasStampPad.com

The Memories In The Making Project Life Card Collection is one of the items that you can earn for FREE through Sale-A-Bration!!! I thought the cards were super fabulous because many of them are window sheets with frames and borders and amazing designs. There are a few that are gold on one side and silver on the other. WOOT WOOT! I love how there is something for everyone there. The other pieces have embossed prints on them so you can have fun and add color for an emboss resist technique. Love it!!!

The card above uses one of the embossed patterns and I brushed over it with an Elegant Eggplant Sponge Dauber to give it some color. Since the card is 4″ x 6″, I had to cut it down a bit (4″ x 5-1/4″). I added some Whisper White Cotton Ribbon. For the greeting, I used the Big News Stamp Set. I layered it onto Elegant Eggplant and added it to my card with Stampin’ Dimensionals. I thought it needed a little bling so I added some Dazzling Details to all of the little dots in the scroll. 🙂

Project Life Card Collection, www.LaurasStampPad.com

I didn’t want to waste that little strip that I cut off so I created this card. I took another Memories In The Making Card, stamped the greeting from the Tin Of Cards Stamp Set in Stazon Ink and added it to my card front once it dried. Be very careful when stamping on Window Sheet as it can be slick and want to slide all over. Straight up and down! This is one of those cards that the dotted wreath is gold on the back side. I’m a silver girl though! 🙂 Since you can see adhesive on Window Sheet, I just added it to the left hand side where the patterned paper is. It is held securely with Tear & Tape so I don’t have to worry about it coming off!

Awesome Ombre, www.LaurasStampPad.com

I wanted to do another one so I took another Card from the Collection that was embossed stripes. I used my Sponge Daubers to add color in this amazing ombre pattern. I used Bermuda Bay, Island Indigo, and Night of Navy. I loved how it turned out. I wrapped some Silver Metallic Thread around a few (hundred) times on the left hand side and tied a knot. I added it to a Bermuda Bay card base and did the awesome greeting again from the Big News Stamp Set. Perfect Man Card!!!

Memories In The Making, www.LaurasStampPad.com

Then with the little strip that I had to cut off, I created this card. Again I took one of the Window Sheet Cards and stamped in Craft White Ink with the Tin of Cards Stamp Set. I adhered it on with Tear & Tape under the strip of ombre! I love how these turned out!

You can use Project Life Card Collections for greeting cards and memory keeping. They are so much fun and so versatile. You can check out a few of my Project Life Album Pages here!

To see all of the cards from the Memories in the Making Card Collection, check out the Video Tutorial below or click here! Don’t forget to give it a thumbs up if you liked it.

Have you ever tried the Project Life Card Collection for memory keeping or card making? Let me know in the comments below!

Happy Stampin’

~Laura


Technique Tuesday – Confetti Fun!!!

Posted on

Happy Tuesday!!! That means I have a fabulous technique to share with you today!! We will be coloring on an embossed image and it is so much fun!!! Check this out!

Sponged Embossed Confetti, www.LaurasStampPad.com

How cute…or manly….is this card? I think this would make a great Man Card and many would probably say a Man Card isn’t described as cute. 🙂 You could use any combination of colors to match the occasion. You could do school colors for a graduation card, wedding colors for wedding or the recipients favorite color for Birthday, Just Because, or Thank You!!! I love it!!

SUPPLIES NEEDED: Embossing Folder, Sponge Daubers, Ink Pads

I took a piece of Whisper White cardstock measuring 4″ x 5-1/4″ and ran it through the Big Shot in the Confetti Embossing Folder from the Occasions Mini Catalog! Then I took my Sponge Dauber and Ink Pads and lightly brushed over the embossed portion. I went in a circular motion to keep in little sections but you could always go back and forth or whichever way you like best. I used Pacific Point, Pumpkin Pie, and Cucumber Crush for this card! Then I placed it onto a Cucumber Crush card base. Since the center is smooth in this folder, I used my Oval Framelits for the greeting! I stamped the greeting from the Party Wishes Stamp Set in Pacific Point. I stamped it on Whisper White and layered it onto Pumpkin Pie. You could always just stamp the greeting directly onto the embossed piece! The greeting is attached to the card front with Stampin’ Dimensionals! How simple is that? I love it!

Colored Confetti, www.LaurasStampPad.com

If you would like to see this in action, check out the Video Tutorial below or by clicking here! Don’t forget to give it a thumbs up if you liked it and be sure to subscribe so you don’t miss out on any future videos!

Happy Stampin’

~Laura


Fabulous Friday!!!

Posted on

Happy Friday everyone! We survived the first full week of 2016!!!! Woot Woot!!! The Occasions Mini Catalog and Sale-A-Bration Promotion have begun and I have had so much fun sharing it will all of you! Yesterday was my big event sharing samples, ideas, product, and fun with lots of fabulous stampers! It was a blast!!! Here are some photos of the displays. I always forget to take pictures during the event because I’m having so much fun chatting and sharing what I love! Note to self: have my husband take photos for me! 🙂

Girls Night Out, www.LaurasStampPad.com

There are so many fabulous ways to celebrate during Sale-A-Bration!

As a Customer: You earn a Free Sale-A-Bration Item for every $50 you spend!!!

As a Hostess: You earn $25 additional in Stampin’ Rewards when you party reaches $250.00. This could be a single order, an in home (or my home) party with friends, a private class, or even an online party where you gather orders from friends and everyone enjoys the comfort of their home!

Want it all?? If your wish list is large and you are ordering anything close to $100, then this is the perfection option for you! When you join Stampin’ Up and my fabulous team during Sale-A-Bration, you will get to pick out $155 worth of product and you will pay just $99 (plus tax, free shipping)! How amazing is that? There are no obligations once you are a demonstrator to do anything! Enjoy the goodies, make the most of your discount and have fun with all of us stampers at our team events!! You can check out more information here! If you have any questions at all, don’t hesitate to reach out. I’m more than happy to quickly respond to anything you are wondering about!

Weekly Deals 1.5

Of course it wouldn’t be a Friday without the Weekly Deals!!! So many fabulous deals!!!

Decorated Anti-bacterial Gel, www.LaurasStampPad.com

Also, I thought I would share this little gift that I recently gave to my cousin when they brought home their new baby! Look how adorable this little AntiBacterial Gel looks. I love it!!!!

Baby Gift, www.LaurasStampPad.com

Here are all of the goodies – Chocolate for a little pick-me-up! Mints to feel fresh even if you don’t have time for a shower. Toilet Paper because it’s a necessity but getting to the store just might not happen today. Anti-Bacterial for all the visitors to use before holding the new baby! Simple, cute and useful! Love it!!!! I used the Scallop Tag Topper Punch for the tags and then brushed the edges with a Bermuda Bay Sponge Dauber.

Hope you all have a wonderful weekend! See you back here on Monday!

Happy Stampin’

~Laura


December 2015 Paper Pumpkin Kit!!!

Posted on

December Paper Pumpkin 2015, www.LaurasStampPad.com

HAPPY NEW YEAR’S EVE!!!!! Here is to a great 2016!!! I thought I would share the December 2015 Paper Pumpkin Kit with you today since it is called One Great Year!!! Now you might be a little surprised as the photo above because this is the December Paper Pumpkin Kit on my Facebook Page…..

December PP for FB, www.LaurasStampPad.com

While I thought this little desk calendar was adorable (check that out here), I just don’t have a need for a desk calendar and so I thought I would create the kit into cards! I was able to get 15 greeting cards out of this kit with all of the supplies. I used my own cardstock for the card bases and an all occasion stamp set but the rest is all from the kit!!!

2016 Desk Calendar Kit, www.LaurasStampPad.com

Here are all of the goodies – Soft Suede Ink Pad, Months Stamp Set which will be great for memory keeping and more, and lots of banners and decorated paper!!!

All Occasion Cards, www.LaurasStampPad.com

Here are a few of the cards I created. As you can see some of the cards look almost just like the calendar just without the month on there. I used the gold banners as banner and as strips of gold. I even used some of the calendar pieces on the inside of the cards to write on. I used Lost Lagoon, Blackberry Bliss, and Hello Honey for the card bases and since Blackberry Bliss is so dark, I wanted to place a piece inside to write the greeting on. It worked out perfectly!!! I greetings came from the Tin of Cards Stamp Set and Crazy About You Stamp Set.

Craft Kit, www.LaurasStampPad.com

As you can see I used the backs of the calendars for greetings and such. I used the banners and flowers as decorations. I was able to create 15 total cards from this kit AND I still had Stampin’ Dimensionals, ribbon, and some gold banners left over. Plus, I have the ink pad and stamp set to use for other projects too! I love Paper Pumpkin!!!

If you would like to try out Paper Pumpkin, you can do so by clicking here. You can subscribe for 1 month or endless months! Just cancel or skip a month any time you would like! It is just $19.95 plus tax each month! The stamps and ink alone are worth that much! Click here to get signed up before January 10th so you can join in the fun! If you would like to see some of the past kits, click here!

Happy Stampin’

~Laura


Last Christmas Card!!!

Posted on

Christmas Tree, www.LaurasStampPad.com

Merry Christmas Eve!!! I think this is probably the final Christmas Card I will post this year! I can’t believe all of the ideas I had this year and I am still sharing them up till the day before! Next week will be ways to use up your holiday-themed paper for all occasion cards! YEAH!

This card uses a Crumb Cake card base and I stamped the greeting from the Peaceful Pines on the bottom in Tip Top Taupe! Then taking a piece of Pool Party cardstock, I rounded the corners with the Corner Rounder Punch and brushed the edges with a Sponge Dauber to add a little color and dimension to the card! I added this piece to the card front with Stampin’ Dimensionals! I stamped the tree from the Peaceful Pines Stamp Set in Mossy Meadow onto Mossy Meadow cardstock and die cut it with the coordinating Perfect Pines Framelits! Bundle & Save 15%! After cutting out the tree, I used another framelit in the set to create that feathering. This is a super cool look and really gives the tree some life. I stamped the little pot in Tip Top Taupe onto Crumb Cake and used the framelits to cut it out as well! The little star was punched out with the Itty Bitty Accents star and some Gold Glimmer Paper! The tree and star are adhered on with Snail Adhesive but the pot is adhered with a Stampin’ Dimensional! This is a very simple tree card with a little bit of elegance! I love it!!!

You can see this Bundle in action on this Video Tutorial! Don’t forget that the Holiday Mini Catalog ends on January 4th and the Occasions Mini and Sale-A-Bration Promotion begins on January 5th!!! If you would like to see a Sneak Peak of one of the Kits in the Occasions Mini Catalog, check that out below or by clicking here! Don’t forget to Subscribe so you don’t miss any more revealing videos or techniques!

Happy Stampin’

~Laura


May Your Days Be Merry!!!

Posted on

Days Be Merry, www.LaurasStampPad.com

Happy Monday everyone! This week is Christmas so I’m sure many of you are scrambling to get those cookies made, presents wrapped, groceries bought, and everything else. I just wanted to say May Your Days Be Merry through it all! Stop and take a deep breath and enjoy the site of your tree lights glistening. Enjoy the sounds of laughter from your children or those at a party! Try to enjoy the little things this week!!!

Today I’m sharing with you a quick and simple card that uses up a few scraps that I had laying around! I used a Whisper White card base measuring 4-1/4″ x 11″. When I am using ribbon, I liked this size/style because it uses less ribbon around than a 5-1/2″ x 8-1/2″ style. I had some strips of Silver Foil Paper left over so I added a strip of that. It can be 2″ wide or a 1/2″ wide, whichever you prefer or whichever you have scraps of! Then I took a piece of the Winter Wonderland Designer Series Paper which was also leftover. If you are cutting your Designer Series Paper into 4″ x 5-1/4″ which is the perfect layering size for a card front then you have a strip leftover that is 1-1/2″ x 4″. That is perfect for a card like this! I tried the Real Red Cotton Ribbon around the card right over the overlap of the two stripes of paper! For the greeting, I stamped it in Real Red on some scrap white with the Berry Merry Stamp Set! I punched it out with the 2″ Circle Punch and brushed the edges with a Sponge Dauber for a pop of color! I added the greeting to the card with Stampin’ Dimensionals and finished it off with a few Rhinestones! Everything needs a little bling! 🙂

Birthday Card, www.LaurasStampPad.com

I had some leftover pieces for this card but didn’t need any more holiday cards. Switch up the greeting and it makes a fabulous Birthday card! I love that!!!

Happy Stampin’

~Laura


Golden Ornaments!!!

Posted on

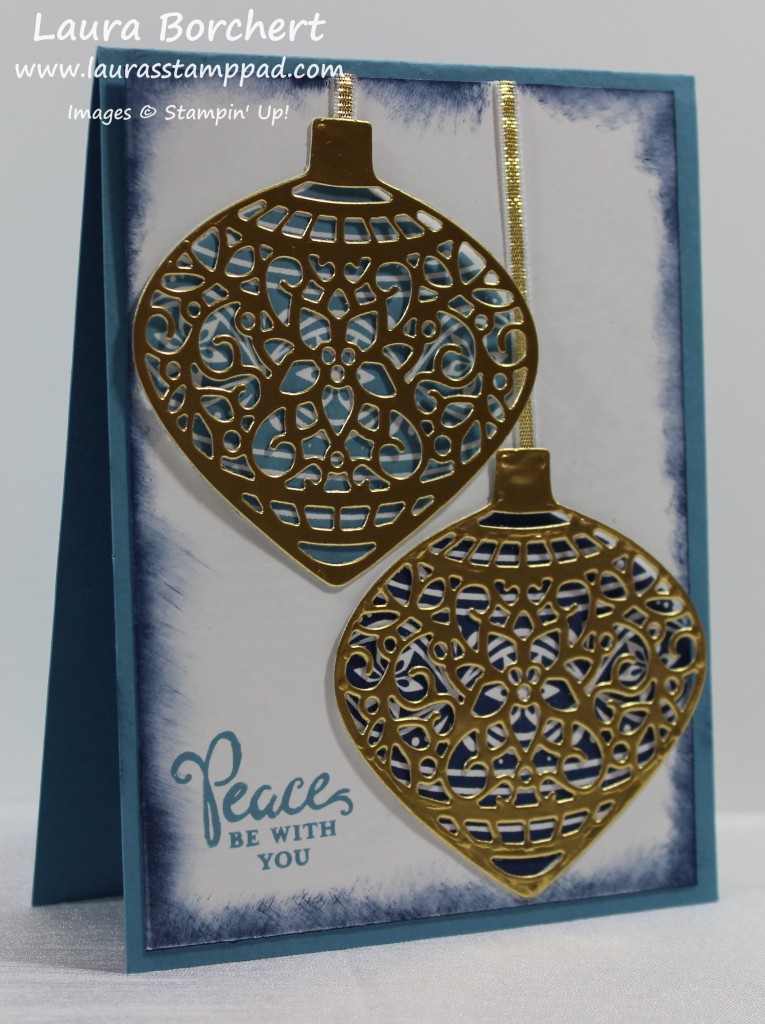
Golden Ornaments, www.LaurasStampPad.com

Shades of blue with some gold shine…….AMAZING!!!! I love this card and don’t know why I didn’t share it with you much sooner! Are you all done with your Christmas Cards? Do you have them sent out yet? Let me know in the comments below! I will be honest and say mine are complete, sent out and my stamp room is ready for Spring!!! I have all of the new Occasions Mini and Sale-A-Bration items all over and I can’t wait to share it with you! You can check out my Haul of Products here! Okay but back to this gorgeous card!

I started with a Marina Mist card base measuring 4-1/4″ x 11″. I really like this size/style of card. I stamped the greeting in the corner of the Whisper White (4″ x 5-1/4″) in Marina Mist. The greeting and the ornaments are all from the Embellished Ornaments Stamp Set in the Holiday Mini Catalog. You will also need the Delicate Ornament Thinlits for the gold overlay. You can Bundle and Save 15% when you purchase them together! When you stamp the ornaments on the Whisper White be sure bottom one is super close to the right side and bottom and not on your greeting. For the upper ornament, be sure it is close to the top but still room for your ribbon to hang and super close to the left hand side. Don’t worry if it doesn’t come out perfect…..made with love, not perfection! Also, it took me 3 times to get it placed correctly! 🙂 I stamped one ornament in Marina Mist and one in Night of Navy! I also brushed the edges of the cardstock in Night of Navy with a Sponge Dauber! Using Gold Foil Paper, I cut out two of the delicate ornament overlays.

Delicate Ornaments, www.LaurasStampPad.com

TIPS: Run it through the Big Shot 2-3 times before taking it out. This will make sure it hit every nook of that piece of paper. When you use the Precision Plate, you won’t have any of those little holes pressed into your image. The upper ornament looks pretty clean, but on the lower ornament cap at the top, you can see little pressed dots from the die. That one I didn’t use the Precision Plate! I adhered the little piece of Gold Ribbon to that top cap section with Snail Adhesive and then placed a few Mini Glue Dots on the ornament in the larger sections. You could also use the Fine Tip Glue Pen! Then I placed it over the top of the stamped ornament and wrapped the end of the ribbon over the edge of the Whisper White cardstock. Now you can adhere your Whisper White to your card front and you are all done!!! It is a little bit more intricate and takes a little longer than some of the other Holiday cards I have created but it sure is stunning!

Happy Stampin’

~Laura

Don’t forget about the Year End Sale!!! Click here to check it out!

Year End Sale


November 2015 Paper Pumpkin!!!

Posted on

November Paper Pumpkin, www.LaurasStampPad.com

I know I probably sound like a broken record but I loved the November Paper Pumpkin! The Cherry Cobbler Pearls are AMAZING!!! I love how the kit included images (holly and mistletoe) that weren’t really in any of the stamp sets in the Holiday Mini Catalog! This means that these cards are totally different than all of the others I have created! AND if you don’t need Holiday Cards you could always make some great masculine cards with the Old Olive stripes and Crumb Cake card bases!

Green Stripes Greeting Cards, www.LaurasStampPad.com

This kit came with 10 total cards – 5 Old Olive Stripes which I have pictured above! I decided not to do the cards exactly like the instructions. I mixed it up a little doing some side ways and both styles on the stripes! I preferred my holly berries to be clustered in groups of 3 rather than randomly placed as well! I used my Sponge Daubers on a few to accent the edges with a little bit of color too!

Crumb Cake Holiday Cards, www.LaurasStampPad.com

Here are the 5 Crumb Cake Cards! You can see I mixed them up in style as well! I used the backside of some of the squares for a stamped greeting rather than the patterned paper! It was so much fun! Also, aren’t those envelopes to die for??? LOVE THEM!!!

November Paper Pumpkin, www.LaurasStampPad.com

Here are a few up close looks at some of the styles!!!

Monthly Craft Kit, www.LaurasStampPad.com

After making the 10 cards, I had so many extra pieces that I was able to make these 4 cards as well! I cute 2 pieces of Whisper White cardstock in half. I added in a little bit of Merry Moments Designer Series Paper as well!

I can’t wait to see what the December Kit is going to be! I love the surprise of it all and the fact that it is wrapped all in tissue paper like a present. You can see my excitement opening the November Kit here! Be sure to Subscribe to my YouTube so that you don’t miss out on the December Reveal and other fabulous techniques! To sign up for your December Kit, click here!

Paper Pumpkin makes a great gift as well to those who are crafty and those that aren’t! All you need is scissors so no worries on wondering if the person will have the supplies to make the kit! Click here to purchase a Pre-Paid Subscription!

Happy Stampin’

~Laura


Thinking of You at Christmas!!!

Posted on

Thinking of You at Christmas, www.LaurasStampPad.com

I really like this simple and yet elegant card for the Christmas Season! Who doesn’t want a card that says someone is thinking of you? It is so touching I think! I love it! 🙂

I started with a Garden Green card base and stamped on a piece of Whisper White measuring 4″ x 5-1/4″! I used the Embellished Ornament Stamp Set for the greeting and holly twig! I used a Garden Green and Real Red marker to color in the holly twig and stamped that on either side of the Whisper White. Before attaching it to my card front, I brushed the edges of the cardstock with a Sponge Dauber! For the greeting, I stamped it in Real Red onto Whisper White cardstock and then die cut it with the Tags & Labels Framelits! I brushed the edges of the greeting with a Real Red Sponge Dauber! Then, I cut out another label in the next size up in Silver Foil Paper and layered them together! I added the greeting to the card front with Stampin’ Dimensionals! I love this!

To see this card in action and how to color your stamps, check out my Video Tutorial below or by clicking here!! Don’t forget to give it a thumbs up if you liked it!

Happy Stampin’

~Laura