Technique Tuesday – Decorative Masks!!!

Posted on

Happy Tuesday!!! You know what that means! I have a fabulous technique to share with you today! I am going to show you how to use your Decorative Masks! Also, I’ll show you how your can use your Build a Banner Masks too!!!

Ombre Polka Dot Background, www.LaurasStampPad.com

You know me and my love for the Ombre look (check out more here and here)! I just can’t get enough of it! I used my Build A Banner Polka Dot Mask for this one but you could use the Dots & Stripes Decorative Mask as well! Soft Sky, Marina Mist, and Night of Navy were the colors I sponged on with my Sponge Daubers (love)! I sponged a few rows of each and then when I went to the next darker color, I rubbed lightly over that last row of the lighter color to give it a blended look. The Happy Birthday is from the Remembering Your Birthday Stamp Set! I sponged the edges of the greeting as well and adhered that with Stampin’ Dimensionals to a 1-3/4 Circle Punched piece of Night of Navy! I ran the circle through the Big Shot with the Stripes Embossing Folder! For a little texture, I looped some Whisper White Baker’s Twine in there as well!

Stars Decorative Mask, www.LaurasStampPad.com

This one is very similar to the one above. I used my Sponge Daubers and the Hearts and Stars Decorative Mask Set! I layered that onto some Lost Lagoon and Hello Honey cardstock and added some Satin Stitched Ribbon in Lost Lagoon! I am really loving that ribbon and find myself reaching for it often! For the popped up stars, I used the small and medium stars from the Bright & Beautiful Stamp Set that is in the Holiday Mini Catalog! Of course, there is a Star Framelit so you don’t have to fussy cut those stars out! 🙂 Love it! You could do this in Red, White, & Blue or Navy and Silver would be fabulous too!

Of course, it is always easier, for me at least, to understand a technique when you see it in action. Here is a Video Tutorial for you see both the Ombre Background and Stars Decorative Mask. Be sure to give the video a thumbs up if you liked it and don’t forget to subscribe to My Channel so you never miss out when I post a new video!

Happy Maskin’

~Laura


Fabulous Friday!!!!

Posted on

Happy Friday!!! Can’t believe this is the last weekend of July! Where has July and Summer gone? Although I am super excited because August is my Birthday Month (yes, I like to celebrate all month long)!!!! We can start celebrating now with these fabulous Weekly Deals!

Weekly Deals 7.20

I am beyond excited for this week’s Weekly Deals because there are LOTS of fabulous items! The Bitty Banners Framelits are adorable and great to use with the matching Itty Bitty Banners Stamp Set. You can check out this card that I just did a few weeks ago! The Curly Label Punch and Dotted Scallop Border Punches are amazing too! You can check out samples here! I always love ribbon and don’t forget that Halloween is around the corner and that Pumpkin Pie Ribbon would be fabulous on treat bags. Stock up now! Okay and now for the Banner Kit! I have the Bermuda Bay one and LOVE IT! It is hanging in my doorway where I have a banner hanging all the time now!

Banner Kit, www.LaurasStampPad.com

I just used a small portion of the Add On Kit! I still have lots of Designer Series Paper and other items left to use for another project! LOVE IT!!!

A Few Other Items:

Buy 3, Get 1 Free Designer Series Paper Special!

Sign Up for My Paper Pumpkin before September 10th and get your first 2 months at 50% Off!

Hope you all have a fabulous weekend! Happy Stampin’

~Laura


Loving my Banner!!

Posted on

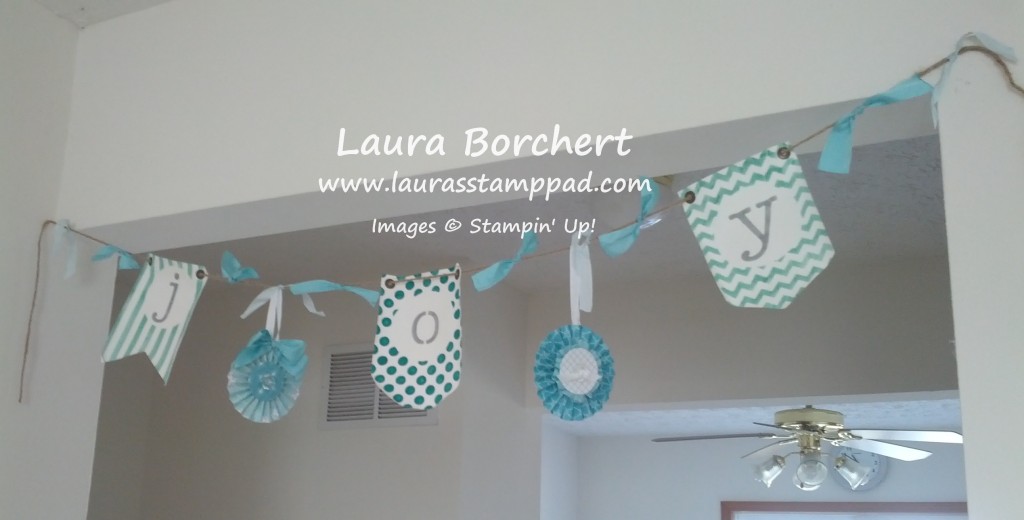
Joy Banner, www.LaurasStampPad.comI have changed out my Banner from the Thankful one (here) to this one!!! It was created with the Build-A-Banner kit in the Holiday Mini Catalog! I used Pool Party and Bermuda Bay for the stripes, dots, and chevron patterns. Smokey Slate was the color used for the letters! The decorations between the letter are rosettes from the Christmas Banner Simply Created Accessories Kit. I love these banners so much and plan on keeping a banner hanging in this spot all year long!!! Next one might be LOVE for Valentine’s Day or something for Spring or both!

Right now you can get the Banner Refill Kit and Christmas Banner Accessories Kit on SALE! Check out the weekly deals here! These items end tonight at midnight so get them while they are on sale!!!

Happy Stampin’

~Laura


Technique Tuesday – Boo Banner Bags!!

Posted on

It is Tuesday and so I’m sharing a fabulous technique with you!!! This week it is these adorable Boo Banner Bags!!!

Boo Banner Bag, www.LaurasStampPad.com

Isn’t he precious??? I had lots of fun making these little Boo Banner Bags!

Here is what you will need: Build-A-Banner Simply Created Banner Kit, Cardstock, Sticky Strip, Sponge Daubers, Ink, & Ribbon.

Boo Banner Bag, www.LaurasStampPad.com

You need to pick one of the three styles of banners you would like to use (banner, point, rounded), any of them would work fine! You will then use your template to color in. I used the Chevron Template and used Crushed Curry and Tangerine Tango for a candy corn look! Then then took the black and colored in the word BOO. You will then need to take any type of ribbon to make the handle. I used the fabulous Chevron Ribbon because it’s super fun (and messes with your eyes if you look at it too long). Trace your banner onto cardstock so you can create your backing. This is where the points and banner tip work better than the rounded one for me because I can cut lines but when it gets to rounding, I am not as smooth! 😉 You will then line the sides and bottom of the cardstock with Sticky Strip, peel off the red backing, and stick to your banner! I added stitch lines with my Basic Black Marker and the eyes for the Boo were created with Whisper White, Crushed Curry, and Basic Black circles (the white line was created with my Chalk Marker)! I hope you try these adorable bags out! I loved making them! I’m thinking about doing Christmas ones…..HoHoHo or Santa or Snowflakes…..Mmmmm endless possibilities! For more ideas with your Banner Kit, check out this post and this post!

Happy Sponge Dauberin’

~Laura


So Thankful For You!

Posted on

I love Thanksgiving because it is a day dedicated to being thankful for all the many things we have. I know we should be thankful EVERY day but this day we really celebrate those things! I am loving my Thankful Banner that I created and couldn’t wait to hang it up…..so I didn’t. What do you think?

Thankful Banner, www.LaurasStampPad.com

This banner is hanging in the foyer area between the living room and the kitchen! I look at it all time and smile!

It was created with the Simply Created Build-A-Banner Kit and I used my sponge daubers with the following ink pads: Crushed Curry, Cherry Cobbler, Night of Navy, Garden Green, and Chocolate Chip. I tied various scraps of ribbon in between the banner in the same colors. Here is another banner that I created for December! You can purchase the Build-a-Banner Kit and make a banner for Halloween (SPOOKY), Thanksgiving (THANKFUL), and Christmas (JOY) and you still have 1 banner left over or if you have a mistake. 😉 I’ll be honest I messed one up so bad it couldn’t be saved!

Happy Decoratin’

~Laura


Build a Banner Simply Created Kit & More!

Posted on

From the moment I first saw the Holiday Mini Catalog I knew the first thing on my wish list was the Build A Banner Simply Created Kit.

Build A Banner, www.LaurasStampPad.com

1. You got the entire alphabet templates for less than $20.00.

2. You got 3 patterned templates that are super cute (chevron is HOT HOT HOT, I love polka dots, and stripes are always a hit).

3. You also got canvas banner and a twine (pre-punched and riveted) AGAIN all of this for less than $20.00!

I was sold and purchased it immediately. It finally arrived and I ripped it open (if you know me, you know I rip into packages, mail, presents, etc like a lion eating dinner) and looked at all of it. I was impressed and couldn’t wait to start creating. I will say that the kit comes with 2 spritzer bottles and while I like using those to spritz a project, I didn’t find them to be the best use for these. When I did it, I made a huge mess and over spritzed and the lines didn’t come out crisp because I had over-saturated it. So I added the spritzers to my collection and pulled out my sponge daubers (oh how I love these)! I loved how the lines were crisp and I could dauber more and more for a darker look without over saturating and making a super huge mess.

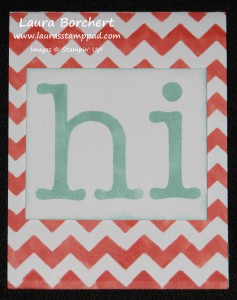
Build A Banner Kit, www.laurasstamppad.comAnd because these alphabet templates are so amazing, I used my daubers on cardstock and made this fabulous card! Love love love this kit and it is so worth the $20.00! Oh, one more thing, you can get the words SPOOKY, THANKFUL, and JOY out of the kit with still one banner left. That is decorations for THREE Holidays! I’m telling you, this kit is amazing!

Happy Stampin’

~Laura


Trick or Treat?!?!?

Posted on

While I’m not a huge fan of Halloween, I do enjoy the candy!!! We don’t get a lot of trick-or-treaters out where we live but the ones we do get are spoiled! I love making adorable packaging for my candy!!! It is super fun and so cute! I, also, send yummies to all of my nieces and nephews because who doesn’t love getting mail AND candy?

Halloween Muslin Bag, www.laurasstamppad.comThis little bag is one of our new Muslin Bags from the Holiday Mini Catalog! They are just the right size for a small gift, candy, or homemade treat! I decorated this bag with the Simply Created Create-A-Banner Kit using the polka dot template and my sponge daubers! You could always add some ribbon and a tag too! Don’t forget these would be fabulous for a countdown to Christmas as well. Put the little treat in the bag for each day! And the best part is that the bag is big enough to hold just about any small gift (rather than those little bitty boxes usually used for the countdown)!

Treat Bag, www.LaurasStampPad.comThis little bag is actually a thick paper bag (Tag A Bag Gift Bags) perfect for a cookie or other handmade treat, gift card, or Stampin’ Up buttons, brads, etc. I used the Tag A Bag Accessories Kit which includes the fabulous printed tags and Baker’s Twine! It also comes with self-adhesive strips which are perfect for closing up the back of the bag. Simple and cute! Hope these ideas help you with your Holiday Treats!

Happy Stampin’

~Laura


Technique Tuesday – Inking with Your Sponge Daubers!

Posted on

It is Tuesday and so I’m sharing a fabulous technique with you!!! This week it is Inking with Your Sponge Daubers!!!!

Tie Dye Technique, www.LaurasStampPad.comOkay if you don’t have these fabulous sponge daubers in your craft collection, CLICK HERE! You totally need them! I probably use mine…..daily! I love love love these things. I brush the edges of my cardstock to give that softened look. I create this fabulous technique. I used them for Reverse Masking in last week’s post! You can use them with your Build A Banner Templates! And I can go on and on! Trust me these are amazing and you get 12 in a pack!!!! Okay onto this fabulous technique!

All you need are your sponge daubers, a few ink pads, and a stamp! You can either ink up your image with the lightest color and then add the other ink colors with the sponge daubers or you can add all of the ink colors with your sponge daubers. In the Happy Birthday sample above, I used the Happy Birthday greeting from the Delightful Dozen Stamp Set. I used Gumball Green, Raspberry Ripple, Bermuda Bay and Summer Starfruit! Always start with your lightest color and just pounce in the ink and pounce or rub in random places on your stamp! Move to the next color and keep going until you have applied all colors and the stamp is covered. Sometimes you might want to rub your dauber on paper before going back into the ink just in case you might have picked up another dark color. This helps keep your daubers clean too!!! Huff on your stamp (Ha Ha like the stamp is hot) and then press onto your cardstock!!! Here is another sample:

Dauber Coloring Technique, www.LaurasStampPad.comFor this fabulous colored leaf, I inked the Magnificent Maple in Crushed Curry and then used my dauber to ink the Pumpkin Pie around going just about a dauber width in and then I took my Chocolate Chip dauber and did just the edges. Doesn’t that leaf just look so amazing and it has that perfect fall look! I have to admit when I first did it I was afraid it wasn’t going to come out and then BOOM onto the paper, lift the stamp and AMAZING! You can try this out with flowers, other greetings and so much more!!! Don’t forget to go order your daubers today!

Have fun and Happy Stampin’

~Laura


Get one of Stampin’ Up’s Fabulous Project Kits!

Posted on

Project Kit

Sometimes I have lots of great project ideas and other times I feel like I don’t have a creative bone in my body! Have you ever been there? Stampin’ Up is doing a fabulous job to help me (and all of you) out now! They have been creating these amazing project kits! The Tag A Bag Bundle and Tag A Box Bundle is in the 2013-2014 Idea Book & Catalog so you might have seen it. BUT the other 3 kits are in the Holiday Catalog which doesn’t start until August 1 (lil sneak peak 🙂 ).  There is a fabulous Halloween kit – Build a Banner Created Kit and Halloween Banner Simply Created Accessory Kit! And a fabulous Thanksgiving Day Kit – Thankful Tablescape Simply Created Kit. And a fabulous Christmas Kit – Build a Banner Simply Created Kit and Christmas Banner Simply Created Accessory Kit. Of course there are many more amazing kits too BUT you can get one of the above mentioned kits for FREE when you sign up!!!! How amazing is that? All you have to do is make a wish list of $125.00 worth of Stampin’ Up product and pick one of these kits and you pay only $99.00 plus tax (shipping is FREE). You will get all these goodies and be a demonstrator. As a demonstrator, you will get a fabulous discount on Stampin’ Up! product and access to lots of ideas and goodies and so much more. And the best part, you can do however much you wish to do. It is all about you! Promotion ends on August 31! If you have any questions or would like to chat, send me an email!