Honey Bee Perfection!!!

Posted on

It’s Wednesday! I just thought I would say that because in this crazy time we are in, I feel like I never know what day it is! 🙂 Today, I’m sharing this honey bee perfection card!

Honey Bee Perfection, www.LaurasStampPad.com

This Sale-A-Bration designer paper is actually sold out already so you can’t redeem it for FREE! That also means that lots of you out there have it so let’s create with it! Don’t forget that Sale-A-Bration ends on March 31st so earn, earn, earn NOW!

For this card, I started with a Whisper White card base. Next, I layered some of the Golden Honey Designer Series Paper onto a piece of Basic Black (4″ x 5-1/4″). The designer paper measures 3-3/4″ x 2 and 3-3/4″ x 3″. You can use any side and pattern!!! Then I tied some Crushed Curry Seam Binding around at the cardstock at the crease between the papers!

Honey Bee and Hive, www.LaurasStampPad.com

For the greeting, I layered Circle Punches or you could use Layering Circles Framelits! The greeting is from the Little Ladybug Stamp Set. This one will also no longer be available after March 31st!

This quick and simple honey bee perfection card is fun to make but also the same card concept can be used for any designer paper! Try it out!

Happy Stampin’

~Laura

Product List

I’m Here For You!!!

Posted on

Happy Monday!!! This card may not be practicing social distancing but always know I’m here for you!!! Now is the best time to send happy mail to friends and family to stay connected and make someone’s day!!!

I'm here for you, www.LaurasStampPad.com

The Gangs All Meer is a Sale-A-Bration stamp set that you can earn for Free with a $50 order. This set is just adorable with the little meerkats and lizard. I love it!

I started with a Crumb Cake card base. Next, I took a piece of Seaside Spray and embossed it with the Coastal Weave Embossing Folder. Then I took a piece of Very Vanilla measuring 3″ x 3-3/4″ and stamped the meerkats up top and the greeting down low in Soft Suede Ink. Using the Soft Suede Light Stampin’ Blends Marker, I colored in the meerkats. They are just so adorable!!!

Gangs All Meer, www.LaurasStampPad.com

Next, I layered this piece onto some Crumb Cake. Using the Seaside Spray Scalloped Linen Ribbon, I added some across to separate the greeting and the focal image. This also gives a little bit of texture. Then I added this piece to the card front with Stampin’ Dimensionals. To finish it off, I added a few Seaside Spray Faceted Dots!

Little Lizard, www.LaurasStampPad.com

On the inside, I added a piece of Very Vanilla measuring 4″ x 5-1/4″. Down in the corner, I stamped the little lizard in Soft Suede Ink. Using Soft Suede and Mossy Meadow, I colored him in. For the “All of Us” greeting, I actually stamped that and masked the “for”. I wanted it to read that we are all here for you….all of us!

Don’t forget that Sale-A-Bration ends next Tuesday! Now is the time to stock up on your supplies so you can earn FREE stuff too. All of the products used on this We’re Here For You card are listed below! Also, our kits are awesome to get for yourself or mail to a friend for fun project to pass the time and also happy mail to send out! Click here to see all of the kits!

Happy Stampin’

~Laura

Product List

Sale-A-Bration 2nd Release!!!

Posted on

We are coming to the end of Sale-A-Bration and Stampin’ Up did a Sale-A-Bration 2nd Release of fabulous items!!! I am loving them! There are 2 Specialty Designer Paper Packs that are amazing! They are both at the $50 level too!!!

Sale-A-Bration 2nd Release, www.LaurasStampPad.com

Is this not the most beautiful paper ever???? It is rose gold and silver foil on white paper. That means that you can use it as is for a super elegant look or you can add color. Using Stampin’ Blends, Marker, Sponge Brayer or Sponge Daubers, you can really make this paper POP! Plus it is flowers and you all know how much I love flowers. The paper pack is 12″ x 12″ and it comes single sided. There are 3 sheets each of the 4 designs!

So Very Vellum, www.LaurasStampPad.com

The So Very Vellum is another one of the $50 Level Free Items!!! This vellum screams Spring with the soft pastel colors of Pool Party, Purple Posy, and Soft Seafoam. That texture on the vellum really makes it stand out. It will be the perfect to add an entire background of this or even just a small piece!

To see each sheet of these Sale-A-Bration 2nd Release papers, check out the video tutorial below or click here. Be sure to give the video a thumbs up if you liked it and don’t forget to subscribe if you are new. If you would like a notification when I post a new video, be sure to click the bell right next to the subscribe!!!

Happy Stampin’

~Laura


Making a Full Bow!!!

Posted on

Happy Tuesday!!! You all know that means I have a fun technique to share with you!!! Today, I’m making a full bow and showing you exactly how I did it!!! Check it out!!!

Koala Cutie, www.LaurasStampPad.com

For this card, I started with a Smoky Slate card base and stamped the little confetti stamp all over the background. By stamping it in Smoky Slate Ink, it just gives that perfect subtle background. All of the images on this card are from the Bonanza Buddies Stamp Set!! Next, I layered a piece of the Birthday Bonanza Designer Series Paper (3-1/2″ x 4-1/2″) onto So Saffron cardstock (3-3/4″ x 4-3/4″). I added these layers to the card front a little diagonal for some fun!

Making a Full Bow, www.LaurasStampPad.com

For the tag, I die cut it from the coordinating Bonanza Dies and stamped the greeting on the bottom in Terracotta Tile. I also stamped the balloon in the same color and added a little string in Momento Black. Then on scrap white, I stamped the koala in Smoky Slate and Memento Black ink. Again, I used the coordinating framelits die cut him out. Then, I added him to the card front with Stampin’ Dimensional for some texture making sure his hand was near the balloon string! Then I added the tag to the card base!

To finish it off, I created a fun little full bow to add to the top of the tag and added some sequins all around. Check out the video below to see how I tied the ribbon. The ribbon and sequins are from the Sale-A-Bration brochure but they are no longer available. I still wanted to share this card for those of you who do have this beautiful ribbon. You could always use any style of ribbon/twine.

Party Surprise,  www.LaurasStampPad.com

For the inside of the card, I added some balloons and confetti in Terracotta Tile. For the balloons, I inked it up once and stamped all 3 balloons to get that variation in color. It’s the perfect coordination!

To this this all in action on making a full bow, check out the video tutorial here. Be sure to give the video a thumbs up if you liked it and don’t forget to subscribe if you are new. If you would like a notification when I post a new video, be sure to click the bell right next to the subscribe!!!

To see more samples using the Birthday Bonanza Suite, click here, here, and here!

Happy Stampin’

~Laura

Product List


Thoughtful Blooms!!!

Posted on

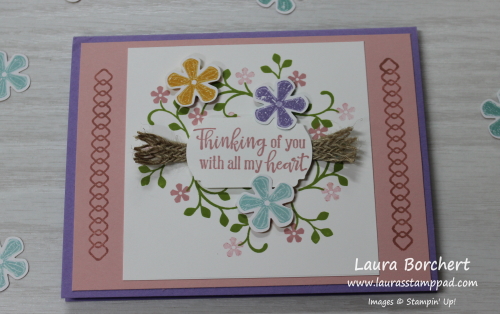
Happy Tuesday, everyone!!! We are going to make this beautiful thoughtful blooms card using Sale-A-Bration products! The Thoughtful Blooms Stamp Set ($50 level) and coordinating punch ($100 level) as well as the Pleased As Punch Designer Series Paper in the Sale-A-Bration Coordination.

Thoughtful Blooms, www.LaurasStampPad.com

I’m loving these spring pastels! They are the perfect pop of color I need during these cloudy cold winter months! 🙂 The texture and dimension on this card really brings it to life too! It’s so fabulous!

I used the Stamparatus for the lines on either side which I also did on the inside to match! The Stamparatus took all the guess work and hoping and praying out of it for me. I knew that each one would be lined up perfectly!

Spring Pastels, www.LaurasStampPad.com

I love how the Pleased As Punch Designer Series Paper coordinates with these products too. It just makes everything more versatile!

Check out the supply list below to recreate this amazing card. I would love to stamp with you…..in person or virtually!

Join in and stamp with me while watching this video below or click here! Let’s make this thoughtful blooms card together! Be sure to give the video a thumbs up if you liked it and don’t forget to subscribe if you are new. If you would like a notification when I post a new video, be sure to click the bell right next to the subscribe!!!

Happy Stampin

~Laura

Product List

Pleased As Punch!!!

Posted on

Today, I wanted to share with you this fabulous Pleased As Punch Designer Series Paper that got released with Stampin’ Up’s Sale-A-Bration Coordination Products!!!

Pleased As Punch, www.LaurasStampPad.com

This paper just screams SPRING and I love it!!!! The other awesome thing about this paper is all of the punches that coordinate with it. Hints the name….pleased as punch! 🙂 The Heart Punch, Umbrella Builder Punch, Tulip Punch, and Bloom Punch all can be used with this paper. I love how quick and simple it is to punch and go with a project and these images are all pretty and perfect!!! This paper is while supplies last or until the end of March so don’t wait long!

Don’t forget the other items in the Sale-A-Bration Coordination release are also while supplies last. These include die cuts for the Happy Birthday To You Sale-A-Bration Stamp Set and the Hostess Lady Bug Stamp Set. There are also dies for the stamp sets in the 2020 Mini Catalog – Positive Thoughts and Special Someone. I will have links for all of these down below so you can get them before they are gone!

Check out the full reveal of the Pleased As Punch Designer Series Paper in the video below or click here! Be sure to give the video a thumbs up if you liked it and don’t forget to subscribe if you are new. If you would like a notification when I post a new video, be sure to click the bell right next to the subscribe!!!

Happy Stampin’

~Laura

Product List

Just Cut Off The Bottom!!!

Posted on

Now this might not sound like great advice for most things in life but when it comes to stamping, try it out! Just cut off the bottom of the cardstock for a whole new look! Check out this other card that I created by cutting off the bottom too!

Just Cut Off The Bottom, www.LaurasStampPad.com

I got the inspiration for this card from the amazing Sandy Carlson! Thank you so much, Sandy for sharing this beautiful card. I loved it and had to recreate it and changed up the greeting!!!

I started with a Bermuda Bay card base (7-1/4″ x 5-1/2″). This means that I cut off 1-1/4″ from the card front of the card base. Next, I layered on some of the Lily Impressions Designer Series Paper. The front piece measures 2-3/4″ x 5-1/4″ and the little piece on the bottom measures 1″ x 5-1/4″. The little piece is technically on the inside of the card!

Lily Pad Stamp Set, www.LaurasStampPad.com

The Whisper White piece on the inside measures 2-3/4″ x 5-1/4″. I stamped the lily pad and greeting in Bermuda Bay Ink. The greeting is from the Thanks For The Laughs Stamp Set and the flower is from the Lovely Lily Pad Sale-A-Bration Stamp Set!

Lily Impressions Sale-A-Bration, www.LaurasStampPad.com

Now for the decoration on the front of the card. I started with tying some Polka Dot Tulle Ribbon around the front flap to add a little bit of texture. Next, I added the Whisper White die cut stitched circle. I stamped the greeting at the top of the circle and added the flowers towards the bottom. The flowers were stamped with the Lovely Lily Pad Stamp Set and die cut with the coordinating Lily Pad Framelits! Just be sure to add adhesive to the top portion of these so that you aren’t sealing your card shut with adhesive on the portion hanging off the circle! For the dainty pink flower, I used the Fine Tip Glue Pen!!!

I just love flowers and stamping with them makes me happy! If you want to try out this fun card and cut the bottom off your next card, check out the supply list below!

Happy Stampin’

~Laura

Product List

Golden Honey One Sheet Wonder!!!

Posted on

Happy Tuesday!!! Today’s Technique Tuesday is the Golden Honey One Sheet Wonder!!! I know how much you all love One Sheet Wonders so I hope you enjoy this one too!!!

All 9 of these cards were created with 1 sheet of 12″ x 12″ Golden Honey Designer Series Paper!!! I used both sides of the paper so no struggle for which side to use!

The first cut was at 4″ creating a 4″ x 12″ strip which I then cut into 4″ x 4″ squares! This is the first 3 cards! I used the Peaceful Moments Stamp Set for all of the greetings!

Next, I cut a 2″ strip off. This creates a 2″ x 12″ piece that I then cut into 2″ x 4″ pieces. That first card was created by cutting the 2″ x 4″ into 2″ squares. I used Stampin’ Blends to color in the designer paper for even more variability. Coastal Cabana, Highland Heather, Whisper White, and Daffodil Delight were the colors I used on all of these cards!

Then, I cut a 5-1/4″ piece off which created a 5-1/4″ x 12″ piece. I cut this one into 4″ x 5-1/4″ and used it as backgrounds for my cards. Again, I colored in the flowers with Stampin’ Blends for some added flare!

The leftover strip is 3/4″ x 12″ and I cut it into 2 pieces to decorate the inside of the 2 cards! One strip is 4″ x 3/4″ and the other is 5-1/4″ x 3/4″. Perfect way to use up every bit of the paper!

Check out the full Golden Honey One Sheet Wonder tutorial in the video below or click here! Be sure to give the video a thumbs up if you liked it and don’t forget to subscribe if you are new. If you would like a notification when I post a new video, be sure to click the bell right next to the subscribe!!!

Happy Stampin’

~Laura

Product List

Hearts & Flowers!!!

Posted on

Happy Wednesday!!! Happy February!!! While this post isn’t all about Valentine’s Day, it is all about hearts & flowers!!!

Hearts & Flowers, www.LaurasStampPad.com

The greeting includes the hearts and the image includes the flowers! The card is filled with love to share with someone special! (PS: Send the cards you make to share the love. Don’t hoard them all to yourself.) Also, I have to give a shout out to Monica Giberti for the inspiration for this card! Thank you, Monica! I love it!

This one I started with a Melon Mambo card base and stamped the “waves” on the background in Melon Mambo Ink. This is from the Lovely Lily Pad Sale-A-Bration Stamp Set. Be sure to off set the stamped images so it doesn’t look like the same image up and down but rather a random look. Next, I layered a piece of the Lily Pad Impressions Sale-A-Bration Designer Series Paper onto some Garden Green cardstock. I placed this in the center of the card base.

For the focal point of the flower, I punched out a 2-1/4″ Whisper White Circle and placed it on the right side. Then using the Lovely Lily Pad Stamp Set and coordinating Lily Pad Dies, I stamped and die cut the image. I used Melon Mambo Ink for the outline and then flipped the stamp over and inked it in Flirty Flamingo! I used Stampin’ Dimensionals to adhere this to the card front! The greeting is on a 1″ x 4-1/4″ piece of Flirty Flamingo cardstock. This greeting is from the Peaceful Moments Stamp Set in the 2020 Mini Catalog. I love this greeting! To finish it all off, I added a few Champagne Rhinestones for some texture and bling!

Lily Pad Impression, www.LaurasStampPad.com

For the inside, I stamped the lily in the corner! It’s perfect and adds a little fun to the inside! I just love the colors of this card and the fact that the Stamp, Dies, and Designer Paper are all items that you can earn for FREE!!!! Woot Woot! I love Sale-A-Bration.

Check out the supplies below so you can start earning these goodies and make a card with hearts & flowers!

Happy Stampin’

~Laura

Product List

February Frenzy!!!

Posted on

We are one step closer to Spring because it is officially February!!! I thought I would start off the month right with some exciting news!!!! It’s a February Frenzy over here!

February Frenzy, www.LaurasStampPad.com

TOMORROW, Stampin’ Up is releasing coordinating products to the ones we already love. That’s right, no more fussy cutting!!!!! The stamps we love so much now have coordinating framelits!!!! There is also an amazing Designer Series Paper Pack that is all thing Spring and coordinates with a lot of the punches we love!

Nature’s Thoughts Dies which coordinate with the Positive Thoughts Stamp Set (floral branches, butterfly, etc.)
~Ladybugs Dies which coordinate with the Hostess Exclusive Little Ladybug Stamp Set
Special Days Dies which coordinates with the Special Someone Stamp Set (racoon, mouse, squirrel, etc)
~Sending Flowers Dies which coordinate with the Sending You Thoughts Stamp Set (greeting Sale-A-Bration Set)
Birthday Dies which coordinates with the Happy Birthday To You Sale-A-Bration Stamp Set (cake, pedestal, etc.)
~Pleased As Punch 12 x 12 Designer Series Paper which coordinates with the Small Bloom SAB Punch, Heart Punch Pack, Tulip Builder Punch, and Umbrella Builder Punch

These will all be available TOMORROW and they are while supplies last. I have posted the links for these items below but they will not work till the products are available tomorrow so mark this page and come back tomorrow to order!

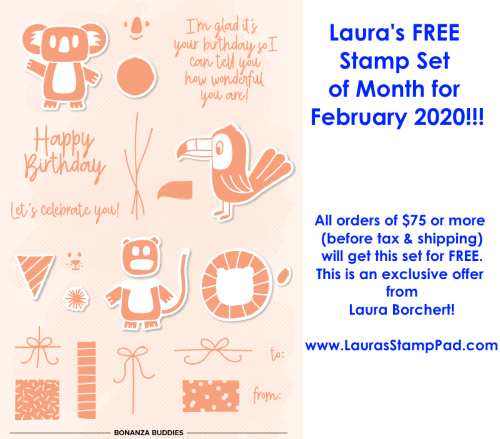
February 2020 Free Stamp Set of the Month, www.LaurasStampPad.com

The FREE Stamp Set of the Month for February 2020 is the Bonanza Buddies Stamp Set. You all know how much I have been loving this set so I picked it for the month! All orders placed this month totaling $75 before shipping and tax will earn this set for FREE from me! Woot Woot! Click here to start shopping and join in the February Frenzy!

Happy Stampin’

~Laura

Product List