Squirrel!!!

Posted on

Distracted by cute things? Yeah me too! Squirrel….I might not be that bad but I do think they are super cute! I was so excited to use one in this adorable Fall card too!! Hilarious side story for you! When I was attending the Leaders Summit, the Leadership Team was all together on a video and they were sharing about their position with the company and stories. One of the questions was who gets off topic the most and they all agreed it was the Finance Guy and they even have a stuffed animal squirrel that they bring out when he goes off on a tangent. I laughed so hard and immediately thought of this post!

Squirrel, www.LaurasStampPad.com

This card uses the Free Stamp Set of the Month for September – Banner Year!!! It’s so easy and super cute!!!

Each little square is 1 inch and I stamped various images from the Banner Year Stamp Set into each one. For the leaf, I used Mint Macaron and stamped the leaf twice without going back to the ink. The acorn was stamped in Crumb Cake, full strength for both. Then for the pumpkin, I used Cajun Craze and Early Espresso. That one is a 2 step stamped image. Finally, on the squirrel, I inked him up completely in Crumb Cake and then before stamping him down I inked just the tail in Early Espresso. There is enough gap between his tail and head to lightly touch the edge of the ink pad and ink just the tail!

Fall Card with the Banner Year Stamp Set, www.LaurasStampPad.com

When layering the squares onto the Crumb Cake square, place them all out and then pick up one at a time to adhere down. This helps with spacing. Then I layered that onto a piece of the Gilded Autumn Designer Series Paper. This all goes onto a piece of Very Vanilla that I stamped the greeting on the bottom in Early Espresso Ink! There are a couple different greeting options in this set that work perfectly! For the ribbon, I used the Mint Macaron Basket Weave Ribbon which is so amazing! For the top card, I wrapped the ends to the back side. In the card above, I forgot to add the ribbon till the end so I just trimmed the ends for a diagonal look!

Wooden Elements for Fall, www.LaurasStampPad.com

To finish off the card, I added a little wooden element from the In Good Taste Elements pack. There are lots of options in the pack so no worries about only having a few. You can make lots of these cards! Check out all of the supplies listed below to make your adorable Squirrel card!

Happy Stampin’

~Laura

Product List

Bundle of Sunflowers!!!

Posted on

Happy Monday!!! This card was created for a large virtual demonstrator event that I was apart of and I really fell in love with it! The bundle of sunflowers are just so fun and fresh! The greeting speaks volumes and the layout is a new one I haven’t used before (or at least in a long time)!

Bundle of Sunflowers, www.LaurasStampPad.com

For this card, I started with a Misty Moonlight card base. Next, I took a piece of Whisper White measuring 4″ x 5-1/4″. Before stamping on this piece, I placed the Bumblebee (1-1/2″ x 4″) on the right hand side as a guide for where my flowers should be stamped. Since I used Stampin’ Blends to color in the flowers, I stamped the images in Memento Black Ink! Be sure to leave a little bit of space between the flowers and the stems so your bow fits perfectly in that gap!

The piece of Bumblebee was actually created with the lined images from the Jar of Flowers Stamp Set. I stamped it diagonally and just stamped once around the middle of the cardstock and then worked my way out. Just follow along in that same diagonal pattern and you are golden. No need for perfection as it is a small piece and the greeting covers a lot too. After stamping, add it to the far right edge. Then using some of the Flowers For Every Season Designer Series Paper, I cut a 1/2″ x 4″ piece and placed it over the edge of the Bumblebee. This gives a smoother look between the two papers.

Coloring Sunflowers with Stampin' Blends, www.LaurasStampPad.com

After coloring the flowers and assembling all the pieces, I added the greeting on and the little ribbon bow. I used a Mini Glue Dot to adhere the bow! For the greeting, I used the Label Me Lovely Punch which is my favorite right now! <3

If you would like to recreate this bundle of sunflowers card, check out the supplies listed below. If you want to see more samples using these fun products, click here and here!

Happy Stampin’

~Laura

Product List

In Color Cards!!!

Posted on

Are you loving the NEW 2020-2022 In Colors as much as me??? Magenta Madness, Just Jade, and Misty Moonlight are my all time favorite colors right now!!! Cinnamon Cider and Bumblebee are pretty good too but I think I will use them more this Fall! You all know I love bright colors! For now, check out these In Color Cards that I made!

In Color Cards, www.LaurasStampPad.com

These quick and simple cards were created with the Memories & More Card Collection as well as the Cards & Envelopes! It doesn’t get much more easy than that! Many of the cards have a greeting already on them so no stamping necessary. It’s perfect!!! You can see with the samples above I added a card from the Card Collection and embellished with ribbon and enamel dots! For the top 2, I actually stamped the greeting!

Flowers For Every Seasons Memories & More, www.LaurasStampPad.com

This fabulous card actually uses 2 of the cards in the pack. I used one as a background “designer paper” and the other one for my greeting! Then I added a few enamel dots for some texture! Quick and simple for sure!

If you would like to make these In Color Cards, just check out the supplies below! Use the greetings on the cards or stamp your favorite greeting! Feel free to tag me on Facebook as I would love to see you creations!!

Happy Stampin’

~Laura

Product List

Is there such a thing???

Posted on

You all know how much I love stamping with flowers, right??? Is there such a thing as too many flowers???

Is there such a thing, www.LaurasStampPad.com

I created this card and I love it but I also think it might be too much! Let me know what you think in the comments below! I did change this up and went with a similar but different look! Stay tuned as I will post that card soon!

I started with a Misty Moonlight card base. Next, I took a piece of Whisper White measuring 4″ x 5-1/4″ and stamped the flowers from Jar of Flowers on either side at the top. Since I colored the flowers with Stampin’ Blends, I stamped the flowers in Memento Black. The Blends that I used were Rococo Rose, Soft Seafoam, Daffodil Delight, and Seaside Spray! I, also, stamped another set of the flowers on scrap paper and fussy cut them out!

Using the diagonal strip image from the Jar of Flowers Stamp Set, I stamped a piece of Bumblebee cardstock with Bumblebee Ink. Don’t worry if this isn’t perfect. Just start with an angle and keep going. It will be just fine and adding the greeting over the top helps to hide any imperfections!

Jar of Flowers, www.LaurasStampPad.com

Now to assemble it all together. I added the fussy cut flowers in the center with Stampin’ Dimensionals to give some texture and make the flowers pop more. Then I added the Bumblebee stamped cardstock on the lower half of the cardstock. Using Misty Moonlight Ribbon, I placed a strip across the card where the paper overlaps! This gives a nice smooth look between the two paper! Now you can add this to your card base. Then I placed a little bow that I created with the same ribbon in the center using a Mini Glue Dot.

For the greeting, I used one from the Celebrate Sunflowers Stamp Set and the Label Me Lovely Punch. Here is a video tutorial for you to see how I layered the label punch! You can always use the greeting of your choice. I added this to the card front with Stampin’ Dimensionals.

So let me know if you are loving this card or if you think it’s too much….if there is such a thing! 🙂 If you would like to recreate this card, check out the supplies below! If you would like to see more in this Flowers For Every Season Suite, click here!

Happy Stampin’

~Laura

Product List

My Jar is Full!!!

Posted on

Happy Monday!!! Today, I wanted to chat with you all about this card that I made. I created it late one night because lately that seems to be the only time I have for good creative thinking…aka after Claire goes to bed! This card came to me and I thought it was sort of funny!!! My jar is empty and my jar is full!!!

My Jar is Full, www.LaurasStampPad.com

I asked my husband what he thought and if he got it. He said yeah but it’s kind of odd. What are your thoughts?? Let me know in the comments below!

Either way, I found this card quick and easy to create. I used the Flowers for Every Season Memories & More Cards & Envelopes! These are super fabulous card bases that already have that fun dotted rectangle! Then I simply stamped on a piece of Whisper White measuring 4″ x 3″. All of my stamping was done with Misty Moonlight. The water in the far was stamped off once for a lighter look!

Memories & More Cards & Envelopes, www.LaurasStampPad.com

The greeting is from the Celebrate Sunflowers Stamp Set and the jars are from the Jar of Flowers Stamp Set! I added a bit of ribbon in the middle to give the card some texture and flare!

I hope that all of you have a Jar that is Full!!! Full is happiness, good health, and lots of love! These times are crazy and uncertain but there is still so much to appreciate and smile about. The days when we can’t get out and go to the park for a fun and different activity are frustrating for sure. I wanted to go to the zoo and experience so much this Spring and Summer. On the flip side though, my husband is working from home and able to spend more time with Claire and I. We get to watch her grow and learn and it’s just magical. Sure the tantrums aren’t but the smiles, new things she can do and say and so much more make it all worth it!

Find the joy in every day!! Also, always remember you all mean the world to me. I appreciate you all so much!

Happy Stampin’

~Laura

Product List

Celebrate Sunflowers!!!

Posted on

It’s summer time so let’s celebrate sunflowers for the next few months! Technically I feel like Sunflowers can be used all the way to November. Am I right?? They are a fun flower to use with so many colors!

Celebrate Sunflowers, www.LaurasStampPad.com

This card makes me think of my sister’s wedding. All the girls wore cornflower blue dresses and we held all kinds of flowers in our bouquets. Misty Moonlight is that exact same cornflower blue!!

For this card, I started with a Misty Moonlight card base. Next, I took a piece of Bumblebee measuring 4″ x 5 -1/4″. Using the smaller sunflower from the Celebrate Sunflowers Stamp Set, I stamped it along the top and bottom in Early Espresso Ink. TIP: Don’t stamp left to right but rather stamp somewhere in the “middle” and then work your way to the sides. This will help with spacing and not have both sides look exactly the same!

Then for the greeting panel, I added a piece of Misty Moonlight in the center. It measures 1-1/2″ x 5-1/4″. Next, I stamped the greeting from the same stamp set in Misty Moonlight and punched the ends with the Lovely Labels Pick A Punch! I added the greeting to the card front with Stampin’ Dimensionals. To finish it off, I added a box made with the Bumblebee Gingham Ribbon.

If you would like to recreate this Celebrate Sunflowers card, click the supplies linked below! To see more fun cards using the new catalog products, click here!

Happy Stampin’

~Laura

Product List

You Make Me Smile!!!

Posted on

Yes, you reading this! You make me smile! Each and every day while I enjoy what I do creating cards. I also LOVE IT because of all of you! Your comments, your likes, your following….it all means the world to me and I love it! I’m happy that you are all enjoying what I love too! I may be crazy, even a hot mess sometimes, and don’t have it together on my Facebook Lives but it’s still fun (and that’s life, am I right?!?!)!!!

You Make Me Smile, www.LaurasStampPad.com

By the way, Daily Dose of Stampin’ Therapy on my Facebook has “ended” as I can’t keep up with 5 days a week and start back with classes and events as things open back up and Brad goes back to working in the office. BUT I am going to change the name to…Laura’s Dose of Stampin’ Therapy or Your Dose of Stampin’ Therapy. It will still happen just not daily. Cast your vote in the comments below for the new name!!!

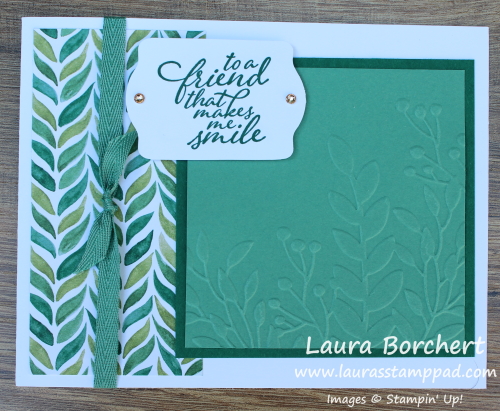
This card uses the Forever Fern Stamp Set and many other items in the Forever Greenery Suite!!! I have been loving all of these products. Those shades of greens and blues are just stunning!

I started with a Whisper White card base measuring 4-1/4″ x 11″. I went with this size because it uses less ribbon to go around the card at 4-1/4″ rather than 5-1/2″. Next, I layered on a 2″ x 4″ piece of the Forever Greenery Designer Series Paper on the left hand side! Any of the pieces in the pack look great as I have tried many! Then I tied some Just Jade Ribbon around the card front and layered over the designer paper! The ribbon goes to the inside of the card!

Forever Greenery, www.LaurasStampPad.com

For the embossed image, I used Just Jade cardstock and placed it in the Greenery Embossing Folder on the bottom end. It does actually emboss a smidge of the top greenery as well….and that’s why the greeting is placed in the upper left corner. 😉 There is a way to hide anything! I layered the embossed image onto Shaded Spruce cardstock. For that fabulous you make me smile greeting, I used the Label Me Lovely Punch and just trimmed it down! The greeting was stamped in Shaded Spruce Ink and added with Stampin’ Dimensionals. To finish it off, I added some Champagne Rhinestones on the edges!

If you would like to recreate this You Make Me Smile card, check out the supplies below! Also, be sure to come back as I have more samples to share with you using this Suite! Click here to see the full sheets of every piece of the Forever Greenery Designer Series Paper!

Happy Stampin’

~Laura

Product List

The Struggle Is Real!!!

Posted on

Happy May! It’s another month and we are still stuck at home! I get it! The struggle is real! My biggest struggle is people! I miss family, friends, strangers, anyone! HUGS! Until, then I shall make these cards and send lots of happy mail!

Struggle is real, www.LaurasStampPad.com

These are some quick and simple cards that I created recently on a Facebook Live that I did. During this “stay at home” time, I have been doing Daily Dose of Stampin Therapy each weekday to stay connected to all of you. It’s a fun little time where we chat, stamp, and laugh together! Click here to join in the fun! If you don’t have Facebook, I’m also posting the videos to my YouTube Channel too!

These cards were made with the retiring In Colors and coordinating In Color Designer Series Paper which is already sold out! I then just added a greeting and embellished. Simple and fabulous!

I'm here for you, www.LaurasStampPad.com

The stamp set that I used for these cards is the Artfully Aware Stamp Set. That set is also retiring so grab it now before it is gone!

If you are looking for great greetings to make quick and simple cards like this during this crazy time, check out Stampin’ Up’s NEW Share Sunshine PDF Download! When you purchase this, you will instantly get the PDF of these funny, cute greetings to print and use as much as you would like. Also, all of the sales for this will be donated to go to COVID-19 efforts through these organizations: The World Health Organization’s COVID-Solidarity Response Fund & United Way Worldwide’s COVID-19 Community Response and Recovery Fund. What a great way to give back and make hearts smile! Not only are you enjoying the therapy of stamping, you are donating to a good cause and sending those cards to make someone’s day! It’s a win win all around!

Happy Stampin’

~Laura

Product List

Relax & Chinchilla Out!!!

Posted on

This is the adorable card I gave my mom for her retirement. I mean actually I sent her a lot of cards but this one I made specifically for her because I thought it was cute and she would enjoy it! Relax & chinchilla out…it’s the perfect greeting, right?

Relax & Chinchilla Out, www.LaurasStampPad.com

Isn’t it adorable??? I even stamped a coordinating envelope!

For this card, I started with a Pretty Peacock card base. Next, I layered on some Mango Melody and then some Tropical Oasis Designer Series Paper!! Then for the focal point, I die cut out 2 sizes of the Stitched So Sweetly labels! These are so cute and perfect for adding a greeting on your card!

Glittered Chinchilla, www.LaurasStampPad.com

Using the Witty-cisms Stamp Set, I stamped the greeting/image in Memento Black Ink. Then I colored the little chinchilla in with the Light Smoky Slate Stampin’ Blends Marker. To add a little bling, I colored over him with the Wink of Stella Pen! Then I layered these together and added it to the card front with Stampin’ Dimensionals!

Retirement Card, www.LaurasStampPad.com

For the inside of the card, I stamped another greeting from the Witty-cisms Stamp Set. I also added a little strip of the Tropical Oasis Designer Series Paper to the left hand side to bring it all together! I love how it turned out and my Mom loved it too!!!

Check out the supplies listed below if you need to make a fun “relax & chinchilla out” retirement card! Don’t forget that the FREE Stamp Set of the Month this month is the Under My Umbrella Stamp Set for order of $75 or more!

Happy Stampin’

~Laura

Product List

Another Sensational Year!!!

Posted on

Everyone should celebrate their birthday like it’s the greatest day ever because after all, IT IS!!!! You were born and are here to celebrate! It’s fabulous!!! This card is perfect to celebrate that and wish you the best for another sensational year!!!

Best Dressed, www.LaurasStampPad.com

It’s just so beautiful! The colors, the flowers, and that fabulous layered greeting! I love it all!

I started with a Blackberry Bliss card base. Next, I layered a piece of Best Dressed Designer Series Paper (3-3/4″ x 5″) onto a piece of Purple Posy (4″ x 5-1/4″). Before adding this to the card front, I tied some Whisper White Crinkled Seam Binding around it. I just tied it into a knot but you could always go for the bow!

Label Me Lovely Punch, www.LaurasStampPad.com

For the greeting, I stamped it from the Sending You Thoughts Sale-A-Bration Stamp Set in Blackberry Bliss Ink! Then I punched it out with the Label Me Fancy Punch! This was then layered onto a Blackberry Bliss piece that I punched out with the Label Me Lovely Punch. I added this to the card front with Stampin’ Dimensionals for some added texture!

Another Sensational Year, www.LaurasStampPad.com

Blackberry Bliss is a super dark color so of course I needed some decoration on the inside. I added in a piece of Whisper White and just put a little leftover strip of the designer paper on the left side. The greeting comes from the same stamp set and coordinates so well! I love it!

Check out all of the supplies listed below so you can make this another sensational year card! Also, check out this one for more inspiration using these products!

Happy Stampin’

~Laura

Product List