Lovely Lasting Lily!!!

Posted on

Happy Monday! I hope you all had a wonderful weekend!!! We are in full swing of the Occasions Mini Catalog & Sale-A-Bration!!! Today, I’m sharing with you this lovely Lasting Lily card that I created!

Lovely Lasting Lily, www.LaurasStampPad.com

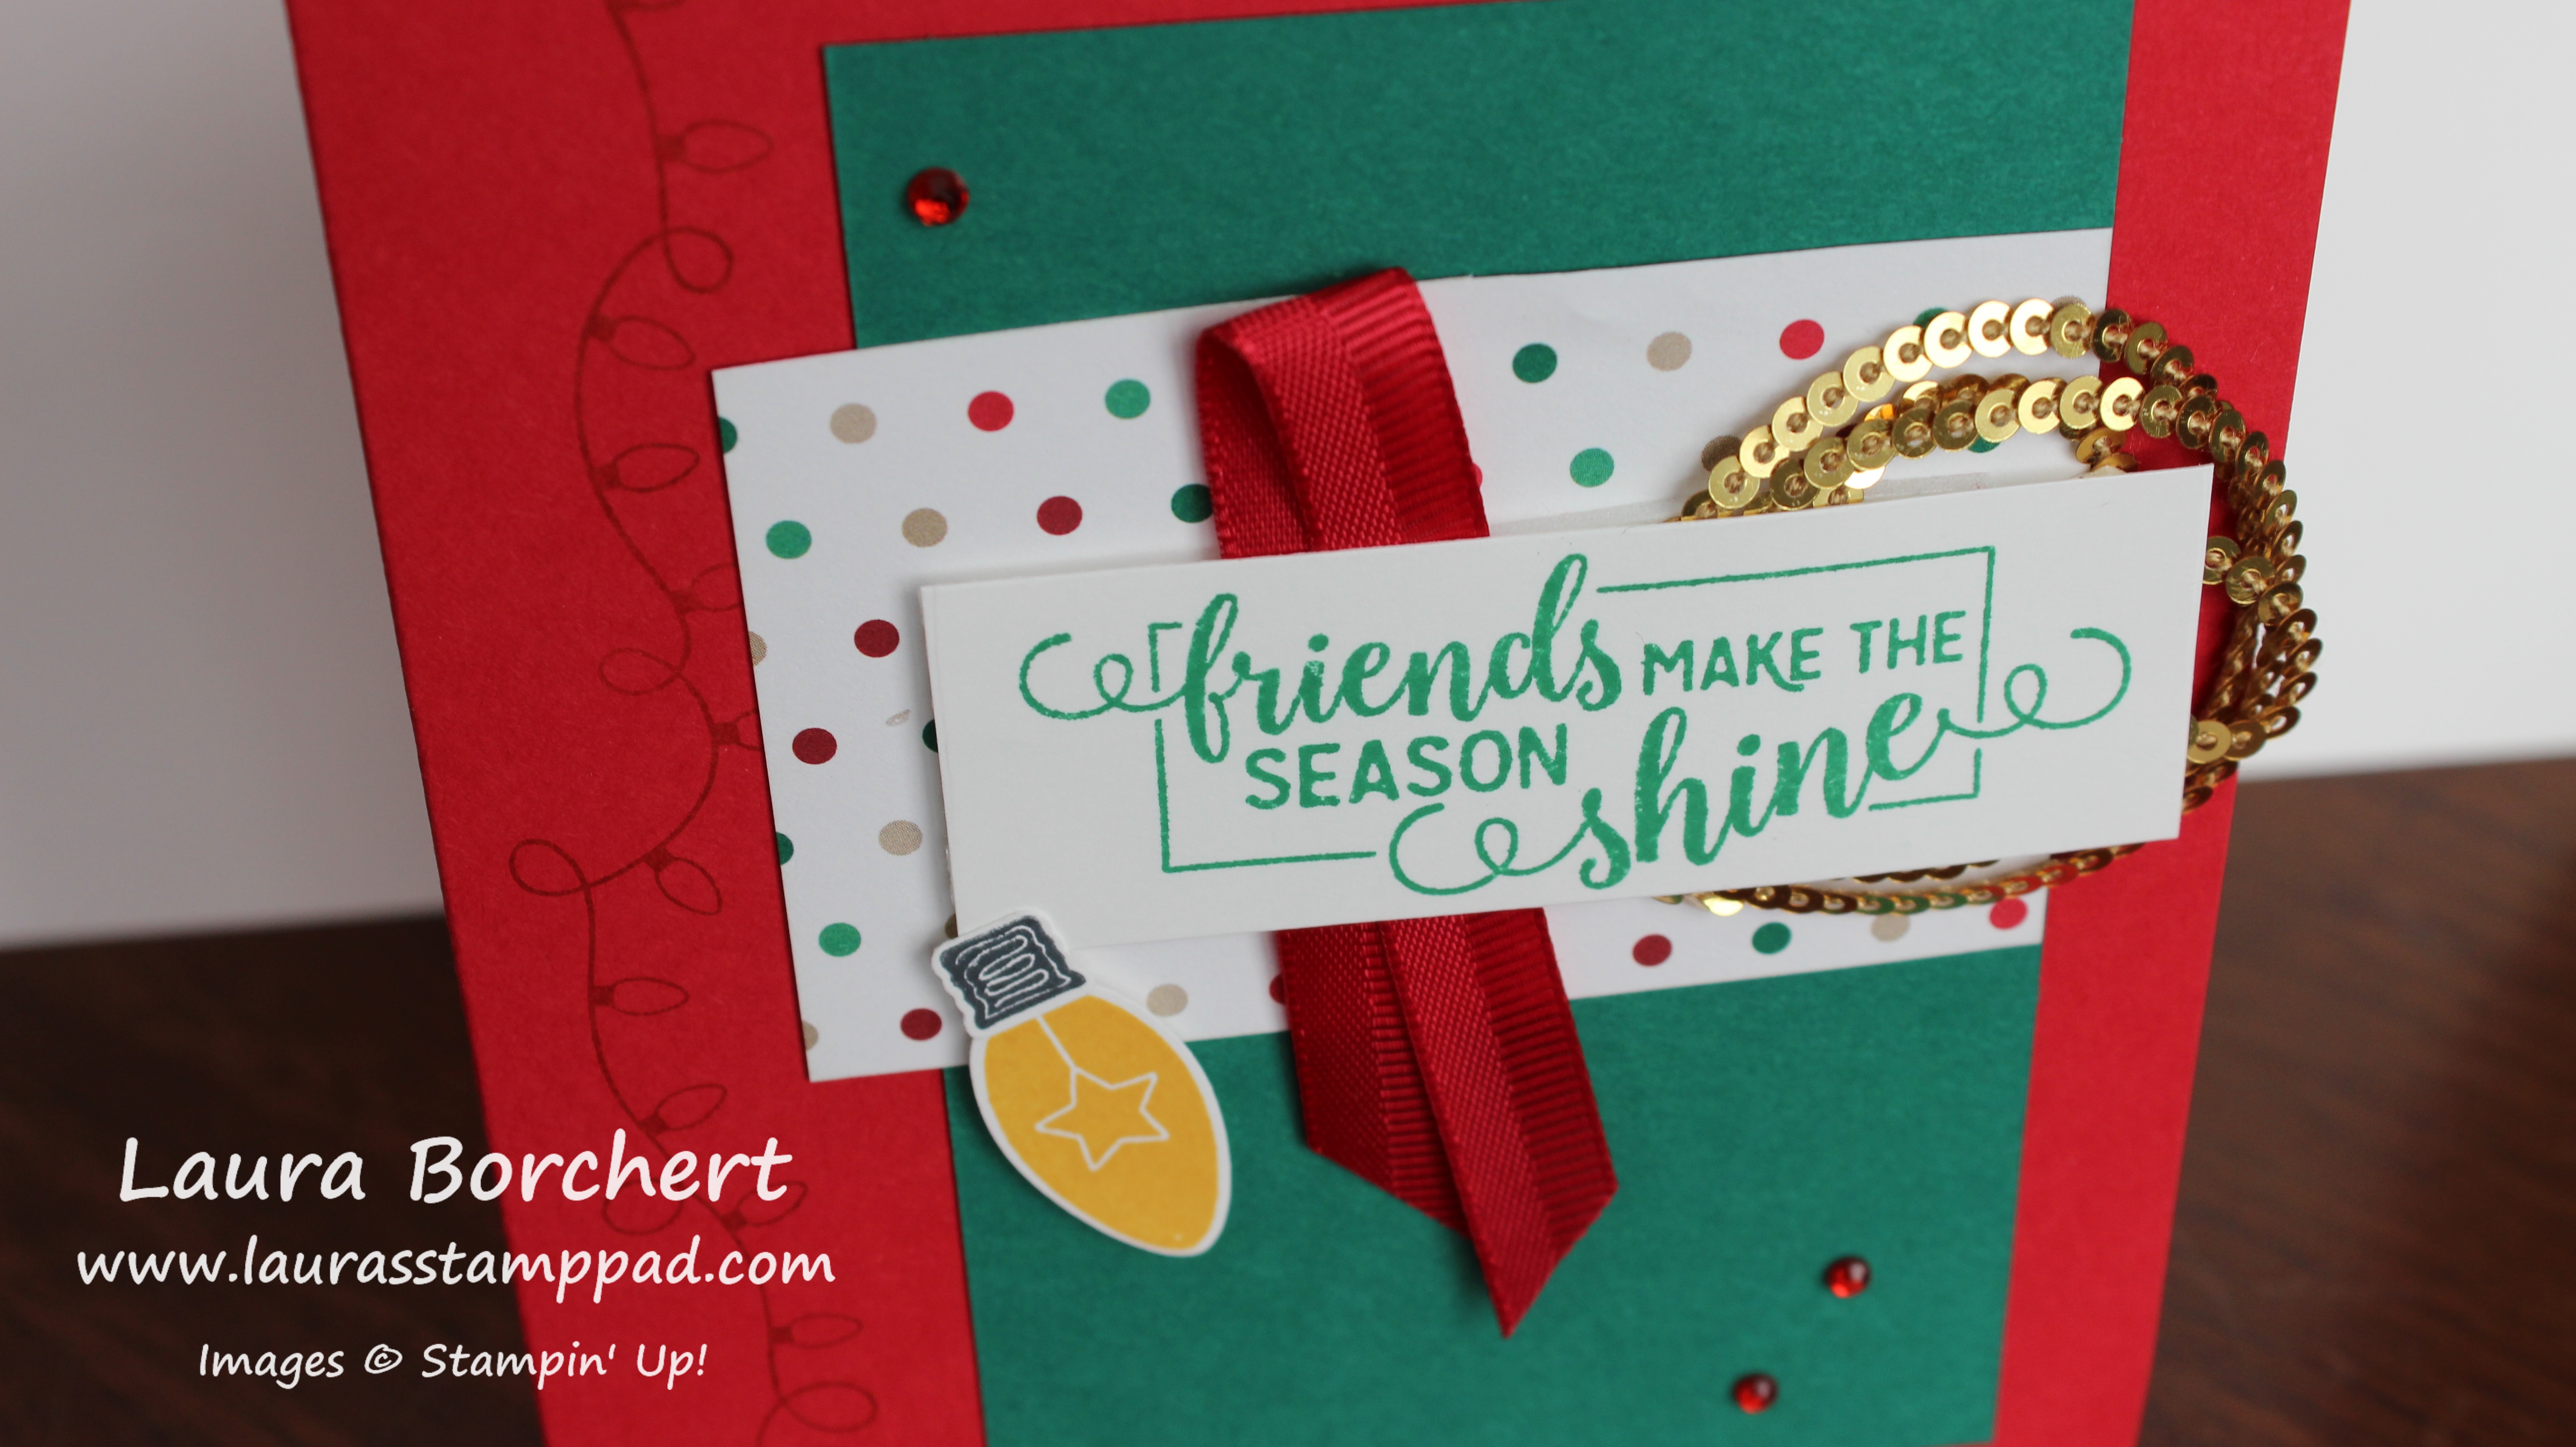
I love the soft look of this card and how easy it is! The greeting is perfect for thinking of you, sympathy, I’m sorry, and many other occasions!

I started with a Soft Sea Foam card base. Next, I took another piece of Soft Sea Foam measuring 5″ x 3-3/4″ and stamped the lilies from the Lasting Lily Stamp Set. This is one of the $100 level free sets you can earn through Sale-A-Bration. It has tons of greetings for both the inside and outside. The flowers and stems were all stamped in Mint Macaron Ink. Before adding this piece to the card front, I punched out a half circle on the right edge using the 3/4″ Circle Punch. This gives a little tab to secure some ribbon! I tied some Silver Metallic Edge Ribbon around the cardstock and into a knot.

For the greeting, I used a piece of Whisper White measuring 1-1/2″ x 3″ and stamped the greeting from the Lasting Lily Stamp Set. Using the Banner Triple Punch, I punched the banner tips. The greeting was added to the card front with Stampin’ Dimensionals for a little bit of texture!

Sale-A-Bration Lily, www.LaurasStampPad.com

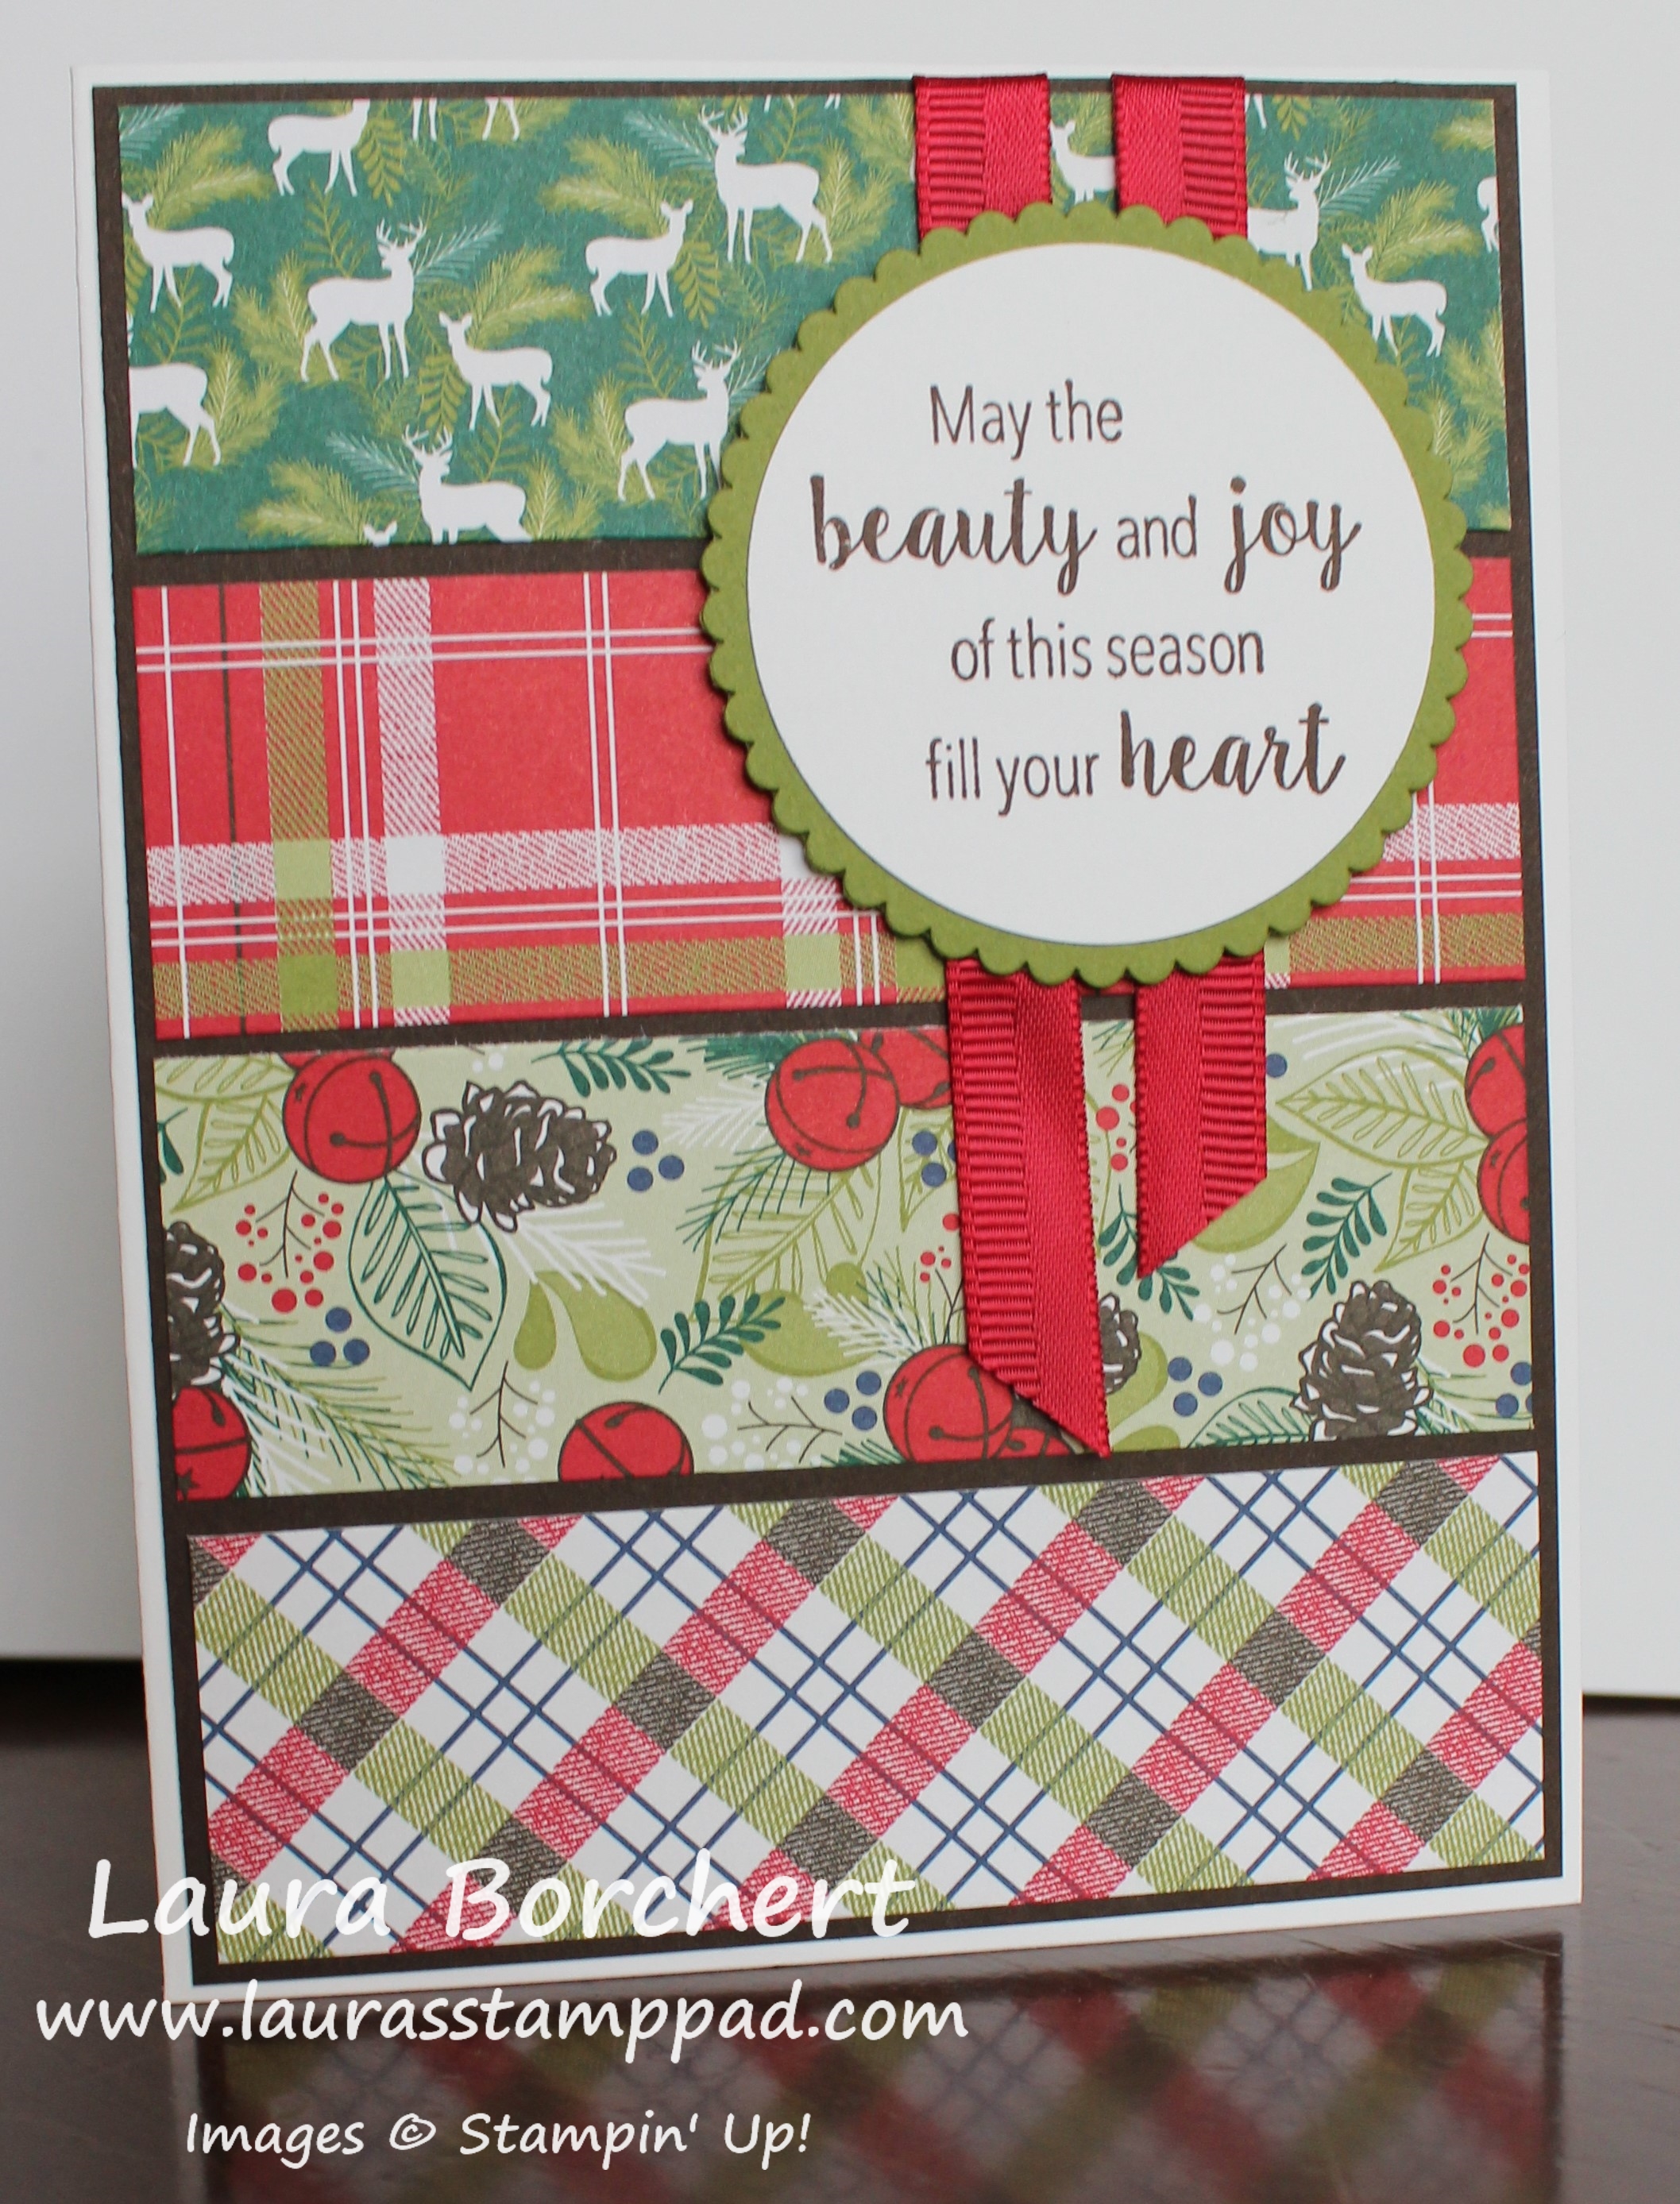
For the inside of the card, I added a piece of Whisper White (4″ x 5-1/4″) and stamped another lily in the corner and greeting up top! Do you like to decorate the inside of your cards? Let me know in the comments below! I didn’t use to but I have been wanting to a lot lately. #newyearnewcardstyle Just maybe! 🙂

Happy Stampin’

~Laura

Product List


Friends Make the Season Shine!!!

Posted on

Friends Make the Season Shine!!! This greeting is just perfect and makes this card sweet! I love it!!!

Friends Make the Season Shine, www.LaurasStampPad.com

I got this idea for this card at a stamp event with fellow demonstrators. I modified it a few different ways for various classes I have had. I almost think I like the simply look better than the more detailed on. Let me know which you prefer in the comment below!

I started with a Real Red card base and stamped the lights along the left side in Real Red Ink. All of the images used on this card are from the Making Christmas Bright Stamp Set from the Holiday Mini Catalog. Don’t forget this catalog ends on January 2nd! Next, I cut a piece of Call Me Clover (2-3/4″ x 4-1/4″) and added it to the card front. Then I cut a piece of the All is Bright Designer Series Paper (2″ x 3″) and placed it over the clover piece, flush with the right side edge.

Shining Bright, www.LaurasStampPad.com

For the focal point, I stamped the greeting in Call Me Clover onto a piece of Whisper White (1″ x 3″). Then I flipped it over and added both the ribbon loop and sequin circles to the back securing with Stampin’ Dimensionals. The ribbon is the Real Red Mixed Satin Ribbon and I just folded it in half. For the Gold Sequin Trim, I wrapped it around my fingers a few times and then slid it off and placed it on the back. You all know how much I love Stampin’ Dimensionals so of course I used plenty to secure the ribbons and to make the greeting pop! Next, I stamped the light bulb in Crushed Curry Ink and the end in Memento Black Ink. Using the coordinating Bulb Builder Punch, I punched it and adhered it to the card front. I finished off the card with a few Red Rhinestones!

Gold Sequin Trim, www.LaurasStampPad.com

Here I created a similar card but left off the Real Red Ribbon, Rhinestones, and Light Bulb. I do like how the Gold Sequin Trim stands out more though. Which is your favorite?

Click the supplies below to create this fabulous card and get these goodies before they retire on January 2nd!! Happy Stampin’

~Laura

Product List


Designer Series Paper Scraps Used Up!!!

Posted on

Come on I know we all have plenty of scraps laying around. Today I’m sharing how to get those Designer Series Paper scraps used up!!!

Designer Series Paper Scraps Used Up, www.LaurasStampPad.com

This card uses scraps of designer paper measuring 4″ x 1-1/4″. I mixed and matched the pieces together. Some of the patterns I used both the front and the back and others I just used one of the sides for each card. All of these are layered on a piece of Early Espresso cardstock measuring 4-1/8″ x 5-3/8″. My tip for getting the spacing correct is to start on the outside and work your way in. All of this was layered onto a Whisper White card base.

For the decoration, I added a piece of the Real Red Satin Ribbon with the loop at the top and the ends hanging down. Simply add a smidge (an inch) of adhesive to the card and press the ribbon into it. Then place your greeting over the top to help secure it. The greeting uses the Laying Circles Framelits in Old Olive and Whisper White. The greeting was stamped in Early Espresso from the Stylish Christmas Stamp Set from the Annual Catalog! Of course the greeting is popped up with Stampin’ Dimensionals for a little bit of texture and a smooth finish over that ribbon!

What designer paper pack do you have lots of scraps from? What style of card or occasion are you going to make this with pattern?? Let me know in the comments below!

Happy Stampin’

~Laura

Product List


November 2018 Paper Pumpkin Kit – To You & Yours!!!

Posted on

The November 2018 Paper Pumpkin Kit – To You & Yours was perfect for me to have a few extra cards to send out to family and friends. I’m always thinking of someone else to send a card to or have a new customer that I want to send one to so this kit was perfect!!! Plus it came in a cute plaid box!!! Check out the unboxing of this kit here!

Dreaming of a Plaid Christmas, www.LaurasStampPad.com

The plaid theme for these cards was super adorable! I loved it. The little greenery pieces were delicate but already die cut for you! Woot Woot!

Christmas Greenery, www.LaurasStampPad.com

I actually didn’t use the ribbon for this card. Oppps I noticed it was on there after I was all done and then I thought I would just leave it off because I liked  the card. Also, I didn’t use the Mini Glue Dots from the kit, I used some Snail Adhesive. While it’s super fabulous that these kits come with adhesive, I love my Snail for a quicker project. I added a little bit of snail on the wood sticker and then pressed the greenery into it. It wasn’t a super strong hold but then I added the greeting over the top with Stampin’ Dimensionals. It was super secure then! I love it!

Plaid Christmas Wreath, www.LaurasStampPad.com

This card was super quick and simple as well. I placed the wood circle sticker down and then added 8-10 little dabs of Snail adhesive around the circle. I pressed the greenery into a circle over the adhesive. It worked perfectly. I added the little bow with a Mini Glue Dot.

November 2108 Paper Pumpkin, www.LaurasStampPad.com

The cute plaid matching envelopes makes it so cute and coordinating. I was able to whip these cards together so quickly and it was awesome. To just relax and craft my Paper Pumpkin Kit is amazing. I am really looking forward to Paper Pumpkin even more lately.

Today is the last day to get signed up for the December Paper Pumpkin Kit. Click here to get signed up! I have been told that it won’t be cards but rather a project. This intrigues me and I can’t wait to see what it is. I’ll be posting the unboxing on my YouTube Channel once it arrives. Can’t wait! Paper Pumpkin also makes the perfect little gift for someone. It comes with everything you need in the kit as well as directions!

Happy Stampin’

~Laura


Froofy Shmoofer Card!!!

Posted on

My husband names this card the Froofy Shmoofer card!!! I say that works, right?? Either way it’s a great card for any occasion, even Christmas!

Froofy Shmoofer, www.LaurasStampPad.com

I started with a Soft Sea Foam card base. Next, I took a piece of Whisper White (4″ x 5-1/4″) and stamped the greenery piece from the First Frost Stamp Set. It is stamped in Tranquil Tide Ink. I started on the side and stamped it up high, flipped it over and stamped it towards the bottom and over and over. This creates a more random pattern. Then I added a little strip of the Frosted Floral Designer Series Paper across the center.

Detailed Greeting, www.LaurasStampPad.com

Using just a little bit of adhesive in the center of the designer paper, I then added a little bit of the Tranquil Tide Mini Ruffled. Don’t worry if it doesn’t seem secure because the greeting will also help hold it in place. For the greeting, I stamped it from the First Frost Stamp Set in Tranquil Tide Ink. Then I took another greenery piece form the set and stamped it over the top in Soft Sea Foam Ink. Then, I punched a few Soft Sea Foam sprigs with the Sprig Punch. I added these on opposing corners. I added the greeting to the card front with Stampin’ Dimensionals.

This card would be a perfect for a winter wedding, Christmas, or even a just because. What occasion would you use this card for?? Let me know in the comments below!

Don’t forget today is the last day for the Online Extravaganza. Get 10% off Inks and Tools!! Click here to check out the sale items!

Happy Stampin’

~Laura

Product List


Festive Farmhouse Fun!!!

Posted on

Happy Monday!!! I hope you all had a wonderful Thanksgiving and weekend! We got to spend lots of time with both sides of the family. It was amazing and Claire enjoyed all the attention. Wish me luck today as I am her only entertainment. 🙂 Now that Thanksgiving is over, it’s time to prepare for the next holiday!!! I created this cute and simple Festive Farmhouse fun card for just the occasion!

Festive Farmhouse Fun, www.LaurasStampPad.com

I’m all about quick and simple cards this year because I just don’t seem to have much time lately now with little Miss Claire in our lives! 🙂 This card also uses every bit of the 12″ x 12″ sheet of Designer Paper because it is a 4″ x 3″ piece! Bonus!

I started with a Cherry Cobbler card base. Next, I took a piece of the Festive Farmhouse Designer Series Paper (4″ x 3″) and layered it onto a piece of Crumb Cake (4-1/4″ x 3-1/4″). Then I added this piece to the card front. I took a piece of the Striped Burlap Trim and cut the ends to a point, making the points opposite for each end. Just add a little bit of Snail Adhesive to the designer paper and press the ribbon into it. It won’t be held super strong at this point but that’s okay. Adding the greeting over the top will hold it much better.

For the greeting, I used the Timeless Tidings Stamp Set. The kit is amazing but the coordinating stamp set is SUPER versatile. Check out these samples using it here and here! The greeting was stamped in Cherry Cobbler Ink and punched out with the 2″ Circle Punch. Then I layered it onto a Cherry Cobbler Scallop Circle. The scallop was die cut with the Layering Circle Framelits. The framelits create smooth and scalloped circles but I used my punch for the smooth one to go faster! If you only have the framelits, it would work perfectly! I added the greeting to the card front with Stampin’ Dimensionals for a little texture and to go smooth over the ribbon!

Do you like quick and simple cards for Christmas or more intricate, detailed ones? Let me know in the comments below! I’m off to work on my cards today! I have a lot to create since my family is huge and all of my customers get one! 🙂

Happy Stampin’

~Laura

Product List


All The Shimmer & Shine!!!

Posted on

Happy Wednesday!!!! Today, I’m sharing this amazing and very simple card. It’s got all the shimmer & shine which just makes it fabulous!

All The Shimmer & Shine, www.LaurasStampPad.com

Can we just stare at this card for another moment??? Isn’t it amazing? The Frosted Floral Designer Series Paper has that amazing shine to it that just makes it pop and look so pretty all on its own. I like letting the paper do all of the work!!!

For this card, I used a Whisper White card base. Next, I layered on a piece of the Frosted Floral Designer Series Paper measuring 4″ x 5-1/4″. It’s really hard to pick which piece to place down because both sides are amazing. Then I took another piece of the designer paper measuring 1/2″ x 5-1/4″ and placed it towards the bottom of the card. This offers a nice little contrasting piece to help the greeting stand out.

For the greeting, I stamped it from the First Frost Stamp Set in Soft Suede Ink. The greeting was stamped on Mint Macaron that was punched with the Banner Triple Punch for those perfect banner tips! I added the greeting to the card front on the right side with Stampin’ Dimensionals for a little bit of texture. On the left side, I adhered a little bow with Mini Glue Dots that was made with the Braided Linen Trim. This card was super quick and simple and yet stunning!

Do you prefer quick and simple cards or more detailed elaborate cards? Maybe you prefer a little bit of both depending on the day or how much time you have?? Let me know in the comments below!!!

Happy Stampin’

~Laura

Product List


Birthday Star!!!

Posted on

Happy Monday!!! The Frosted Floral Designer Series Paper may look all pretty, floral, and feminine but check out this fun Birthday Star card that is rather masculine.

Birthday Star, www.LaurasStampPad.com

I started with a Whisper White card base. Next, I took a piece of Mossy Meadow measuring 4-1/4″ x 3-1/4″ and layered on a piece of the Frosted Floral Designer Paper. This paper is beautiful because it is printed on shimmery paper. I love it!!! The Designer Paper measures 4″ x 3″ which is perfect for using up every inch of the 12″ x 12″ sheet. I love when I don’t have to waste any of it!

For the greeting, I cut a piece of Mossy Meadow measuring 2″ x 3″ and layered on a piece of Whisper White measuring 1-3/4″ x 2-3/4″. The greeting was stamped from the Special Celebrations Stamp Set in Soft Suede Ink. This stamp set has greetings for every occasion and a coordinating greeting for the inside. For a little decoration, I added a strip of Burlap Ribbon to the left hand side. On the top, I folded the ribbon to the back side and secured it with Stampin’ Dimensionals. Then placed some Tear And Tape down and pressed the burlap into it. Using the All Is Bright Paperclips, I added the little star which also secured the ribbon. The greeting was then added to the card front with Stampin’ Dimensionals.

Do you think this card looks masculine? Let me know in the comments below! You could also recreate this card with a more floral piece from the same pack of paper for a feminine look or even a different occasion than birthdays!

Happy Stampin’

~Laura

Product List


Spooky Kitty!!!

Posted on

I love kitty cats and think they are just precious and fun. I don’t really feel like black cats are spooky unless it’s Halloween! Do you think this is a spooky kitty??

Spooky Kitty, www.LaurasStampPad.com

Today, I’m going to share some tips on how I can create fun Halloween cards without buying lots of Halloween goodies. First of all, I’m not a huge fan of Halloween but that doesn’t mean I can’t make a few cards to send out! Therefore, I like to purchase minimal Halloween products but still create fabulous projects. Do you like to send out Halloween Cards?

For this card, I started with a Pumpkin Pie card base. Next, I took a piece of Highland Heather cardstock and added some Toil & Trouble Designer Series Paper to the bottom (4″ x 3″). Using the Black Glittered Ribbon, I tied it into a knot around the top of the designer paper because  it smooths out the transition from designer paper to cardstock. Next, I stamped the greeting which is from a past September Paper Pumpkin kit which was Halloween themed. Paper Pumpkin always has perfect holiday stuff in it that can be used over and over. I love it!!! The greeting was stamped in Pumpkin Pie Ink so it pops out on the purple.

Hat & A Cat, www.LaurasStampPad.com

Finally for the decorations, I used the Cat Punch and more Toil & Trouble Designer Paper. The spooky hat was fussy cut from one of the sheets. This was quick and it’s super cool to add an accent like this to your card even if you don’t like fussy cutting like me! The cat was added to the card front with Snail Adhesive and the hat was added with Stampin’ Dimensionals for texture.

So for this adorable card, I only purchase the Toil & Trouble Designer Series Paper. The Paper Pumpkin subscription stamps and the Cat Punch were items I had on hand already. If you would like to sign up for Paper Pumpkin to get fun holiday stamps for every occasion, click here!!!

I hope you enjoyed this simple and fun card!!! Hope you enjoyed this card and it gives you inspiration for your Halloween Cards this year! Click the supplies below to get yours created!

Happy Stampin’

~Laura

Product List


Technique Tuesday – Securing Chicken Wire to Your Card!!!!

Posted on

Happy Tuesday!!! That means I have a fun technique!!! We are securing Chicken Wire to your card….well not real chicken wire! Instead Stampin’ Up has created this fun Chicken Wire Element that is super cute and easy to add to your project!

Securing Chicken Wire to Your Card, www.LaurasStampPad.com

This card is perfect for Fall and Thanksgiving! I’m loving the colors and elements so much from the Country Lane Suite!

I started with an Old Olive card base. Next, I took a piece of Crumb Cake (4″ x 5-1/4″) and stamped the cotton floral image from the Country Home Stamp Set in Memento Black Ink. I used the Stamparatus so I had even spacing side to side and the images didn’t overlap. Not having to stress about stamp placement is amazing! Using the Stampin’ Blends, I colored the flowers. For the white cotton, I used the White Watercolor Pencil. It worked perfectly! Next, I added this piece to the card front.

Harvest Blessings, www.LaurasStampPad.com

For the greeting, I stamped it in Pumpkin Pie from the Country Home Stamp Set. I made sure to stamp it on the right hand side so I had room for my ribbon and bow on the left. Next, I layered this onto a piece of Pumpkin Pie cardstock. For the bow, I actually added a small piece of Braided  Linen Thread to the end, wrapping the ends to the back side and securing with Stampin’ Dimensionals. Then I took another piece to tie a bow and secure it on with a Mini Glue Dot. This faux bow look makes it look like it is wrapped around but yet the bow is not sideways! It’s perfect!

Before adding this on, I placed the Chicken Wire Element on the bottom of the Crumb Cake cardstock. I didn’t actually use adhesive on that piece but secured it with the Country Lane Designer Paper. Be sure to place the greeting piece off to the side as a guide for how low the designer paper needs to go so you aren’t covering up the designer paper or all of your stamped flowers. After securing the designer paper, I added the greeting on top with Stampin’ Dimensionals!!!

If you would like to see this all in action, check out the video below or click here! Be sure to give the video a thumbs up if you liked it and don’t forget to subscribe if you are new. If you would like a notification when I post a new video, be sure to click the bell right next to the subscribe!!!

Happy Stampin’

~Laura

Product List