This Country Floral Embossing Folder was one of the Sale-A-Bration items and that ended last week. If you earned it, try out this amazing card!!! If you didn’t earn it, don’t worry as it is coming back! Woot Woot!
I went very basic as I feel like the embossing folder is just so stunning. Adding a little gold bling and some navy makes it POP! You could use silver and any other color as well. What colors would you use? Let me know in the comments below!
I started with a Very Vanilla card base. Next, I took another piece measuring 4-1/8″ x 5-3/8″ and embossed it with the Country Floral Embossing Folder. I went a tiny border from the embossed piece and the card base so it looked like it filled out the card front more. I don’t like actually embossing the card front of the card base because then it makes the inside all bumpy and the card base less secure in my opinion. After adding this piece to the card base, I tied some Gold Metallic Edge Ribbon around the card.
For the greeting, I used Circle Punches and the Well Said Stamp Set from the Occasions Mini Catalog. I love this stamp set because it has lots of greetings for any occasion and it has a greeting for the inside of the card as well! Perfect! I stamped the greeting in Night of Navy Ink. To finish off the card, I added a few pearls for bling and texture!
This quick and simple card can be created with any style of embossing folder! It is great to have a few on hand and add a greeting as you need a card!
Happy Tuesday!!! You know that means I have a fabulous technique to share with you! This one is a Piece of Cake….lol! It uses the Piece of Cake Stamp Set and coordinating Cake Builder Punch too! 🙂
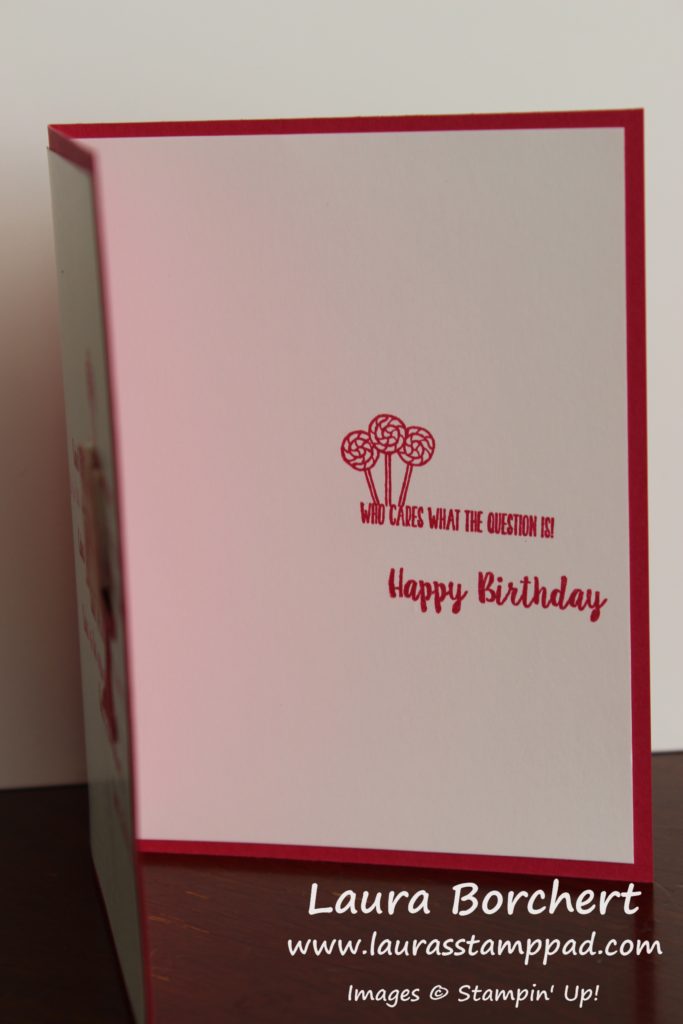
Look how fabulous this card is in each of the colors. It can be masculine or feminine!!! All you need is the card base and 2 pieces of Whisper White measuring 4″ x 5-1/4″. One is for the front of the card and the other is for the inside.
For the front, I stamped the greeting from the Piece of Cake Stamp Set all over the center of the cardstock. After inking up the image, I stamped 3 times before going back to the ink for that fun variation of color. It is super cool to get 3 different shades from 1 ink pad! Next, using the same color, I stamped the cake stand in the same ink onto the same cardstock color. For the sample above, that was Melon Mambo. The cake was then stamped in Melon Mambo Ink onto Powder Pink cardstock. Using the Cake Builder Punch, I punched out the images.
One of the best ways to save paper with the dual punch is to cut long skinny strips. Using the Fine Tip Glue Pen, I added the cake stand to the card front. Before adding the cake, be sure to stamp the lollipops. Simply place the cake down on the plate, move it down a 1/4-1/2″ and then stamp the lollipops. Then I added the cake with Stampin’ Dimensionals. Using the cake as a guide really helps get the spacing correct.
Using the Fine Tip Glue Pen again, I added glue all over the drips of the cake and then poured Dazzling Diamonds over the top for a fun glittered look (Gorgeous Grape card). For the Melon Mambo card, I went the safe glitter route and used Wink of Stella!
For a more masculine look, on the Bermuda Bay card, I just colored in the drips with the Fine Tip Glue Pen and let it dry for a nice glossy look! Which one is your favorite???
A little decoration and fun on the inside of the card too!!!
If you would like to see this all in action, check out the video below or click here! Be sure to give the video a thumbs up if you liked it and don’t forget to subscribe if you are new. If you would like a notification when I post a new video, be sure to click the bell right next to the subscribe!!!
Happy Tuesday!!! You all know what that means….I have a fabulous technique to share with you today!!! This All Adorned Sale-A-Bration Stamp Set is perfect to use on a Stamparatus because the images interlock. The set is photopolymer so you can see through the images and use it on blocks as well!
I am loving Night of Navy and Pineapple Punch together. The contrast is AMAZING and the colors work for many occasions. This card is perfect to have on hand and just stamp a greeting on the inside when you need it.
I started with a 4″ x 8″ Night of Navy card base. I wanted the square look since the pattern looks better for a square. It still fits into a regular envelope with a little room on the side but that’s okay and this way it will still cost the same postage. Next, I took a piece of Pineapple Punch measuring 3-1/2″ x 3-1/2″ and stamped the corner image on each corner. This was super simple with the Stamparatus. Simply line it up to stamp in one corner and then rotate your cardstock around! Perfectly lined up and in the corner each time! I love that!
Then for that fabulous focal point, I stamped the 2 layering images overlapping each other using the Stamparatus. First, stamp 1 of the images. I started with the Night of Navy image. Next, place the other stamp over the top and pick it up with the clear plate of the Stamparatus. Then ink it in Pineapple Punch and stamp. That image was then punched out with a 2″ Circle Punch and layered onto a Night of Navy piece punched out with the 2-1/4″ Circle Punch. I added these to the card front with Stampin’ Dimensionals.
For the inside, I stamped a few of the images on the corners to make it all match with the front. I used the greeting from the Well Said Stamp Set because I’m going to use this card for an upcoming Bridal Shower!! The perfect little card for any occasion!
Now is the time to get the Stamparatus because you just need $1 more and you will earn this All Adorned Sale-A-Bration Stamp Set for FREE!!! Click the supply list below to start shopping!
If you would like to see this all in action, check out the video below or click here! Be sure to give the video a thumbs up if you liked it and don’t forget to subscribe if you are new. If you would like a notification when I post a new video, be sure to click the bell right next to the subscribe!!!
Cupcakes are my favorite dessert followed by cheesecake. I love to make cupcakes and decorate them too! I think I have made cheesecake like twice…it is so expensive to make and finicky. So when it’s time for a celebration, we celebrate with cupcakes! What is your favorite dessert to eat, make, or celebrate with?? Let me know in the comments below!
Sale-A-Bration ends on March 31st so this is the last week. Get these cupcakes before they are gone! Unfortunately, the coordinating Call Me Cupcake Framelits are sold out already. If you were lucky and got a set, you can recreate this card exactly. If you missed out, You can always fussy cut out the cupcake or just stamp it in the corner!
I started with a Granny Apple Green card base and layered on a piece of Lovely Lipstick (4″ x 5-1/4″). Next, I took a piece of Whisper White (3-3/4″ x 5″ and stamped the little flower in Lovely Lipstick. You can stamp all over as a background or in a upper left to lower right diagonal pattern. For the greeting, I stamped it in Granny Apple Green Ink and punched it out with the Pretty Label Punch. All of the images on this card come from the Hello Cupcake Sale-A-Bration Stamp Set. Using a little bit of the Lovely Lipstick Ribbon from the All My Love Ribbon Pack in a loop, I placed it down and added the greeting on top with Stampin’ Dimensionals.
For the cupcake, I stamped the liner in Crumb Cake and the cake in So Saffron Ink. I love lemon cake or just a yellow cake. Yellow cake reminds me of my Grandma! 🙂 The icing was stamped in Lovely Lipstick and the little heart was stamped in Granny Apple Green. All 4 of these images were then die cut with the coordinating Call Me Framelits. If you have them, fabulous but if not, no worries. You can just fussy cut the images or stamp these directly to the Whisper White layer (just don’t stamp flowers in that corner). A final little touch that I did was add some Wink of Stella to the icing for a little shine! It did bleed the ink a bit but I was okay with that for a soft pink all around! Still looks tasty to me!
Check out the supply list below so you can create this card and earn the Hello Cupcake Stamp Set for Free with Sale-A-Bration (free item with every $50 spent).
I love designer paper and my biggest struggle with it is that one side must be covered up in order to enjoy the other side. Today, I’m sharing a card using all of the Happiness Blooms Paper….both sides!!!
I love it and there is no right or wrong way to do this. Thank you to Mary Ellen Stites for the inspiration on this card! Also, this is a great way to use up those little leftover scraps of designer paper!
I started with a Grapefruit Grove card base. Next, I took a piece of Call Me Clover measuring 4-3/4″ x 3-3/4″ and layered on the strips of Happiness Blooms Designer Series Paper. The designer paper is cut into 3-1/2″ x 3/4″ strips. Since one paper pack has so many options front and back, it is super easy to just mix and match the patterns. Once I had all of the pieces on, I tied some Calypso Coral Satin Ribbon around it and then added it to the card front.
For the greeting, I stamped it in Night of Navy Ink from the Well Said Stamp Set. This set is super fun because there are so many mix and match greetings and something for the inside of the card as well. After stamping the greeting, I punched it out with the Tailored Tag Punch. Then using the Bloom By Bloom Stamp Set, I added a few flowers around the greeting. The greeting was added to the card front with Stampin’ Dimensionals. I finished off the card with a few Happiness Blooms Enamel Shapes over the flowers.
How do you like to use your designer paper?? Let me know in the comments below. Also, you can check out some of my One Sheet Wonders which are great for using designer paper. Also, check out the supply list below for you to make this card too!
Happy Technique Tuesday!!! You all know what that means!!! I have a fabulous technique to share with you all today! I’m not really sure if there is an official name for this so I’m calling it Faux Embossing with Punches!!
Look how fabulous that white panel looks with those butterflies all over. The awesome thing about this technique is that 1. it uses up scraps and 2. you can do it with any of your punches.
I started with a Grapefruit Grove card base. Next, I took a piece of Whisper White cardstock measuring 2″ x 5-1/4″ and placed a lot of punched butterflies all over it. I punched the butterflies out of scrap white cardstock using the Butterfly Duet Punch. Don’t worry! For those of you who haven’t had a chance to order this yet, it will be available again soon. The butterflies can be placed straight up and down or angled all over. Be sure to allow the butterflies to fall off the edges so it looks like the pattern continues.
Once you have all the butterflies in place, simply turn it over and use the edge of the cardstock as a guide to trim off the butterflies hanging over the edge. Then I added this to the card front and tied some ribbon around it. Using the Butterfly Gala Stamp Set, I stamped the greeting in the lower right corner
For the butterflies, I stamped the outline in Grapefruit Grove full strength. Then the solid image was stamped off once for that lighter look. The centers and antennae were done in Memento Black Ink. TIP: To get the antennae in the right spot, place the butterfly where you would like it, then move it down a smidge. Stamp the antennae above the butterfly. Then attach the butterfly to the card correctly placed on the antennae. This is much easier than trying to stamp the antennae after the butterfly is placed down and hoping they look attached.
If you would like to see this all in action, check out the video below or click here! Be sure to give the video a thumbs up if you liked it and don’t forget to subscribe if you are new. If you would like a notification when I post a new video, be sure to click the bell right next to the subscribe!!!
It’s Monday and while that is a bit of a bummer that the weekend is over. It means a new start to a week and let’s make it a good one! After all it is the last week of February and one step closer to Spring! So put on a smile this Monday and know that you are amazing!!! Thank you to Jean Noellsch for the inspiration for this card.
Surely this beautiful bright card is going to make you smile!!! I just love flowers and bright colors. I’m also loving the Dot To Dot Embossing Folder right now too. It’s just so classic and goes with everything!
I started with a Whisper White card base. Next, I layered on a piece of Pineapple Punch (4″ x 5-1/4″) that was run through the Big Shot in the Dot to Dot Embossing Folder! Using a strip of the Happiness Blooms Designer Series Paper and the Banner Triple Punch, I created the floral banner for the left hand side. Then using that same patterned piece, I die cut an oval with the Layering Ovals Framelits to back the greeting! The greeting was stamped from the Incredible Like You Stamp Set. To finish it off I added a few Happiness Blooms Enamel Dots. The greeting was added to the card front with Stampin’ Dimensionals for texture as well as the fact that they hold better on an embossed surface.
I couldn’t decide whether it needed this little knot of ribbon or not. What do you think – knot or not?? Let me know in the comments below!
If you would like to recreate this card, check out the supply list below! Don’t forget that orders of $50 earn a FREE Sale-A-Bration item!!!!
Happy Technique Tuesday, everyone!!! You all know I am loving butterflies right now! I also know that you all are loving them too because the Butterfly Duet Punch flew off the shelves like magic. Wowza there were so many sold so quickly, Stampin’ Up couldn’t keep up and trust me they were ordering more just as fast as we were buying. So for those of you who have this amazing bundle, check this out. For those of you still waiting, Pin This or save it for later! Sponging butterflies is soooooo much fun and endless color options! A big shout out to Patty Bennett for the fabulous inspiration!
Are these not the most stunning things you have ever seen??? LOVE IT!!!!! It is super easy to do too which is just icing on the cupcake!
I started with a Basic Black card base. Next, I layered a piece of the Botanical Butterfly Sale-A-Bration Designer Paper (3-3/4″ x 5″) onto a piece of colored cardstock (4″ x 5-1/4″). I used Gorgeous Grape and Mango Melody for the samples above! Before adding this layer to the card front, I tied some Black/Silver Striped Ribbon around the bottom. I love the little hint of shimmer in this ribbon but still sticking to a black and white with pops of color theme!
Also, since the card base is black, I had to add a piece of Whisper White to the inside of the card. Using the Well Said Stamp Set, I stamped the coordinating greeting from the front on the bottom of the inside. The 4th little butterfly that is punched out fits perfectly on the inside as well for a fabulous look!!! The greeting on the front was just stamped, trimmed around and layered on to coordinating cardstock to really make it POP! I added the greeting with Stampin’ Dimensionals. For the card above, I used Pumpkin Pie on the greeting!
Okay now for sponging butterflies to make them look stunning! Simply stamp your favorite butterfly style from the Butterfly Gala Stamp Set in Black Ink onto Whisper White cardstock. Then using a Sponge Dauber, add some color down the center. For the big butterfly, I was able to just dauber up and down. For the little butterfly, I had to sort of tilt it to the side to only add a little bit of color. If I used the full dauber, it would have covered the whole butterfly. As you can see, I used Gorgeous Grape and Bermuda Bay for one of the butterflies and Pumpkin Pie and Mango Melody for the other. After the centers are complete, take the second color and brush the edges, making sure to blend into the center color a bit. Don’t worry, it will look a bit messy but once you punch them out. AMAZING!
If you are dying to recreate this and don’t have the Butterfly Duet Punch yet, you can always fussy cut the butterflies! Which color combination is your favorite?
If you would like to see this all in action, check out the video below or click here! Be sure to give the video a thumbs up if you liked it and don’t forget to subscribe if you are new. If you would like a notification when I post a new video, be sure to click the bell right next to the subscribe!!!
Happy Tuesday!!! I have a fabulous technique to share with you today! This banner front card is fun and different from just a regular card! It’s also a fabulous masculine card which I struggle with! Luckily it works for Valentine’s Day, Father’s Day, and even Birthdays and Graduation. Just mix up the greeting!!! Also, a shout out to Karla Endris for the inspiration on this card!
Which one do you like best?? Let me know in the comments below! Not only is the greeting different but I have a different color banner for each. On the Smoky Slate banner card, I stamped off once with the grease spots. For the Basic Gray banner, I stamped in full strength Smoky Slate!!!
I started with a 7-3/4″ X 4-1/4″ card base and scored it at 5-1/2″ (or 2-1/4″) depending on which way you prefer to measure). This allows for just a small flap for the card front. Next, I layered on a piece of the Classic Garage Designer Series Paper measuring 2″ x 4″. With this size, you can get 4 pieces from one sheet of 6″ x 6″. Then I die cut the gears from the Garage Gears Framelits in Real Red cardstock. Using the Fine Tip Glue Pen, I added the gears to the card front!
Using the grease spot stamp from the Geared Up Garage Stamp Set, I stamped it along the right inside edge in Smoky Slate. You can either go full strength or stamped off once or a little bit of both! For the banner, I cut a piece of Basic Gray (or Smoky Slate) measuring 2″ x 5-3/4″. Using the Banner Triple Punch, I punched the banner tips and then placed it inside the card. I closed that front flap and placed my finger along the edge as a guide. Then I added adhesive up to that edge where my finger was. This is to make sure I don’t have too much adhesive that it peaks out of the flap. Then simply close the flap over the banner with adhesive to adhere it. Using the coordinating Garage Gears Framelits, I die cut the greeting pieces and stamped it. Of course, I added it to the card front with Stampin’ Dimensionals for some texture.
For this version of the card, I stamped the greeting on a banner that is 1″ wide and used the Banner Triple Punch. Adhere the two banners together before adhering it to the card base.
If you would like to see this all in action, check out the video below or click here! Be sure to give the video a thumbs up if you liked it and don’t forget to subscribe if you are new. If you would like a notification when I post a new video, be sure to click the bell right next to the subscribe!!!
Do you know what movie that is from??? I Am A Beautiful Butterfly…..if you guessed A Bug’s Life you are correct! I love that movie and the crazy little bugs. Butterflies are all I seem to want to play with right now! The Butterfly Gala Stamp Set, Duet Butterfly Punch, Botanical Butterfly Designer Paper…..I want it all!!!
Today, I am honored to be a part of the Blogging Friends Blog Hop!!! I created this amazing butterfly card and the other Blogging Friends used it as inspiration for their project. Be sure to check out all of their links below to get more fabulous ideas on how to use these products!
Isn’t this card so fabulous with that POP of purple and those gorgeous butterflies??? I am love love loving it! Also, I always love playing with some back and white! The super cool thing about this card is that the butterflies were already colored for me so that was super easy!!
I started with a Basic Black card base. Next, I took a piece of Highland Heather (4″ x 5-1/4″) and ran it through the Big Shot in the Swirls & Curls Embossing Folder. This makes such a fabulous background and gives the card a lot of texture. I added this piece to the card front! Then I took a strip of the Botanical Butterfly Designer Series Paper which is a Sale-A-Bration item and punched some banner tips using the Banner Triple Punch! The strip measures 1″ x 3-1/2″. This was added to the card front on the right side edge. For the greeting, I stamped it in Memento Black Ink from the Butterfly Gala Stamp Set. Then I punched it out with the Pretty Label Punch! This was then layered onto a Daffodil Delight 1-3/4 Circle. The greeting was added to the card front with Stampin’ Dimensionals for even more texture!
Now for those amazing butterflies that I didn’t have to color. Those were actually punched out with the Butterfly Duet Punch from the Botanical Butterfly Designer Paper! How cool is that??? No fussy cutting or coloring! The piece of paper has LOTS of butterflies with different color combinations to pick from. I went with these two so that I could keep with the purple theme. Another tip: the butterfly hiding behind the greeting isn’t even a full butterfly. I really loved the coloring on that one but it was at the edge of the paper so it wasn’t a complete butterfly. No need to fret, I just make it look like the butterfly was flying up from behind the greeting! It looks fabulous and you would never know! After all, we can’t waste designer paper! Am I right?
Click the blue box below to see a complete list of the other Blogging Friends in this Blog Hop and see their amazing creations!
Check out the supply list below so you can recreate this amazing card and earn the Botanical Butterfly Designer Paper for FREE through Sale-A-Bration!!!


 Metallic-Edge Ribbon")


 Circle Punch")


 Designer Series Paper")

 Satin Ribbon")


 Striped Metallic Ribbon")


 Designer Series Paper")


