How often do you treat yourself to something wonderful?!?! It might be ice cream or a massage or a nap or maybe a new purse or outfit!!! No matter what it is be sure to do it as often as you can because you deserve it! 🙂
I wanted to create a card with the Sale-A-Bration Penguin Playmates Designer Series Paper that wasn’t winter or penguins! Here is what I came up with and I love it!!! This shows you that this paper can be used all year long for any occasion. I think this makes a fabulous birthday card but it would work for a baby card too!
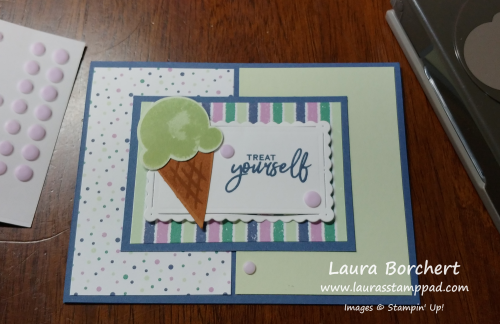
I started with a Misty Moonlight card base and then added on some Penguin Playmates Designer Paper (2-1/2″ x 4″) and Soft Sea Foam cardstock (2-3/4″ x 4″)! If you would like an even split you could always do that but I sort of like the uneven look where the cardstock is bigger than the designer paper. Next, I layered together more Penguin Playmates Designer Paper (2-1/2″ x 3-1/2″) onto Misty Moonlight cardstock (2-3/4″ x 3-3/4″). This layer is added to the card front flat as well because I popped up the focal point with Stampin’ Dimensionals!
Using the Scalloped Contour Dies, I die cut a rectangle in Basic White and stamped the greeting in Misty Moonlight Ink. Then I stamped the ice cream from the Sweet Ice Cream Stamp Set in Soft Sea Foam onto Soft Sea Foam cardstock and punched it out with the coordinating punch! For the cone, I stamped off once with Cinnamon Cider and then onto the cardstock with the triangle. For the waffle cone lines, I went with full strength Cinnamon Cider! I added this to the left of the greeting on the card front and finished it off with some Playing with Patterns Resin Dots!
On the inside of the card, I took a piece of Basic White (4″ x 5-1/4″) and stamped Happy Birthday in Misty Moonlight Ink. Then I took some of the dots and stamped them in Soft Sea Foam. All of the images are from the Sweet Ice Cream Stamp Set! I love it!!! If you would like to recreate this card and don’t have all of the supplies, check them out below. Go on, treat yourself and have fun!!! Don’t forget it’s Sale-A-Bration still too so Stampin’ Up will treat you too!
Happy Stampin’
~Laura
Product List

 Designer Series Paper")


")


")


 Specialty Designer Series Paper")
 Double-Stitched Satin Ribbon")


 Denim Ribbon")


")
 Designer Series Paper")


 Polka Dot Tulle Ribbon")


")


")


 Designer Series Paper")


 Ribbon")
