Detailed Deer Card #2!!!

Posted on

Yesterday I shared a fun card using the Dashing Deer Stamp Set and coordinating framelits. Today it’s Part 2 and I’m sharing this detailed deer card!!! Click here to check out yesterday’s card if you missed it!

Detailed Deer Card, www.LaurasStampPad.com

As you can see, this card is very similar in style to the one I shared yesterday! It also uses the same greeting banner, stamped floral image, same colors, and the die cut deer!!! This makes creating multiples for Christmas super easy!!!

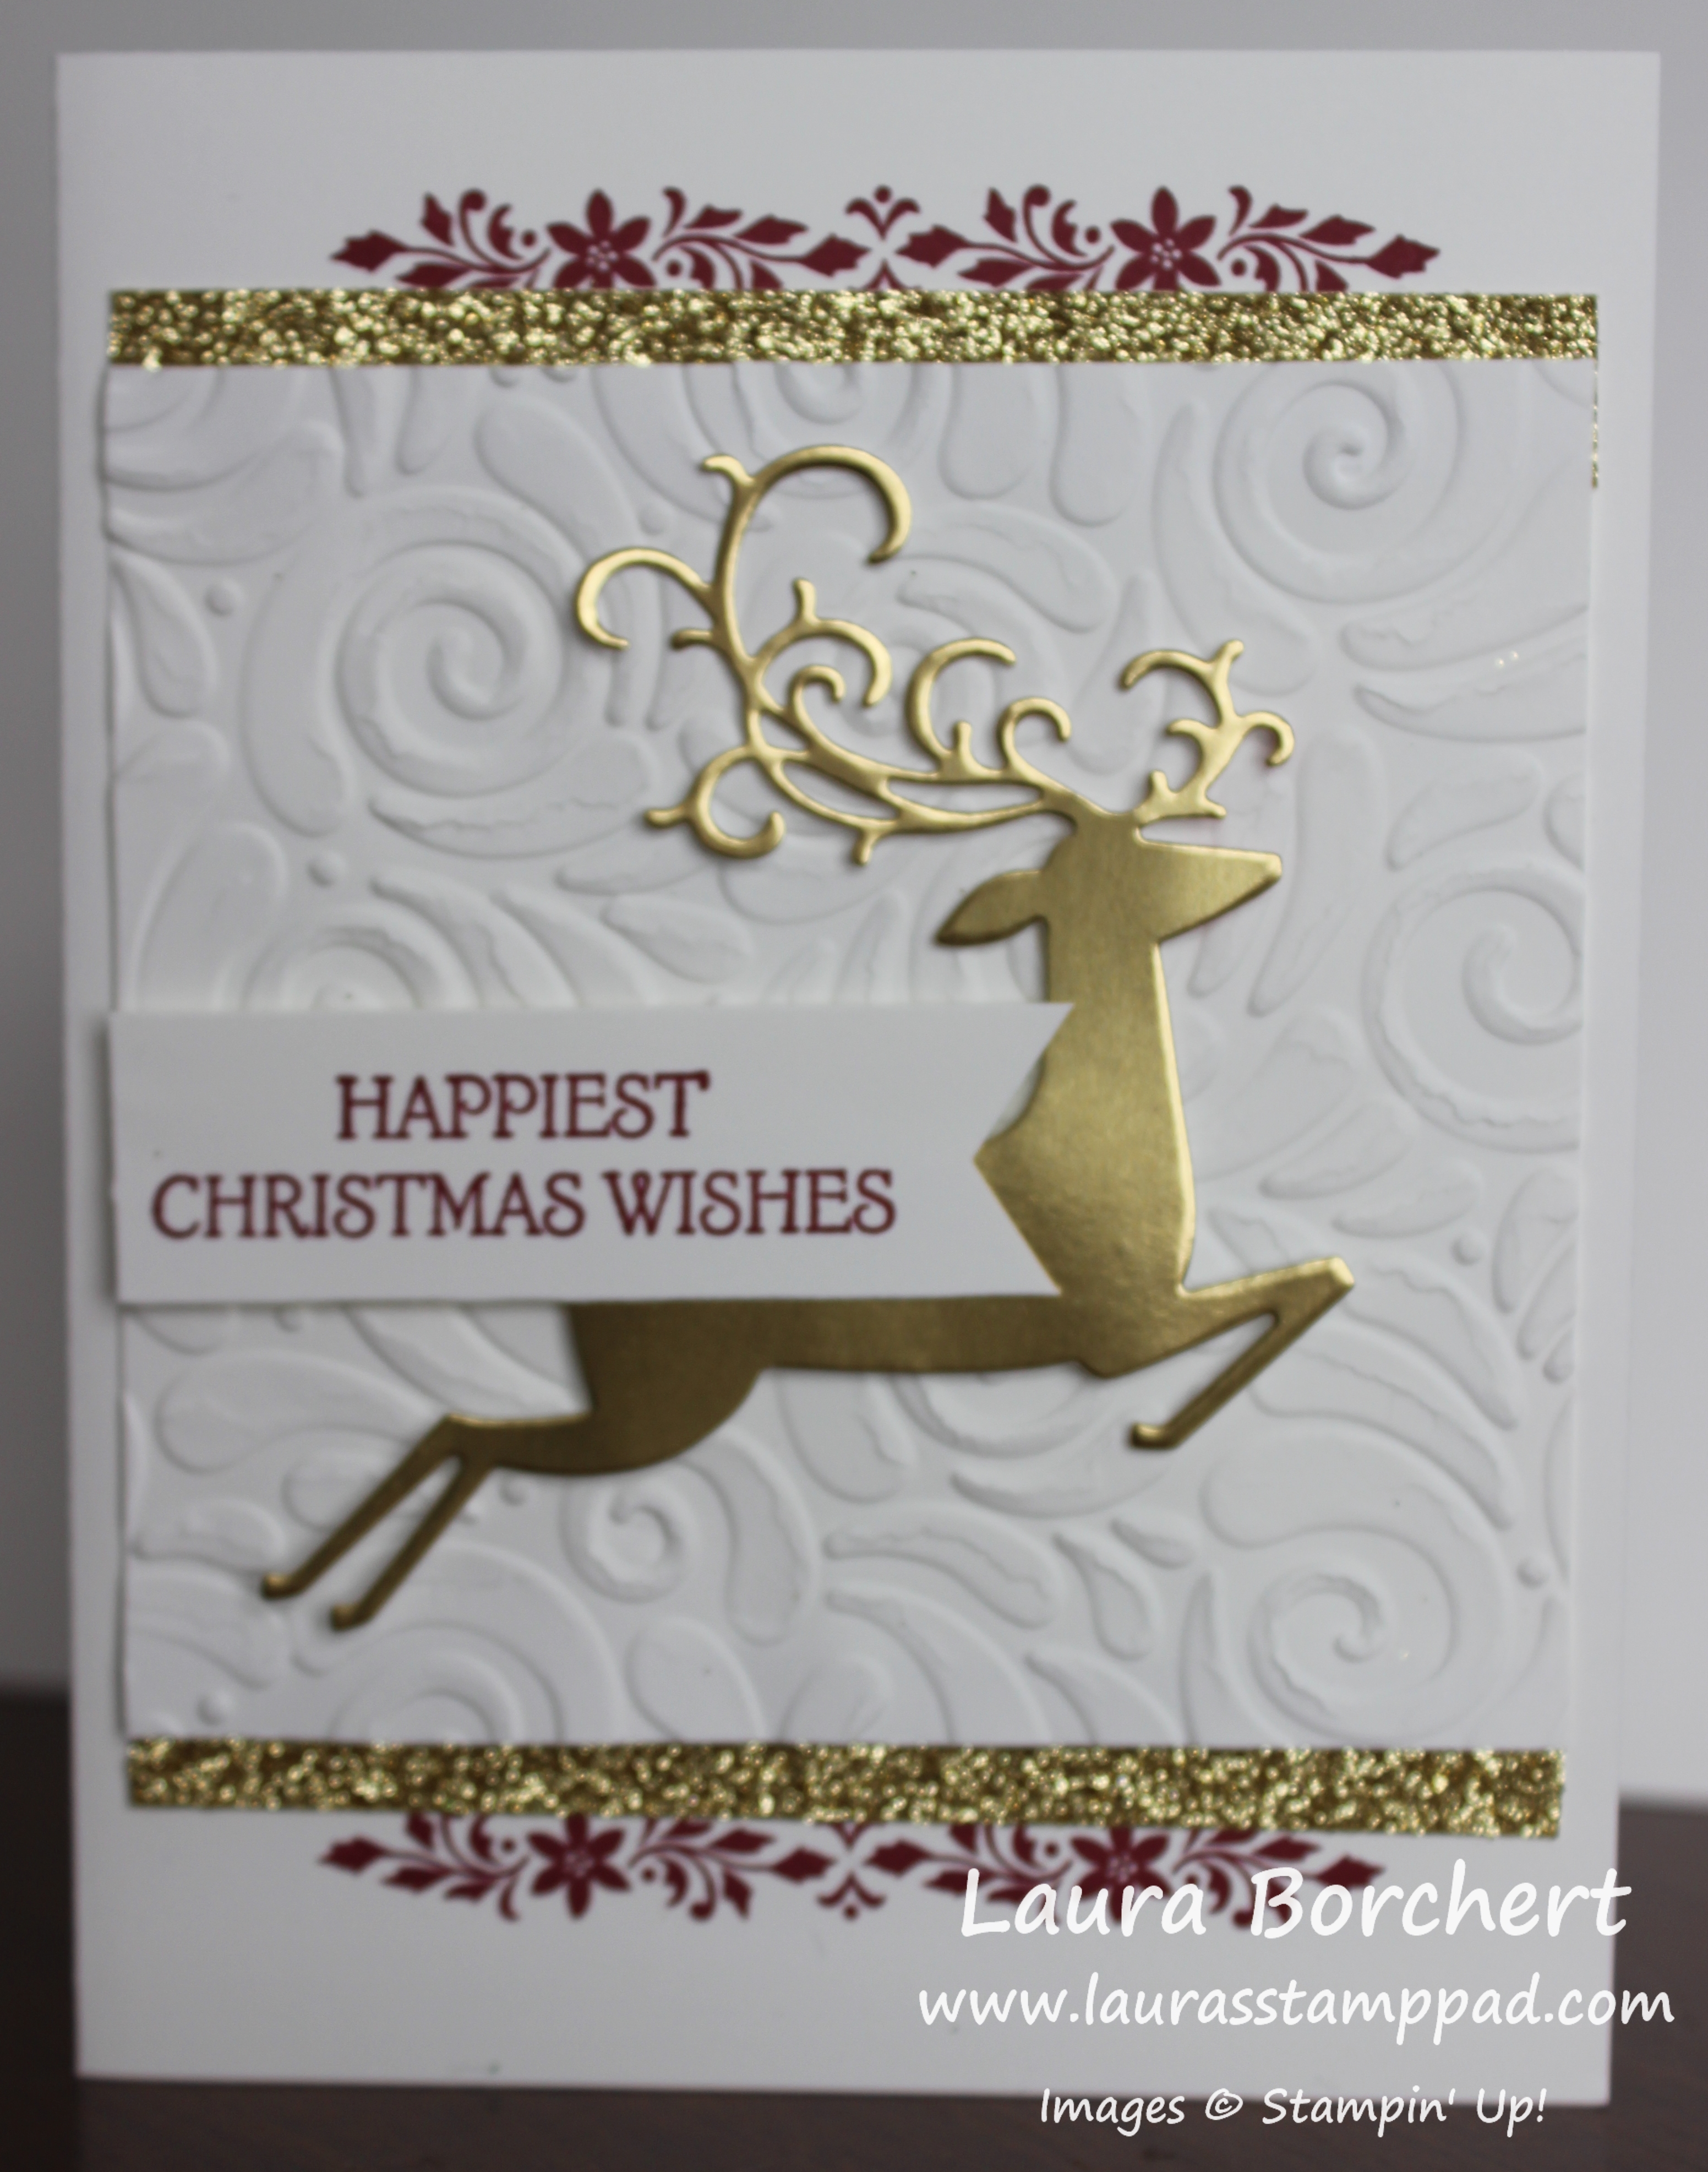
I started with a Whisper White card base and stamped the floral image on the top and bottom in Merry Merlot Ink. All the images for this card are from the Dashing Deer Stamp Set from the Holiday Mini Catalog. Next, I added a little strip of Gold Glimmer Paper just above and just below the stamped image. Then I took a piece of Whisper White (4″ x 4″) and embossed it with the Swirls and Curls Embossing Folder. TIP: I know this is sort of after the fact but I wanted to point out that you might want to hold the glimmer paper up to the embossed cardstock to make sure they line up correctly. While I cut the glimmer paper and white paper at 4″, after embossing it the white paper pulled in a smidge. This made the glimmer paper hang out a little on the ends and I had to trim it off.

Swirls & Curls Embossing Folder, www.LaurasStampPad.com

Now for the focal point, I added Stampin’ Dimensionals (and some Mini ones) to the die cut Gold Foil Deer. I used the coordinating Detailed Deer Framelits (Bundle & Save 10%). Next, I added the greeting which was stamped in Merry Merlot Ink and punched with the Banner Triple Punch. It also was added with Stampin’ Dimensionals. Be sure not to put a dimensional on the spot that it sits on the deer because then it would be popped over the deer. So I just added some to the top side of the greeting and let the bottom rest on his back.

I love that I was able to cut a lot of the same dimensional and colors for 2 cards and get 2 different looks. It’s also super fabulous to not have to waste Gold Foil Paper because this deer isn’t really the easiest for minimal waste. This way I’m using the deer and the negative image for 2 cards. It’s perfect!!!!

If you would like to create these 2 cards, click on the supplies below to get started. Also, you can check out the video tutorial here!

Happy Stampin’

~Laura

Product List


All The Shimmer & Shine!!!

Posted on

Happy Wednesday!!!! Today, I’m sharing this amazing and very simple card. It’s got all the shimmer & shine which just makes it fabulous!

All The Shimmer & Shine, www.LaurasStampPad.com

Can we just stare at this card for another moment??? Isn’t it amazing? The Frosted Floral Designer Series Paper has that amazing shine to it that just makes it pop and look so pretty all on its own. I like letting the paper do all of the work!!!

For this card, I used a Whisper White card base. Next, I layered on a piece of the Frosted Floral Designer Series Paper measuring 4″ x 5-1/4″. It’s really hard to pick which piece to place down because both sides are amazing. Then I took another piece of the designer paper measuring 1/2″ x 5-1/4″ and placed it towards the bottom of the card. This offers a nice little contrasting piece to help the greeting stand out.

For the greeting, I stamped it from the First Frost Stamp Set in Soft Suede Ink. The greeting was stamped on Mint Macaron that was punched with the Banner Triple Punch for those perfect banner tips! I added the greeting to the card front on the right side with Stampin’ Dimensionals for a little bit of texture. On the left side, I adhered a little bow with Mini Glue Dots that was made with the Braided Linen Trim. This card was super quick and simple and yet stunning!

Do you prefer quick and simple cards or more detailed elaborate cards? Maybe you prefer a little bit of both depending on the day or how much time you have?? Let me know in the comments below!!!

Happy Stampin’

~Laura

Product List


Spooky Kitty!!!

Posted on

I love kitty cats and think they are just precious and fun. I don’t really feel like black cats are spooky unless it’s Halloween! Do you think this is a spooky kitty??

Spooky Kitty, www.LaurasStampPad.com

Today, I’m going to share some tips on how I can create fun Halloween cards without buying lots of Halloween goodies. First of all, I’m not a huge fan of Halloween but that doesn’t mean I can’t make a few cards to send out! Therefore, I like to purchase minimal Halloween products but still create fabulous projects. Do you like to send out Halloween Cards?

For this card, I started with a Pumpkin Pie card base. Next, I took a piece of Highland Heather cardstock and added some Toil & Trouble Designer Series Paper to the bottom (4″ x 3″). Using the Black Glittered Ribbon, I tied it into a knot around the top of the designer paper because  it smooths out the transition from designer paper to cardstock. Next, I stamped the greeting which is from a past September Paper Pumpkin kit which was Halloween themed. Paper Pumpkin always has perfect holiday stuff in it that can be used over and over. I love it!!! The greeting was stamped in Pumpkin Pie Ink so it pops out on the purple.

Hat & A Cat, www.LaurasStampPad.com

Finally for the decorations, I used the Cat Punch and more Toil & Trouble Designer Paper. The spooky hat was fussy cut from one of the sheets. This was quick and it’s super cool to add an accent like this to your card even if you don’t like fussy cutting like me! The cat was added to the card front with Snail Adhesive and the hat was added with Stampin’ Dimensionals for texture.

So for this adorable card, I only purchase the Toil & Trouble Designer Series Paper. The Paper Pumpkin subscription stamps and the Cat Punch were items I had on hand already. If you would like to sign up for Paper Pumpkin to get fun holiday stamps for every occasion, click here!!!

I hope you enjoyed this simple and fun card!!! Hope you enjoyed this card and it gives you inspiration for your Halloween Cards this year! Click the supplies below to get yours created!

Happy Stampin’

~Laura

Product List


Using Up the Pieces!!!

Posted on

Happy Monday!!! Today, I wanted to share a card I created by using up the pieces I had leftover from the Toil & Trouble Designer Series Paper. It’s October so Halloween is almost here and I just had 1 sheet of the paper left. Here is what I came up with.

Using Up The Pieces, www.LaurasStampPad.com

I tend to cut my designer paper into 4″ x 3″ rectangles a lot because this uses up every inch of the 12″ x 12″ sheet. I like when I can use it all up with no scrap left behind.

Pumpkin Pie is the color I used for the card base. Then I layered on the piece of Toil & Trouble Designer Series Paper (4″ x 3″) to the bottom portion of the card front. I tied some Whisper White Polka Dot Tulle Ribbon around the card for some texture. While it is a bit see through, it still softens the transition from the cardstock to the designer paper. For the greeting, I used the Everyday Label Punch and the Painted Harvest Stamp Set. I stamped it in Soft Suede Ink. The greeting was added to the card front with Stampin’ Dimensionals.

I thought about adding bling or some sort of embellishment around the greeting but decided to just go simple. What do you think? Let me know in the comments below!

Also, if you would like to check out more samples using the Painted Harvest Stamp Set, click here, here, and here! I had so much fun with that set last year and was excited to get it out again this Fall!

Happy Stampin’

~Laura

Product List


Eeeek It’s Halloween…..Well Not Yet!!!

Posted on

Happy Monday!!!! Eeeek It’s Halloween!!! Okay, not today but it sure is coming upon us fast. This is the last week of September and of course I can’t share Halloween samples with you on the day….it’s too late by then! So I’m sharing this one early!!!
Eeeek It's Halloween, www.LaurasStampPad.com

Okay so if you have been following me for awhile, you probably know I’m not a huge fan of Halloween. I easily get scared and I just don’t feel like growing up it was that big of a holiday so I’m just sort of meh about it! It seems people are either SUPER in love with Halloween or in the same boat with me! Which one are you??? Let me know in the comment below!

Since I’m not a huge fan, I bought the Toil & Trouble Designer Series Paper from the Holiday Mini Catalog and that’s it! I have created a few fun cards using that cute paper because after all I do still need a few Halloween Cards. Paper Pumpkin is my other savior because it always has goodies for the holidays. In fact, this greeting is from the September 2018 Paper Pumpkin Kit! I love it and might just use it again next year! 🙂

I started off with a Whisper White card base. Then I cut the Toil & Trouble Designer Series Paper into 2″ x 2-5/8″ rectangles. That is 2-1/2 and then 2 more little marks past. LOL Normally, I don’t do eighths but sometimes it’s required. These rectangles were placed using with opposites patterns. You could always recreate this card using the back sides of both pieces for another fun look. It’s always fun when you have options with both sides! Next, I added some of the Black Glittered Organdy Ribbon around the top and tied it into a knot. Have you seen this ribbon? It is stunning…bling bling!!!

For the greeting, I stamped it from the September 2018 Paper Pumpkin Kit in Gorgeous Grape and punched it out with the Everyday Label Punch. Then I punched out another one in Pumpkin Pie. Cut the Pumpkin Pie one in half and add one half to the left side of the greeting peaking out as far as you wish. Then add the other half to the other side. This gives a fabulous layered look! I added the greeting to the card front with Stampin’ Dimensionals for some texture!

This card is super simple and could be used with lots of different papers and greetings! I hope you enjoyed it and have an idea for getting your Halloween cards ready to go early this year!

Happy Stampin’

~Laura

Product List


Galvanized Metallic & Tin Tile!!!

Posted on

Happy Friday everyone!!! Yesterday, I shared the Tin Tile Embossing Folder and all the cool looks with foil paper. Today, I’m sharing a sample I created using the Galvanized Metallic & Tin Tile Folder!!!

Galvanized Metallic & Tin Tile, www.LaurasStampPad.com

That Galvanized Metallic Paper goes together so well with Rich Razzleberry, don’t you think??? I love it!!!

I started with a Mint Macaron card base measuring 4-1/4″ x 11″. Then I cut a piece of the Galvanized Metallic Paper (4″ x 3″) and ran it through the Big Shot with the Tin Tile Embossing Folder. I just love how detailed and fabulous that folder is. Check out yesterday’s post to see more on this folder. Also, I cut a piece of the Country Lane Designer Series Paper (4″ x 3″). Next, I added these to the card front, overlapping them in the center. You can decide which one you want to show more.

So Grateful For You, www.LaurasStampPad.com

For the focal point, I started by adding some Tear And Tape all along the overlap of the papers. Then, I pressed some Rich Razzleberry Velvet Ribbon into it and trimmed the ends flush with the edge of the cardstock. Normally I wrap the ribbon around to the back but I thought I would try something new this time since this ribbon is a little more bulky and I didn’t want it to cause a bump.

The greeting was stamped in Rich Razzleberry from the Country Home Stamp Set from the Holiday Mini Catalog. Using the Everyday Label Punch, I punched it out and added it to the card front with Stampin’ Dimensionals for a smooth look over the ribbon and they press into the embossed image better. To finish it off, I added some Frosted Epoxy Droplets to the ends. The frosted look goes well with the rustic paper! It’s just perfect!

I hope you all have a wonderful weekend! I’m super excited because it’s our Annual Family Reunion and I just love weekends full of family time!

Happy Stampin’

~Laura

Product List


Pitcher of Flowers!!!

Posted on

While I love a vase of flowers, it’s always fun to mix up the container every now and again. This gorgeous pitcher of flowers is just stunning!!!

Pitcher of Flowers, www.LaurasStampPad.com

The flowers so all the work for this simple card. While coloring takes a little bit of time, this card is super simple otherwise. You could always stamp a few of these and color a few evenings while watching TV and then assemble them all one of the evenings. I used basic colors for the base so that the flowers could be just about any color. This makes it easy to mix it up!

I started with a Crumb Cake card base. Next, I added a layer of the Country Lane Designer Series Paper (2″ x 5-1/2″). For the focal point, I stamped the pitcher and flowers in Memento Black Ink and colors using the Stampin’ Blends! I am soooooo proud of myself for how this turned out. Stampin’ Blends really make you feel like an artist! Trust me, I am not an artist at all. That little swatch for the shadow is just that…..a little swatch…but it looks amazing!  I used Light Crumb Cake for the shadow. The other colors I used were Dark Pool Party and Light Bermuda Bay for the pitcher. The cattails were done in Bronze. I used Rich Razzleberry and Old Olive for the greenery and artichoke. Isn’t that what that is??? Let me know in the comments below if it’s not! Daffodil Delight was used for the little beady things.

Creating a Shadow with Stampin' Blends, www.LaurasStampPad.com

For a little more fun, I used the Detailed Trio Punch to round the corners before adding it to the card front with Stampin’ Dimensionals. The little greeting on the bottom was stamped with the Country Home Stamp Set too! I stamped it onto Bermuda Bay and then punched it out with the Classic Label Punch. After adhering it on the card, I trimmed off the right hand edge.

Coloring with Stampin' Blends, www.LaurasStampPad.com

Here are a few of the samples from those in my classes. I just love the different color combinations everyone used! Which one is your favorite?

Click the supplies below so you can color this fabulous pitcher with flowers!!!

Happy Stampin’

~Laura

Product List


Technique Tuesday – Duplicate-able Holiday Card!!!

Posted on

Happy Tuesday!!! That means I have a fabulous technique for you today! This one is a super easy duplicate-able holiday card. I know this time of the year can be super crazy but we still want to send out a card made with love. Also, there is nothing like a little stamping therapy! 🙂

Duplicate-able Holiday Card, www.LaurasStampPad.com

This simple yet fabulous card with a little bit of bling is perfect for the Holiday Season! The other bonus to this card is that if you get them done early or late, it still applies because it says season. 🙂 Right?!?!?!

I started with the Suite Seasons Designer Washi Tape which has Garden Green, Cherry Cobbler and Real Red in it. Since Garden Green can be used with both reds, I used that as my card base. Then for the middle layer which is 4″ x 5-1/4″, I used Real Red or Cherry Cobbler based on which washi tape I used.

Filled with Happiness, www.LaurasStampPad.com

The Whisper White layer measures 3-3/4″ x 5″. I added the Suite Season Designer Washi Tape on each of the pieces. I like to start in the middle and work my way out. This seems to work best for spacing. Typically I like to go at a bit of a diagonal with the washi tape as well. There is no way I am going to get it perfectly straight so why not just angle it on purpose!

Suite Season Designer Washi Tape, www.LaurasStampPad.com

There are lots of different color combinations that you can create with the 5 rolls of washit tape in this pack. Three of the rolls have a foil shine in them as well – copper, silver, and gold! I love the little bit of bling!

Holly, Jolly, and Bright, www.LaurasStampPad.com

For the greeting, I used the Pretty Label Punch and 1-3/4″ Circle Punch. The greetings are from the Joyous Noel Stamp Set from the Holiday Mini Catalog but you could use whatever greeting will fit in the punch! All of the greetings were stamped in Garden Green Ink. This way I could use them on both the red and cherry cards. I layered the punched pieces together and added it to the card front with Stampin’ Dimensionals for a little bit of texture.

Washi Tape Holiday Card, www.LaurasStampPad.com

To finish off the cards, I added a few Rhinestones for some bling. Also, I used some of the Santa’s Workshop Enamel Shapes from the Holiday Mini Catalog.

I was able to create a lot of cards in no time at all and with minimal supplies. I love that I could get different looks but not have to use tons of different products. This is perfect for making multiples. How many Christmas or Holiday cards do you make each year? Let me know in the comments below!

If you are loving this look and want to make these to send out to your family and friends, click the supplies listed below to get started!

If you would like to see this all in action, check out the video below or click here! Be sure to give the video a thumbs up if you liked it and don’t forget to subscribe if you are new. If you would like a notification when I post a new video, be sure to click the bell right next to the subscribe!!!

Happy Stampin’

~Laura

Product List


Simply Thankful For All The Good Things!!!

Posted on

Happy Monday!!! This greeting – Simply Thankful For All The Good Things is perfect for Thanksgiving but also all year long!

Simply Thankful For All The Good Things, www.LaurasStampPad.com

The Country Lane Designer Series Paper is sooooo pretty. You all know I love floral prints but this one is floral and rustic and just perfect for Fall.

I started with a Mint Macaron card base. Next, I took a piece of the Country Lane Designer Series Paper measuring 4″ x 5-1/4″ for the background. Using another piece from the same pack of paper (2″ x 4″), I punched the banner tips with the Banner Triple Punch. For the greeting, I layered Whisper White (1-1/2″ x 2-1/2″) onto Blackberry Bliss (2″ x 3″). The greeting is from the Country Home Stamp Set and stamped in Blackberry Bliss Ink. I added the greeting to the card front with Stampin’ Dimensionals for a little bit of texture. To finish it off, I tied a little bow in Linen Thread and adhered it with a Mini Glue Dot.

Designer Paper is so stunning that sometimes you don’t need much more than a simple greeting. This makes for a fabulous quick and simple card! I love it! Click the supplies listed below to recreate this beauty!

Happy Stampin’

~Laura

Product List


Technique Tuesday – Stamping a Perfect Row!!!

Posted on

Happy Tuesday!!! That means I have a fabulous technique to share with you today!!! I am stamping a perfect row of vases today!!! No worries or panic that you will get them all straight or you have nailed it and now for the final vase and…..boo you messed up. The Stamparatus makes it quick and easy!

Stamping a Perfect Row, www.LaurasStampPad.com


I love the colors in this card. They are so bright and cheery and go so well together – Melon Mambo, Coastal Cabana, and Crushed Curry! First I’m going to start with a little set-up tutorial for the Stamparatus before getting into the full details of this card.

First, I lined up all three vase outlines on my cardstock spaced out and what seemed lined up straight. Then I shut the Stamparatus plate to pick up each of these vases. Using the grid lines on the clear plate, I made sure the vases were in fact straight and then I stamped a practice round onto scrap paper to verify. Next, I took the solid vases and placed them on the scrap stamp piece and then shut the other plate. Now I have my outlines on one plate and the solids on the other plate. When I decided to do the vases in different colors, I realized I couldn’t have them all on the same plate because it was difficult to get color on that middle vase without making a mess on the other 2. So I took the middle vase out and stamped that one by hand. Then I inked the other 2 vases with their colors and stamped them with the Stamparatus.

Keeping the vases in place, I flipped both Stamparatus plates over and stuck the scallop trim on one and the greeting on the other. Again I used a scrap piece of paper till I got it lined up correct. For the scallops, I placed the paper down, stamped, flipped the paper around, and stamped again. This gave me that top and bottom border.

Now for the card details. I started with a Coastal Cabana card base. Next, I worked on each of the focal points starting with the vases. Using a piece of Whisper White measuring 4″ x 3″, I placed it in my Stamparatus and stamped all 3 of the vase outlines from the Varied Vases Stamp Set in Memento Black Ink. Then I stamped the solid vases in Crushed Curry, Coastal Cabana, and Melon Mambo Ink. Next, I stamped the flowers in Memento Black and colored them in with the Daffodil Delight Dark Stampin’ Blends.

Varied Vases, www.LaurasStampPad.com

To add a little more fun to this piece, I rounded 2 opposing corners with the Detailed Trio Punch and tied some Black Baker’s Twine around the left end. After tying the twine, I placed Stampin Dimensionals over it to secure it in place.

Next up is the greeting which was stamped on a 1″ strip. After stamping it in Coastal Cabana and Memento Black, I placed it on the card front and trimmed off the extra. This way I didn’t have to use such a small piece for stamping. Then I added the 1-1/2″ x 5-1/2″ strip of Garden Impressions Designer Paper along the left edge. Finally, I added those fabulous vases with Stampin’ Dimensionals for some texture.

If you would like to see this all in action, check out the video below or click here! Be sure to give the video a thumbs up if you liked it and don’t forget to subscribe if you are new. If you would like a notification when I post a new video, be sure to click the bell right next to the subscribe!!!

Happy Stampin’

~Laura

Product List