Today, I’m sharing with you the Occasions Mini Catalog Designer Series Paper!!! The catalog just doesn’t do this amazing stuff justice!!! Here you will see it on a bigger scale and each piece front and back!!!
The Painted With Love Specialty Designer Series Paper is 12″ x 12″ and has gold foil on one side of each piece! I love the shades of pink, purple, coral, and gold! The hearts are great for Valentine’s Day too! Check out the Video of each sheet here!
The Myths & Magic Specialty Designer Series Paper is 12″ x 12″ and one side of each sheet has a fabulous glitter image. The glitter is on the mermaids, wizards, unicorns, and other designs. This paper is super fun and will make amazing kid/teen cards! I love it!!! Check out the Video of each sheet here!
The Petal Passion Designer Series Paper is 12″ x 12″ and all black and white. I love black and white paper that I can add a pop of color with cardstock, ribbon, or embellishments. This paper is fun to color with Watercolor Pencils, Stampin’ Blends, Markers, or the Sponge Brayer!!! Check out the Video of each sheet here!
The Sweet Soiree Specialty Designer Series Paper is 12″ x 12″ and has a silver foil design on one side of each sheet! These pastels and floral prints are great for the transition from Winter to Spring! I just love flowers! Also, there are cakes and other fun images that are perfect for Weddings, Bridal Shower, and more! Check out the Video of each sheet here!
The True Gentleman Designer Series Paper is 12″ x 12″ and perfect for man cards! I love the color scheme and prints. I always struggle with man cards but I think this paper will make it super easy!!! Check out the Video of each sheet here!
The Picture Perfect Party Designer Series Paper Stack is 6″ x 6″. I love the bright colors and fun designs of these sheets. Birthday cards are my most used and this stack screams birthday!!! Check out the Video of each sheet here!
The Tutti-Frutti Designer Series Paper Stack is 6″ x 6″! These bright colors and fun fruits are perfect for Spring and Summer! Those are my favorite seasons so I love this stack!!! Check out the Video of each sheet here!
Which one is your favorite?? My favorites are the Painted with Love and Picture Perfect Party!!! Let me know yours in the comments below! Also, let me know if you like this display of the designer paper so you can really see it. Do you find it helpful? If so, I’ll be sure to do it for every new catalog release!
Tis the season of Graduation and for many they are doing the Graduation Polka…..Dots!!! Teeeheehee! I know when I graduated….10 years ago!….I was doing all the dances. You couldn’t pay me to go back to school so graduation was a big celebration!!! As it should be!
This card is perfect to have on hand for any occasion even Graduation!!! I have done this card in boy colors like this and in girly colors like this sample! Not let’s get started on this fun debossed card!
I started with a Pacific Point card base. Then I took a piece of Whisper White (3-3/4″ x 5″) and ran it through the Big Shot with the Celebrations Duo Embossing Folder in the middle. I have found that stamping over the top of the de-bossed image turns out the best when you stamp on top of the Stampin’ Pierce Mat. This mat has some give for the cardstock to press into rather than a hard surface like the table. I used the Happy Celebrations Stamp Set to stamp the polka dots all over and make the greeting pop! I went with Pacific Point Ink and Cucumber Crush Ink. I stamped the dots all over the cardstock, some in full strength and some as the stamped off shade of ink.
For this card, I highly recommend going back to the ink pad each time and if you want the lighter shade, then stamp off onto a scrap piece of paper rather than on the card. The reason for this is because if you fall half off the cardstock, it makes the second stamp image have a line on it. Also, if you stamp over the celebrate greeting, the second stamp will have the letters in a darker ink so to avoid this, just go to the ink pad each time! 🙂 My favorite part of stamping with photopolymer, is that you can see the ink and paper touch! It’s so cool! Be sure to stamp the dots with firm even pressure so that your ink hit the cardstock around each piece!
Now that the focal point is complete, I wrapped some Silver Metallic Thread around it and secured the ends to the back with Stampin’ Dimensionals. Since it is a Man Card, I didn’t want to go all out with ribbons and bows but a little thread is perfect! I added more Stampin’ Dimensionals all over to raise this layer up from the Cucumber Crush layer (4″ x 5-1/4″). Finally, I added this piece to the card base! Perfect!
I love Graduations but they always make me cry. Just that amazing accomplishment and moving on to the next step in life is so fabulous and makes me emotional! It’s still crazy to think I graduated 10 years ago! How many years since your last graduation? Let me know in the comments below!!!
Happy Tuesday!!! Today’s technique is this amazing Pop & Twist Card. It’s one of those super WOW cards that you won’t really make tons of them but making at least one is super fun!!! Don’t worry, I did a video tutorial too to help out!
Okay, so the front looks pretty simple but that’s because the inside is the major WOW for this card!!! I got the idea for this card from LeeAnn Greff and made a few changes with the way I created it! Thank you, LeeAnn! Now let’s get started on this beauty!
Now for the inside…here’s the tricky part! 🙂 Don’t worry! I will walk you through it all. I found it best to create a template using normal printer paper because then you can practice without wasting cardstock. It was easier to create some of the folds with the printer paper and use them as a guide on cardstock as well. So with the printer paper (or your actual cardstock for the card), I made the following score lines:
Along the 11″ side: Score at 4-1/4″, 5-1/2″, and 6-3/4″
Along the 8-1/2″: Score at 2-1/4″, 4-1/4″, and 6-1/4″
Next, these scores create rectangles in each corner of the cardstock so I cut those off. I was left with a sort of cross looking template that was wide going up and down and little going side to side. I folded on the score lines but not each of them, just in half going both ways! The next 2 folds are the tricky ones because you will be folding diagonally. This fold is not corner to corner, it is actually line to line. With the thick/wide piece at the bottom/closest to you, fold the right hand (small piece) diagonally down. Go down to where the middle score line of the small piece lines up with the middle score line of the wide piece. This will create a diagonal line with the center, in the middle of your folded cross lines from scoring above. You will notice that the diagonal line doesn’t go corner to corner but just past it. That is correct! Next I rotated it 90 degree and folded diagonally again, creating an X. All red lines in the photo below are the lines I folded on.
Now I used this template for all of my card inserts. I just found it much easier to place on the top of the cardstock, score diagonally and fold than it was to try to get the cardstock to fold correctly the first time without the template. To finish the insert, I popped in the sides (small pieces). Mountain on that middle score line and valley on the sides. This will create a house look to the cardstock. Next, place it in your Stampin’ Trimmer with the point of the house at 5-1/4″ and trim off the extra. It should be about a 1/4″. This is so it fits into your card base perfectly and helps even things out on your little house.
Using Fast Fuse or Tear And Tape (a strong adhesive), outline one side of the house! I placed it inside the card, centered and sticky side up and then pressed the top closed to adhere it. Flip it over and repeat! Don’t try to place the sticky part on the card without closing it because then it might not close correctly. It could be off set a bit and you will want it to close and lay smooth. Now I can add my decoration pieces to either side. I used a piece of Party Animal Designer Paper (3″ square) to the left side and Whisper White (3″ square) to the right side so I could write my message.
Next up is the amazing pop out piece! I cut a piece of Crushed Curry measuring 2-3/4″ x 11″ and scored at 2-3/4″, 5-1/2″, and 8-1/4″. This creates four 2-3/4″ squares. I placed pieces from the Party Animal Designer Series Paper onto each square. Just be sure that all of your patterns go in the same direction, up and down. To add this, I like to use Tear & Tape because you can place it down and then reveal the sticky later! I placed a small piece in the upper left corner and lower right corner of the small pieces sticking out the sides (see template above). This is because the insert (Crushed Curry piece) will adhere to the top of one panel and the bottom of the other, making it twist sideways!
I placed the insert in there to make sure that my patterned pieces were going to twist right side up when I opened the card. Then I peeled off one of the pieces of tape and attached it. The piece will line up (on top of) the white or designer paper you placed down above. If it is centered on that and to the edge, you are golden. You don’t want the insert in too deep or our too far. Making sure the other adhesive side is on the opposite, reveal the sticky and press your card closed to adhere. Now it Pops & Twists! I found the first few times, you have to help it close up as it’s still a little stiff!
Of course to see this all in action, check out the Video Tutorial below or click here! Be sure to give it a thumbs up if you liked it and don’t forget to subscribe if you are new!
All of these items in the Party Animal Suite are retiring at the end of the month and many of them are on sale! Get them before they are gone by clicking here!
First of all, I just love this card! The anniversary lace & hearts is just so elegant and soft looking which is perfect for such an occasion!!! <3
For this card, I started with a Crumb Cake card base. Next I layered on a piece of Flirty Flamingo (4″ x 5-1/4″) and a piece of Falling in Love Designer Series paper (3-7/8″ x 5-1/8″). I loved this paper because it’s has soft beautiful patterns. Unfortunately it is sold out already!
Now for the greeting, I used the So Detailed Framelits (on the retired list and on sale) to die cut the banner with the hearts it in. I used Very Vanilla cardstock! The greeting was stamped in Crumb Cake Ink with the So In Love Stamp Set (also on the retired list and on sale). To attach this to the card, I added adhesive to the far left, the middle spot where the greeting is stamped, and the little end tab. Then I took some Flirty Flamingo Ruched Ribbon and tied a bow. I attached it to the card with a Mini Glue Dot.
I love the simple and yet elegant look. This card could be used for a baby card, wedding card, or anniversary card because it is soft and simple. You could mix up the designer paper and go with any occasion.
Of course, if you would like to see this all in action, check out my Video Tutorial below or click here! Don’t forget to give it a thumbs up if you liked it and be sure to subscribe if you are new. I post a new video every Tuesday and Thursday!
Some of the items used for this card are retiring as well as a lot of others. You can check out the complete list here:
Of course, these items are all while supplies last and some are sold out already! You can start shopping here! Less than a month till the New Catalog is out!!!
This is every stamper’s perfect T-Shirt! Of course some may be in different colors of a different style but this one is perfect for me. I love PINK and I love that baseball tee look!!!
I started with a Daffodil Delight card base. Next I took a piece of Whisper White (4″ x 5-1/4″) and stamped all over the background. Melon Mambo, Pumpkin Pie, and Daffodil Delight Inks are the colors I used! I simply stamped a few times on the 1/3 of the piece and then a few into the next 1/3″. This makes the pattern look like it blends into the next color.
Now for the focal point, I die cut the Pumpkin Pie square with the Stitched Shapes Framelits. I love how the little stitching adds so much texture to the card! I added this to the center of the card. For the shirt, I stamped the girl’s shirt in Basic Black Ink onto a scrap piece of Whisper White. All of these stamps are from the Custom Tee Stamp Set. I stamped the “baseball tee accents” in Melon Mambo Ink and die cut the shirt with the T-Shirt Builder Framelits. I added the shirt to the card front with Stampin’ Dimensionals. To finish off the card, I added a few pops of color with some Brights Enamel Shapes!
I just love this card and it’s perfect for any stamper friend! The T-Shirt Builder Bundle is great for either gender and any age because there are so many options! Check out yesterday’s post where I showed off another sample and a video tutorial!
This bundle is retiring as well as many others. Check out the retiring list here and start shopping now because all of these items are while supplies last.
Happy Tuesday!!! That means I have a fabulous technique to share with you using the T-Shirt Builder Bundle from the Occasions Mini Catalog! I love how this set is perfect for all ages and both men and women!!!
This card is perfect for Father’s Day or change up the greeting and make it a Birthday Card!!! Either way, it’s the perfect Man Card and I really struggle with those! Let’s get started!
I used the T-Shirt Builder Bundle for this entire card! Starting with the shirt, I stamped the men’s shirt, buttons down the front, and the collar. All of them are stamped in Basic Black onto Pear Pizzazz. I stamped the tie in Basic Black onto Whisper White. Using the T-Shirt Builder Framelits, I die cut the shirt, collar, and tie. I thought the tie needed a pop of color so I colored in every other stripe with the Pacific Point Marker.
For the card, I started with a Pear Pizzazz card base. Next, I took a piece of Pacific Point cardstock (4″ x 5-1/4″) and stamped the tie on the background in Pacific Point Ink. This gives the background a some pattern. After stamping the background, I adhered it to the card base. Then I took a piece of Crumb Cake (4″ x 2″) and ripped around the top edge for a little texture. I stamped the greeting from Custom Tee Stamp Set. The set actually says RAD DAD but I omitted the Rad part but just inking Dad. I stamped it below the #1! Then I adhered it to the bottom of the Pacific Point on the card . Then I added the shirt. The actual shirt was added flat to the card but I added the collar with a Stampin’ Dimensional to make the shirt look more real!
If you would like to see this all in action, check out my Video Tutorial below or click here! Don’t forget to give it a thumbs up if you liked it and be sure to subscribe if you are new. I post a new video every Tuesday and Thursday! Check back tomorrow as I will be posting another sample using the T-Shirt Builder Bundle!
Stamping your own designer paper is fun and makes endless possibilities for all of your projects! I used the So In Love Stamp Set for this beauty!!!
You all know I just love flowers and this card just makes my heart happy! The color combination is fabulous too – Mint Macaron, Blushing Bride and Rose Red!
I started with a Mint Macaron card base. Next I took a piece of Very Vanilla (3-3/4″ x 5″) and stamped all over the background using the So In Love Stamp Set. The largest flower was stamped in Rose Red Ink. The set of four smaller flowers were stamped in Blushing Bride Ink. The greenery was stamped in Mint Macaron Ink. Be sure that when you are stamping your own designer paper that you fall off the edges so it looks like the pattern continues!
Once it was all stamped, I layered it onto a piece of Rose Red measuring 4″ x 5-1/4″! Then I wrapped some Mint Macaron Sheer Linen Ribbon around it and tied it into a knot. Because of the ribbon, I added this layer to the card front with Stampin’ Dimensionals. This way it lays nice and smooth! For the greeting, I die cut a circle from the Stitched Shapes Framelits and stamped it in Rose Red Ink. I added it to the card front with Stampin’ Dimensionals and finished it off with some Pearls!
This card would be perfect for so many different occasions. If you changed up the colors it would be fit each season too! Also, that color combination is just fabulous! Let me know your favorite color combo in the comments below! I need some new ones to try!!!
Happy Stampin
~Laura
Don’t forget that the Stampin’ Up! Retired List is out and items are selling out fast! You can check out the complete list here:
Some of these items are sold out already so you can just start shopping here! Not only do you get to enjoy getting some great products before they are gone (and at a discount for some), you will also be able to earn Laura’s Loyal Stampers Stickers!!!
This baby bunny is just precious and I used Basket Bunch Stamp Set which is Easter themed! I love using a stamp set in out of the box way! To see a few other samples with this set, click here and here!
You could always create this little baby bunny card in pink, blue, or even yellow. Go with the color that you enjoy the best!
I started with a Whisper White card base! Next I die-cut a scallop oval and smooth oval using the Layering Ovals Framelits. With the smooth oval and the card base, I pounced the Embossing Buddy over the top to reduce any static on the paper before heat embossing. Next, I stamped the greeting from the Tin of Cards Stamp Set and bunny from the Basket Bunch Stamp Set in Versamark Ink. I poured Gold Embossing Powder over the top and heated it with the Heat Tool. Oh how I love watching the powder melt! It’s so magical every time! Check out this Video for the basic on Heat Embossing!
Now that the heat embossing is all complete, it’s time to add color! I stamped the dotted splatter on the background twice in Melon Mambo Ink using the Happy Celebrations Stamp Set. To color in the bunny, I used some Melon Mambo Ink and an Aqua Painter. I love how the embossed image acts like a little barrier to keep the ink/water in! To assemble the card, I layered the bunny oval onto the scallop oval. Then I took some Gold Thread and wrapped it around my fingers a few times (10-12), slid the loops off my fingers and twisted in the middle. Next, I placed this on the back of the scallop oval and secured it with some Stampin’ Dimensionals. I always like to add more dimensionals to really make my gold thread fan out just so. Peel the backs off of the Stampin’ Dimensionals and adhere to the card! It’s just so precious!!!
I know today is Thursday and I normally do a Video on Thursday but I did a special one yesterday for my Stampin’ Anniversary. You can check that out here!
Don’t forget that the Stampin’ Up! Retired List is out and items are selling out fast! You can check out the complete list here:
Some of these items are sold out already so you can just start shopping here! Not only do you get to enjoy getting some great products before they are gone (and at a discount for some), you will also be able to earn Laura’s Loyal Stampers Stickers!!!
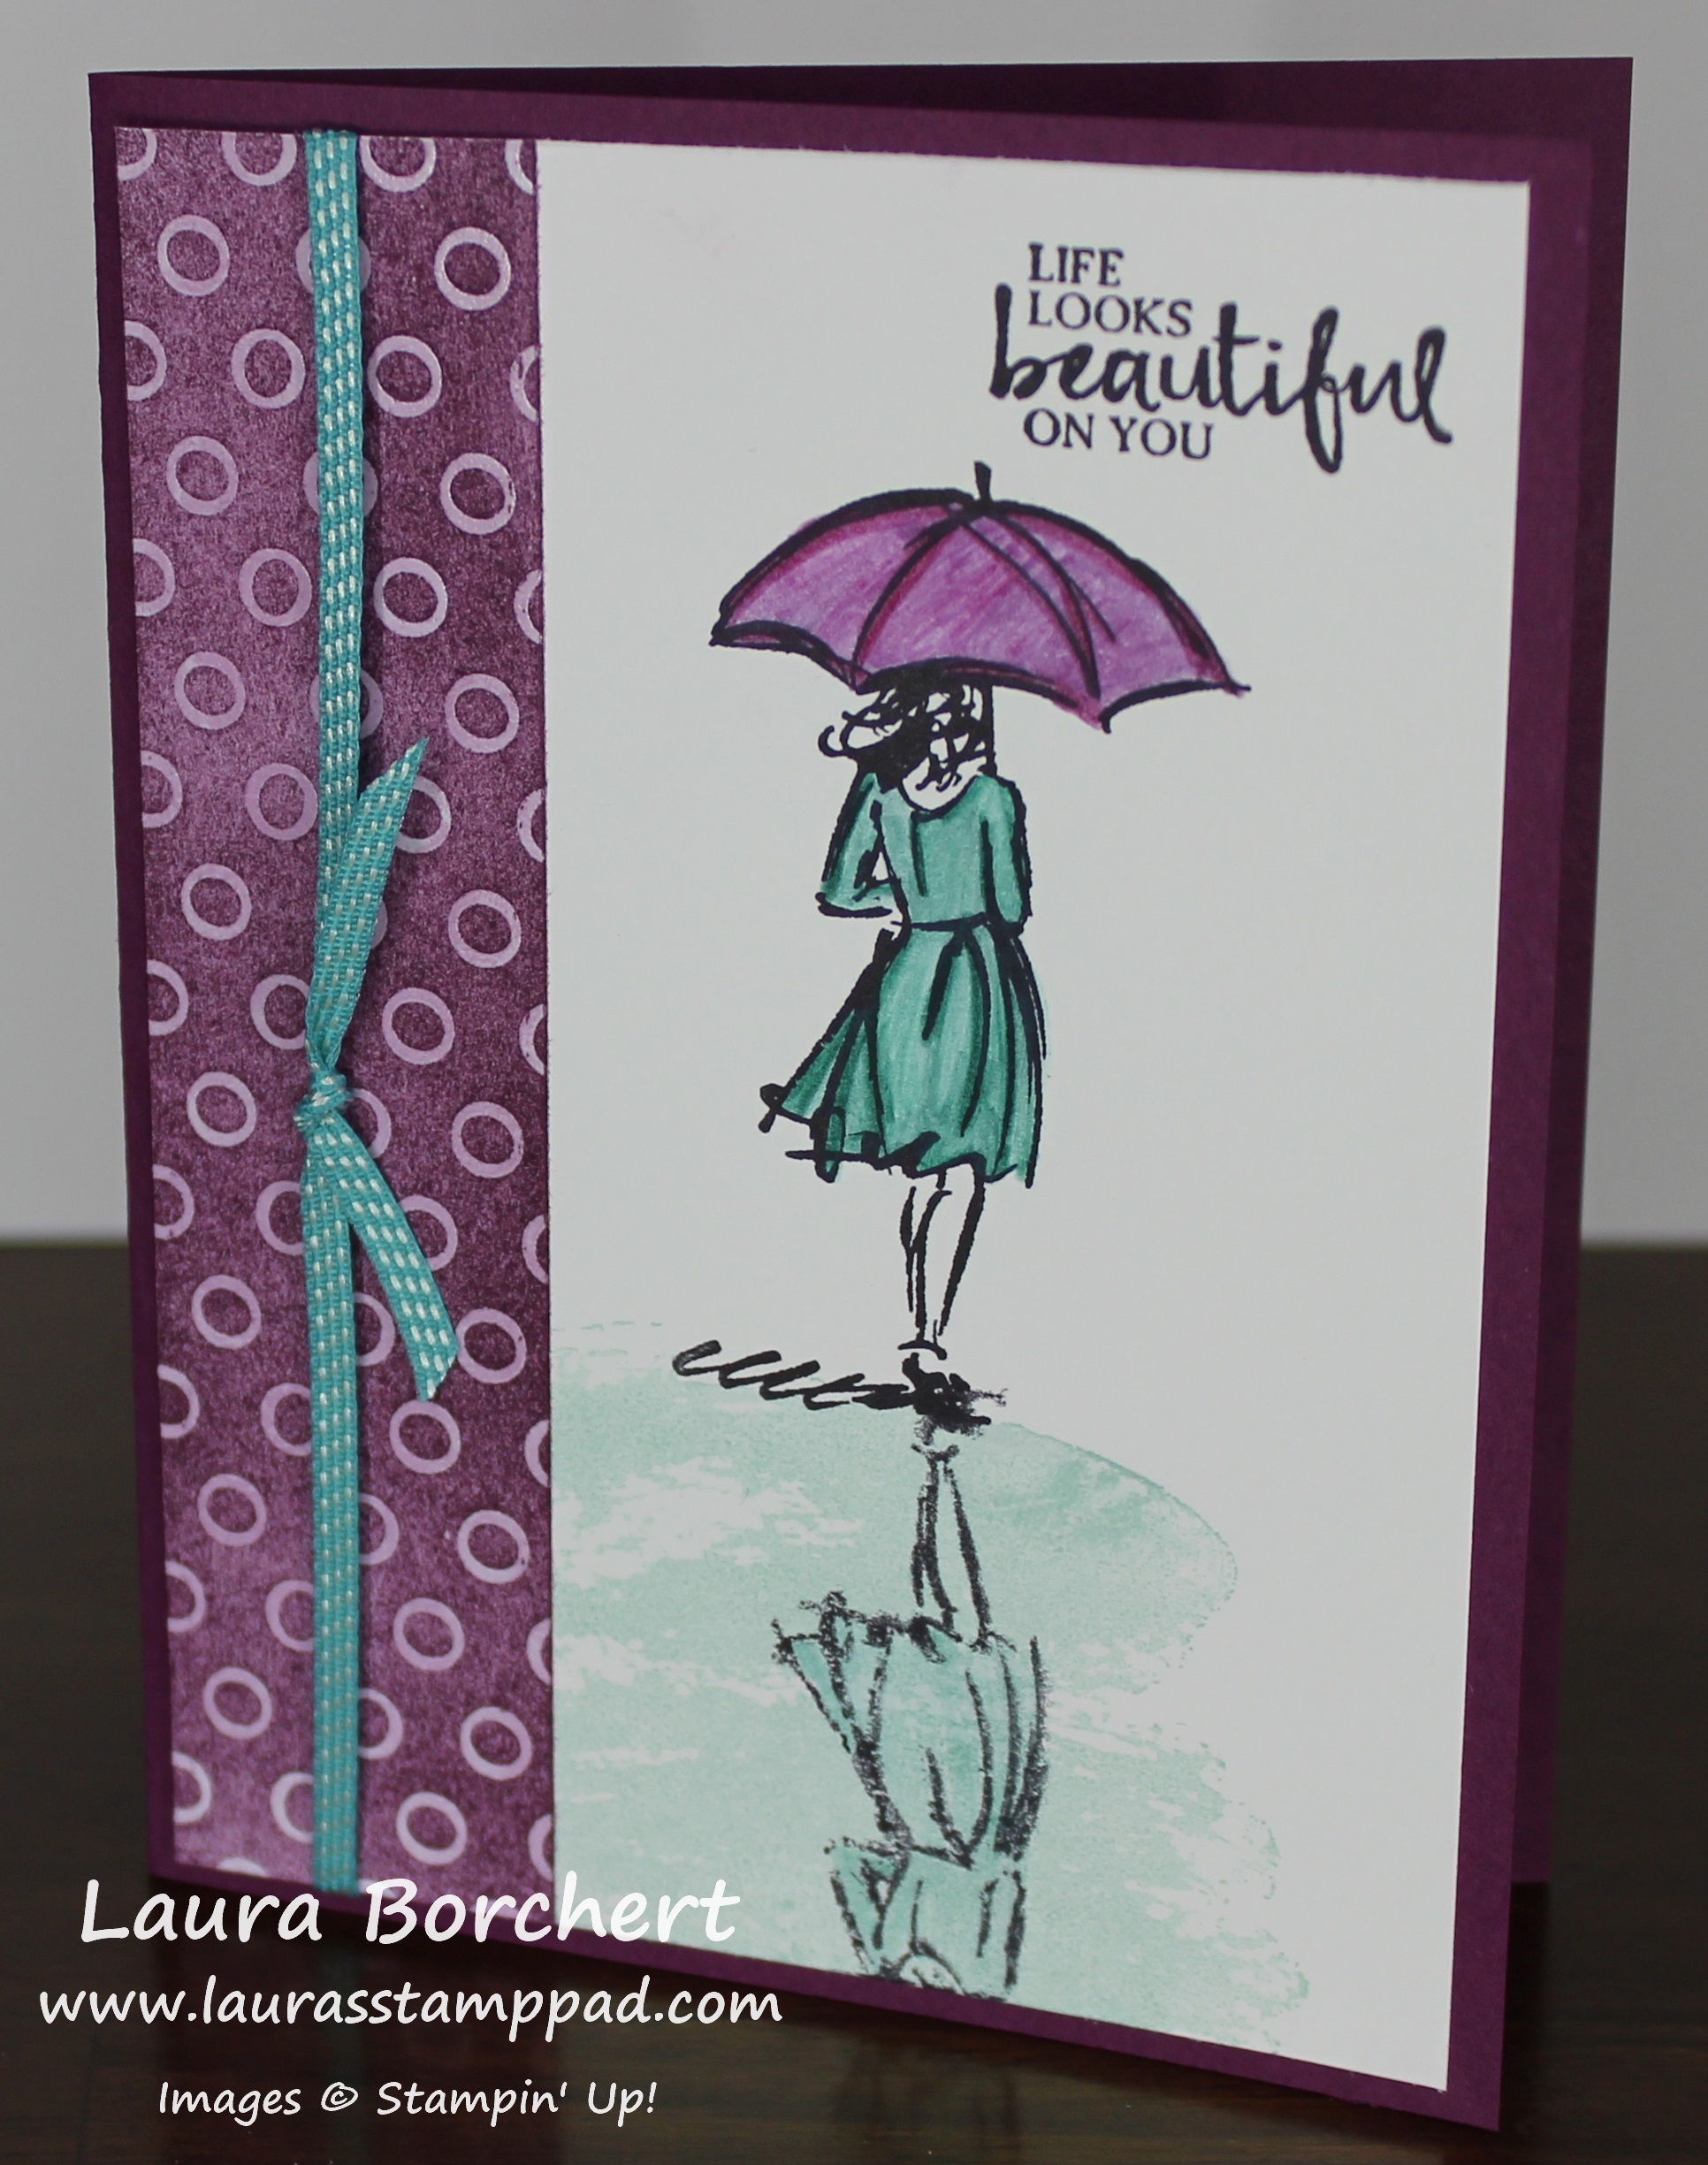
Happy Tuesday!!! That means I have a fabulous beautiful reflection technique to share with you today! I am super loving the Beautiful You Stamp Set. Check out more samples here, here, and here!
Isn’t this card just stunning? It’s beautiful and peaceful! I just love it so let’s get started!
I started with a piece of Whisper White (4″ x 5-1/4″) cardstock and stamped the greeting from the Beautiful You Stamp Set at the top. I did it after the fact in mine but it helps to do it first! Next, I stamped the girl from the same stamp set in Basic Black Ink onto the cardstock and then onto a piece of Window Sheet. Be careful when you stamp on the Window Sheet because it is slick! Then I flipped the Window Sheet over and placed it on the cardstock, matching it with the black squiggle on the bottom. Press over the window sheet to make sure the ink transfers to the cardstock. I love how it looks foggy and incomplete because that is how it would look as a reflection. Also, it helps make your card still look good when it doesn’t come out perfect! 🙂
For coloring, I used the Watercolor Pencils to color her dress and umbrella (Bermuda Bay & Rich Razzleberry). I used the Blender Pen to blend the color around! Then I went back through and added accents with the pencils. I didn’t trust myself to get the perfect watercolor wash for the puddle so I used the Watercolor Wash Stamp Set and Pool Party Ink. I stamped off once for a lighter look!
I really wanted a piece of Designer Series Paper for the left hand side but didn’t have any that was Rich Razzleberry. Then I realized I could make my own with the Irresistibly Floral Designer Series Paper. Using the Sponge Brayer and Rich Razzleberry Ink, I colored the Designer Paper to match! Be sure to wipe off any excess ink to really make the embossed design pop! I added this piece to the left hand side of the card and tied some Bermuda Bay Stitched Ribbon around it! Next I adhered this piece to a Rich Razzleberry card base! I just love it!!!
If you would like to see this all in action, check out my Video Tutorial below or click here! Don’t forget to give it a thumbs up if you liked it and be sure to subscribe if you are new. I post a new video every Tuesday and Thursday!
These Lace Doilies are so amazing and I’m super sad to see them retiring. They are perfect because they are white on one side and vanilla on the other side!!! LOVE IT!!!
I started with a So Saffron card base. Then I took a piece of Very Vanilla (4″ x 5-1/4″) and adhered some Falling In Love Designer Series Paper (2″ x 5-1/4″) to the left side. I really feel like the flowers have a hint of yellow in them and this card really made it pop! For the greeting, I used one of the Lace Doilies (retiring in May) in the center. I adhered it with a little bit of Snail Adhesive in middle. Then I die cut a scallop circle using the Layering Circles Framelits and stamped the greeting from the So In Love Stamp Set.
I added the scallop greeting to the card front with Stampin’ Dimensionals. To finish off the card, I added a few So Saffron Enamel Shapes for some random pops of color! A simple and elegant card for any occasion. The perfect one to always have on hand!
Don’t forget that the Stampin’ Up! Retired List is out and items are selling out fast! You can check out the complete list here:
Some of these items are sold out already so you can just start shopping here! Let me know in the comments what items you are sad to see go! These Lace Doilies are high on my list! Another item that I am sad to see go is the Decorative Label Punch.
Not only do you get to enjoy getting some great products before they are gone (and at a discount for some), you will also be able to earn Laura’s Loyal Stampers Stickers!!! Just one way for me to show my appreciation to you!!! 🙂