July 2019 Paper Pumpkin!!!

Posted on

I just can’t seem to get my Paper Pumpkin kits done before the 10th of the next month! But I still got it completed and now I’m sharing! Here is the July 2019 Paper Pumpkin Kit!!! Don’t start Red Box Pile Up and get your kit out now!!!

July 2019 Paper Pumpkin, www.LaurasStampPad.com

This card was super quick and simple to create as it is just layering the pieces on! For the Linen Thread, I just wrapped it around my fingers 2 times and then placed it over the dimensionals on the greeting! A tip for adding the dimensional adhesive piece on the wheel is to peel off the backing and place the wheel on. For the first one, I took the circle adhesive foam off and it lost it’s shape a bit. It was much harder doing it that way.

Applying adhesive, www.LaurasStampPad.com

Just peel it off and place the wheel over the top and then pull it back out to put on your card!

You've been on my mind, www.LaurasStampPad.com

I love the color combination in these cards. It’s soft colors but they also POP! It’s perfect! Also, my favorite part is those amazing sequins which come with adhesive backs! Woot Woot!

You're The Best, www.LaurasStampPad.com

Now for the final card set in the July 2019 Paper Pumpkin kit! The texture on these card fronts is amazing! I love it. I added a bit of adhesive to the card and then pressed the leaves into it. Then I added the greeting over the top! It was super easy!

If you want to see past Paper Pumpkin Kits, click here! The August Kit is already on it’s way so you can’t get that one. The September Kit will be Halloween themed so if you love Halloween, click here to subscribe and get that kit. You can enjoy it for 1 month or more. It is all up to you!

Happy Stampin’

~Laura

June 2019 Paper Pumpkin Kit!!!

Posted on

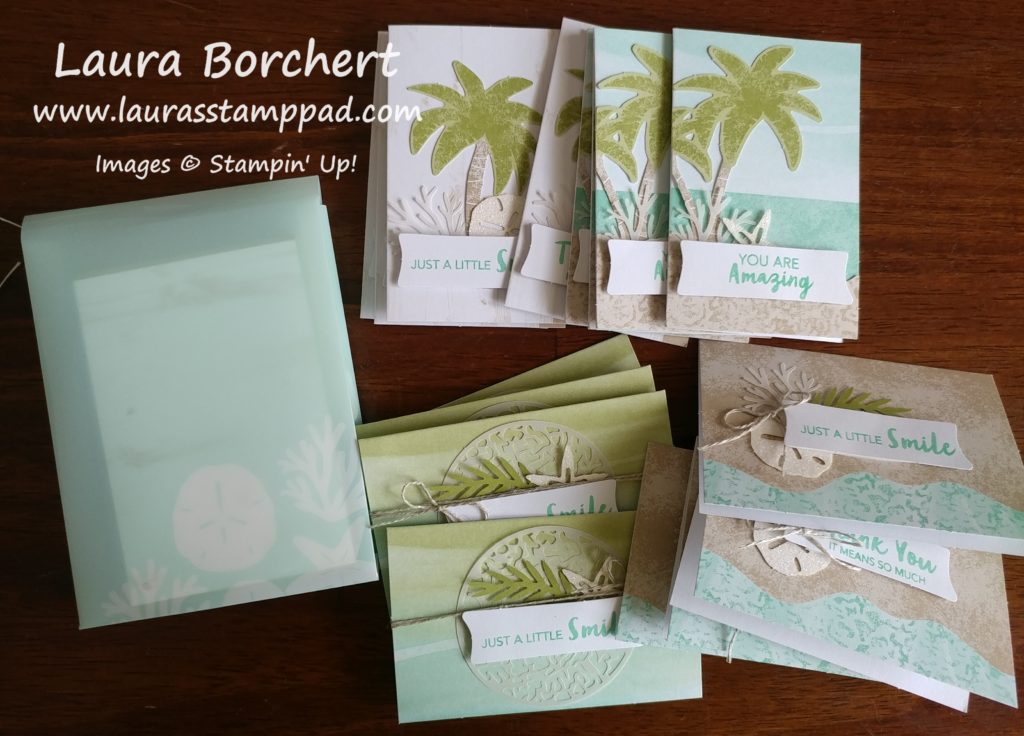
I’m a little bit behind on getting my June 2019 Paper Pumpkin Kit completed but it is done now! This kit wasn’t my favorite as I don’t have a huge need for mini cards that can’t be mailed. I still always complete the kits even if they aren’t my favorite because it gives me a reason to give out the cards. I will give one to the person at the Post Office, Dentist, neighbor, etc. Who wouldn’t love to get a little note to brighten their day! Another option might be that I put some cards in the little box and give it as a gift!

June 2019 Paper Pumpkin Kit, www.LaurasStampPad.com

I am excited to have a beach themed stamp set in my craft room. I don’t normally buy beach themed stuff because I’m in Illinois and I don’t feel like it applies. You just never know when you might need an image like this though for that perfect someone.

One of the tips I would give for this kit is to not worry about securing the vellum, leaves, and sand dollars as much. For those items, I put a dab of adhesive down or a glue dot and stick the piece on it. Then I made sure the greeting went over it to super secure it. Don’t stress about trying to get that little bit image so secure. Another thing that I did differently is using the linen thread. I added little bows to one set and I tied some around the card on another set. The 2 sets with palm trees don’t have any linen thread.

Beach Themed Cards, www.LaurasStampPad.com

The little coordinating envelopes is super cute too! I love them!!! Did you like the June 2109 Paper Pumpkin Kit?? Let me know in the comments.

Unfortunately, I am posting this after the July date so I hope you got signed up for that already. If you aren’t signed up, be sure to do it now so you don’t miss the August Kit! Click here to try out Paper Pumpkin. You can try it out for 1 month or more! Cancel at any time. Be sure to follow me on YouTube so you can catch the unboxing and reveal!!!

Happy Stampin’

~Laura


May 2019 Paper Pumpkin!!!

Posted on

Today is the last day to sign up for the June 2019 Paper Pumpkin! Click here to sign up for that. Sneak Peak details for that kit are that there will be
16 fun-sized, beach-themed cards and envelopes. But wait that isn’t all, there is also an exclusive carrying case! Of course, the exclusive stamp set and ink spot too! Now before we get too excited for June, let me share with you the May 2019 Paper Pumpkin Kit!

May 2019 Paper Pumpkin, www.LaurasStampPad.com

This card set is probably my favorite!!! You all know I love pink and flowers so it shouldn’t be a surprise! For these cards, the instructions actually have you stamp the dots around the flowers. You can see in the far left card, I forgot to do that. Ops! For the second card, I went ahead and did it like the instructions even though rustic/dirty/worn is not really my look. I stamped it and compared the 2 and you know what, I liked it!!! It just looks fabulous! Paper Pumpkin is perfect for making me stamp outside my normal range! I love that!

Birds of a Feather, www.LaurasStampPad.com

For this card, I struggled a bit on getting things lined up but over all I think they look great and no one else would notice but me. First, I stamped all of the birds on the card base. Then I realized that I stamped the bottom right bird a bit low so I had to move my greeting. You can see in the middle card, I ended up covering up the birdie. Also, be sure to stamp your greeting high enough that the twine can run along the bottom of the greeting tag.

Eggs in a Nest, www.LaurasStampPad.com

This card also has fabulous little speckles along the bottom of the card base. It really gives a fun messy look especially since my loops are fun and messy too. I stamped all the greetings on my tags before ever getting started and I think that was a bit of mistake. For this card, I feel like the greeting is a bit too high but again I am probably the only one to notice. It’s just being nit-picky!

Thank You Dear Friend, www.LaurasStampPad.com

I am loving the blue flowers and that twine behind them. The look is just fabulous! My tip for these cards is to make sure your velvet ribbon is lined up in the center. If it is not, when you go to place the tag down, the points are off on the velvet ribbon and then the “uncentered-ness” stands out a bit more.

Overall, I loved the Shelli Kit….and the floral box!!! So many cards that I can add to my collection and even more goodies leftover to use for another project. I love that the cards pushed me outside my normal stamping comfort zone too!

Can’t wait to see the June Kit! Today is the last day to sign up so click here to do that NOW! Check out past kits here!

Happy Stampin’

~Laura


Ways To Store Your Paper Pumpkin Stamps!!!

Posted on

You all know I love organization!!! Today, I’m sharing with you a few ways to store your Paper Pumpkin Stamps. Believe it or not, my way is probably the least “organized” but it works for me and my space. I hope you find these useful and let me know if you store your Paper Pumpkin stamps this way!

Ways to Store Your Paper Pumpkin Stamps, www.LaurasStampPad.com

Each month, I get a little stamp set in plastic like shown above for Paper Pumpkin. These stamps are fabulous because they have a little bit of everything in there. After a year or even a few months, you have have basic greetings like Birthday, Thinking of You, etc. As time goes on you even get the holidays like Valentine’s Day, Christmas, Thanksgiving, etc. I go back to these stamps A LOT for specific holidays because I know I have variety in there. This also helps me not have to buy another stamp set from the Annual Catalog for that holiday. This is super handy when I really only want to make 1 or 2 cards. Try out Paper Pumpkin, even for just a month or 2. Click here to try it out!

Shoe Box Stamp Set Storage, www.LaurasStampPad.com

Okay so back to the topic….what do you do with these little sets of stamps each month?? For me, I have a plastic shoe box that I throw them all into. Nothing fancy or super detailed. The little shoe box can be found at a big box store for less than $1. I added a label on the side and end and toss the set in each month! It works for me and I have room for it like this for now!

Paper Pumpkin Stamp Storage, www.LaurasStampPad.com

There is a more organized, pretty way to store your stamps too!!! Each month, Stampin’ Up sends an email after Paper Pumpkin has arrived (around the 20th of the month). This email has details for buying refill kits, alternative options for using the kit pieces, AND a printable stamp set image. This can be printed a trimmed down to fit in a Clear Mount Stamp Case like the photo on the right.

It can also be dropped into a 3 ring binder sleeve with the stamps and even the color flyer from the kit. The awesome thing about this print out is that it shows the samples of the cards and the entire stamp set. Now you know if an image is missing or you can quickly see what the stamps are without having to dig through a box. You can also print it in color but I used my B&W printer.

How do you store your Paper Pumpkin Stamps?? Are you going to try out one of these 3 options?? Let me know in the comments below!

If you would like to see this all in action, check out the video below or click here! Be sure to give the video a thumbs up if you liked it and don’t forget to subscribe if you are new. If you would like a notification when I post a new video, be sure to click the bell right next to the subscribe!!!

Happy Stampin’

~Laura


April 2019 Paper Pumpkin Kit!!!

Posted on

I love flowers and I love Pink so the April 2019 Paper Pumpkin Kit was one of my favorites!! It also came with a card box so you could gift the cards and they are perfect for a Mother’s Day Gift!!! Love it!! Check out the unboxing video here!

April 2019 Paper Pumpkin, www.LaurasStampPad.com

I actually used some of my own inks for this kit because I wanted more color!!! The kit came with Gray Granite which I used for the greetings. The kit states the coordinating colors in the directions which stated Flirty Flamingo and Pear Pizzazz. That is what I used for the flower on the cards and envelopes. Pear Pizzazz was the color I used for the leaves! I love how it turned out with more color!

Roses Are Red, www.LaurasStampPad.com

I stamped the rose and leaves in the Flirty Flamingo and Pear Pizzazz for these cards too! They were super simple to stamp and assemble. I was done in now time at all!!

Thank You Notes with Roses, www.LaurasStampPad.com

For this one, I just had to add in the leaves as the roses were already printed on the layer! When adding the piece that the Baker’s Twine was tied to, I used Stampin’ Dimensionals for a smoother look!

Card Gift Box, www.LaurasStampPad.com

To top it all off, there was this adorable little card box in there that makes gift giving cards even that much sweeter! I think putting a few cards in there for a Mother’s Day gift will be perfect!!! You could also give the gift of Paper Pumpkin! The May Kit will be perfect as it is a special edition Shelli Kit. She has given hints to what it will be by saying it is 12 cards, birds, Springtime, and elegance! I can’t wait to see it! Click here to sign up and try out Paper Pumpkin and get the Shelli Kit!

Happy Stampin’

~Laura


March 2019 Paper Pumpkin!!

Posted on

Oh how I feel so behind on Paper Pumpkin because I usually like to post the previous month before the 10th of the next month! Sorry!!!! Either way, you should totally try out Paper Pumpkin any time of the year. Sign up now (before May 10th) to get the May Kit!!!!

March 2019 Paper Pumpkin, www.LaurasStampPad.com

These pop out cards were SOOOOO CUTE!!! I went ahead and pulled out my calendar to do certain numbers for upcoming birthdays!!! I had a few left over and decided to just do Happy 21st Birthday….then on the inside I put “…Again!” That works for any age above 21! I wrote in the cards too! I’m feeling so on top of things….now to just remember I did it when that person’s birthday comes! 🙂

The front decoration was super simple and fun to mix and match the labels and greetings! I think I added dimensionals to different layers than the directions stated but that’s okay!

Pop Out Cards, www.LaurasStampPad.com

The hardest part of the inside was probably all the folding and getting the cake to fold out while the rest folds in. Another tip when putting the pop out insert in is to place it inside the card, open one side and peel off the sticky. Close the card to have to attach. Flip over the card, open the flap, and peel off the sticky. Close the card. By doing it this way, it will close flat and position correctly. If you try to position it in there perfectly it might not close flat or it will be pushed in too far.

Another tip I have is to know that there are TONS of goodies in this kit. There are plenty of labels, numbers, and candles. I ended up tearing my candles apart for the top section and then realized there were small and large candle pieces. Silly Laura! Also, all the extra pieces can be used to make more cards! Woot Woot!

Have you tried out Paper Pumpkin??? It is so worth a try. Even if you only do it for 1 month!! You get a clear block with your first kit which is fabulous for this kit but all future stamping too! Stamp and Ink come in every box! Then there is the project which you can create just like the instructions say or you can use the pieces to create your own style. Try it out by clicking here!

Happy Stampin’

~Laura


February 2019 Paper Pumpkin!!!

Posted on

My February 2019 Paper Pumpkin got delayed in the mail and I just got around to creating it. It was amazing as usual with the black and white look and fun use of plants. Quick and simple cards to put together and enjoy with a ton of supplies or time. That’s my kind of stamping sometimes!!!

Cactus, www.LaurasStampPad.com

These cards were super cute and easy to put together! I love the greetings and the rustic look with a little bit of bling. The color combination is perfect too with the greenery and then pops of Fresh Fig and Lemon Lime Twist.

I took this kit with me the other day when I traveled to my hometown for a Stamp Class. I knew I would have have some time to kill between set-up and actual class so I put this kit together! It was perfect!

February 2019 Paper Pumpkin, www.LaurasStampPad.com

My favorite card is the one on the far left with the YOU. I just love the look of it and that little bit of string and a few bling! I used the fun images in the stamp set for each of the envelopes to coordinate with the card. It turned out perfect. There are so many fun images and greetings in this stamp set!

If you would like to try out Paper Pumpkin, click here to join in the fun! You can try it out for 1 month or several. It is all up to you. Just cancel any time before the 10th of the month.

Happy Stampin’

~Laura


Did You Know???

Posted on

Today, I’m going to chat with you about Paper Pumpkin. Some of these things you may know but some might be new. Here we go, Did you know…

Paper Pumpkin 6th Birthday, www.LaurasStampPad.com

Paper Pumpkin is celebrating their 6th Birthday in March! Woot Woot! The box is going to be super cute and that always makes me excited. I love to use the fun, pretty boxes in my craft room for storage like Stampin’ Blends, etc.

Speaking of Paper Pumpkin boxes, did you know that you can turn the box inside out, pop it back together, and use it for mailing. No need to peel off labels or anything, it’s a perfect clean box. You can even write on it with a Sharpie since it’s more cardboard like rather than slick on the inside.

Did you know that you can store Paper Pumpkin stamps in Clear Mount Stamp Cases. Click here to purchase some! Stampin’ Up also sends out a stamp case insert each month for the set. This comes in the Paper Pumpkin Email. Here is the insert for the February Paper Pumpkin Stamp Set.

The March Paper Pumpkin Kit is going to come with TWO stamp sets!!! If you haven’t tried out Paper Pumpkin, March is the month to do it. For $19.95 (plus tax, no shipping), you will get 2 stamp sets, 1 stamp spot, a clear block, and all the supplies for making the card project! We have been told it will be cards and they will “POP”. I can’t wait to see it. All of those goodies are totally worth it! Click here to give it a try! You can try it out for 1 month, 2 months, 8 months, forever! Just keep getting it as long as you enjoy it!

Happy Stampin’

~Laura


March 2019 Free Stamp Set of the Month!!!

Posted on

It’s March and it is a new month!!! I’m pumped because that means we are closer and closer to daylight savings and Spring! Bring on warmer weather and sunshine!!! Are you all tired of me hoping for Spring? I don’t care because I just do not like Winter….sorry winter lovers! Back to the task at hand….the March 2019 Free Stamp Set of the Month is…..drum roll…..

March 2019 Free Stamp Set of the Month, www.LaurasStampPad.com

You all know I love flowers and this set has been so much fun to play with!!! I love the entire Happiness Blooms Suite! The big bold images are fun to use for card front, envelopes, and the inside of the card. There is a flower size/style for every project! Click here to start shopping and earning! Don’t forget that you will earn Sale-A-Bration goodies as well!

Paper Pumpkin's Birthday, www.LaurasStampPad.com

Paper Pumpkin is turning 6 in March. To celebrate, Stampin’ Up is putting TWO Stamp Sets in the kit!!! Stampin’ Up also let us know that the kit will contain cards and that they “POP”. I’m so excited to see what this kit will be and I CAN NOT WAIT for that confetti box! Super cute!!! If you haven’t tried out Paper Pumpkin, March is the month. For $20, you will get 2 stamp sets, 1 ink spot, a clear block, and supplies for 8 cards. Now that is a steal! You can try it out for 1 month or many months….it’s all up to you! Click here to get the March Kit!!!

Happy Stampin’

~Laura


Donut Love!!!

Posted on

Happy Friday everyone!!! I thought I would share my Valentine’s Day that I created for Brad and Claire!!! Brad LOVES donuts. In fact, he recently camped out on Kohl’s website waiting for a donut blankie to go on sale. He was so excited when it finally happened and now we have a fun donut blanket in our living room! I used all of this as my inspiration!

Donut Love, www.LaurasStampPad.com

So Brad’s card didn’t turn out as well as I had envisioned but it also turned out just perfect. He loves chocolate icing on donuts but I didn’t want to just make a chocolate donut. I cut a donut using the Layering Circles Framelits and then added Fine Tip Glue all over the top. About half way through the drying, I tested it with my thumb (see bottom left). The funny thing is that I would totally stick my thumb into his donut to steal a taste or on accident while picking it up to bring it to him. He also knows I don’t have patients so of course I tested it too early. To get the brown color, I used the Bronze Stampin’ Blends Marker!

I love sprinkles so I had to make the second donut with sprinkles to represent me! 🙂 I used the stamps from the May 2017 Paper Pumpkin Kit which were perfect!!! The greetings and sprinkles came from that set! I love having all the past Paper Pumpkin Stamp Sets on hand for greetings and images! On the inside of the card, I put …Husband, Friend, and Daddy! He really is the best!!!

We Love You A Hole Bunch, www.LaurasStampPad.com

Here is Claire’s card and it turned out just precious! Of course her donuts are smaller so I used punches! I created a little plate in the corner with the rounded part done half way freehand and half way with the larger donut guide. To make it look a little more like a plate, I took a Sponge Dauber to the edge of it for shading. For the greeting, it stated “I” but I wanted it to be from both Brad and I so I created the “We” with the Make A Difference Stamp Set.

I think she loved it!!! 🙂 Also, I took it back away before she could rip it to shreds so into the keepsake box it goes!

I hope you all have a wonderful weekend! Don’t forget that Sale-A-Bration is still going on and there is also the Sale-A-Bration 2nd Release Items! Click here to start shopping!

Happy Stampin’

~Laura