Berry Burst Embossing Paste!!!

Posted on

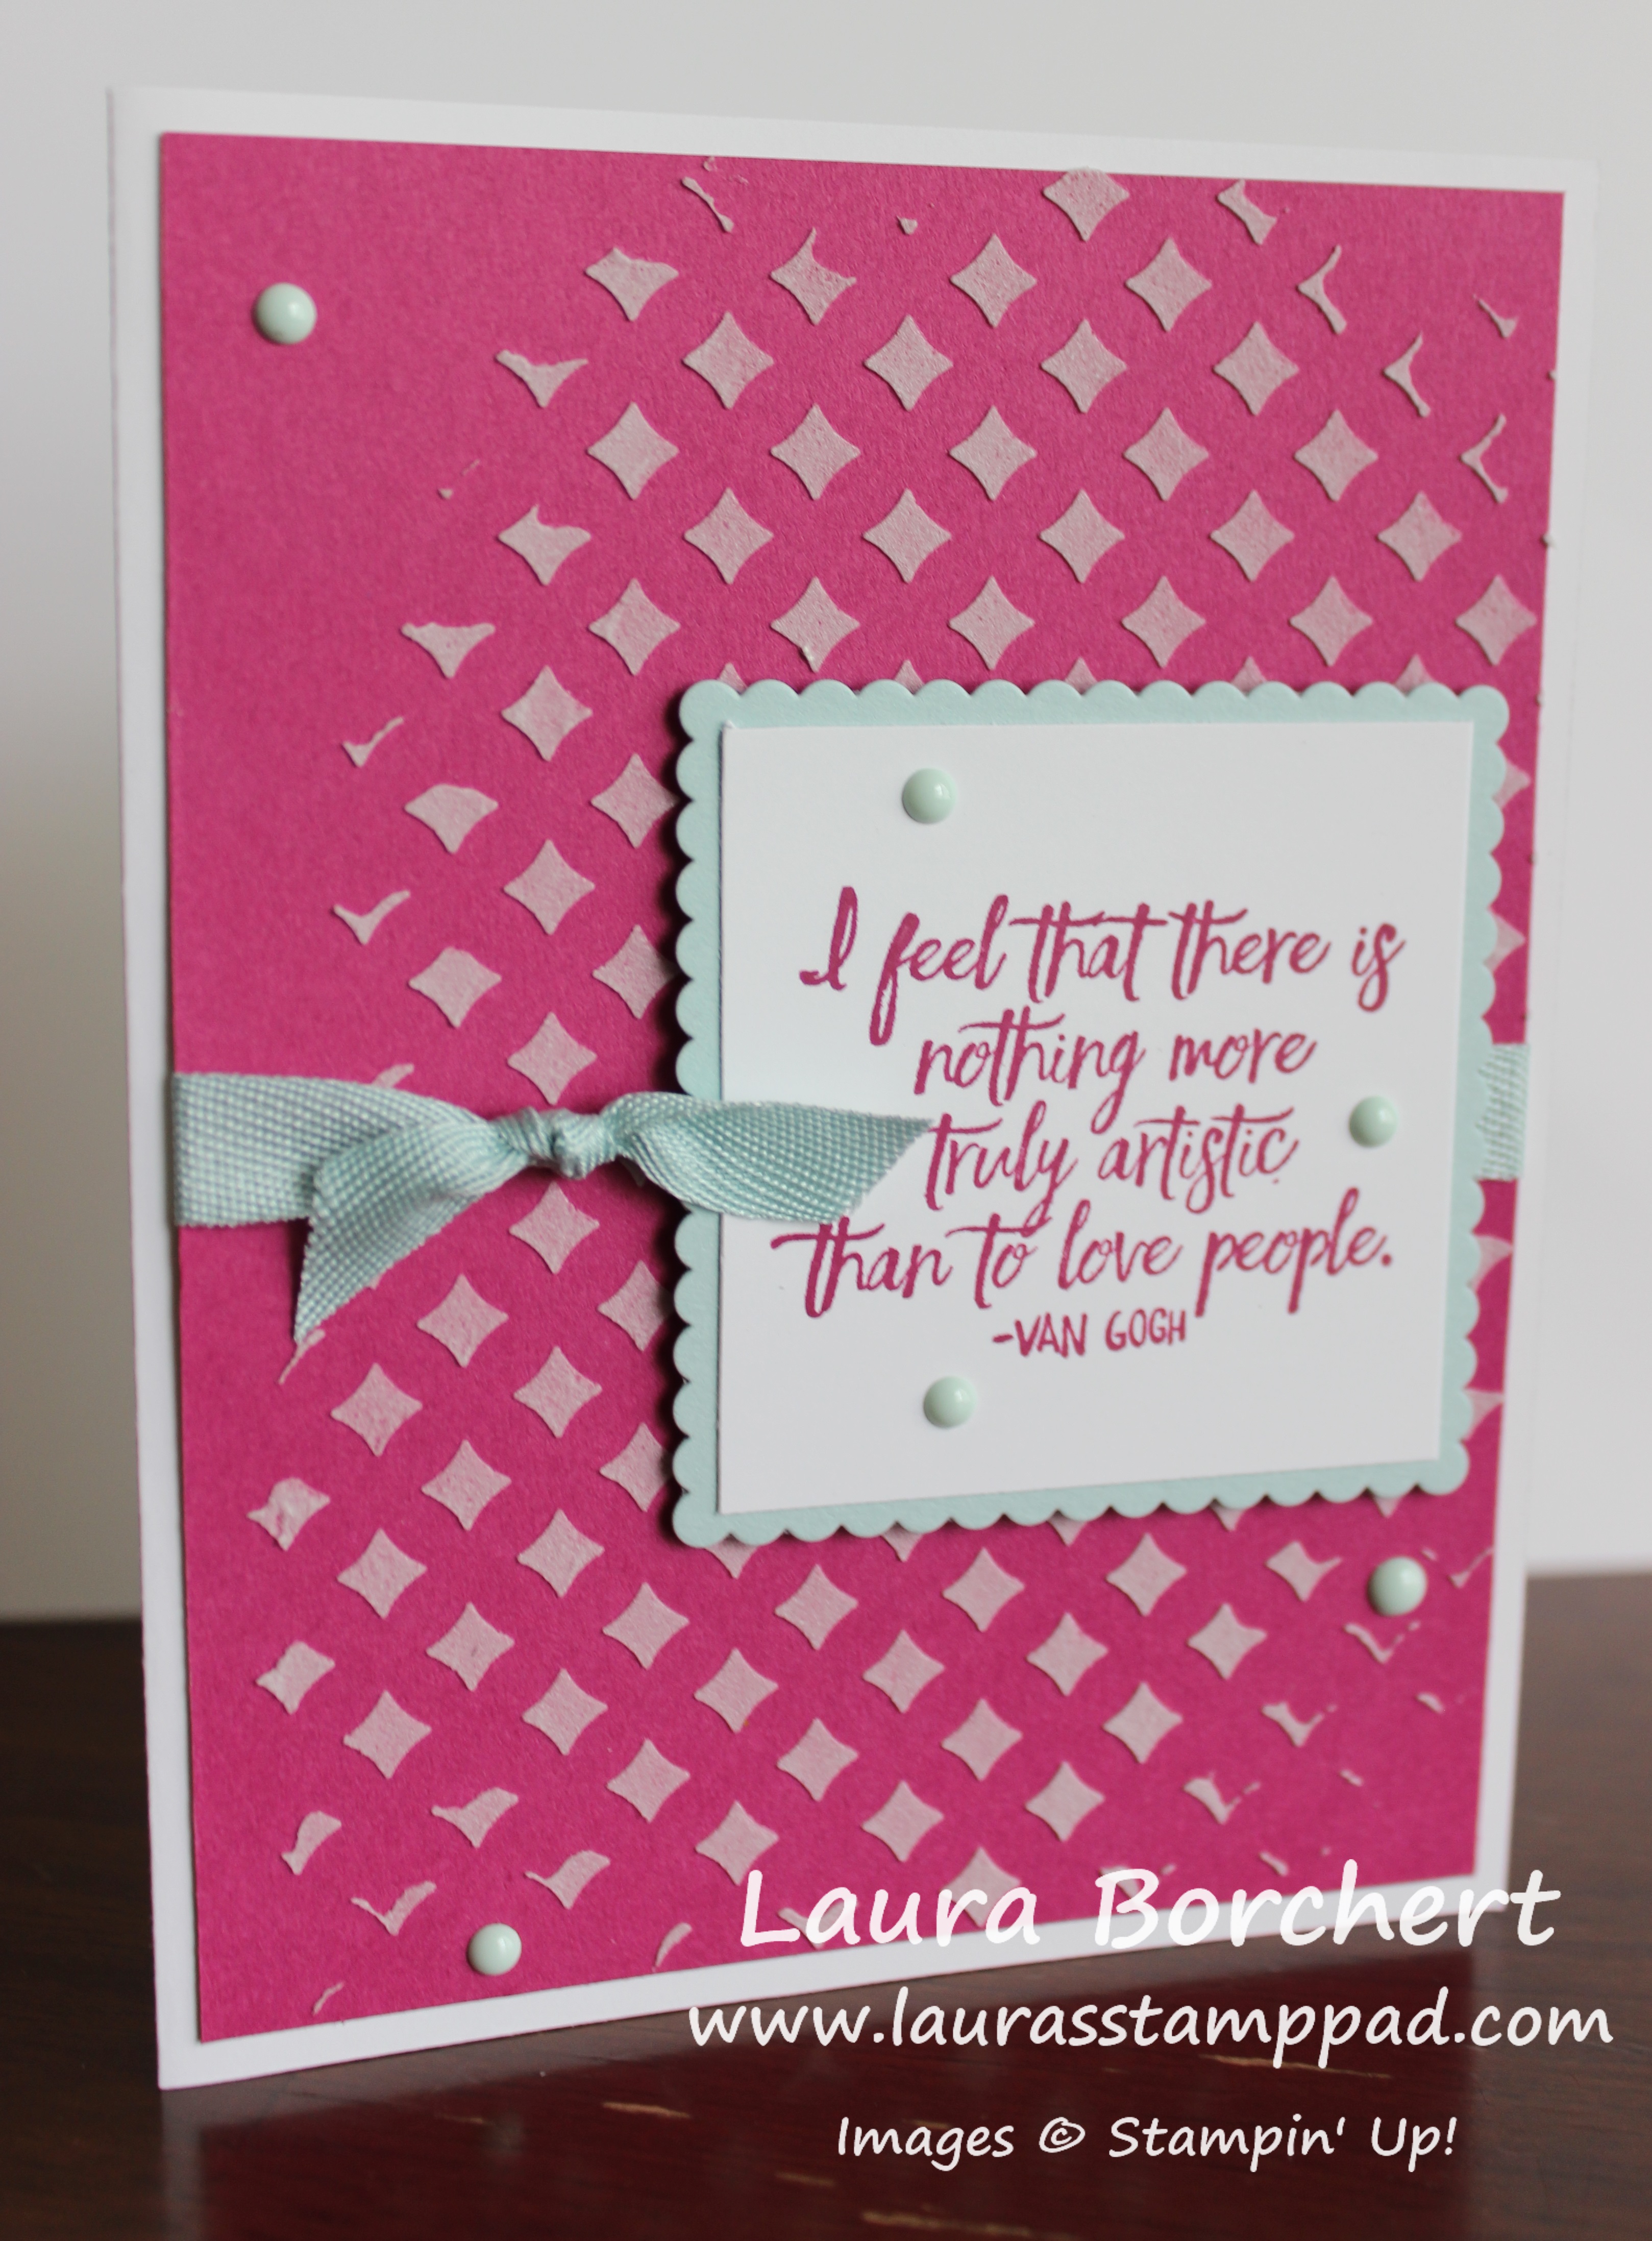
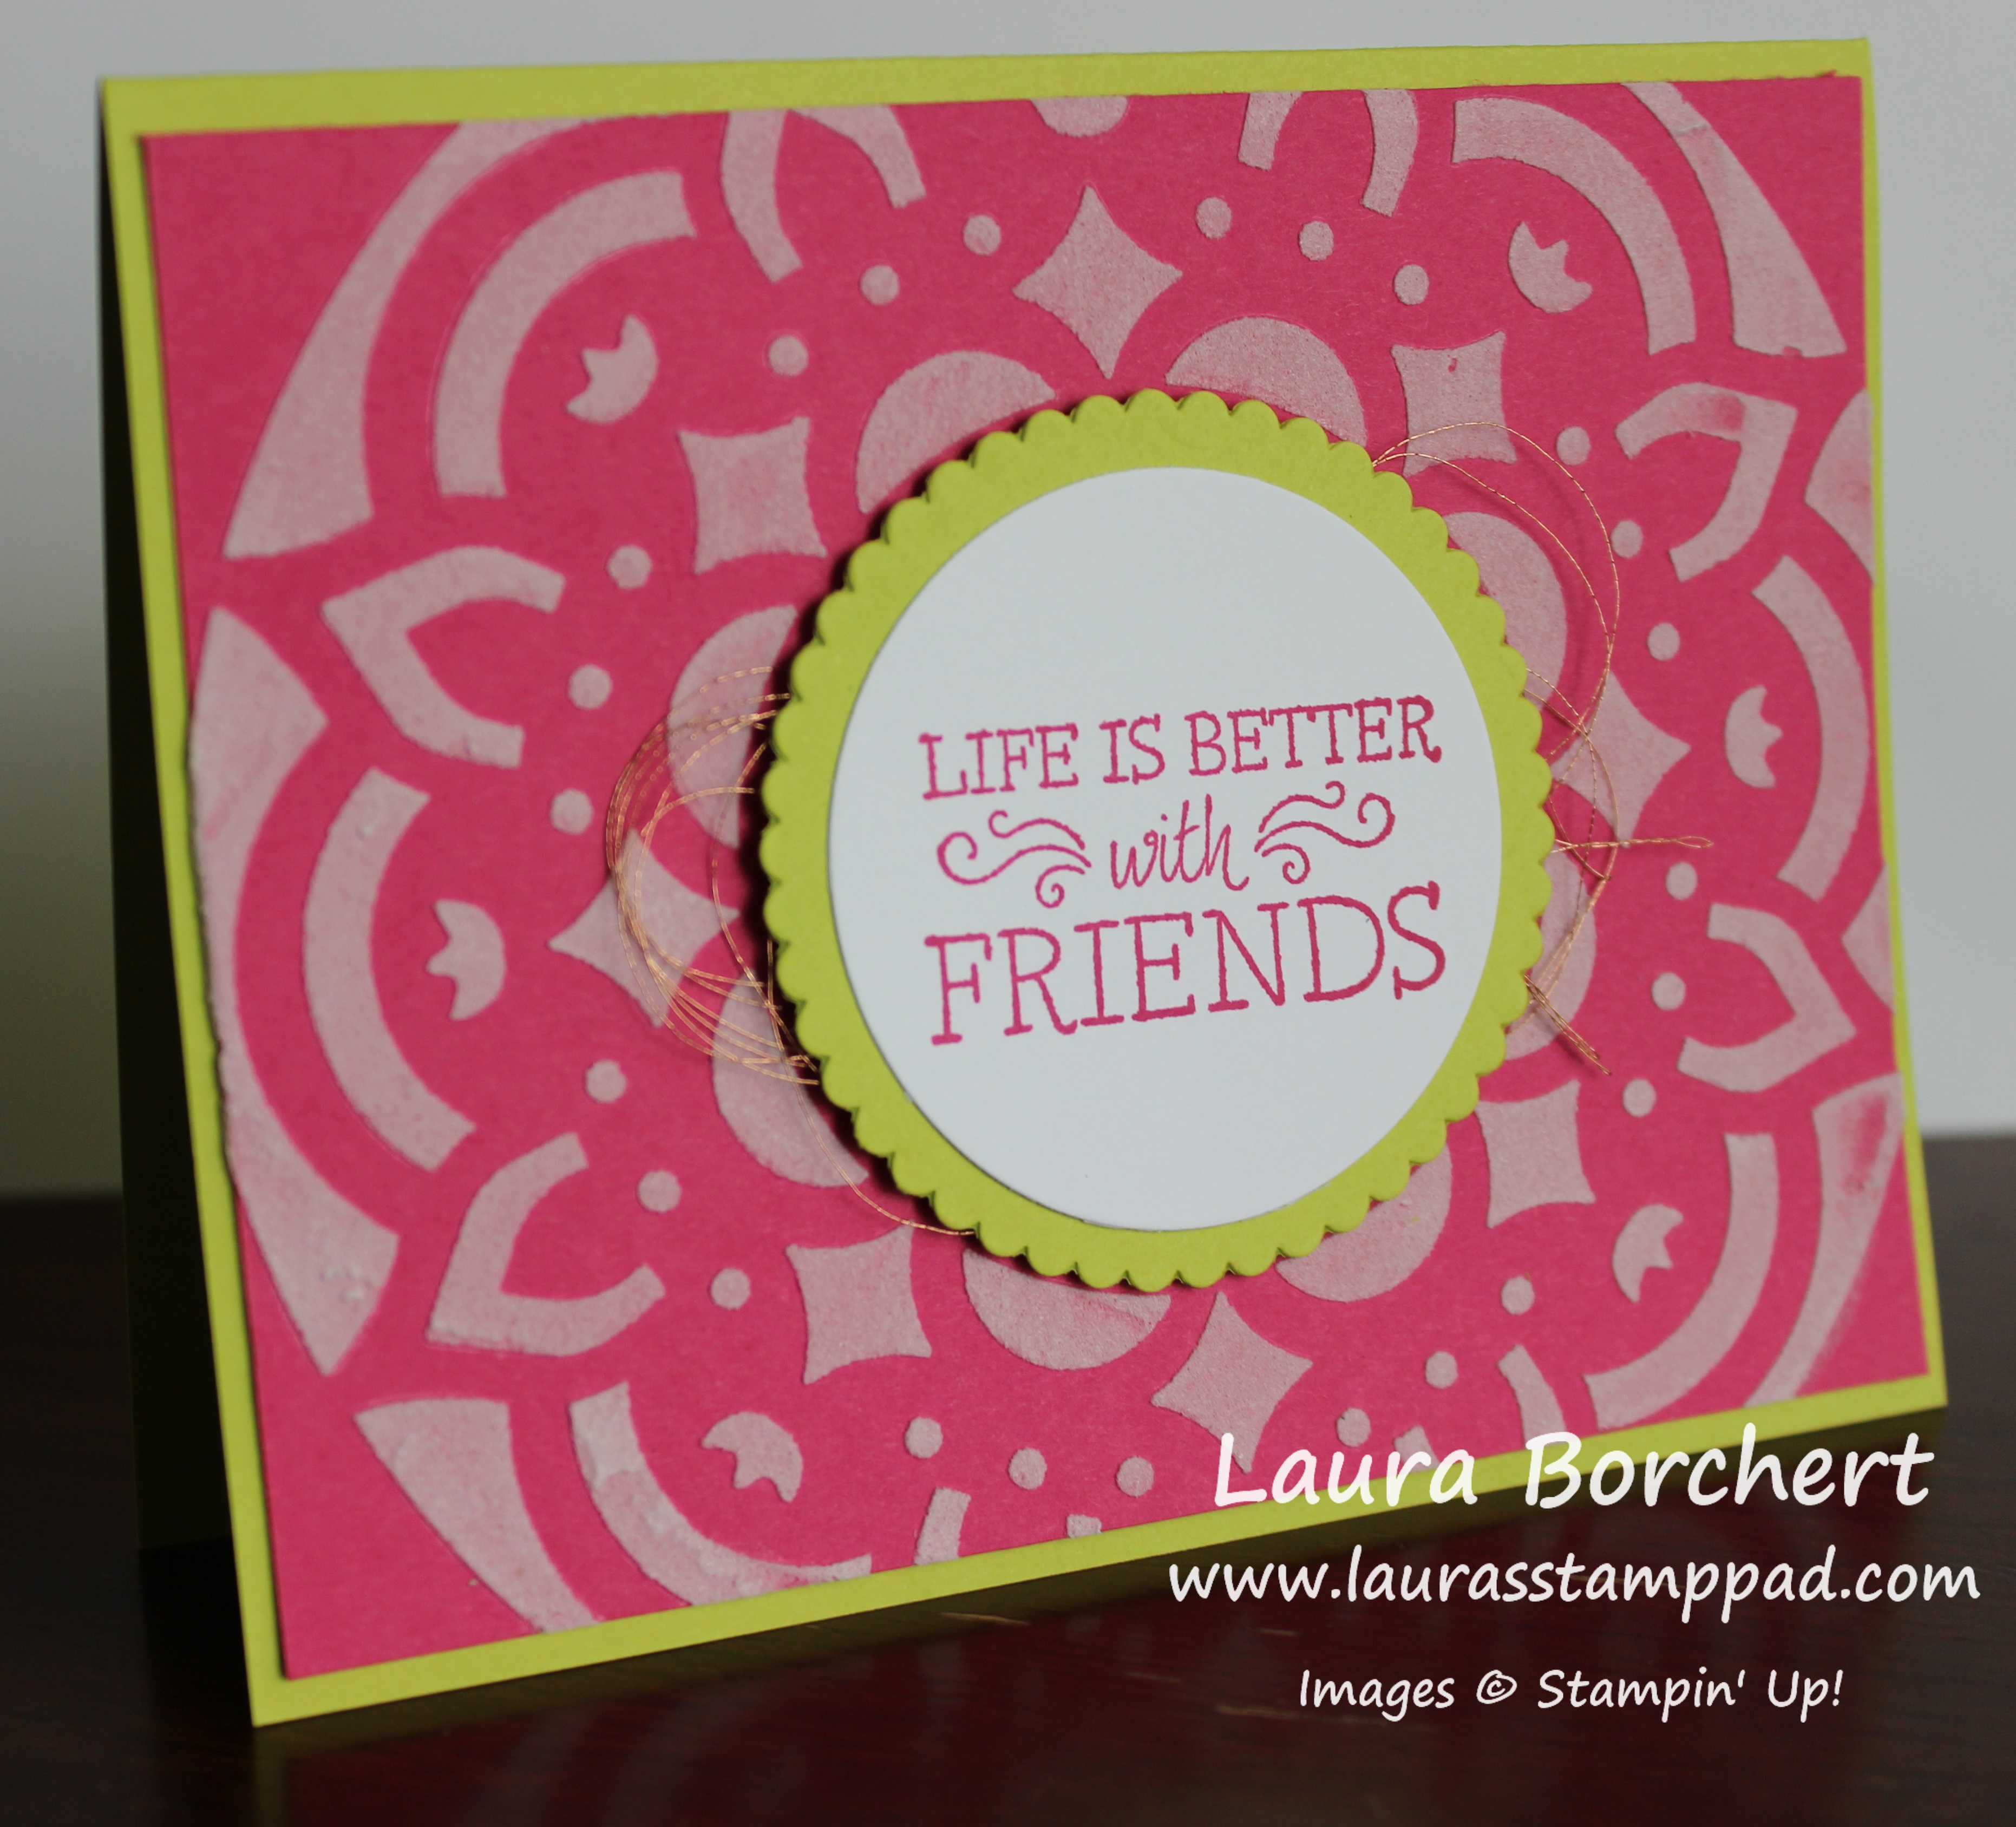
Did you know you can color Embossing Paste??? Here I made Berry Burst Embossing Paste and I love how it looks with Peek-A-Boo Peach!!!

Berry Burst Embossing Paste, www.LaurasStampPad.com

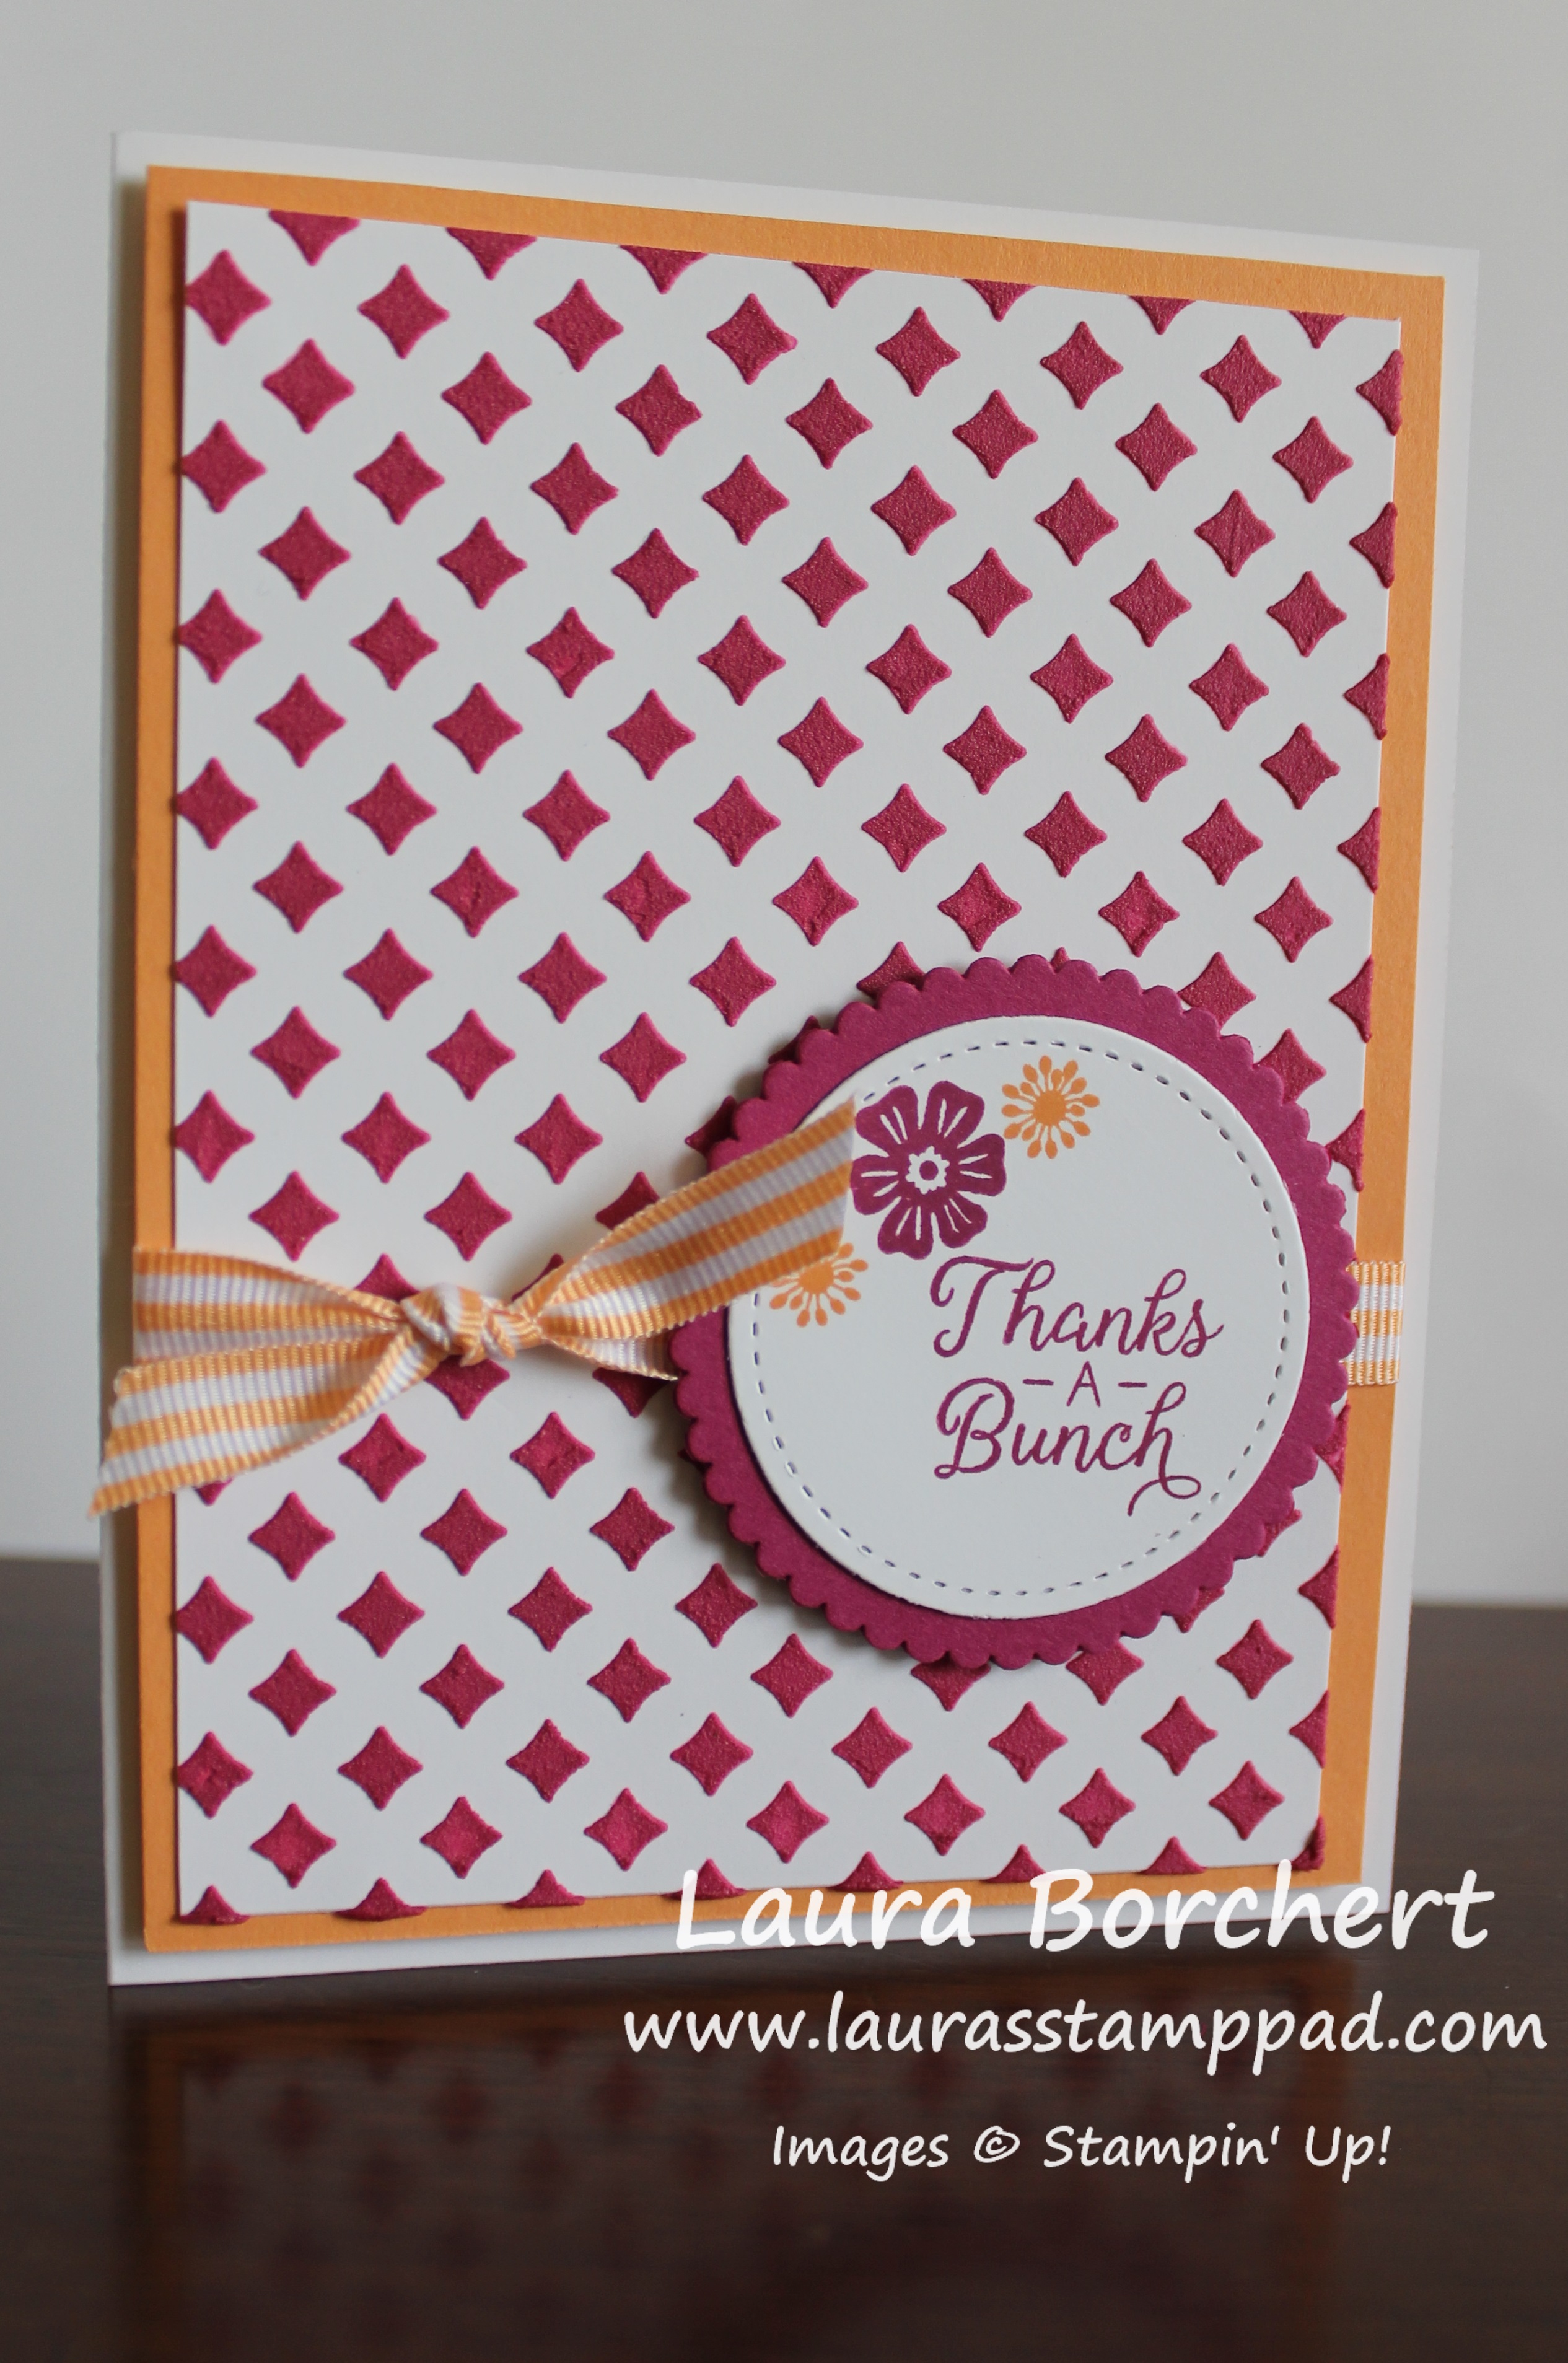
This color combination is super fabulous! You all know I love PINK but with this peach is just stunning!

I started with a Whisper White card base. Next I took another piece of Whisper White (3-3/4″ x 5″) and placed the diamond mask on top. This mask is from the Pattern Party Decorative Masks pack! Using the Silicone Mat, I scooped some Embossing Paste onto it and mixed in a few drops of Berry Burst Ink Refill. Simply fold and smear the paste around with the Palette Knives until you get the desired color. Once the color is perfect, just smear it over the top of the mask, allowing it to fall into the diamond shapes. I did a complete cover for this one but you could also just do a corner or one smear across. It’s all up to you! I set this aside and cleaned up the tools before finishing the card. It’s best to clean up the tools right away as it dries fast.

While the paste was drying, I worked on the greeting. First, I die cut the circles with the Layering Circles Framelits and Stitched Shapes Framelits. Using the Beautiful Bouquet Stamp Set, I stamped the greeting and added a few flowers in Berry Burst and Peek-A-Boo Peach!

Layering Circles with Stitched Shapes, www.LaurasStampPad.com

Now it’s time to assemble. I added the embossed piece to a layer of Peek-A-Boo Peach (4″ x 5-1/4″) and tied some Striped Ribbon around it. I added this layer to the card base with Stampin’ Dimensionals! The greeting was also added with Stampin’ Dimensionals since it goes over ribbon and embossing paste.

I love the simple look, cute greeting, and all that texture! If you want to check out more on the Embossing Paste, check out this Video Tutorial.

Happy Stampin’

~Laura

Need Mittens in Alaska, www.LaurasStampPad.com

Don’t forget you can get the Smitten Mittens Stamp Set for FREE with a $75 order placed before August 31st!!! Click here for more details!


Technique Tuesday – Perfectly Line Up the Poinsettia!!!

Posted on

Happy Tuesday!!! You know that means I have a fabulous technique for you!!! Today, I’m going to show you how to perfectly line up the Poinsettia for die cutting with the Carols of Christmas Bundle! (Stamp Set and Framelits, Bundle and Save 10%)

Perfectly line up the Poinsettia, www.LaurasStampPad.com

I am loving the Tranquil Tide deep green look of this card with that little bit of gold bling! Yet, I still did a Very Vanilla base so you can write on the inside easily with any style of pen!

I started with a Very Vanilla card base and layered on a piece of Tranquil Tide measuring 4″ x  5-1/4″. Next, I took 2 strips of the Eastern Palace Designer Series Paper (1″ x 3-3/4″) and added them to the top and bottom. Now for the greeting, I used a piece of Very Vanilla measuring 3-3/4″ x 3-1/4″. I stamped the greeting and leaves in Tranquil Tide Ink from the Carols of Christmas Stamp Set. For the leaves, I rotated each one around so they looked different for each flower! Next, I added this piece to the card front in the middle!

Deck the Halls Pointsettia, www.LaurasStampPad.com

Now for the poinsettia flowers, it is important to stamp them all in the same direction to make it easier to die cut them. This took me awhile to get it all lined up so here are my tips.

Lining Up the Poinsettia, www.LaurasStampPad.com

First, I lined up the actual stamp with the one on the stamp case. I noticed that the arrow on the stamp was not in the same place as the lined up image. At least it isn’t where I would have lined it up at. So I took a Sharpie Marker and added a dot. Now each time I stamp, I make sure that blue dot is at the top of my paper. When stamping the flowers, be sure to leave a little bit of space between each one. The framelit is rather wide and it will cut into the next one if it is too close. Since there are 2 corner poinsettia framelit, I placed one on the stamp case and lined it up. Then I made 2 little marks with a Sharpie Marker on the top and bottom petal so I knew which one to grab for. This has made it so much easier to use!!!

After stamping the poinsettia in Real Red and die cutting them out, I added them to the corners of the greeting on top of the leaves. I used Mini Stampin’ Dimensionals to give some texture and pop to the card!

If you would like to see this all in action, check out the Video Tutorial below or click here! Be sure to give the video a thumbs up if you liked it and don’t forget to subscribe if you are new. If you would like a notification when I post a new video, be sure to click the bell right next to the subscribe!!! If you would like to see more samples using the Carols of Christmas Bundle (Save 10%), click here and here and stay tuned for more!

Happy Stampin’!

~Laura

Need Mittens in Alaska, www.LaurasStampPad.com

Don’t forget you can get the Smitten Mittens Stamp Set for FREE with a $75 order placed before August 31st!!! Click here for more details!


Make Your Own Designer Paper!!!

Posted on

Happy Monday!!! Today I’m going to show you that you can make your own designer paper just my stamping all over!!! It’s a lot of fun to mix and match the colors! Plus you all know I love FLOWERS!

Make Your Own Designer Paper, www.LaurasStampPad.comThis is one of those quick cards that you can create in now time. It also is perfect for any occasion so you can have fun with it and make a few while you are at it. Perhaps, just leave the greeting portion blank so you can stamp the necessary greeting when you need to!

I started with a Tangerine Tango card base!  Next I took a piece of Whisper White (4″ x 5-1/4″) and die cut the scallops with the Seasonal Layers Thinlits Dies. If you have trouble with the die moving on your before running it through the Big Shot, simply add a little Post It Note (or Post It Note Tape) like I did in the photo below! I die cut multiples and it held up each time without needing to add more!Secure Your Dies, www.LaurasStampPad.com

Now that we have that decorative bottom, it’s time to stamp the top. I used the Beautiful Bouquet Stamp Set for the greeting and flowers. Be sure to leave space for the greeting in the lower right corner. You can stamp it first or at the end….or later if you make a lot ahead of time! For the flowers, I used Tangerine Tango, Berry Burst, Bermuda Bay, Crushed Curry, and Old Olive. Start with the largest flower first so you have plenty of room and then just fill in. Be sure to fall off the edges of the cardstock so it looks like the pattern continues. I tied some Bermuda Bay Mini Chevron Ribbon around at the bottom of the stamped flowers! This gives a nice breaking point for your greeting to stand out. The greeting was stamped in Basic Black and then I added a few Glitter Enamel Dots for texture.

I just love flowers and bright colors! They make me so happy! I hope this card makes you happy as well and you have a wonderful day!

Happy Stampin’

~Laura


Technique Tuesday – Creating Snowy Evergreen Trees!

Posted on

Happy Tuesday!!! You all know that means I have a fabulous technique for you! I’m showing you creating snowy evergreen trees with Embossing Paste! It’s super fabulous!

creating snowy evergreen trees, www.LaurasStampPad.com

This card is so amazing! I just love it!!! The texture and snow on those trees looks so real! Eeee! 🙂

I started with a Whisper White card base. Next, I layered on Real Red (4″x 5-1/4″) and Whisper White (3-3/4″ x 5″). Using the Card Front Builder Thinlits, I die cut the double and the single tree in Garden Green. I added these to the top half of the card and then placed the Wood Textures Designer Series Paper piece over the tree bottoms.

Now for adding snow to the trees. I used 2 of the Palette Knives; one to scoop out some and one to apply it on. Since it dries so quickly, I didn’t want to leave the tub of Embossing Paste open while working. Using the second Palette Knife, I pulled a bit of the paste off and just lightly touched the edges of the tree. Just a few light dabs all over the trees is all you need! It gives that light snowy look. Be sure to tap a little in the middle of the tree so it’s all around and not just on the sides.

Embossing Paste Snow, www.LaurasStampPad.com

For the greeting, I stamped it from the Carols of Christmas Stamp Set in Real Red Ink onto Whisper White. I die cut the greeting with the Layering Squares Framelits as well as the Gold Foil layer. I added the greeting to the card with Stampin’ Dimensionals. To finish off the card, I added a Gold Metallic Enamel Star to the top of the one tree!

Greeting Layer, www.LaurasStampPad.com

I spent a long time trying to figure out how to layer the greeting. Here are some of the ideas I was playing with – Garden Green, Silver Foil, Gold Foil, or Crumb Cake! Which one would you pick? Let me know in the comments below!

If you would like to see this all in action, check out the Video Tutorial below or click here! Be sure to give the video a thumbs up if you liked it and don’t forget to subscribe if you are new. If you would like a notification when I post a new video, be sure to click the bell right next to the subscribe!!! If you would like to see more samples using the Carols of Christmas Bundle (Save 10%), click here and stay tuned!

Happy Stampin’

~Laura


Loving the Petal Garden Suite!!!

Posted on

I am loving the Petal Garden Suite from the moment I saw it in the New Annual Catalog a month ago. The colors are stunning and it has lots of flowers in it!

Petal Garden Suite, www.LaurasStampPad.com

Oh this card is just stunning. I love the color combination and different patterns and that rose! Also, is the greeting not the sweetest ever?!?!?!

I started with a piece of Pool Party as my card base. Next I layered on a piece of Rich Razzleberry (4″ x 5-1/4″) and then Whisper White (3-3/4″ x 5″). Then I punched out various pieces of the Petal Garden Designer Series Paper with the 1-1/2″ Circle Punch. Some of the pieces I punched twice to use one circle with the front of the paper and one with the back. There are so many amazing patterns that it was hard to pick just 5.

I punched one in Whisper White cardstock after stamping the greeting from the Graceful Garden Stamp Set. Stamp first and then punch it out so you can center the image inside the punch for a perfect look! For the scallop circle, I die cut some more of the designer paper with the Layering Circles Framelits. I placed all of the circles down to figure out my spacing. Then picked each one up individually to add adhesive. This way I didn’t mess up my spacing and I had it all even!

I adore you, www.LaurasStampPad.com

Now for that stunning purple rose! I stamped the rose from the Graceful Garden Stamp Set in Rich Razzleberry Ink onto Rich Razzleberry. Next, I fussy cut it out with Paper Snips. I did the same with the leaves in Old Olive. I adhered the two together overlapped and added it to the card with Stampin’ Dimensionals. To finish off the card, I added a few Old Olive Enamel Shapes for some texture and more pops of color.

If you would like to see more on the Petal Garden Suite, check out the Video Tutorial below or click here! Be sure to give the video a thumbs up if you liked it and don’t forget to subscribe if you are new. If you would like a notification when I post a new video, be sure to click the bell right next to the subscribe!!!

Happy Stampin’

~Laura


Nothing More Truly Artistic Than To Love People!!!

Posted on

There is Nothing More Truly Artistic Than To Love People….that’s just a fabulous greeting for a card, especially a homemade one!

Truly Artistic People, www.LaurasStampPad.comI really like this card for all of the layers and texture but also that color combination. Berry Burst is my favorite color right now for sure!!!

I started with a Whisper White card base. Next, I took a piece of Berry Burst (4″ x 5-1/4″) and added some Embossing Paste. I used the Pattern Party Decorative Masks and the Palette Knives to swipe some paste diagonally across. I didn’t fill in each diamond hole, I just swept it across and that’s it. That messy, eclectic look is super cool for any style of card! I set that part aside to dry while I completed the greeting!

Scallop Square Greeting, www.LaurasStampPad.com

For the greeting, I die cut out the squares with the Layering Squares Framelits. The greeting was stamped from the Just Add Text Stamp Set in Berry Burst Ink. Now to assemble, I tied some Soft Sky Classic Weave Ribbon around the Berry Burst and added it to the card front. Next, I added the greeting with some Stampin’ Dimensionals. I like using these for dimension on my project as well as a nice tight grip over the embossing paste. The foam sinks into the embossed image and holds on tight. To finish off the card, I added a few Soft Sky Enamel Shapes.

If you would like to see more samples as well as video tutorials using Embossing Paste, check them out here, here, and here!

Happy Stampin’

~Laura

Want to join my Mailing List and get fabulous offers, card making tips, and more? Be sure to sign up in the upper right corner if you are on a computer or at the very bottom of the page if you are on a mobile device!


Technique Tuesday – Carols of Christmas Bundle!!!

Posted on

Happy Tuesday!!! It’s August and Stampin’ Up pre-released the Carols of Christmas Bundle!!! The holiday mini catalog will come out next month but we get to enjoy this amazing stamp set and coordinating framelit….NOW!

Peace on Earth, www.LaurasStampPad.com

This card is quick and simple and perfect for making multiples this holiday season!

I started with a Whisper White card base which is perfect for writing your message on the inside. Next I took a piece of Fresh Fig cardstock measuring 4″ x  5-1/4″ and stamped all over it with the Carols of Christmas Stamp Set. The corners each have the little fan image stamped in them. Then I used the four dots (pointsettia center) to add a little more decoration to the background. Next, I added this layer to the card front.

Carols of Christmas Bundle, www.LaurasStampPad.com

For the greeting, I used the Stitched Shapes Framelits for the Whisper White square. The greeting was stamped in Fresh Fig Ink and then lines with a fan were stamped in Garden Green. There are 2 images like this – one is straight across to use with the Deck The Halls greeting and the other one has a wave to it. I used the wave one to coordinate with the wave in the greeting. All of these images are in the Carols of Christmas Stamp Set. I layered the greeting onto a piece of Silver Foil Paper die cut with the Layering Squares Framelits.

Next, I took some Silver Metallic Thread and wrapped it around my finger 8-10 times. Then I slid the thread off my fingers and twisted it in the middle to create a figure 8. Set the twist down on the back of the greeting and secure it with a Stampin’ Dimensional. Then I fan out the loops and secure them with more dimensionals. Peel off the backs of the dimensionals and attach it to the card front. To finish off the card, I added a few Silver Enamel Shapes (or you can use Rhinestones).

If you would like to see more on the Carols of Christmas Bundle, check out the Video Tutorial below or click here! Be sure to give the video a thumbs up if you liked it and don’t forget to subscribe if you are new. If you would like a notification when I post a new video, be sure to click the bell right next to the subscribe!!!

Stay tuned as I will be posting more samples and fun with this bundle! 🙂 Click here to purchase your bundle so you can play along and earn Laura’s Loyal Stampers Stickers!

Happy Stampin’

~Laura


Creating a Wooden Crate Full of Daisies!!!

Posted on

This Wooden Crate Full of Daisies is so beautiful! I love bright colored flowers. Also, this card uses up the leftover pieces from making the 3D wooden crate I showed on Tuesday. Check that out here!Wooden Crate Full of Daisies, www.LaurasStampPad.com

Isn’t this card so rustic and fabulous?!?!?! I love the navy and yellow and that gingham ribbon!!!

I started with a Whisper White card base and layered on a piece of Night of Navy (4″ x 5-1/4″). Next I took a piece of Whisper White (3-3/4″ x 5″) and stamped the flowers from the Daisy Delight Stamp Set in Crushed Curry. I stamped the background image stamped off once and then stamped the detailed image in full strength. After I had all of the flowers placed, I added the stems in Old Olive. Some of the flowers have a hidden stem and some have a stem out front. This is all a variation to show a full crate of flowers!

Flat Box Tutorial, www.LaurasStampPad.com

For the crate, I used the Wood Crate Framelits. I die cut out 1 crate piece with all of the top portion of the crate on the Wood Textures Designer Series Paper. That bottom rectangle does not need to be completely on the paper because it will be cut off. This is a great way to use up the rest of the designer paper after die cutting a full crate to use as a 3D box. All of the tabs in the photo above are folded back and adhered. The rectangle above was just an extra piece cut out to fill in the spots that aren’t covered by the tabs. I wanted the crate to look seamless and have the same wood color peaking through the slats rather than the white cardstock I placed it on. Now I have a flat crate for my card!

Daisy In A Crate, www.LaurasStampPad.comNow it is time to assemble the card! I placed the crate over the flower stems and stamped the Farmer’s Market seal on the crate. This stamp is from the Wood Words Stamp Set. Bundle & Save 10% when you purchase the stamp set and crate framelits. Next I added this to the card front on top of the Navy cardstock. I stamped the greeting from Wood Words Stamp Set onto a strip of white. After that, I cut the banner tips and paired it with a Crushed Curry strip. Finally, I added the little bow of Night of Navy Gingham Ribbon with a Mini Glue Dot.

Navy Gingham Ribbon, www.LaurasStampPad.com

If you would like to see this all in action, check out the Video Tutorial below or click here! Be sure to give the video a thumbs up if you liked it and don’t forget to subscribe if you are new. If you would like a notification when I post a new video, be sure to click the bell right next to the subscribe!!!

Happy Stampin’

~Laura


Giant Textured Medallion Using Embossing Paste!!!

Posted on

Check out this giant textured medallion using Embossing Paste that I created!!! I think this would be super cool on a gift bag or something that could really show the entire thing!

Giant Textured Medallion Using Embossing Paste, www.LaurasStampPad.com

I started with a Lemon Lime Twist card base. Then I took a piece of Melon Mambo (4″ x 5-1/4″) and placed it on some Grid Paper. Using the medallion from the Pattern Party Decorative Masks, I placed it on top and smeared the Embossing Paste all over. There are 3 different styles of Palette Knives to use for smearing the paste on your project. I just pick the one available or my favorite one. I haven’t really found that one is better than another. Once you are done applying the paste, be sure to rinse the items so it doesn’t dry on your tools.

While the image is drying, I worked on the greeting. I used the Layering Circles Framelits in Whisper White and Lemon Lime Twist. This color combination is so beautiful and makes me happy! Next, I stamped the greeting from the Just Add Text Stamp Set in Melon Mambo Ink. After layering the circles together, I added some loops of Copper Metallic Thread to the backside. Simply wrap it around your fingers, slide the loops off and twist in the center creating a figure 8. Place this on the back of the greeting and secure with Stampin’ Dimensionals. That twist is what really makes the loops fan out so nicely.

Life Is Better With Friends, www.LaurasStampPad.com

Now to assemble it all together. I added the Melon Mambo medallion piece to the card base. If you find your cardstock curled a lot, be sure to use a strong adhesive like Tear & Tape or Fast Fuse. Next, I added the greeting with the Stampin’ Dimensionals securing the loops! I love it!

If you would like to see more samples and a video using Embossing Paste, click here and here!

Happy Stampin’

~Laura


Technique Tuesday – Wooden Crate of Chocolate!!!

Posted on

Happy Tuesday!!! You all know that means I have a fabulous technique to share and this one is a wooden crate of chocolate!!! YUM!

Wooden Crate of Chocolate, www.LaurasStampPad.com

Aren’t these adorable and super real looking with that Wood Textures Designer Series Paper???

The Wood Textures Designer Series Paper comes in a 6″ x 6″ Stack and both sides of the paper are the same pattern. This is perfect so that the inside of  your box looks the same. I love that! I die cut out 2 of the box dies from the Wood Crate Framelits to create the box. This requires 2 sheets of  the Designer Paper but don’t worry we will be using the leftovers. 🙂 Using some of those leftover pieces, I die cut out the little tag for the treat bag.

Now for assembling the box, I scored on all of the lines and added Tear and Tape to the side and bottom tabs. I prefer Tear and Tape for this because you can apply it to the box in advance. Then reveal it as you need it without having sticky tabs in your way! Another tip for assembling the box is to press it flat to the tab rather that doing it in the air. This will make for a more square/even box and it won’t be off set.

v

For the decorations, I stamped the star from the Wood Words Stamp Set in Night of Navy and Real Red. Using the Wood Crate Framelit, I die cut them out and placed them on either side with Mini Stampin’ Dimensionals. (Bundle & Save 10%) I wanted to make sure the sticky wasn’t peaking through the slats. Now for the chocolate, I placed it into a 3″ x 6″ Gusseted Cellophane Bag and tied it up with some Night of Navy Gingham Ribbon. Next, I stamped the greeting onto the little tag and tied it around with Linen Thread. All of this rustic look is just precious!

Lindors in a Crate, www.LaurasStampPad.com

As you can see, 2 of the Lindor Truffle Chocolates fit perfectly on the bottom of the box. These could be sitting on a table for guests to enjoy or wrapped with as a little treat!

Stay tuned to see how I use the leftover pieces to create a flat crate on a card. I’ll be posting that on Thursday!!!

If you would like to see this all in action, check out the Video Tutorial below or click here! Be sure to give the video a thumbs up if you liked it and don’t forget to subscribe if you are new. If you would like a notification when I post a new video, be sure to click the bell right next to the subscribe!!!

Happy Stampin’

~Laura