Cute Halloween!!!

Posted on

Are you a fan of Halloween??? Do you prefer scary or cute Halloween?? I’m typically not a huge fan of Halloween but Claire is turning me as she loves it. I feel like I have been more drawn to Halloween things this year too. It’s crazy how our crafting changes. I do prefer more of a cute look than scary, gory for sure!

Cute Halloween Stampin' Up Card, www.LaurasStampPad.com

This card is super simple and easy to create because you can use various prints from the Cute Halloween Designer Series Paper to create tons of these cards. Also, it’s so simple and fun that you could make multiples to send to all of your friends and family for a little #happymail!!

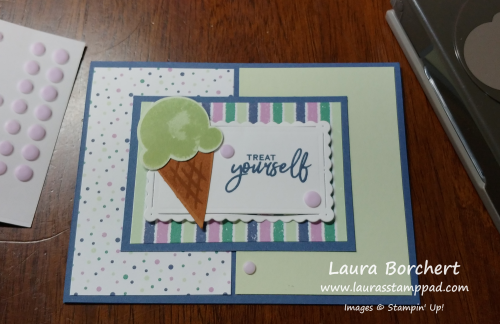
I started with a Basic Black card base. Next, I layered on a piece of Smoky Slate measuring 5″ x 3-3/4″. Then I added 3 strips of the designer paper and those measure 3″ x 1-1/4″. It is super fun to mix and match the different looks.

For the greeting, I used the Frightfully Cute Stamp Set and coordinating dies for the label! I am loving that label because it’s super cute and it has those dot details. I used Pumpkin Pie Ink for the greeting on the front and inside. The greeting on the front is adhered with Stampin’ Dimensionals over a little piece of Highland Heather Grosgrain Ribbon under it. Any little scrap of ribbon that you might have works perfects. Those little leftovers at the end of a spool are perfect for this look!

Frightfully Cute Stampin' Up Bundle, www.LaurasStampPad.com

The inside of the card has a piece of Basic White measuring 4″ x 5-1/4″. I stamped the greeting in Pumpkin Pie and then added a few bats in Memento Black Ink. Don’t forget to add a few bats to the envelope as well!!!

I hope this inspires you to create a little spooky fun for Halloween! Click on the supplies listed below to get started!

Happy Stampin’

~Laura

Product List

Treat Yourself!!!

Posted on

How often do you treat yourself to something wonderful?!?! It might be ice cream or a massage or a nap or maybe a new purse or outfit!!! No matter what it is be sure to do it as often as you can because you deserve it! 🙂

Treat Yourself Stampin' Up!, www.LaurasStampPad.com

I wanted to create a card with the Sale-A-Bration Penguin Playmates Designer Series Paper that wasn’t winter or penguins! Here is what I came up with and I love it!!! This shows you that this paper can be used all year long for any occasion. I think this makes a fabulous birthday card but it would work for a baby card too!

I started with a Misty Moonlight card base and then added on some Penguin Playmates Designer Paper (2-1/2″ x 4″) and Soft Sea Foam cardstock (2-3/4″ x 4″)! If you would like an even split you could always do that but I sort of like the uneven look where the cardstock is bigger than the designer paper. Next, I layered together more Penguin Playmates Designer Paper (2-1/2″ x 3-1/2″) onto Misty Moonlight cardstock (2-3/4″ x 3-3/4″). This layer is added to the card front flat as well because I popped up the focal point with Stampin’ Dimensionals!

Using the Scalloped Contour Dies, I die cut a rectangle in Basic White and stamped the greeting in Misty Moonlight Ink. Then I stamped the ice cream from the Sweet Ice Cream Stamp Set in Soft Sea Foam onto Soft Sea Foam cardstock and punched it out with the coordinating punch! For the cone, I stamped off once with Cinnamon Cider and then onto the cardstock with the triangle. For the waffle cone lines, I went with full strength Cinnamon Cider! I added this to the left of the greeting on the card front and finished it off with some Playing with Patterns Resin Dots!

On the inside of the card, I took a piece of Basic White (4″ x 5-1/4″) and stamped Happy Birthday in Misty Moonlight Ink. Then I took some of the dots and stamped them in Soft Sea Foam. All of the images are from the Sweet Ice Cream Stamp Set! I love it!!! If you would like to recreate this card and don’t have all of the supplies, check them out below. Go on, treat yourself and have fun!!! Don’t forget it’s Sale-A-Bration still too so Stampin’ Up will treat you too!

Happy Stampin’

~Laura

Product List

It’s A Sheep Party!!!

Posted on

It’s a Sheep Party for my Birthday!!!! My birthday was actually this past weekend but I like to celebrate all month long. Today is the last day of my birthday month. Lucky for you Sale-A-Bration continues through the end of September!!!

Sheep Party Stampin' Up Sale-A-Bration, www.LaurasStampPad.com

I really love Z fold Cards because they show off so many layers and fun just like these cute sheep! They are totally having fun! I used the Counting Sheep Stamp Set which is a Sale-A-Bration FREE Item and the coordinating Sheep Dies are ALSO a FREE Sale-A-Bration item! Woot Woot! That means if you spend $100 or 2 orders of $50 during Sale-A-Bration, you can select these!

I started with a Pacific Point card base measuring 11″ x 4-1/4″ and folded it in half at 5-1/2″. Then I took the card front and folded it back in half to create the Z (at 2-3/4″). Next, I stamped one sheep onto a piece of Basic White (4″ x 5-1/4″) in Memento Black Ink and added it to the inside of the card. I also stamped another sheep onto a piece of scrap Basic White and die cut it out. There are 3 sheep to pick from so have fun with it! I colored the legs, ears, and face with Ivory Stampin’ Blends and the hooves with Light Smoky Slate Stampin’ Blends!

Counting Sheep Stampin' Up Stamp Set, www.LaurasStampPad.com

The front panel of the card has a layer of Basic White (2-1/2″ x 4″) and then layer of Granny Apple Green (2-1/4″ x 3-3/4″). Using the grass stamp from the Counting Sheep Stamp Set, I stamped randomly all over in Granny Apple Green! This just adds a little more fun to card! For the greeting, I used the Double Oval Punch and added it to the card with adhesive only on the left hand side so it could hang off a bit.

TIP: The dies come with a balloon and a flag! To reduce die cutting all day long, I die cut both of them at the same time in Real Red scraps. Some of my cards had a flag in the sheep’s hand and other’s had a balloon! Two for the crank of one! 😉 LOL

Check out all the supplies I used below so you can create a Sheep Party card for your next birthday celebration!! Don’t forget that Sale-A-Bration ends September 30th and these freebies are while supplies last!!!

Happy Stampin’

~Laura

Product List

Color & Contour!!!

Posted on

Pink is my favorite color and I just love flowers so this card makes me super happy! The Color & Contour Stamp Set has been on my desk a lot lately. This card could be made in every In Color with the supplies I used!!! Check out the list of items below so you can make some too!

Color & Contour Stampin' Up Stamp Set, www.LaurasStampPad.com

I started with a Basic White thick cardstock base! When I create a card with the base of white or vanilla, I like to use the Thick Cardstock! Next, I took a piece of the In Color Designer Series Paper (4″ x 5-1/4″) and wrapped some Polished Pink Open Weave Ribbon around it. This ribbon comes in all 5 of the in colors! Adding just a small piece across the card front adds a little texture and fun to the card but no need for a bow and only uses a small amount!

For the focal point, I die cut one of the scallop rectangles from the coordinating Scalloped Contour Dies. LOVE THESE!!! The greeting was stamped in Polished Pink and then I added it to the card front!! The flower image was stamped in Memento Black Ink and colored with Stampin’ Blends! Then I die cut it out with the same Scalloped Contour Dies and added it to the label with Mini Stampin’ Dimensionals!

2021-2023 Stampin' Up! In Colors, www.LaurasStampPad.com

For the inside of the card, I added a little leftover strip of the designer paper to the left hand side. Then using the little dots of the Color & Contour Stamp Stamp Set, I stamped them in the right hand corner. To get a little variation of color, I inked it up and stamped 3 times, moving the stamp around a bit.

I love this Color & Contour Bundle so much because it’s super versatile. This card could be created in any color you like too! Check out the supplies listed below to see what I used! If you want them all, click ADD ALL TO CART for quick and simple shopping!

Happy Stampin’

~Laura

Product List

Here For You Now…

Posted on

You all know how much I love flowers, scrolly fonts, and ribbon as my go-to embellishment!!! Check out this card that just screams LAURA!!!! The greeting – Here For You Now And In Better Days Ahead is just amazing too!!!

Here For You Now, www.LaurasStampPad.com

I created this card with the NEW Hand Penned Designer Series Paper measuring 3″ x 3-3/4″ which is a perfect size to use up an entire sheet of 12″ x 12″ Designer Series Paper! BONUS! I layered it onto Misty Moonlight and a Pale Papaya card base! This color combination is just fabulous!!!

The stamp set I used is the Color & Contour Stamp Set which has this fabulous greeting, flower, and those fun little dots that I used in the corner. I thought it added a little extra fun rather than just have solid cardstock! The greeting was stamped on a die cut which is in the Color & Contour Bundle – Scalloped Contour Dies. These are AMAZING!!!! Such fun scallop edged images with so much fun texture and look! MUST HAVE!

Color & Contour Stampin' Up Stamp Set, www.LaurasStampPad.com

On the inside of the card, I stamped a flower and the coordinating greeting. It really pulls the card together I think. You could also stamp the flower onto the envelope too.

Hand Penned Designer Series Paper Stampin' Up, www.LaurasStampPad.com

Here I created 2 more cards using different prints from the same Hand Penned Designer Series Paper Pack. Because the colors were a bit different, I went with Pale Papaya and Pool Party! Which color combination is your favorite – Misty Moonlight or Pool Party??? Let me know in the comment below! I love how you can use different patterns in the same pack for a fabulous card in the same style!

If you would like to recreate this “Here For You Now” card, check out the supplies listed below! You can purchase them individually or click Add All To Cart for quick and easy shopping!!!

Happy Stampin’

~Laura

Product List

Berry Delightful

Posted on

It’s the last week of Sale-A-Bration and today I’m sharing with you a berry sweet card using the Berry Blessings Stamp Set and Berry Delightful Designer Series Paper. This is a $100 Level Sale-A-Bration item and you get both the stamps and paper! Woot Woot!

Berry Delightful Designer Series Paper by Stampin' Up, www.LaurasStampPad.com

The colors for this card are STUNNING! Just Jade and Night of Navy are so perfect together! I got the inspiration for this card from fellow stamper, Angie L!

I started with a Just Jade card base. Next, I used the Wrapped in Texture (oppps this one retired with the Holiday Mini Catalog) Embossing Folder to emboss a piece of Just Jade (3-1/2″ x 4″). I actually used a few different embossing folders for different textured looks and they are all fabulous! Of course, the one I photographed for this post is a retired one! I’m sorry about that! 🙂 #PregnancyBrain

Next, I layered the embossed piece on the upper half of the card front and a piece of the Berry Delightful Designer Series Paper (2″ x 4″) to the lower portion of the card. For the overlap of the 2 papers, I added a little 1/2″ strip of Night of Navy cardstock. This is a great way to use up scraps of cardstock.

Berry Blessings Stampin' Up Stamp Set, www.LaurasStampPad.com

For the focal point, I die cut a Basic White Stitched Oval from the Stitched Shapes Dies. Before popping it out of the die, I ran the large stylus from the Take Your Pick Tool around the edge, just following the metal frame. This gave the oval a bit of pop which you can see in the upper left of the photo above! Just a little added fun and texture! Then using the Berry Blessings Stamp Set, I stamped the blueberries in Just Jade and Pacific Point Ink. I added this to the card front with Stampin’ Dimensionals! Finished off the front with a few Night of Navy Rhinestones from the Holiday Rhinestone Pack!

Sale-A-Bration Berry Collection Stampin' Up, www.LaurasStampPad.com

For the inside of the card, I took a piece of Basic White (4″ x 5-1/4″) and stamped some blueberries near the bottom. For the solid background stamp of blueberries, I stamped off once for that lighter look! Then I took a piece of the Berry Delightful Designer Series Paper and added it to the bottom. This is just the back side to what was used on the front! The greeting was stamped in Night of Navy!

There are still a few more days left of Sale-A-Bration where you can earn the Berry Blessing Bundle (stamps & paper) for FREE with a $100 order! Check out the supplies below if you would like to recreate this card!

Happy Stampin’

~Laura

Product List

Total Perfection!!!

Posted on

I love Birthdays! Everyone has one and it’s the perfect time to celebrate OURSELVES! It’s our day! So do exactly what you want and enjoy it to the fullest. Heck, sometimes I even like to call it my birthday month! It’s not my birthday month but I do have a fabulous birthday card to share with you today! I think it’s total perfection!

Total Perfection, www.LaurasStampPad.com

I just love this birthday greeting from the Sale-A-Bration Approaching Perfection Stamp Set! That set has lots of fun birthday greetings in it AND you can get it for FREE with a $50 order! Woot Woot!

This fun card is a Z fold card. I started with a Bermuda Bay card base. Fold it in half like a normal card and then fold the front panel back in half! It’s as easy as that. Then I added some Flower & Field Sale-A-Bration Designer Series Paper to the front panel. This piece measures 5-3/8″ x 2-1/8″.

Approaching Perfection Sale-A-Bration Stamp Set, www.LaurasStampPad.com

For the greeting, I used the Stitched Rectangle Dies in Whisper White and Bumblebee. When I did the greeting with regular dies, it just didn’t pop. Then I did the stitching and it just POPPED! It’s crazy how such a little texture gives such a big look! The greeting was stamped in Bermuda Bay on the front and inside! Be sure when adding the rectangle greeting to the card front that you only put adhesive on the left hand side otherwise you will seal your card closed! Then I finished it off with a few Black

Z Fold Birthday Card, www.LaurasStampPad.com

If you would like to create this Total Perfection card, check out the supplies below! Remember that you can select the Approaching Perfection Stamp Set and Flower & Field as FREE Sale-A-Bration items for every $50 you spend!

Happy Stampin’

~Laura

Product List

Embossed Designer Paper!!!

Posted on

I feel like this season there is a chance for more mailed Christmas presents than normal. That means sending a fun thank you will be needed, right?!?!? This embossed designer paper card with a super cute seasonal greeting is perfect….and simple!

Embossed Designer Paper, www.LaurasStampPad.com

I started with a Night of Navy card base. Next, I took a piece of the Snowflake Splendor Designer Series Paper (ON SALE) and embossed it with the Winter Snow Embossing Folder. This gives some cool texture and really makes the splatter/cloudy designer paper pop more! Then I layered this onto a piece of Seaside Spray cardstock (4″ x 5-1/4″). Using some Night of Navy ribbon from the Playing With Patterns Ribbon Pack, I tied it around the layered embossed piece. Then I added it to the card front.

Thank You Snow Much, www.LaurasStampPad.com

For the greeting, I die cut out the label from the Painted Labels Dies. The greeting is from the Snowflake Wishes Stamp Set! I stamped the greeting in Night of Navy Ink and then I stamped a few snowflakes around in Seaside Spray. For the snowflakes, I did stamp off once to make sure it was a subtle background look and not overwhelming on the greeting! This was added to the card front with Stampin’ Dimensionals!

On the inside of the card, I added a piece of Whisper White (4″ x 5-1/4″) and stamped a few snowflakes along the right side!!! Don’t forget you can always stamp the envelope as well to really pull it all together!

Check out all of the supplies for this embossed designer paper card below. Want them all, just click ADD ALL TO CART!!! It’s that simple!

REMINDER: Christmas is right around the corner. Let your friends and family know what you want with a Stampin’ Up List! Fill this out and pass it out to anyone who asks! All of my contact information is on there for them to reach out and place an order for you or order online! I have already had fun being an elf this year and helping some with early shopping!

Happy Stampin’

~Laura

Product List

All the Presents!!!

Posted on

It’s December so let the decorating, baking, card sending, and gifting begin!!! NOTE: Stampin’ Up! suggestions orders be placed by December 9th to ensure the delivery will arrive before Christmas. Want to recreate this fun All the Presents card?? Check out the technique below!

I started with a piece of Real Red cardstock for the card base (5-1/2″ x 8-1/2″). Next, I layered on a piece of Heartwarming Hugs Designer Series Paper (4″ x 5-1/4″) on top. Then I took a piece of Real Red Double Stitched Satin Ribbon and wrapped the ends around a scrap piece of Pear Pizzazz. I added this to the center of the card. When I assembled the card, I thought the focal point didn’t pop enough. The ribbon also got lost in the stripes but when I added the Pear Pizzazz it was PERFECT!

Now for the focal point, I die cut a Stitched Nested Label in Whisper White. Then using the Most Wonderful Time Stamp Set, I stamped both the presents and the greeting. For the greeting, I used Mossy Meadow Ink.

For the present which are all connected on one stamp, I inked one of the outside presents in Real Red Ink. Since it’s photopolymer, I was able to see how far in I needed to add ink. Then I inked the other end and middle present in Pear Pizzazz Ink (light green). Finally I inked the present on the end that’s already inked in Pear Pizzazz in Mossy Meadow. Since I went from light green to dark green, I wasn’t that worried about mixing ink colors. Then I stamped it down onto the label. All of the bows were inked in Real Red Ink and stamped down! Check out this video of Laura’s Dose of Stampin’ Therapy for a better look at this technique!

On the inside of the card, I stamped the little tree 3 times after inking it just once in Mossy Meadow Ink. This gives that fun variation in color and looks like there are multiples! The greeting was stamped in Real Red Ink. Both of these images are from the same Most Wonderful Time Medley!

To recreate this All The Presents card, check out the supplies listed below! Need all of them, click Add All To Cart for quick and simple shopping!

Happy Stampin’

~Laura

Product List

Snowy Slopes!!!

Posted on

Have you seen the NEW Curvy Celebrations Suite?? There are 2 stamp sets and dies and paper and they are super fun! Check out this fun card I created with snowy slopes!

Snowy Slopes created with the Curvy Celebrations Suite, www.LaurasStampPad.com

I love the color combination – Sahara Sand and Shaded Spruce! This would make a great Winter card for any occasion! It is so fun and peaceful!

I started with a Sahara Sand card base and added a piece of the Classic Christmas Designer Series Paper (4″ x 5-1/4″). The awesome thing is that there are lots of prints in the pack that work for this piece so there are lots of fabulous looks! Next, I took a piece of Whisper White and die cut the dotted slope. This creates 2 pieces with slopes. Two for one in die cutting is totally my kind of die cutting!

Classic Christmas Designer Series Paper, www.LaurasStampPad.com

Before adding the snowy slopes to the card front, place one down where you would like it to be and then slide it down a smidge. Then I stamped the trees in Shaded Spruce just above that slope. I used it as a guide. Once the trees were stamped, I added the slopes. They can overlap and swag any which way! Then I added this piece to the card front with Stampin’ Dimensionals. You know I can’t have a card without them! I finished off the card with a little green rhinestone from the Holiday Rhinestone Pack!

Curvy Christmas Stamp Set, www.LaurasStampPad.com

For the inside, I used the greenery and greeting from the same Curvy Christmas Stamp Set! This greenery image is amazing and perfect for card insides and envelopes! I love it!

Check out all of the supplies below so you can recreate this snowy slopes card! Don’t forget these products are while supplies last or till the end of the year! Get them before they are gone!

Happy Stampin’

~Laura

Product List