This card has been the favorite in all of my Christmas Card Classes this year! The funny this is……it is not even a Christmas Stamp Set – it’s Lovely As A Tree!!! While I am not a fan of the color brown, I do really like this card and that POP of color with the Cherry Cobbler Seam Binding!
For the card base, I used a piece of Soft Suede measuring 4-1/4″ x 11 and I ran that through the Big Shot with the Decorative Dots Embossing Folder. TIP: You will want to fold your cardstock in half first so that you know where your crease is and won’t put the card in too deep on the folder! If so, you will end up with a few dots on the back of your card. Then you will take a piece of 2-1/2″ x 5-1/2″ Very Vanilla cardstock and stamp the tree towards the top and the greeting towards the bottom; leaving space in between for your ribbon. The tree is from the Lovely As A Tree Stamp Set and the greeting is from the October Promotional Set – Good Greetings. You can always use the Teeny Tiny Wishes Stamp Set or any other favorite greeting of yours. Now you will adhere this to a piece of Crumb Cake measuring 2-3/4″ x 5-1/2″. Once those two pieces are together, you will tie your Cherry Cobbler Seam Binding around them both. I just did a knot but you could always do a bow if you wish. Now you will place this piece onto your card front with Stampin’ Dimensionals! DONE! This is a fairly simple card so you can crank out many of them in a little amount of time!
I hope you enjoyed this sample! Let me know your favorite Holiday Card that uses a non-holiday Stamp Set in the comments below!
I love the simplicity and elegance of this card! Of course, you know me and my love for Embossing Folders and this Filigree Frame one is no different – so elegant and so simple! You could use this Filigree Embossing Folder for weddings, anniversaries, birthdays, babies, and so much more! Just stamp a greeting in the middle and you are done! LOVE IT!
I started this card off with a Real Red card base. For the Whisper White piece, I actually cut it a smidge bigger that usual because I wanted all of the filigree on it so it measures 4-1/8 x 5-3/8″! I ran that through my Big Shot with the Filigree Frame Embossing Folder! I then stamped my greeting from the Bright & Beautiful Stamp Set! You could always pick your favorite greeting! I thought the card needed a little bling so I took the star from the Itty Bitty Punch Pack and punched 2 stars from the Silver Glimmer Paper! I attached those with Mini Glue Dots! DONE! How fabulous is that? You could whip up many of these in no time at all!
Are you making Christmas Cards this year? I would love to see your creation, leave me a photo or description in the comments below!
You will start with a piece of Garden Green cardstock measuring 4-1/4″ x 11″ and score along the 11″ side at 2-3/4″ and 8-1/4″ and fold those in. This created your gate fold card base! Next you will need 2 piece of the Plaid Designer Series Paper from the Trim the Tree Paper Stack measuring 2-1/2″ x 4″. Put some adhesive on the back of one piece of Designer Series Paper and attach one end of your Cherry Cobbler Sheer Linen Ribbon (7″) to the edge (outside edge, centered from top to bottom, see photo above). Now add additional adhesive and place it on the left side panel of your card base. Adhere the right side panel as well. Now you will pull the ribbon around to the front and next to the edge of the inside portion of the panel you will apply 2 strips of Sticky Strip as shown below! Cut the end of the ribbon diagonally or with banner tips!
Now it is time to create the window! Just like on Monday’s sample, you will start with a 3-1/2″ x 3-1/2″ piece of Early Espresso cardstock and run it through the Big Shot with your Woodgrain Texture Embossing Folder! This adds a little texture to your window! Then place four 1″ Square Punched pieces on top to resemble a window! These will be your guide! You can punch your squares out of Post-It notes on the sticky end or just use some scrap paper and add a small dab of Snail Adhesive. Now using your 1″ Square Punch, you will slide the white square in and line up those scrap squares and punch! Now you have your window!
Now to create the curtain you will need some of the Garden Green checked Designer Series Paper from the Trim the Tree Designer Paper Stack. You will need three Large Oval Punches and you will cut one in half! Turn your Window frame over (face down) and apply Snail adhesive to the back side! You will place the two full ovals on the top two windows diagonally with the green check face down and then you will add the halves to the two bottoms. These bottoms ones are only slightly diagonal. Turn over your window and it should like to curtains (see photo above). Now you can pull the Sticky Strip backs off of your card base and center your window to the front of your card. Your window should only be adhered to your card on the left side so that your card can still open!
Now for the planter, you will need a piece of Garden Green cardstock measuring 3/4″ x 3″ and you will cut a diagonal from both ends to give the shape of the planter. Then using your Sponge Dauber, brush the edges of the planter with Early Espresso. Place two Stampin’ Dimensionals on the back of the planter (towards the bottom, so your holly and be tucked under) and place it on your window. You will need 1 wreath for all of the holly in the planter. I used Wild Wasbi, Garden Green, and Cherry Cobbler for my wreath and Cherry Cobbler for the Ribbon! Check out this Video Tutorial to see how to stamp and die-cut your wreath!
Now you will cut the wreath into sections about 1″ or less long. You will want to cut along the leaves so it looks like real holly and leaves. Place 2-3 of your pieces in the planter (left, center, right) with Snail Adhesive. Then take the other 2 pieces and place them in between with Stampin’ Dimenionals to add texture and dimension. Adhere the ribbon to the center of your planter and you are all done!!!
I hope you enjoyed this technique on another way you can use your Wondrous Wreath Stamp Set! Be sure to check back on next week to see more fabulous ideas!
Happy Tuesday!!! That means I have a fabulous technique to share with you!!!! When I get a Stamp Set, I enjoy stamping with it in the obvious ways (click here and here) but I always like to see how I can use it in other ways! In ways that you might not think of right away! In ways that give you so many more options! So today I’m going to show you just that!!!!
Let’s get started! I used a piece of Soft Sky as my card base and added a piece of 4″ x 5-1/4″ Whisper White cardstock after running it through the Big Shot with my Woodgrain Texture Embossing Folder. Next you will take a piece of Whisper White cardstock measuring 3-1/2″ x 3-1/2″ and place four 1″ Square Punched pieces on top to resemble a window! These will be your guide! You can punch your squares out of Post-It notes on the sticky end or just use some scrap paper and add a small dab of Snail Adhesive. Now using your 1″ Square Punch, you will slide the white square in and line up those scrap squares and punch! Now you have your window! Then I took a piece of 3-1/2″ x 3-1/2″ Soft Sky cardstock and stamped the holly berry wreath image all over in Whisper White Ink. This created a snowy look as you gaze out the window! Once that is dry (craft ink takes a bit longer), you will adhere that to you Whisper White window frame with Stampin’ Dimensionals. By using dimensionals, it adds depth to the window and outside! You can adhere your window to the top 3/4 of your card; allowing room on the bottom for your greeting. For the garland, you will need to stamp and die-cut 2 wreaths! I used Wild Wasbi, Garden Green, and Cherry Cobbler for my wreath and Cherry Cobbler for the two Ribbons! Check out this Video Tutorial to see how to stamp and die-cut your wreath!
Now you will cut one of your wreaths in half and adhere it across your window (the across swag). With your other wreath, you will cut it in half but this time you will want to actually cut around the leaves. Since these leaves will be showing you don’t want to just cut across but actually in and around the leaves. Now you can adhere those two pieces to your window as well, pointing the ends of the garland out from the window (see picture above). I used Snail Adhesive for the Ribbons as well. For the greeting, I stamped the Happy Wonderful Christmas on a piece of scrap Whisper White cardstock and punched it out with my X Large Oval Punch! I adhered this to my card with Stampin’ Dimensionals! For the final touch, I cut out a holly berry with a few leaves from the leftover wreath pieces and adhered that next to my greeting!
I hope you enjoyed this technique on another way you can use your Wondrous Wreath Stamp Set! Be sure to check back on Thursday to see another fabulous idea!
I love these little trees in the Festival of Trees Stamp Set and since they are Photopolymer you can see exactly where you are stamping! I decided to share this sample card with you to show off a little bit of my craziness! 😉 I’m a crazy stamper just like all of you! You will see that the little tree with the purple dots is REALLY covered in dots. That is because I stamped the tree and then took my Blackberry Bliss Marker and colored in all of the dots. Then about 3 samples later of playing with this stamp set, I realized “there’s a stamp for that.” NOTE: I used the stamp for that already as little snow dots on a background piece. So I had used the stamp but didn’t realize it was meant for the tree ornaments. (me shaking my head)
Here is a photo of the stamps in the set. There is garland and the ornaments (dots) that you can use to decorate your trees. Of course the dots fit perfectly in the tree on the top left. Stampin’ Up! – 1, Laura – 0
Of course you can color in the dots on the trees with a marker but I will say it was quite tedious! 😉 Now for the card basics, I started with an Old Olive card base and added a 4-1/4″ x 3-1/4″ piece of Blackberry Bliss with Stampin’ Dimensionals. Then I took a piece of 3″ x 4″x Whisper White cardstock and ran it through my Big Shot with the Stripes Embossing Folder. You know how I love to add texture! I stamped the Merry Christmas greeting at the bottom in Blackberry Bliss. This greeting was from the October promotional set – Good Greetings. You could also use the Merry Christmas from Teeny Tiny Wishes or any other favorite set of yours! For the trees, I stamped them in Old Olive on some scrap Whisper White and then punched them out with the coordinating Tree Punch (Bundle & Save)! I attached them to the card with Stampin’ Dimensionals! Adorable!
Happy Tuesday!!!! You know what that means….I have a have technique for you…..or trick/tip for you! So let’s get started on this amazing tip!
So the trick I have for today focuses on the JOY in this card! These small little word Framelits can be difficult to pop out of the die because they are so thin and delicate. Of course there are little holes that you can use to poke through to pop it out but sometimes that leaves little dots on your letters. TIP: Lay a piece of wax paper on top of your Silver Foil Sheet and then the Die on top of that. Run it through the Big Shot and when it comes to popping it out – Easy Peasy! 🙂
Of course you can use this trick for all of your little Framelits and not just the Wonderful Wreath ones! Let me know what you think of this trick and if it worked well for you in the comments below!
Also, I can’t do this post with making sure to say Happy Veterans Day! Thank you so much to all of the men and women who fight for our country!
Need a quick and simple Christmas Card? This is the card for you! It is quick to make and has a major WOW factor with the embossed snowflakes and beautiful color! I started with a Pool Party card base. The Whisper White piece measures 4-3/4″ x 3-1/2″ and then run that through the Big Shot with the Northern Flurry Embossing Folder. Then I brushed the edges of the cardstock with my Sponge Daubers! Love them! The greeting is from the Christmas Bliss Stamp Set and it is stamped in Pool Party as well! See! Quick and Simple! You could crank (literally with your Big Shot) these cards out in no time at all.
I like to watch my favorite movie or show while working my Big Shot! What do you like to do while crafting – watch a movie, chat with others, listen to music or books on tape, or just enjoy the silence? I like each of these at different times! 🙂 Leave me a comment down below with your favorite!
When I look at this card I see a rustic look…..am I the only one? I’m guessing because of the twine? I am not really sure. Leave me a comment down below if you agree or think I’m crazy? 🙂
Either way though I love this card and it is simple to make, especially if you are making lots and lots of them to send out to all of your friends and family! I started with a Whisper White card base and stamped the trees from the Christmas Bliss Stamp Set. It is a Photopolymer Stamp Set so you can see exactly where you are stamping and that really helped with lining up those trees. Then I took a 3″ x 5-1/4″ piece of Cherry Cobbler Cardstock and ran it through my Big Shot with the Stripes Embossing Folder. I adhered that to my card and wrapped the twine around twice before tying it into a knot. The greeting was stamped from the Christmas Bliss Stamp Set as well in Garden Green and I rounded the corners with my Corner Rounder Punch! Of course I couldn’t finish this card without some Stampin’ Dimensionals so I popped the greeting up with a few of those!
Have you started working on your Holiday Cards yet? Be sure to subscribe to my blog on the top right hand side so you don’t miss out on any more fabulous samples using this Stamp Set and others!
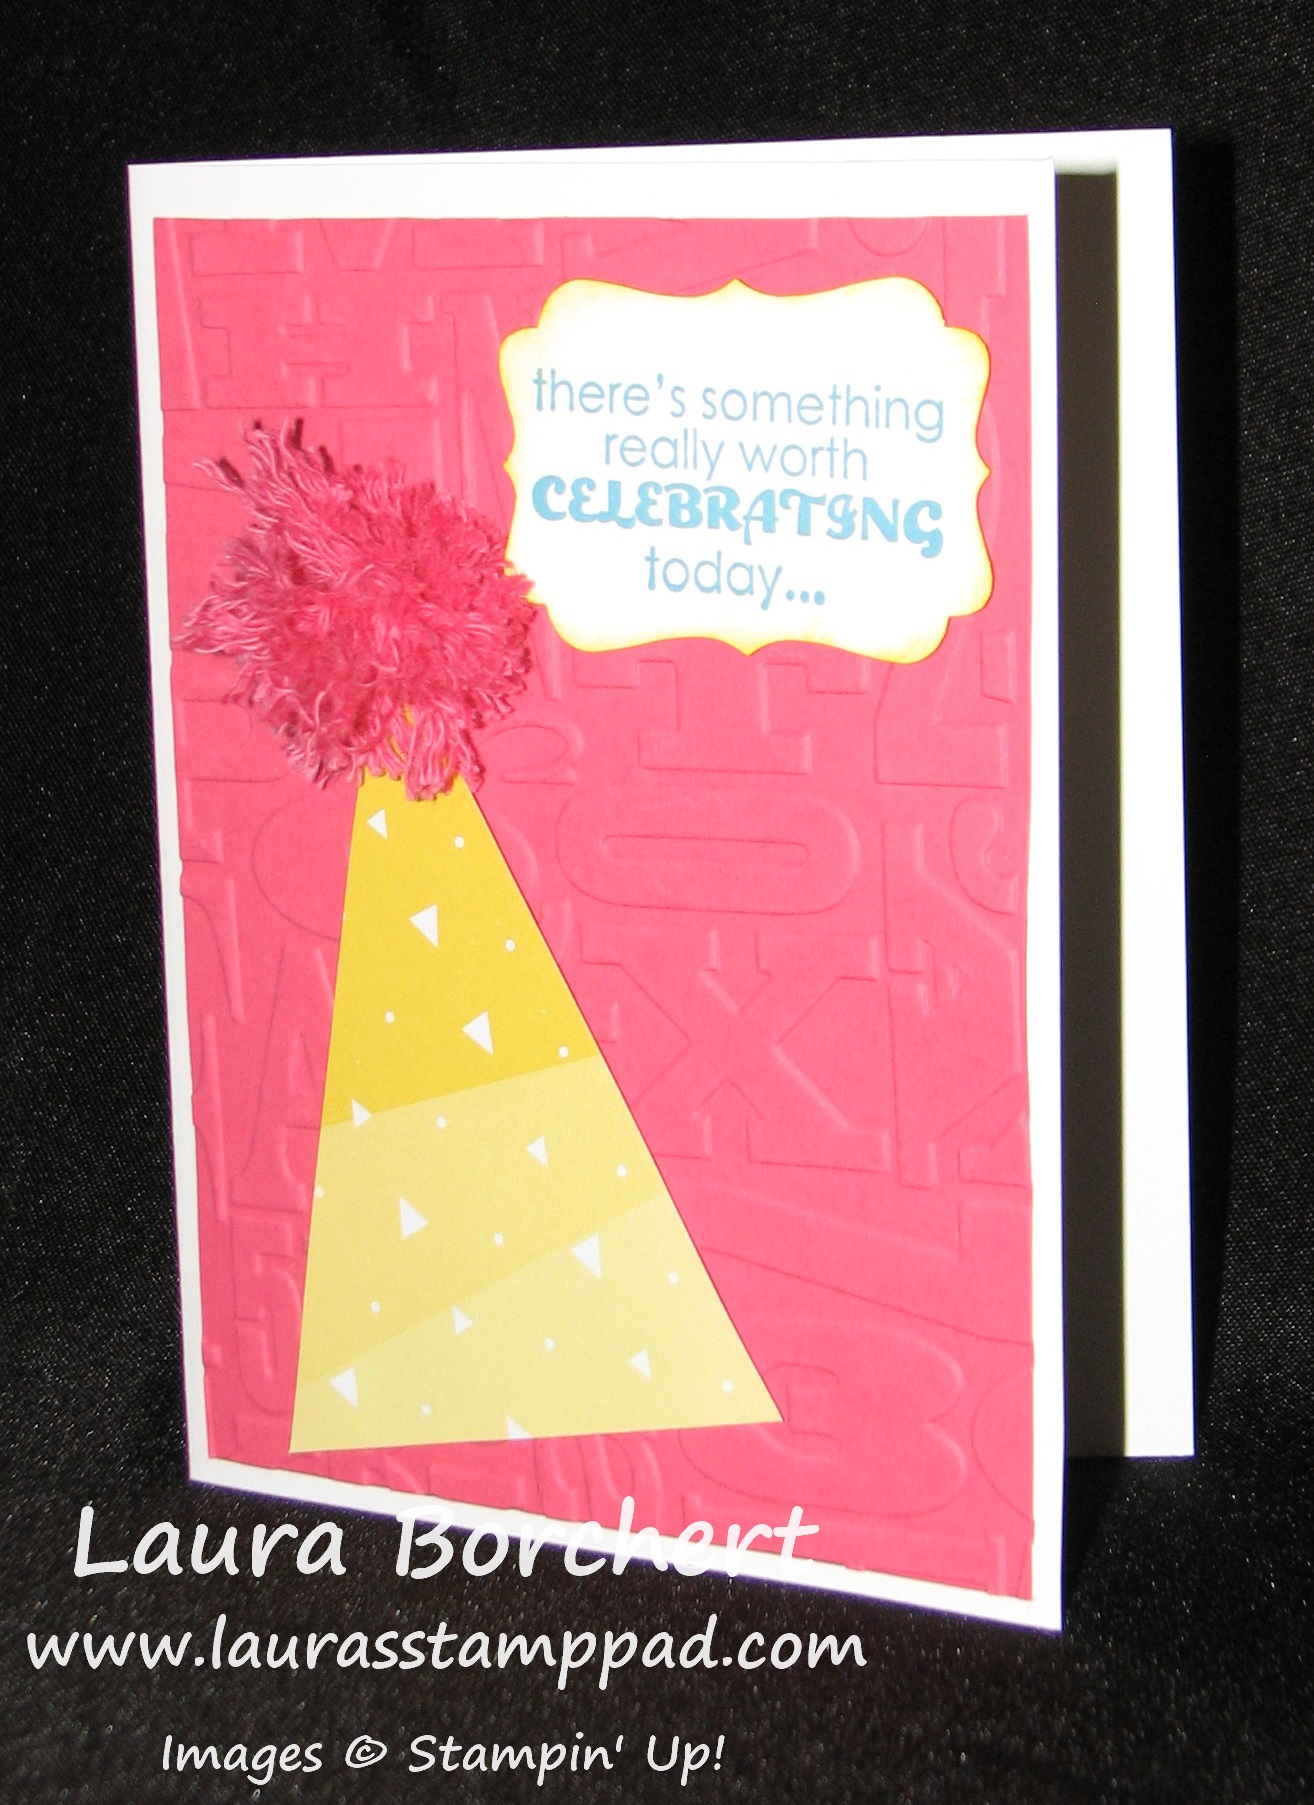
Happy Tuesday!!! That means I have a fabulous technique to share with you and today it is making cut little Pom Poms!!!!
I am loving the Pink little Pom Pom on that party hat!!!! It is just so fluffy!!! And fairly easy to make! Let’s get started!
Supplies Needed: Baker’s Twine (I prefer to use the Thick style), a fork or piece of scrap paper, and a needle
The supply list is short and a little odd but you will see! For this card, I used the Thick Strawberry Slush Baker’s Twine. Since I wanted a smaller pom pom, I just wrapped the twine around the tines of a fork about 10 times. Then you will take another piece of the twine and loop it through the middle tines and tie all of your loops together. Now you can slide the loops off of the fork and cut all of the loops. I do kind of like all of the loops too…super cute! Once you can have cut your loops, you can either stop there or take your needle and run it up each piece of Baker’s Twine to fray the ribbon into lots of smaller strands. This is the part that sometimes can take awhile and make you want to go crazy! Once you think you have done them all, you find another one. 🙂 Fluff all of the pieces and your Pom Pom is complete!!!! I attached the Pom Pom to the Sweet Taffy Designer Series Paper triangle with Stampin’ Dimensionals. I layered the party hat onto a piece of Strawberry Slush that I had run through my Big Shot with the Alphabet Press Embossing Folder! The greeting is from Remembering Your Birthday and I punched it out with my Decorative Label Punch!
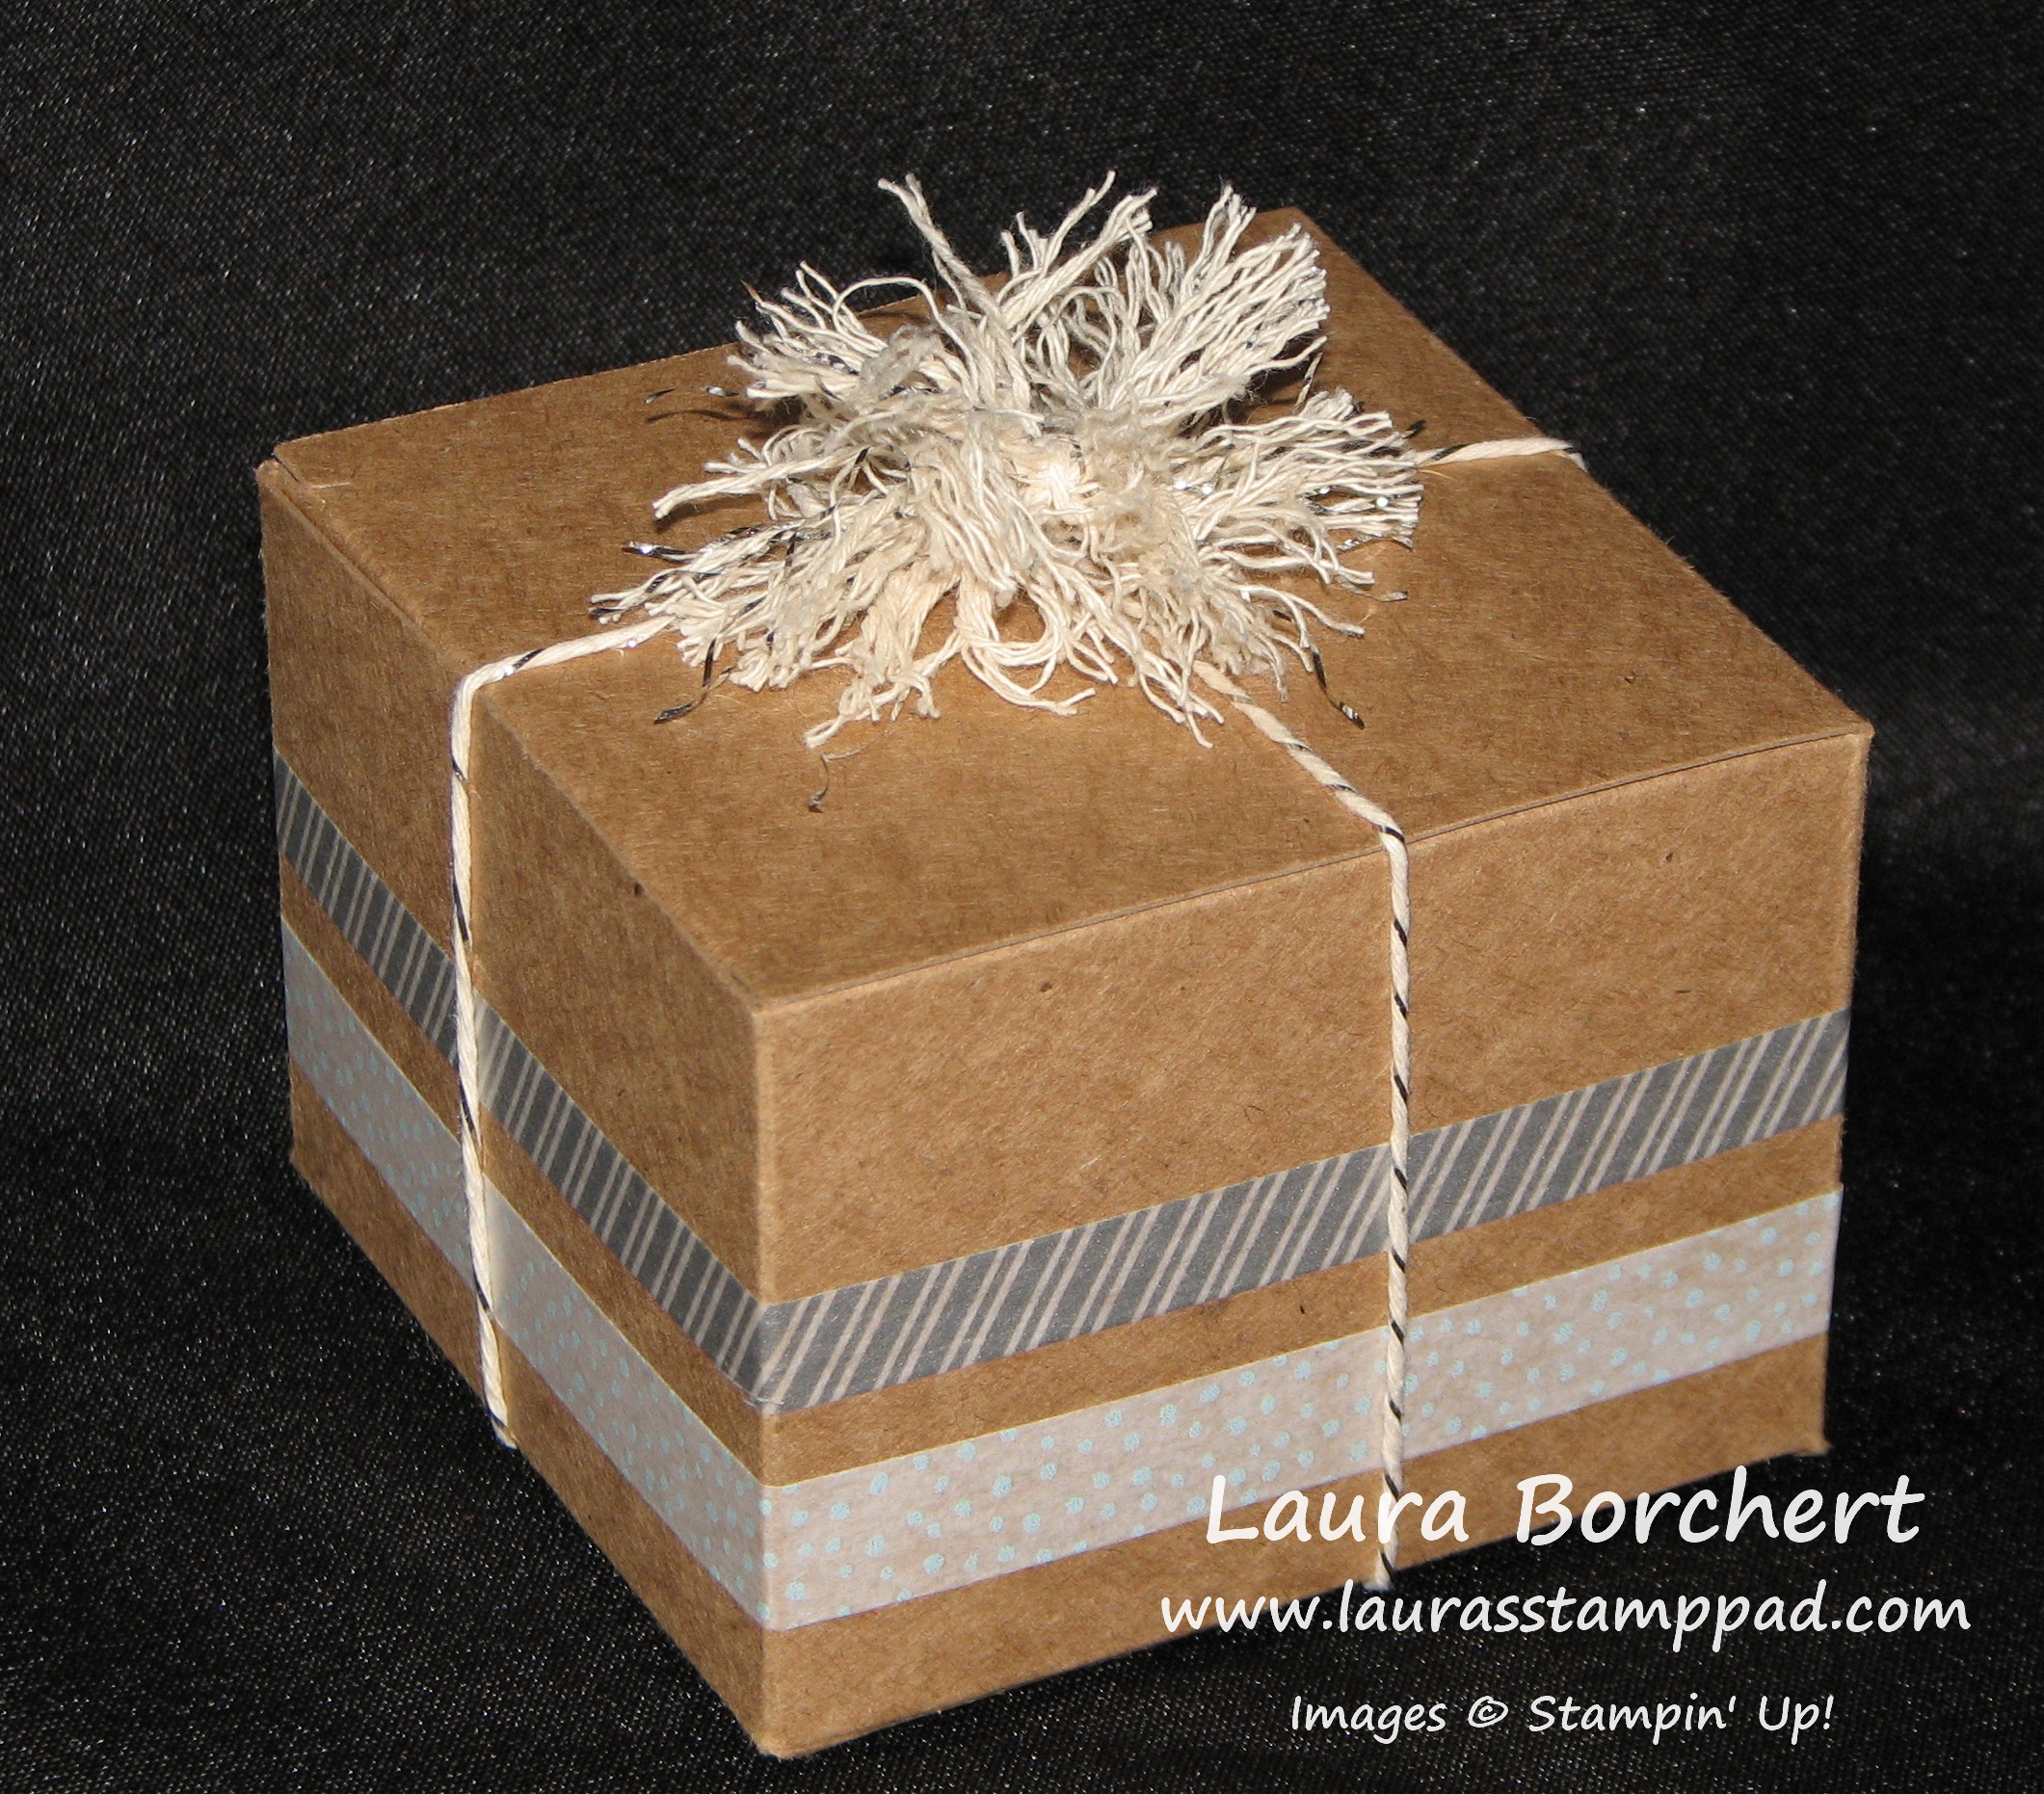
For this adorable gift box, I decorated it with the All Is Calm Designer Washi Tape which is super simple. Then I used the Silver Baker’s Twine for the pom pom. To make this one a little bigger, I wrapped the twine around a piece of scrap paper that was wider than the fork. Again 10 times around, slide it off and tie it in the middle, cut the loops and fray it!
To see this all in action, check out my Video Tutorial!!! Be sure to give the video a thumbs up if you liked it and don’t forget to subscribe so you don’t miss out on any future videos (like the one on Thursday 😉 )
I am really loving these blues and greens for the Holidays this year! Lost Lagoon and Pear Pizzazz are such warming colors and still represent winter (snowflakes and blue, trees and green). I used the Christmas Bliss Photopolymer Stamp Set! I love the images and greetings in this set and it is just $15.95! Love it!!! I used a card base of Very Vanilla and added a piece of Lost Lagoon cardstock (4″ x 5-1/4″) that I had ran through the Big Shot with my Decorative Dots Embossing Folder! For the greeting, I stamped Warmest Wishes in Lost Lagoon and the trees in Pear Pizzazz. I stamped the upper trees and then without re-inking the stamp, moved down and to the right and stamped again! 🙂 Of course, I had to add some color to the edges with my Sponge Daubers and layered this piece onto some Pear Pizzazz cardstock! Simple and Fabulous!
What are your favorite Holiday Colors – Real Red and Garden Green? Lost Lagoon and Soft Sky? Cherry Cobbler and Mossy Meadow? Leave me a comment down below!


