This card is perfect for anyone at anytime! Getting a card like this randomly would be fabulous! (Feel free to send one to me any time! 😉 hehe) I started with a card base of Whisper White and added a piece of Elegant Eggplant (4-1/8″ x 5-3/8″) that I ran through my Big Shot with the Filigree Frame Embossing Folder. I know I know it is actually retired now from the Holiday Mini Catalog but I couldn’t not share this fabulous card AND if you have it, here is another way to use it! Then I took a piece of Whisper White cardstock and die cut it with the Label Collections Framelits and the Big Shot. I stamped the greeting from the One Tag Fits All Stamp Set from the Occasions Mini Catalog in Elegant Eggplant! To finish it off, I added Dazzling Details to the diamond for some bling!
That’s right, there is more fabulous reasons to Sale-A-Brate! Stampin’ Up has introduced 4 NEW items to the Sale-A-Bration list of Freebies for the final month of this promotion! Starting on Sunday, you can earn one of these 4 new items with every $50 order you place!!! WOOT WOOT! You can check them out by clicking here – Sale-A-Bration Extras!
Um…..those letters are FABULOUS! I can’t wait to get the For Being You Stamp Set because I want to color in the Thanks letters. You know I make lots of Birthday and Thank You cards and I love color!!!! Super fabulous especially with Blendabilities and getting an ombre look. Oh listen to me having a little crafty dream! 🙂 The accessory pack is fabulous because I love these In-Colors. I’l admit I’m not a button fan but I am a ribbon fan so I’m sold. I’ll just do a give-away for the buttons later!
You had me at Flowers and Butterflies! LOVE IT! Also, note that the Sheer Perfection Stack is Vellum. That means it is that sort of see-through, sort of flimsy printed paper. Does that make sense? The fun thing is you can layer it on colors and allow it to pop through OR you can color the images with your Blendabilities! Fabulous!!!! I can’t wait to start earning these on Sunday!
Of course what is a Friday with out the Weekly Deals!!!! I hope you all have a fabulous weekend! We have another Winter Storm coming out way….boo! Looks like lots of staying home, cuddling and keeping warm, and hopefully crafting because if not I’ll be baking and I don’t need any more sweets! 🙂
I’m so excited to say this! I love when I complete another year in my scrapbook because then I know that those memories are documented. Of course, I’m sure I missed some things here and there but I know that looking through the album so many amazing memories coming flooding back. That is what I love about it! Plus I’m an organizational freak so I like knowing it is all in one place, put together and complete! I did my 2014 Album in My Digital Studio just like last year! You can see some more samples here, here and here!
Many of my pages are fairly simple with a solid or patterned background paper, lots of pictures which are sometimes layered on a color and sometimes not, some journaling and maybe a few other images. I am all about the pictures (all about the pictures…..anyone else singing that song?) and that is what is most important to me. While I enjoy seeing a page with one large picture and lots of embellishments, that isn’t my style. I can take 200 pictures in one hour of an event and I find it hard enough already to narrow it down to 20 or less for my pages. I love My Digital Studio (MDS) for the journaling. I’m still not a huge fan but I say (type) SO much more in these albums then I ever did in my other albums. I would run out of space or misspell something and get frustrated and I don’t like my hand-writing. With MDS, I have spell check, different fonts, I can backspace and delete and it is so much easier!
Documenting my family history has become very important to me as all of my grandparents are now angels watching over me rather than here telling me stories and giving me hugs! I have a big family and I find it really interesting to see how we are all connected because many times my parents will say, “oh they are related to you” and I never understand the connection. With photos and timelines and stories, I have made some of those connections and I love it! Family is so important to me and I love these pages now and I’m sure I will even more with every year that passes. I added some ribbon and some of the embellishments to these pages!
I have to document Date Night! After all, they say date nights don’t happen very often after children. No we aren’t pregnant yet but we hope to have children in the future! 🙂 I love the Baroque Motifs Stamp Set which is now retired but still available as a Digital Download! Woot Woot! I love how I POPPED my two favorite photos by backing them differently!
The most amazing night – Garth Brooks Concert with my family! My parents took us to the Garth Brooks Concert for Christmas this year. It was an amazing concert. It was fun to go with my family. The songs and moment were breathtaking. I used two photos that I took as the background for my pages. I LOVE IT! If you have been to a concert and seen everyone with their phones (or lighters), you know how amazing it looks and here I was able to show that off in my album!
Are you working on documenting your memories?? A Wedding, A Baby, A Vacation, Every Year? What is the hardest part for you – picking a layout, journaling (like me), or just finding the time? Leave me a comment down below!
Would you like to organize your photos and document those memories but don’t have the time, energy, or creativity? I have the perfect solution for you – Project Life! It is super simple because all you have to do is drop the photo in, drop in a decorative card and maybe write a few words! Interested in learning more, leave me a comment down below! I’m working on adding an event to calendar and I want to make sure to invite you!
…Flowers and the Work of Art Stamp Set!!! You can actually add in bright colors to all of that as well!!!! Love love love it!!!!
This card just has so many fabulous parts to it! I started with a card base of Pear Pizzazz. Then I took a piece of Whisper White cardstock measuring 4″ x 5-1/4″ and stamped the zig zag image from the Work of Art Stamp Set on the bottom using my markers to color it in (Bermuda Bay, Crushed Curry, and Calypso Coral)! Then for the flowers, I stamped them from the Flower Shop Stamp Set in Memento Black Ink on some scrap Whisper White cardstock and colored them with my Blendabilities. I used the lightest color to come in the entire flower and then took either the Medium or Dark marker to color the lines in the flowers! You can use which ever you prefer based on how dark you want it. I like dark bold colors!!! 🙂 Then I punched the flowers out with the coordinating Pansy Punch! I added some leaves which were punched in Pear Pizzazz with the Bird Builder Punch. The blue flower is flat on the card and the other two are adhered with Stampin’ Dimensionals! I finished it off with the greeting stamped from the Work of Art Stamp Set and some pearls on the flowers! I love it because of the amazing colors, springy feel, flowers, pearls and some of my favorite stamp sets!
If you would like to see more samples using the Work of Art Stamp Set, click here! To see some samples using the Flower Shop Stamp Set and Blendabilities, click here and here!
Happy Tuesday!!!! You know what that means…..I have a fabulous technique to share with you today! Today, I’m going to show you how to get the most out of your Designer Series Paper (DSP). After all when it is this gorgeous, you can bear to think some might go to waste. Have no fear, I’m here to cheer you on to USE that Designer Series Paper and use it ALL!
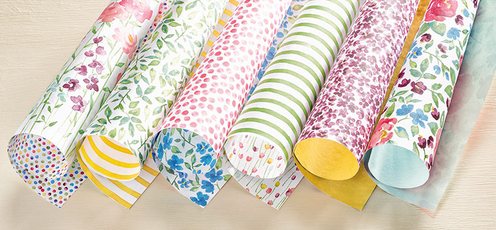
This is the Painted Blooms Designer Series Paper from the Occasions Mini Catalog! It is so amazing and beautiful….of course I would say that being a flower fanatic and all but still it is just fabulous! Well thanks to a fellow stamper friend of mine – Patty Bennett who showed off the perfect way to create 6 cards using the sheet of paper on the far left which is a field of flowers. Even Stampin’ Up didn’t want to cut this paper up and so they framed it!!!
So lets see how to create 8 cards with this one sheet of Painted Blooms Designer Series Paper!!!! First you will start with the top of the Designer Series Paper and measure 5-1/4″ down and cut all the way across. Then to the same again….measure from the cut line you just did 5-1/4″ down and cut all the way across. You will be left with a strip of flower stems that measures 1-1/2 inches wide. Now taking those two pieces that are 12″ x 5-1/4″, you will cut along the 12″ side at 4″. This will create 6 pieces measuring 4″ x 5-1/4″. With that bottom strip that is 1-1/2″, cut that along the 12″ side at 5-1/2 creating two pieces that measure 5-1/2″ x 1/1/2″. Those are your 8 pieces and you are only giving up that little corner piece but you could always find a use for that as well. Now you can adhere your Designer Series Paper to the card base color of your choice. I used Blackberry Bliss, Rose Red, Pool Party, & Whisper White!
As you can see in the photo, the piece of paper was all used up! After you adhere the Designer Series Paper to your card base, you can decorate and embellish as you wish! I used the Million & One Stamp Set, Label Love Stamp Set and Lots of Thanks Stamp Set for my greetings. I used the Butterfly Thinlits on a few of them and thought that no greeting was necessary! I love how they turned out! Just beautiful!
To see these cards in action and maybe understand the cutting a little bit better, I created a Video Tutorial for you! Be sure to give it a thumbs up if you enjoy it!
Don’t worry if you use up all of your Painted Blooms Designer Series Paper….I know where you can get more! 🙂 Want to see other ways to get lots of cards out of one sheet of Designer Series Paper? Check out this post!
Simple and Beautiful! Notice I did not say quick…hehe! It could be quick if you are fast at coloring! This card is very simple though as I just took a half sheet of Whisper White cardstock, folded it in half and stamped various flowers from the Blooming with Hope Hostess Stamp Set with my Memento Ink Pad! Then I got started coloring with my Blendabilities! I will say it now….I am NOT an Artist. That was my Grandfather who could paint with any tool and he was amazing!!! This is the latest painting that I have gotten and plan on having it framed! 🙂
I don’t think I have the patience for being an artist like this but I do enjoy stamping and coloring with my Blendabilities. I really love using stamp sets that make shading on the image super easy. Take a look at the flowers in the card above and you will see those extra lines….I use those lines as my guide. I usually color in the flower with the lightest Blendabilities Marker and then go back with either the Medium or Dark Marker and color around the edges and in those extra lines on the image. Works for me! If you want to see more on how to use your Blendabilities, you can check out this video that Stampin’ Up created! If you want to see some more samples using Blendabilities, check out this one and this one!
Do you enjoy coloring? Do you prefer to color with stamped images like this one or do your own shading? Leave me a comment down below. Also, if you have any tips or tricks, I would love to hear them!!!
Happy Friday!!! Just wanted to pop in to say that you are lovely and amazing!!!! 🙂 Actually that is the name of the NEW Photopolymer Stamp Set but you are still lovely and amazing! Check out this fabulous set!
I love the little envelope. Isn’t it cute? Also, the font on these greetings is beautiful! I love a good scrolly font and the greetings are perfect for so many different types of cards. “Love You More Than Chocolate” is perfect for a friend or family member who you REALLY love! “Lovely Amazing You” is just so fabulous as well. I love it! And “You Make My Heart Happy” well now that greeting would be great for lots of cards and I’m sure the recipient of that card will have a happy heart as well!
Of course what is a Friday without the Weekly Deals as well!!! Here you go!!!
Daffodil Delight & Pumpkin Pie Cotton Ribbon ….anything to brighten up the stamp room and make me think of SPRING…especially after this week. I love the Mosaic Punch and you can see some samples here and here! Of course, I love the Pansy Punch because it is a flower. I use it rather often and you can see some samples here,here and here! Don’t forget that the What’s Up Punch coordinates with the You Brighten My Day Sale-A-Bration Stamp Set that you can earn for FREE! Love it!
I hope you have a fabulous weekend! Keep warm and stay safe out there!
I chose the title of the post today because of the project that I’m sharing! I’m using the Irresistibly Yours Designer Series Paper from Sale-A-Bration which was brought to life with a little ink and a sponge dauber. I added a Butterfly that was die cut from the Butterfly Thinlits that is found in the Occasions Mini Catalog! Butterflies always make me think of new beginnings and hope! So that is why I thought this title was fitting! Now here is the amazing card that I created!
Just Beautiful! I love it!!!! I used a little piece of the Irresistibly Yours Designer Series Paper that I had leftover from another project. I used my Sponge Dauber to add Mossy Meadow Ink to it. Then I layered it on some Mossy Meadow Cardstock and placed it on the left hand side of my card front. I stamped the greeting from the Petite Pairs Stamp Set in Tangelo Twist! Also, I brushed the edges of my Butterfly with the Tangelo Twist Sponge Dauber! I love that butterfly and the amazing look of this card!
To be honest…..I think I like this blue one better! Something about it just draws me in so much more. This one I did with Lost Lagoon and I brushed the edges of the Butterfly in Lost Lagoon with my Sponge Daubers as well. Both of these cards are just amazing and fairly simple to create! Be sure to check out my Video Tutorial on the Butterfly Thinlits here and you can check out the other sample that I created in the video by clicking here! I hope you enjoyed these ways to use your Butterfly Thinlits!
This card LIGHTS UP MY LIFE! I love the bright colors! I love the bling with Glimmer Paper and Rhinestones! I love the greeting! This is sure to brighten anyone’s day! I started with a card base of Coastal Cabana and layered a piece of Strawberry Slush measuring 3-3/4″ x 5″! I used my Top Note Die and Big Shot to cut out the Whisper White piece. Using the lights from the One Tag Fits All Stamp Set, I inked JUST the lights in Memento Ink and stamped them in the corners. The easiest way to do this is to turn over your stamp and ink it up with the ink pad. You can see where you are inking better. TIP: Then to be safe, place a post-it note or scrap piece of paper over the words before stamping. I do this just in case it is still a little dirty because I don’t want that light image coming through on my project and if some ink got on there while inking up the lights! Come on, I’m not the only one that has made this mistake, am I? Well it won’t happen to all of you because of the tip I gave you! 🙂 I colored in the lights with my Blendabilities – Coastal Cabana, Calypso Coral, and Melon Mambo! I added a Rhinestone to one of the lights! Now for the tag and greeting! I stamped the greeting in Memento onto a scrap piece of Whisper White and punched it out with the Large Oval Punch! I layered this onto a piece of Strawberry Slush punched out with the Scallop Oval Punch! I stamped the Tag image from the One Tag Fits All Stamp Set onto a piece of Whisper White cardstock and colored it with my Blendabilities – Coastal Cabana, Calypso Coral, and Melon Mambo! I fussy cut the tag because I wanted the full image and if you use the Note Tag Punch, it is slightly smaller! I attached the tag to my card with Stampin’ Dimensionals. I added a small strip of Silver Glimmer Paper…use up those scraps! 🙂 Then I used Stampin’ Dimensionals to add the oval greeting as well! LOVE IT!!! You can see this card and others using this stamp set in my Video Tutorial here!
What color combination brightens your day? Let me know in the comments below!
Happy Tuesday all! I hope you all had a wonderful weekend celebrating Valentine’s Day, Mardi Gras or just a nice weekend relaxing!!! Now it is time to get out those crafty supplies and create this amazing rainbow card because today is Technique Tuesday!!!
LOVE THIS! I think I like the stars better than the scallop but either way these cards are AMAZING!!!! Now let’s get started!
SUPPLIES NEEDED: Irresistibly Yours Designer Series Paper, Sponge Daubers, Ink Pads, Paper Towel, Greeting Stamp
You will start with a piece of Irresistibly Yours Designer Series Paper (Sale-A-Bration) measuring 4″ x 5-1/4″. Get out your ink pads and Sponge Daubers. I used Bermuda Bay, Tempting Turquoise, Mossy Meadow, Daffodil Delight, Pumpkin Pie, Melon Mambo, and Elegant Eggplant. Starting on one corner start with your Bermuda and go diagonal. Just add enough color for the look you want and you don’t need to go really wide. Take your next color and overlap it a little with the previous color so they blend together really well. I was able to use each color twice but as you can see in the two samples above, some colors are wider and my angles are different. That is okay!!!! Love it! Once you are all done adding your rainbow colors, you will take the paper towel to wipe off access ink that is sitting on top of those embossed images. You will really start to see your white embossed image POP right now! Now you can layer this onto your card front. I used Whisper White Cardstock. For my greetings, I used the Label Love Stamp Set and coordinating Artisan Label Punch (Bundle & Save!). The card on the left I used Pumpkin Pie Ink and for the card on the right, I used my markers in the same colors as the rainbow to color the stamp! LOVE IT!
If you would like to see this in action, check out my Video Tutorial! Be sure to give it a Thumbs Up if you liked it! 🙂 Also, if you would like to see more samples using the Irresistibly Yours Designer Series Paper, check those out here, here and here!