Fabulous Friday!!!

Posted on

Happy Friday!!!! I have some Fabulous Deals to share with you today!!!!

Weekly Deals, www.LaurasStampPad.com

Loving the deals this week! Although I just bought 2 packs of the Indigo Baker’s Twine for some wedding invites I was making and now it goes on sale. Ugh….but that stuff is amazing and the cheapest ribbon ($0.0038 per inch)! I love using it to tie other ribbons like this or to wrap around the card like this or create an amazing lollipop like this! So many amazing ways to use this ribbon and it is my go-to for balloons too. As for my second favorite item….I think it is tie between the Punch Pack and the Secret Garden Framelits. You know me and my love for flowers! 🙂 Here and here are a few samples with the Punch Pack!!! These punches are perfect to decorate the center of flowers, add as a little background pop, and eyes for a little Punch Art piece with the circle!!! Here is an amazing project with the Secret Garden Framelits! I hope you enjoyed these samples using some fabulous products that are on sale!!!! Double Bonus!

Happy Stampin’ and have a Wonderful Weekend!!!

~Laura


Wedding Programs!!!

Posted on

As you all know, I LOVE weddings and have started working with Brides to create fabulous custom pieces to make their day even more special! I have been doing lots of wedding lately but I am waiting to post them till after the wedding! Well today I am sharing with you some Wedding Programs that I recently did for an amazing couple!!!

Wedding Programs, www.LaurasStampPad.comOkay, so first of all I love the colors – Melon Mambo and Night of Navy!!!! (Melon Mambo was one of my wedding colors 🙂 ) These were very basic but super fabulous! I did some in Melon Mambo and some in Night of Navy which was super cute because then they were able to enjoy both colors! Also, these are perfectly personalized with the “R” monogram! These programs were double sided – one side was the order of events and the other side was the wedding party and family members!  I loved making these and when the Bride came to pick them up, she was so excited and bursting with happiness! I’m so happy I was able to add this special touch to make her wedding day even better! If you are getting married or planning a party and need help with the invitations, programs, thank you notes, party favors and so much more, reach out to me! I’m happy to help you! You can check out more samples that I have created here and here!


Easter is Coming!!!

Posted on

Embossing Foil, www.LaurasStampPad.comI know Easter is still a few weeks away but now is the time to start making your cards and gift projects! Here is a quick and simple Easter Card but you could always change out the greeting and this card would be perfect for any occasion! I used the Summer Picnic Designer Series Paper which has perfect Spring colors! I love it! Then I stamped a flower from the Mixed Bunch Stamp Set and punched it out with the coordinating Blossom Punch! I stamped one flower in Wisteria Wonder and then another one in Pear Pizzazz. After punching them out, I cut off two petals from the Pear Pizzazz flower and attached it to the back of the Wisteria Wonder flower to make it look like leaves! I added a little Candy Dot in the middle of the flower for a little POP! Also, have you noticed the shiny foil in the background? That’s right, I embossed some of the Silver Foil with the Argyle Embossing Folder! It gives a little shine, texture, and dimension. Perfect!!! For more samples with Foil, click here and here! I hope this gives your some inspiration for your Spring or Easter projects!

Happy Stampin’

~Laura


Technique Tuesday – Treat Boxes with the Tag Topper Punch

Posted on

Happy Tuesday!!! You know what that means – I have a fabulous technique to share with you today!!! I love using products in more ways than the obvious use. The Tag Topper Punch is for making fabulous tags or bookmarks like these!!! But now I can fabulous little treat boxes too!!!

Tag Topper Punch Treat Box, www.LaurasStampPad.com

Isn’t it cute??? And the best part is it was super simple (and quick) to make and we all know that you always need more than one treat box when you are making them!!!!

Supplies Need: Cardstock, Tag Topper Punch (Scallop or Angled), Sticky Strip, and any kind of decoration (Stamps, Designer Series Paper, Ribbon, etc)

For my little box (which holds about 8 Hershey Kisses), I started with a piece of cardstock measuring 2″ x 6-1/2″. Then you will score that piece long ways at 2-3/4″ from each end (that will leave an inch between the two score lines). Then you will punch both ends with your Tag Topper Punch and fold on the score lines. Then you will need two 1-1/2″ squares which you will score on two opposite sides 1/4″ in. (Score lines are marked in pen for you to see!)

Tag Topper Punch Box Template, www.LaurasStampPad.com

Now you will add Sticky Strip (best hold for boxes) to the scored tabs on your 1-1/2″ Squares! You will then attach those to the ends of your box!!! Now your box is complete and you can decorate and add goodies! I decorated mine with the Kaleidoscope Designer Series Paper belly band and stamped my greeting from the Label Love Stamp Set in Crushed Curry and punched it out with the Artisan Label Punch!!! Then I added a little bit of Whisper White Taffeta Ribbon on the top to hold the kisses in!!!

Tag Topper Treat Box, www.LaurasStampPad.com

You can make your boxes as big or small (long) as you need but they will always be 2″ wide in order to fit into the punch. With this one I made it with only 1/2″ long to fit the little Hershey Bars (fits 2 perfectly). I also didn’t put sides on this one and instead let my belly band be the sides and what holds it together! So many fun little boxes you can create with this punch!!! I hope you try it out and let me know what you think in the comments below! I love hearing from you all!!!

Happy Punchin’

~Laura


Scallop Tag Topper Punch!!!

Posted on

The NEW Tag Topper Punches that are in the Occasions Mini Catalog are super cute and fun to use! There is the Scallop Tag Topper Punch and then Angled Tag Topper Punch!!! Here are a few samples using them to make tags….the obvious use! Check back tomorrow to see some super cool ways to use these AMAZING punches!

Tag Topper Bookmark, www.LaurasStampPad.com

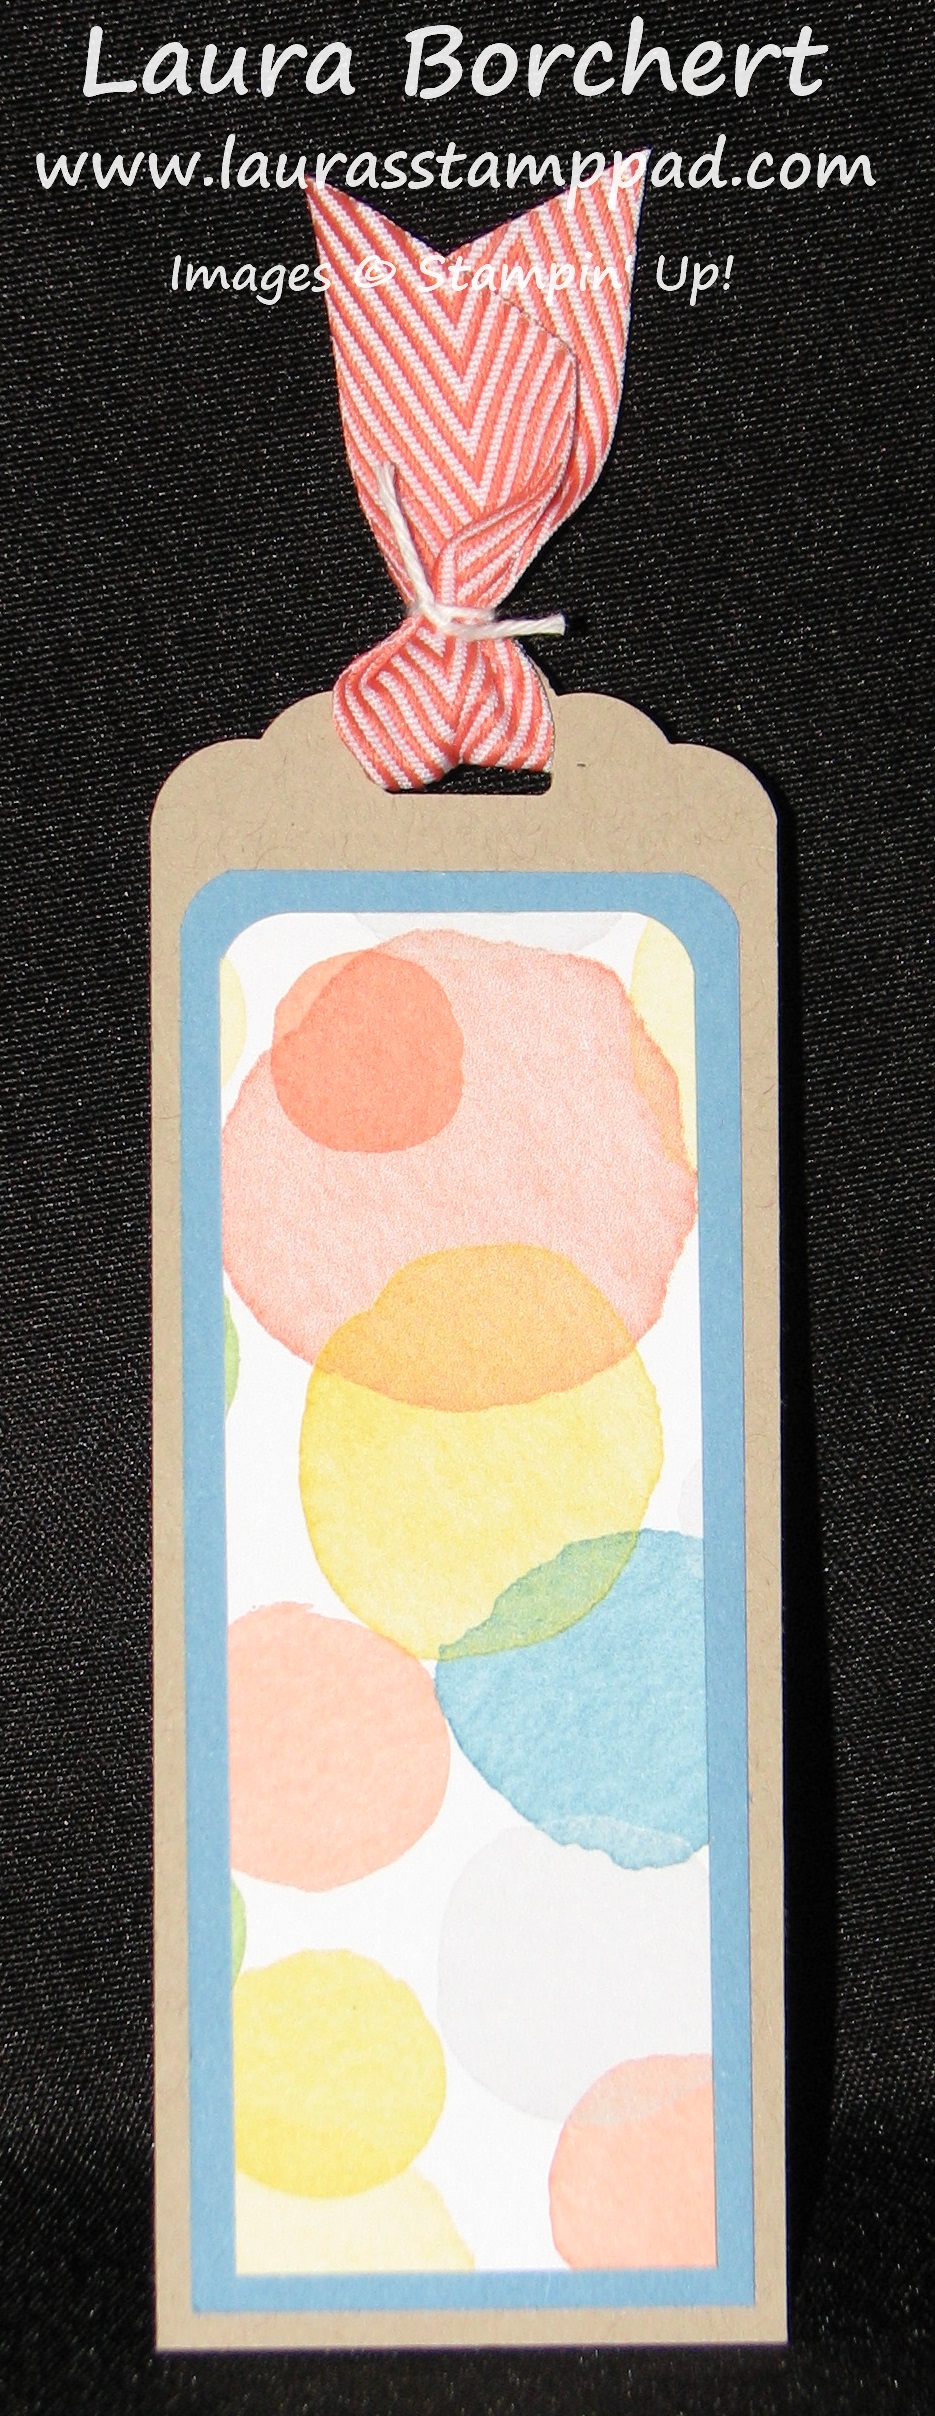
Look how cute and simple this bookmark is! All you need is a 2″ wide piece of cardstock (it can be as long as you wish) and punch the top and decorate! I used the Corner Rounder Punch for my layers so it would match the rounded corners of the tag. I added some of my favorite Designer Series Paper – Watercolor Wonder!!!! (LOVE!) For the Ribbon top, I used some Calypso Coral Chevron Ribbon and rather than making a knot, I just took some Baker’s Twine and tied the ends! Super cute and knot (hehe) as bulky! This is super simple that you could make tons of them for Teacher Gifts, Bible Study Groups, as a gift with a Cookbook or together with a child or group of children!

Flower Tag Topper Punch, www.LaurasStampPad.com

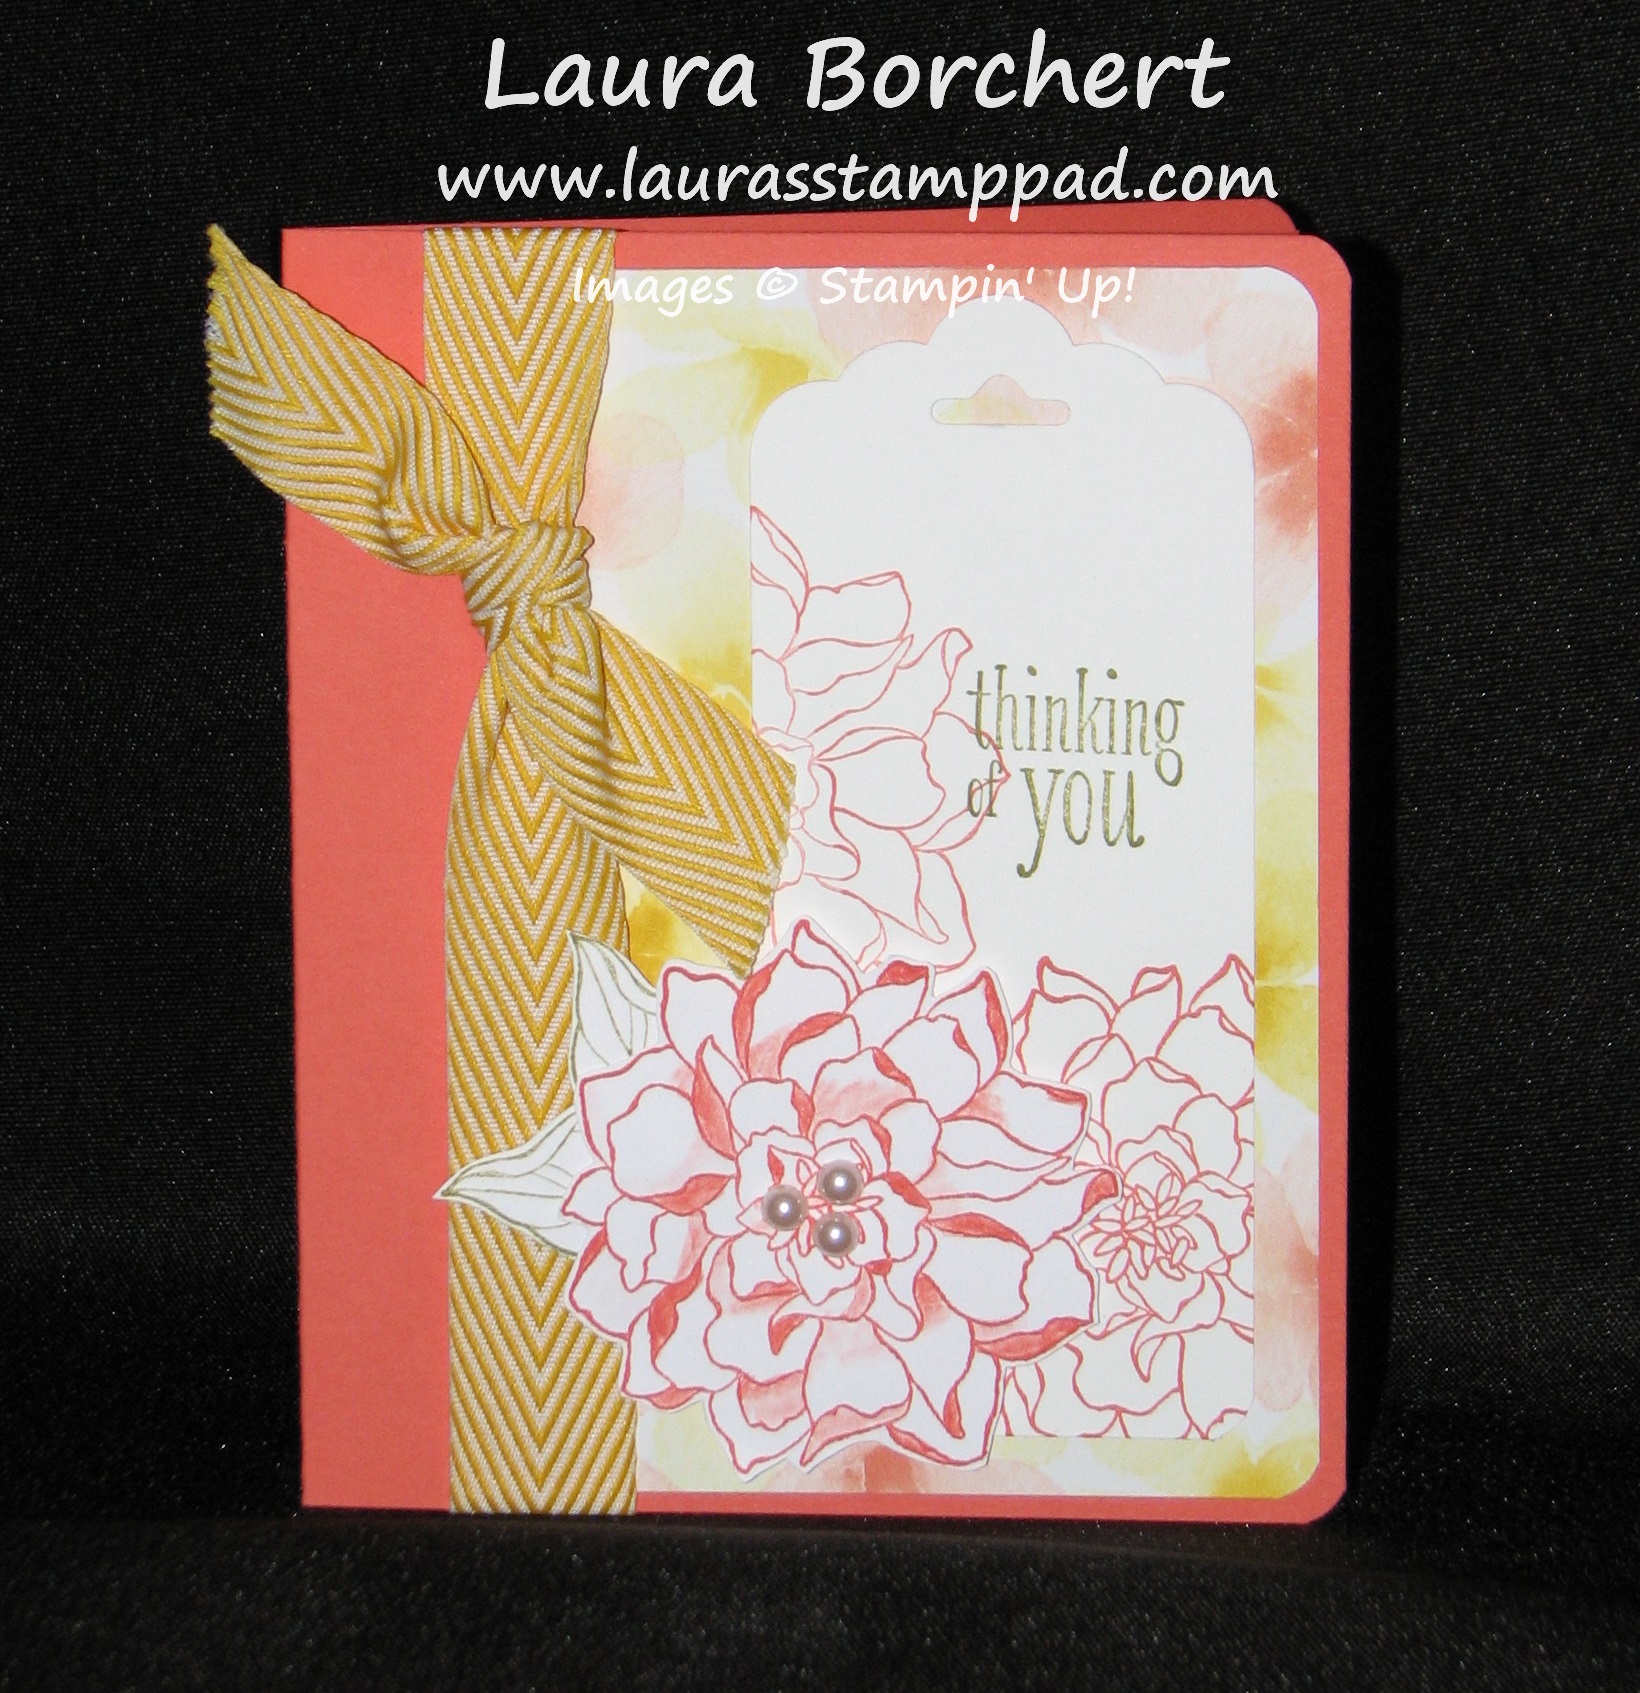
Here is another fabulous project – this card has a stamped tag on the the front. I used more Watercolor Wonder DSP and my Peaceful Petals Stamp Set! I stamped the image in Calypso Coral and then added a little color on some petals with my Blender Pens. I cut out one of the flowers, added some leaves, and used Stampin’ Dimensionals to make it pop out!!! Love love love the colors of this one! Be sure to check back tomorrow for another fabulous way to use this punch! And remember this adorable card using this punch? I LOVE when one punch can do so many different things! It really gives you more bang for you buck!!!

Happy Stampin’

~Laura


Fabulous Friday!!!

Posted on

It is FINALLY FRIDAY! And not just Friday for me but it is the weekend of Spring Into Stamping which is an amazing event where lots of demonstrators gather to chat, share ideas, learn new techniques and so much more!!!! I’m soooooo excited for this weekend! Let me know if you are interested in becoming a demonstrator so you can join in all the fun!!!

Weekly Deals, www.LaurasStampPad.com

Here are the Weekly Deals for this week!!! There are lots of my favorites on the list this week. I’m not sure which one is my favorite but I have used about a million rolls of the Natural Trim Ribbon. I have used it a lot on some of my wedding projects because it has that rustic look to it! You can check out some of the samples here and here!

Mixed Bunch Note Cards, www.LaurasStampPad.com

And now I LOVE this Blue Denim Jean Ribbon. How amazing are these little cards? I need to whip up some thank you cards real quick the other day and I had the Mixed Bunch Stamp Set out. I grabbed some Notecards, stamped a little and added the ribbon. I love the summer look that these cards have and they took me about 5 minutes to create 8 of them! Now that is fabulous!!! Quick and Simple!!!

Of course I love flowers so the Fancy Flower Punch and Fun Flowers Bigz Die are up there on my list of favorites as well. Here is a sample using the die!!! You can also check out samples using the lace tape here!

I hope you enjoyed the samples and ideas for these fabulous products that are on sale! As always, they are only on sale till Monday night and then on Tuesday a whole new set of items comes out!!! Happy Stampin’ and Shoppin’!

Have a fabulous weekend! I can’t wait to share all the fabulous ideas with you starting next week!!! Eeee So excited!

~Laura


My Paper Pumpkin!!!

Posted on

Have you heard about My Paper Pumpkin? It is this fabulous box of goodies that comes right to your door with everything you need (except scissors and sometimes adhesive) to make AMAZING crafty projects! Sometimes it is cards, sometimes home decor, sometimes mini albums, and sometimes it is gift packing! When you first sign-up, your first box comes with a clear block for you to use with all future kits and then each monthly kit comes with ink, stamps, and all the supplies you need! How fabulous is that? And it is just $19.95 – FREE SHIPPING!

March Paper Pumpkin, www.LaurasStampPad.com

Here is the amazing kit from March! It took about 30 minutes for me to put these cards all together. As you can see the kit came with 8 pre-printed cards, 8 envelopes with gold foil liners, gold glimmer dots (self-adhesive), wooden greetings, glue dots, 2 border stamps, and 2 ink pads (Island Indigo & Calypso Coral)! I used a few other colors just to mix it up (Crushed Curry, Real Red, and Melon Mambo). Some of the cards I used the gold dots and others I did not. I didn’t stamp at all on one of them and I placed the greeting and stamped images in random spots each time! And then I went all out on one of them and stamped the border image on the wooden greeting. How cool is that? Here is another photo of some of the cards up close!

March Paper Pumpkin, www.LaurasStampPad.com

I hope you enjoyed these and if you would like to try out My Paper Pumpkin, click here!!!! Be sure to sign up before April 10th to get the April Kit. If you sign up after the 10th, you will get the May kit! You can order multiple kits any month and you can also put in a “zero” any month you may be out of town or too busy! Super simple to sign up and create! Get your kit today!

Happy Stampin’

~Laura


Ronald McDonald House Love!

Posted on

Ronald McDonald House, www.LaurasStampPad.comStampin’ Up has been giving to the Ronald McDonald House for many many years now. Each year they pick a Stamp Set that for every purchase of that set, they donate $3.00. This year it is the Tag It Stamp Set and I love love love that set! You can check out some samples using it here and here! I decided I wanted to join in! I have a little Ronald McDonald House in my kitchen to collect soda tabs! My husband has really gotten into it and he told everyone at work so now they all drop their tabs into his lunch bag each day! We fill the little house (sandwich baggie full) about every 3-4 months! When I send in my tabs, I always include some hand-stamped cards for them to use at the Ronald McDonald House! I know how much a hand-stamped card can brighten my day and so I wanted to share that with all of those at the house as well. Recently, I have told all of my stampers that they can join in the fun as well. They can bring their tabs and/or cards to me and I will mail them in with mine! I have had such an amazing response! In the photo above, you can see that I received LOTS of tabs AND cards! I’m so excited and can’t wait to send them in!!!! I will post more when I have it all ready to go later this month!!!! If you are local and would like to donate cards or tabs, feel free to bring them by any time or bring them to the next stamp event! If you are not local, you can donate to your local Ronald McDonald House. Click here to find one close to you and learn more about this fabulous organization!

Happy Stampin’

~Laura


Technique Tuesday – Heat Embossing on Foil!

Posted on

Happy Tuesday and April Fools Day!!! That means that I have a fabulous Technique to share with you today and it is no fool!! We will be heat embossing onto Silver Foil!!! It is a super cool WOW look for your projects!

Embossing Foil, www.LaurasStampPad.com

Supplied Needed: Foil Sheets (Silver or Gold), Stamp Set, VersaMark, Embossing Powder, and Heat Tool

First you will cut your Foil Sheets into you desired size and then stamp your image with VersaMark onto the Foil. VersaMark is a clear super sticky “ink” (it’s not really an ink) that is used for heat embossing because when you pour your powder of choice over top it will stick. It is clear so that you can use Clear Embossing Powder or colored embossing powder. NOTE: Be careful when stamping onto Foil, it will slide! Once you have stamped your image, you will pour the powder of your choice over it. I used White Embossing Powder. Then you will melt the powder with your Heat Tool. TIP: Start in the corner and as you see it start to melt, move the tool along. Don’t swing the heat tool around like you are painting a wall. Also, you will need something to hold your foil down (besides your finger) because it will get HOT! Once it is done, let it sit for a minute or less to cool and set. Then you can add it to your project. The foil may curl a bit but as it cools it will flatten out. I used the Mixed Bunch Stamp Set for my flowers and Summer Picnic Designer Series Paper on this sample. The fabulous scallop look on the edge of my design was created with the Adorning Accents Embossing Folders! Super cute way to use this little border and I think that maybe have been the first time I have used that scallop in MONTHS! I hope you enjoyed this technique and try it out on your next project!!! Leave a comment below on which stamp set you think would look fabulous embossed on foil! And for more ways to use your foil, check out this post and this post!!!

Happy Stampin’

~Laura


Foil Flowers!!!

Posted on

Embossing Foil, www.LaurasStampPad.comThe color combination for this card is not your typical combination but it goes soooo well together! Do you ever sit down and see colors together and think “WOW those go so well together?” No, just me? Okay! Well this fabulous color combination is Crushed Curry, Wisteria Wonder, Coastal Cabana, and Basic Gray! I used my Mixed Bunch Stamp Set to randomly (make a squiggle line since I can’t do random) stamp my flowers in all of the colors. Then I took the coordinating Blossom Punch to punch out a Silver Foil Flower! Then I ran the flower through the Big Shot with the Decorative Dots Embossing Folder which is one of the Sale-A-Bration items that you can earn for FREE before March 21st! Of course I used Stampin’ Dimensionals to adhere that to my card. You always have to have a little POP and I love how dimensionals make that happen! For the little embellishment, I used my Coastal Cabana marker to color Whisper White Taffeta Ribbon! How cool is that? You can create any color you need for a project this way! Love it! Then I tied it through a Vintage Faceted Designer Button. Now I know this makes it un-mail-able (is that a word? 😉 ) but it is super cute and this one I can hand deliver to my Mom on Mother’s Day! When we created this card in Stamp Class, many of the attendees used Antique Brads, Candy Dots, or punch cardstock in place of the Faceted Designer Button. So many possibilities!!! I hope you enjoyed this and you can check out more samples using Silver Foil here and here!

Happy Stampin’

~Laura