Here For You!!!

Posted on

I love the message on this card and it really comes in handy now and again! I recently made this card for a friend who was having surgery and I hope it warmed her heart. Here for you, I promise! It would make a great card for teenagers or those going off to college too!

Here For You, www.LaurasStampPad.com

I love the color combination with this card. The red is bold but the blue softens it for a warm and heartfelt feeling! Try out Real Red and Balmy Blue and see for yourself!!!

I started with a Balmy Blue card base measuring 5-1/2″ x 8-1/2″ and stamped the “I Promise” and the heart outline all over the card front. Be sure to angle the images in different ways. Typically I start with the larger image and then fill in with the smaller one! I used Balmy Blue Ink for just that subtle background look!

Stampin Up Together Forever Bundle, www.LaurasStampPad.com

Next, I took a 3″ x 3″ piece of You’re A Peach Designer Series Paper and layered it onto Real Red (3-1/4″ x 3-1/4″). Then I tied some Real Red Faux Linen Ribbon around it and added it to the card front with Stampin’ Dimensionals. For the greeting, I used the Here For You Dies and adhesive sheets. Simply add the adhesive sheet to the back of the Real Red cardstock and then run it through the Mini Cut & Emboss Machine (which is on sale for 20% this month)! Now you have a homemade sticker and a quick and easy greeting! I also snuck in the heart next to the greeting to die cut at the same time!

Homemade Here For You Greeting Card, www.LaurasStampPad.com

For the inside of the card, I added the heart and greeting that was stamped all over the background! Just a little fun touch! You could also add some to the envelope!

If you would like to make this Here For You card, check out the supplies listed below! Don’t forget that the Mini Cut & Emboss is on sale for 20% off till the end of March!!! There are also select bundles on sale as well!

Happy Stampin’

~Laura

Product List

Lovely Layered Look!!!

Posted on

I know that Sale-A-Bration is over but I just have to share this fun card with you! This lovely layered look works with lots of different stamped images. If you don’t have the Sale-A-Bration Friendly Hello, that’s okay! If you do, then I hope this card inspires you to create with it!

Lovely Layered Look, www.LaurasStampPad.com

This look is super cool and it’s super easy to do! That’s my kind of WOW card! For this one, I would say all of the coloring is the hardest part, LOL! You all know I am not a huge fan of lots of coloring!

I started off with a piece of Basic Black cardstock as the card base. Then I cut 2 piece of Basic White measuring 5-1/4″ x 4″. One is for the card front and the other one is for the inside of the card. Using Memento Black Ink, I stamped the greeting in the center and then added flowers all around it and to the edge of the cardstock. Then, it’s time to color. I actually colored after I cut the circle but I think it would probably be easier to color first.

Once you are done coloring, simply cut out the greeting with the Layering Circles Dies. Adhere the rectangle to the card front, be sure it is right side up so that the greeting circle lines up with the flowers and the greeting isn’t upside down. Then die cut out the scallop circle in Basic Black cardstock and layer the greeting on top. Then just like a puzzle piece, place this layer over the center of the card! How amazing is that?!?! Simple and fabulous!

If you would like to see this lovely layered look in action, check out this video!

Happy Stampin’

~Laura


On The Horizon!!!

Posted on

The On The Horizon Bundle is stunning. There are so many beautiful scenes that you can create with it and with the coordinating paper! I fell in love and decided to create the March Online Card Class with it!!!

On The Horizon Stampin' Up, www.LaurasStampPad.com

This card is just 1 of the 5 cards that I will be creating for the March Online Card Class that will take place on Friday, March 11th at 7:30 p.m. CT. This will be on Facebook on my Laura’s Stamp Pad Page! Click here to like and follow my page and be sure to set your notifications so you don’t miss out on all the posts, videos, and fun that goes on there!

It is FREE for anyone to watch the Online Card Class on Friday night. You can even watch any time after as the video will be posted there for you to enjoy any time. I will also be posting it to my YouTube Channel too if you prefer that over Facebook! If you wish to stamp along with me there are 2 options – purchase the pre-cut card kit or purchase the PDF Tutorial. Click here for all the details on those options! The PDF Tutorial has all of the measurements, list of products, and step by step directions for the projects!

I hope you will join in the fun next Friday for the March Online Card Class – On The Horizon because it will be lots of fun!

Happy Stampin’

~Laura


Calming Camellia!!!

Posted on

The Calming Camellia Stamp Set is an exclusive stamp set during Sale-A-Bration for orders of $350 or more. This can be a single order or a few orders gathered together!

Calming Camellia Stampin Up Stamp Set, www.LaurasStampPad.com

This card is super simple but does require a lot of die cutting! This card uses the Scallop Contour Dies and I am LOVING those lately! The little detailed scallop for each one makes it super fun to layer. I die cut 4 scallops for this card – 3 for the front and 1 for the inside!

You could mix up the colors or go for a monochromatic look like I did! I used Melon Mambo and Blushing Bride cardstock. The ink is Melon Mambo!

Stampin' Up! Scalloped Contour Dies, www.LaurasStampPad.com

On the inside, I stamped some more fun but I will say that it makes the area for the greeting rather small. When I created this card on video, I actually stamped the curly cues on the Basic White card base rather than the scalloped die cut and I LOVE that look. You can check out the video tutorial here!

You have less than 2 weeks left to get this beautiful Calming Camellia Stamp Set so you can recreate this card! Click the supplies used below to get started! What color would you use?!?!?

Happy Stampin’

~Laura

Product List

Relax With Me!!!

Posted on

Something I would say we all probably could do more of….Relaxing! I know I sure can but it’s so hard for me to relax as I always feel like there is something that needs to be done. Of course there are 2 little ones who take up the rest of my time too! So relax with me for another 5 minutes and check out this fun card!

Relax With Me, www.LaurasStampPad.com

The In The Moment Stamp Set has beautiful images for a card like this! The greetings are great for everyday type cards! #HappyMail The line art images are great for coloring as well so shout out to all of my coloring lovers!!!

For this card, I stamped the image in Memento Black Ink and colored it in! I always like to take a photo of the markers I use so I remember for next time….and to share with all of you! Then I used the Layering Circle Dies to die cut out the image! This was then layered onto a piece of the In Good Taste Designer Series Paper!

Stampin' Up Stamp Blends Alcohol Markers, www.LaurasStampPad.com

The neutral colors of the card base and designer paper make it super easy to use any colors you would like for the image which is fun to mix it up! You could create multiples of this card and even add different greetings to each one! What occasion would you use this card for?!? Let me know in the comments below!

If you would like to create this Relax With Me card, check out the supplies listed below! Click ADD ALL TO CART for a quick shopping! Don’t forget that it is still Sale-A-Bration time!!!

Happy Stampin’

~Laura

Product List
Friendly Birthday!!!

Posted on

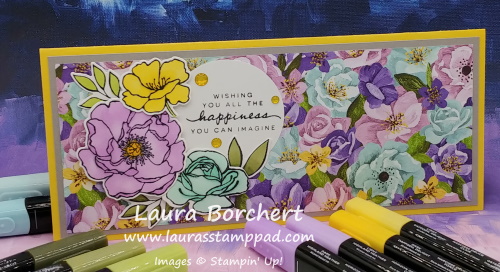
One of the options for a $100 order is the Friendly Hello Bundle which includes a stamp set and 12″ x 12″ Designer Series Paper! I love the pastel yet bright colors and of course it’s FLOWERS! <3 I created this fun friendly birthday card in both Pale Papaya and Fresh Freesia!

Friendly Birthday Homemade Greeting Card, www.LaurasStampPad.com

I honestly am not sure which color I prefer the most! I really love both of them and had fun using this designer paper! Also, I love the fact that I created the same card with multiple sheets in the paper pack and got a similar look. Woot woot!

Friendly Hello Sale-A-Bration Bundle, www.LaurasStampPad.com

This card uses a regular card base of 5-1/2″ x 8-1/2″ but rather than just folding it in half, I folded a bit from both sides. The left side is 3-1/4″ and the right side is 1″. On the left I added a piece of the designer paper (3″ x 5-1/4″) and on the right I stamped a greenery image from the stamp set. The image was stamped in the same color as the card base for a subtle look!

Stampin' Up Scallop Contour Dies, www.laurasstamppad.com

For the greeting, I used the Scallop Contour Dies for that adorable dotted scallop retangle! Precious!!! The greeting from the Friendly Hello Stamp Set fits perfectly in that die! I added a little loop of ribbon on one end and added it to the card front hanging off a bit. When I have a piece hanging off like this I like to use Tear & Tape! Then I finished it off with some jewels!!!

Coloring With Stampin' Blends Markers, www.LaurasStampPad.com

On the inside of the card, I stamped the floral image in Memento Black and colored the flower in with Stampin’ Blends! There is still time for you to earn the Friendly Hello Bundle so you can make friendly birthday cards like these! Click the supplies listed below or just click ADD ALL TO CART for easy shopping!

Happy Stampin’

~Laura

Product List

Sweet Conversations!!!

Posted on

Valentine’s Day is less than a week away!!! Here are some cards that I created with the Sweet Conversations Suite – Stamp, Dies, and Designer Paper!!! Super simple and fun to show you love someone!!! The January Paper Pumpkin also helped with my Valentine’s this year!

Sweet Conversations Stampin Up Stamp Set, www.LaurasStampPad.com

I really love this card. It’s a simple stamping with the greeting only. Highland Heather is a fabulous color to use with reds and pinks too! I am super digging it! The coordinating Sweet Hearts Dies are super fabulous because there are 13 individual hearts of different sizes that you can die cut all at the same time. It didn’t take forever for me to die cut a lot to make lots of these. That is a BONUS for me for sure! I’m not always a huge fan of die cutting a lot for a card!

Happy Galentine's Day, www.LaurasStampPad.com

Happy Galentine’s Day…..do you celebrate?!?!? I simply took the same greeting as the card above and stamped it down. Then using the Hug Me stamp, I cut out the G and added it over the top of the V. Super cute and fun! This card uses other dies from that same set – the tag and the hearts! The heart dies from the set actually coordinate with the Designer Series Paper. Love it!!!

Click on the supplies below if you would like to recreate these cards using the Sweet Conversations Bundle!!! Don’t forget that it’s still Sale-A-Bration time so you can earn FREE Stuff with every $50 order!!!

Happy Stampin’

~Laura

Product List

Heart & Home Online Class!!!

Posted on

February is the 3rd month of my New Online Class option for those of you to stamp with me near and far! I LOVE IT!!! It’s been so much fun thus far and I am giddy excited about what I have planned for the upcoming months! For February, I have the Heart & Home Online Class and here is a sneak peak!

Heart & Home Online Class, www.LaurasStampPad.com

This is my favorite card in the February Class! There is just something about that blue and white pattern that I LOVE!!!! I also love those antique blue and white dishes. It’s just classic and stunning! My other favorite part about this card is the greeting! I inked up the flower image and then stamped off twice and then stamped it over the greeting! It’s subtle and amazing! I love it!

Blessings of Home Stampin' Up Stamp Set, www.LaurasStampPad.com

The inside greeting for this card from the Blessings of Home Stamp Set melts my heart! I LOVE LOVE LOVE IT!!! This year I have really tried to make a point in telling people I love their shirt or I enjoyed our visit or you really mean a lot to me. This card is perfect!!! I urge you all to do the same. It makes other smile as well as makes you feel warm and fuzzy! (And right now with a winter storm coming for us, I need warm and fuzzy!)

I still have kits available for the February Heart & Home Online Class so sign up for your kit now so you can stamp along with me!!! You can also purchase the PDF Tutorial so you can cut all the pieces and stamp these SIX cards! That’s the other exciting thing about the February Class….I just couldn’t stop at 5 so there is a 6th bonus card!!! 🙂

Not sure you are into the kit this month, you can still join in the fun and watch me create these cards LIVE on Facebook (and then posted to YouTube) on Friday, February 11th at 7:30 p.m. CT!!! It’s free for anyone to join in and chat with me while I stamp and offer techniques and a fun evening!

Happy Stampin’

~Laura

Product List

Awesome Otter!!!

Posted on

You all know I LOVE flowers when it comes to stamping. What about animals?!? Are you a big fan or not? I do thing the Awesome Otter Sale-A-Bration Stamp Set is pretty cute and it’s FREE with a $50 order!

Awesome Otter Stampin' Up Sale-A-Bration Stamp Set, www.LaurasStampPad.com

Come on, you can’t tell me that that face isn’t adorable!!!! And the Party Hat!!! I love it! I also will say that I don’t think this card is specific to really little kids either! What do you think?! Let me know in the comments below! I was inspired to create this card because of a swap card I received from Laura Mulligan so shout out to her! Thank you!

For this card, I started with a Thick Basic White card base and stamped the party hat all over on the top in Pool Party Ink. Next, I added a strip of the Sunshine & Rainbows Sale-A-Bration Designer Series Paper. Then I stamped the greeting on the corner of a strip of Basic White, added more Designer Paper and added it to the card front with Stampin’ Dimensionals.

Stampin' Up Stampin' Blends, www.LaurasStampPad.com

For the focal point, I die cut some of the Sunshine & Rainbows Designer Paper. You can use whichever size circle you would like. Then I stamped the adorable otter onto a piece of Basic White in Memento Black Ink. After coloring him with Stampin’ Blends, I used that same circle die and cut him out. This gives that same rounded look on the bottom. For the top half, I fussy cut out the otter and layered it onto the designer paper circle! For the party hat, I simply stamped it onto some of the designer paper in Memento Ink and then fussy cut it out! This circle was then added to the card front with Stampin’ Dimensionals!

Sunshine& Rainbows & Awesome Otter Sale-A-Bration Designer Series Paper, www.LaurasStampPad.com

If you need just a general #happymail card, you can always change up the greeting to this one! OH and don’t forget the final touch of Iridescent Rhinestones for some bling!

If you would like to recreate these cute cards using the Awesome Otter Stamp Set, click on the supplies listed below! Don’t forget it is Sale-A-Bration time till the end of February so you can earn FREE stuff for every $50 you spend! Woot Woot!

Happy Stampin’

~Laura

Product List

Senior Years!!!

Posted on

I make a LOT of birthday cards for those of all ages and while I love flowers and nature, I thought I would mix it up a little. The Senior Years Stamp Set is super cute and has great greetings for birthday and even retirement greetings!

Senior Years Stampin Up Stamp Set, www.LaurasStampPad.com

You might remember that this look is similar to those I posted on Tuesday! That is because it is the exact same layout and dimensions just with a different stamp set. I used the Senior Years Stamp Set and colored in with Stampin’ Blends!

MAJOR QUESTION: When making these cards, I couldn’t help but feel like I needed to color the person as if they were the recipient getting the card. Now that is in no way correct because not everyone has this hair cut or would wear a purple dress. Then I feel like will the person getting this card think, does she think that looks like me?!?!? Or will they just think this is a cute card?!?!? Let me know in the comment below!

Candles on Your Cake Homemade Card, www.LaurasStampPad.com

This greeting for the inside of the card is AMAZING! I love it. Honestly as I have gotten older, I have started using the number of candles for both numbers. So rather than adding 31 candles to a cake, I would add 3 in a row and then 1 spaced over from that to represent 31. After all 31 candles could create a cake going up in flames and that would be a tragedy. LOL

Happy Birthday Old Man, www.LaurasStampPad.com

Here is the guy version of this card! I just had so much fun with this card style and getting masculine birthday card, feminine birthday cards and then all those beautiful butterfly cards out of it! If you would like to recreate these Senior Years cards, check out the supplies listed below and don’t forget that every $50 earns you a Sale-A-Bration item! Woot Woot!

Happy Stampin’

~Laura

Product List