Heat Embossing with Copper….or any metallic is something that I LOVE but always forget to do! It seems I pull out my heat tool and use it a lot but then I put it back away and forget about it! Maybe I need a heat embossing station so I use it more! How about you?!?!
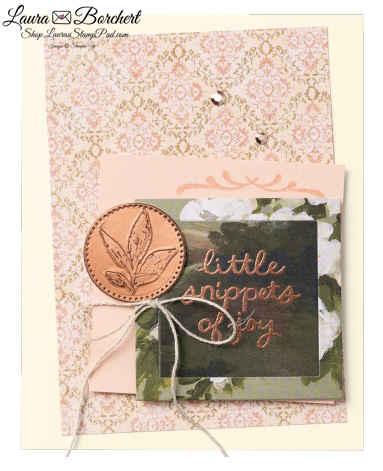
- Score the 8-1/2″ x 5-1/2″ Very Vanilla Cardstock at 4-1/4″ to create the card base. Adhere the large Designer Series Paper piece to the card base (at a slight angle)!!
- Stamp the flourish image in Petal Pink ink on the Petal Pink Cardstock square; adhere it over the Designer Series Paper using Stampin’ Dimensionals!
- Die cut the smaller squares from two different Designer Series Paper patterns using the Joyful Frames Dies. Stamp the sentiment of your choice in VersaMark ink on the smallest square. Add copper embossing powder and heat set. Adhere both pieces over the Petal Pink Cardstock square using Stampin’ Dimensionals!
- Swipe the VersaMark pad over the Very Vanilla Cardstock piece! Add copper embossing powder and heat set. Repeat this step three times to make the copper embossing thick and layered! On the fourth time, press the leaf image stamp into the hot embossing powder. Keep the stamp in place until the embossing powder is cool, then remove it! This leaves an impressed image that is sure to WOW!
- Die cut the leaf using the small circle from the Stylish Shapes Dies!
- Adhere the copper “medallion” to the card using Stampin’ Dimensionals!
- Tie a bow with Linen Thread and adhere it under the medallion. Finish with copper embellishments for added shimmer!!!
I hope you enjoyed this tutorial and give it a try! It’s such a WOW card and super fun! Let me know in the comments if you try it out or if you have created a medallion like this before!!!
Check out all of the supplies used below so you can do some embossing with copper! You can click each item for easy shopping or ADD ALL TO CART for even easier shopping! Don’t forget that you can earn special rewards when you shop with me! Fabulous Friends Club Perks when your order hits $40 or more and Laura’s Free Gift of the Month too when you order $75 or more!!!
Happy Stampin’
~Laura
Product List![Joyful Squares Bundle (English) [ 166850 ]](https://assets1.tamsnetwork.com/images/EC042017NF/166850s.jpg "Joyful Squares Bundle (English) [ 166850 ]")
![Stylish Shapes Dies [ 159183 ]](https://assets1.tamsnetwork.com/images/EC042017NF/159183s.jpg "Stylish Shapes Dies [ 159183 ]")
![Beautiful Gallery 6" X 6" (15.2 X 15.2 Cm) Designer Series Paper [ 165196 ]](https://assets1.tamsnetwork.com/images/EC042017NF/165196s.jpg "Beautiful Gallery 6\" X 6\" (15.2 X 15.2 Cm) Designer Series Paper [ 165196 ]")
![Very Vanilla 8 1/2" X 11" Cardstock [ 166784 ]](https://assets1.tamsnetwork.com/images/EC042017NF/166784s.jpg "Very Vanilla 8 1/2\" X 11\" Cardstock [ 166784 ]")
![Petal Pink 8-1/2" X 11" Cardstock [ 146985 ]](https://assets1.tamsnetwork.com/images/EC042017NF/146985s.jpg "Petal Pink 8-1/2\" X 11\" Cardstock [ 146985 ]")
![Petal Pink Classic Stampin' Pad [ 147108 ]](https://assets1.tamsnetwork.com/images/EC042017NF/147108s.jpg "Petal Pink Classic Stampin' Pad [ 147108 ]")
![Versamark Pad [ 102283 ]](https://assets1.tamsnetwork.com/images/EC042017NF/102283s.jpg "Versamark Pad [ 102283 ]")
![Metallics Wow! Embossing Powder [ 165678 ]](https://assets1.tamsnetwork.com/images/EC042017NF/165678s.jpg "Metallics Wow! Embossing Powder [ 165678 ]")
![Linen Thread [ 104199 ]](https://assets1.tamsnetwork.com/images/EC042017NF/104199s.jpg "Linen Thread [ 104199 ]")
![Adhesive Backed Metallic Gems [ 163780 ]](https://assets1.tamsnetwork.com/images/EC042017NF/163780s.jpg "Adhesive Backed Metallic Gems [ 163780 ]")
![Heat Tool (Us And Canada) [ 129053 ]](https://assets1.tamsnetwork.com/images/EC042017NF/129053s.jpg "Heat Tool (Us And Canada) [ 129053 ]")
![Beautifully Celebrated Bundle (English) [ 166975 ]](https://assets1.tamsnetwork.com/images/EC042017NF/166975s.jpg "Beautifully Celebrated Bundle (English) [ 166975 ]")
![Gears & Textures Photopolymer Stamp Set [ 166851 ]](https://assets1.tamsnetwork.com/images/EC042017NF/166851s.jpg "Gears & Textures Photopolymer Stamp Set [ 166851 ]")
![Basic White 8 1/2" X 11" Cardstock [ 166780 ]](https://assets1.tamsnetwork.com/images/EC042017NF/166780s.jpg "Basic White 8 1/2\" X 11\" Cardstock [ 166780 ]")
![Bubble Bath 8 1/2" X 11" Cardstock [ 161718 ]](https://assets1.tamsnetwork.com/images/EC042017NF/161718s.jpg "Bubble Bath 8 1/2\" X 11\" Cardstock [ 161718 ]")
![Pretty In Pink Classic Stampin Pad [ 163807 ]](https://assets1.tamsnetwork.com/images/EC042017NF/163807s.jpg "Pretty In Pink Classic Stampin Pad [ 163807 ]")
![Gray Granite Classic Stampin' Pad [ 147118 ]](https://assets1.tamsnetwork.com/images/EC042017NF/147118s.jpg "Gray Granite Classic Stampin' Pad [ 147118 ]")
![Timid Tiger Classic Stampin' Pad [ 165278 ]](https://assets1.tamsnetwork.com/images/EC042017NF/165278s.jpg "Timid Tiger Classic Stampin' Pad [ 165278 ]")
![Bubble Bath Classic Stampin' Pad [ 161664 ]](https://assets1.tamsnetwork.com/images/EC042017NF/161664s.jpg "Bubble Bath Classic Stampin' Pad [ 161664 ]")
![Shaded Spruce Classic Stampin' Pad [ 147088 ]](https://assets1.tamsnetwork.com/images/EC042017NF/147088s.jpg "Shaded Spruce Classic Stampin' Pad [ 147088 ]")
![Basics Embossing Powders [ 155554 ]](https://assets1.tamsnetwork.com/images/EC042017NF/155554s.jpg "Basics Embossing Powders [ 155554 ]")
![Shy Shamrock Stampin’ Blends Combo Pack [ 163825 ]](https://assets1.tamsnetwork.com/images/EC042017NF/163825s.jpg "Shy Shamrock Stampin’ Blends Combo Pack [ 163825 ]")
![Baker's Twine Essentials Pack [ 155475 ]](https://assets1.tamsnetwork.com/images/EC042017NF/155475s.jpg "Baker's Twine Essentials Pack [ 155475 ]")
![Stampin' Dimensionals [ 104430 ]](https://assets1.tamsnetwork.com/images/EC042017NF/104430s.jpg "Stampin' Dimensionals [ 104430 ]")
![A Round Of Hellos Photopolymer Stamp Set (English) [ 167227 ]](https://assets1.tamsnetwork.com/images/EC042017NF/167227s.jpg "A Round Of Hellos Photopolymer Stamp Set (English) [ 167227 ]")
![Garden Green Classic Stampin' Pad [ 147089 ]](https://assets1.tamsnetwork.com/images/EC042017NF/147089s.jpg "Garden Green Classic Stampin' Pad [ 147089 ]")
![Daffodil Delight Classic Stampin' Ink Refill [ 119672 ]](https://assets1.tamsnetwork.com/images/EC042017NF/119672s.jpg "Daffodil Delight Classic Stampin' Ink Refill [ 119672 ]")
![Pretty In Pink Classic Stampin’ Ink Refill [ 163816 ]](https://assets1.tamsnetwork.com/images/EC042017NF/163816s.jpg "Pretty In Pink Classic Stampin’ Ink Refill [ 163816 ]")
![Uninked Stampin' Spots [ 141822 ]](https://assets1.tamsnetwork.com/images/EC042017NF/141822s.jpg "Uninked Stampin' Spots [ 141822 ]")
![2" (5.1 Cm) Circle Punch [ 133782 ]](https://assets1.tamsnetwork.com/images/EC042017NF/133782s.jpg "2\" (5.1 Cm) Circle Punch [ 133782 ]")
![2024 2026 In Color™ Flat Pearls [ 165266 ]](https://assets1.tamsnetwork.com/images/EC042017NF/165266s.jpg "2024 2026 In Color™ Flat Pearls [ 165266 ]")

![Loveliest Tree Cling Stamp Set (English) [ 163714 ]](https://assets1.tamsnetwork.com/images/EC042017NF/163714s.jpg "Loveliest Tree Cling Stamp Set (English) [ 163714 ]")
![Peaceful View Cling Stamp Set [ 165310 ]](https://assets1.tamsnetwork.com/images/EC042017NF/165310s.jpg "Peaceful View Cling Stamp Set [ 165310 ]")
![Forever Plaid 3 D Embossing Folder [ 164049 ]](https://assets1.tamsnetwork.com/images/EC042017NF/164049s.jpg "Forever Plaid 3 D Embossing Folder [ 164049 ]")
![1 7/8" (4.8 Cm) Circle Punch [ 165259 ]](https://assets1.tamsnetwork.com/images/EC042017NF/165259s.jpg "1 7/8\" (4.8 Cm) Circle Punch [ 165259 ]")
![Cloud Cover 8 1/2" X 11" Cardstock [ 165621 ]](https://assets1.tamsnetwork.com/images/EC042017NF/165621s.jpg "Cloud Cover 8 1/2\" X 11\" Cardstock [ 165621 ]")
![Mossy Meadow 8-1/2" X 11" Cardstock [ 133676 ]](https://assets1.tamsnetwork.com/images/EC042017NF/133676s.jpg "Mossy Meadow 8-1/2\" X 11\" Cardstock [ 133676 ]")
![Pecan Pie 8 1/2" X 11" Cardstock [ 161717 ]](https://assets1.tamsnetwork.com/images/EC042017NF/161717s.jpg "Pecan Pie 8 1/2\" X 11\" Cardstock [ 161717 ]")
![Old Olive Classic Stampin' Pad [ 147090 ]](https://assets1.tamsnetwork.com/images/EC042017NF/147090s.jpg "Old Olive Classic Stampin' Pad [ 147090 ]")
![Pecan Pie Classic Stampin' Pad [ 161665 ]](https://assets1.tamsnetwork.com/images/EC042017NF/161665s.jpg "Pecan Pie Classic Stampin' Pad [ 161665 ]")
![2025–2027 In Color™ Flat Pearls [ 165192 ]](https://assets1.tamsnetwork.com/images/EC042017NF/165192s.jpg "2025–2027 In Color™ Flat Pearls [ 165192 ]")

![Words For The Season Dies (English) [ 165797 ]](https://assets1.tamsnetwork.com/images/EC042017NF/165797s.jpg "Words For The Season Dies (English) [ 165797 ]")
![Traditions Of Christmas 12" X 12" (30.5 X 30.5 Cm) Specialty Designer Series Paper [ 165853 ]](https://assets1.tamsnetwork.com/images/EC042017NF/165853s.jpg "Traditions Of Christmas 12\" X 12\" (30.5 X 30.5 Cm) Specialty Designer Series Paper [ 165853 ]")
![Real Red 8-1/2" X 11" Cardstock [ 102482 ]](https://assets1.tamsnetwork.com/images/EC042017NF/102482s.jpg "Real Red 8-1/2\" X 11\" Cardstock [ 102482 ]")
![Strawberry Slush 8 1/2" X 11" Cardstock [ 165625 ]](https://assets1.tamsnetwork.com/images/EC042017NF/165625s.jpg "Strawberry Slush 8 1/2\" X 11\" Cardstock [ 165625 ]")
![Traditional Wreath 3 D Embossing Folder [ 165874 ]](https://assets1.tamsnetwork.com/images/EC042017NF/165874s.jpg "Traditional Wreath 3 D Embossing Folder [ 165874 ]")
![Stampin' Brayer [ 162936 ]](https://assets1.tamsnetwork.com/images/EC042017NF/162936s.jpg "Stampin' Brayer [ 162936 ]")
![Traditional Sparkling Sequins [ 165875 ]](https://assets1.tamsnetwork.com/images/EC042017NF/165875s.jpg "Traditional Sparkling Sequins [ 165875 ]")

![Keeping Traditions Photopolymer Stamp Set (English) [ 169229 ]](https://assets1.tamsnetwork.com/images/EC042017NF/169229s.jpg "Keeping Traditions Photopolymer Stamp Set (English) [ 169229 ]")
![Crumb Cake Classic Stampin' Pad [ 147116 ]](https://assets1.tamsnetwork.com/images/EC042017NF/147116s.jpg "Crumb Cake Classic Stampin' Pad [ 147116 ]")
![Real Red Classic Stampin' Pad [ 147084 ]](https://assets1.tamsnetwork.com/images/EC042017NF/147084s.jpg "Real Red Classic Stampin' Pad [ 147084 ]")
![Soft Sea Foam Classic Stampin' Pad [ 147102 ]](https://assets1.tamsnetwork.com/images/EC042017NF/147102s.jpg "Soft Sea Foam Classic Stampin' Pad [ 147102 ]")
![Garden Green 8-1/2" X 11" Cardstock [ 102584 ]](https://assets1.tamsnetwork.com/images/EC042017NF/102584s.jpg "Garden Green 8-1/2\" X 11\" Cardstock [ 102584 ]")
![Christmas Tags & More 6" X 6" (15.2 X 15.2 Cm) Mix & Match Specialty Designer Series Paper [ 165907 ]](https://assets1.tamsnetwork.com/images/EC042017NF/165907s.jpg "Christmas Tags & More 6\" X 6\" (15.2 X 15.2 Cm) Mix & Match Specialty Designer Series Paper [ 165907 ]")
![Basics Wow! Embossing Powder [ 165679 ]](https://assets1.tamsnetwork.com/images/EC042017NF/165679s.jpg "Basics Wow! Embossing Powder [ 165679 ]")
![Christmas Greenery Dies [ 165872 ]](https://assets1.tamsnetwork.com/images/EC042017NF/165872s.jpg "Christmas Greenery Dies [ 165872 ]")
![Azure Afternoon Classic Stampin' Pad [ 161663 ]](https://assets1.tamsnetwork.com/images/EC042017NF/161663s.jpg "Azure Afternoon Classic Stampin' Pad [ 161663 ]")
![Melon Mambo Classic Stampin' Pad [ 147051 ]](https://assets1.tamsnetwork.com/images/EC042017NF/147051s.jpg "Melon Mambo Classic Stampin' Pad [ 147051 ]")
![Summer Splash Classic Stampin Pad [ 163809 ]](https://assets1.tamsnetwork.com/images/EC042017NF/163809s.jpg "Summer Splash Classic Stampin Pad [ 163809 ]")
![Summer Splash 8 1/2" X 11 Cardstock [ 163797 ]](https://assets1.tamsnetwork.com/images/EC042017NF/163797s.jpg "Summer Splash 8 1/2\" X 11 Cardstock [ 163797 ]")
![Frosted Iridescent Dots [ 165766 ]](https://assets1.tamsnetwork.com/images/EC042017NF/165766s.jpg "Frosted Iridescent Dots [ 165766 ]")


![Pop Up Petals Bundle (English) [ 168010 ]](https://assets1.tamsnetwork.com/images/EC042017NF/168010s.jpg "Pop Up Petals Bundle (English) [ 168010 ]")
![Florals In Bloom 12" X 12" (30.5 X 30.5 Cm) Designer Series Paper [ 165175 ]](https://assets1.tamsnetwork.com/images/EC042017NF/165175s.jpg "Florals In Bloom 12\" X 12\" (30.5 X 30.5 Cm) Designer Series Paper [ 165175 ]")
![Tuxedo Black Memento Ink Pad [ 132708 ]](https://assets1.tamsnetwork.com/images/EC042017NF/132708s.jpg "Tuxedo Black Memento Ink Pad [ 132708 ]")
![Daffodil Delight Stampin' Blends Combo Pack [ 154883 ]](https://assets1.tamsnetwork.com/images/EC042017NF/154883s.jpg "Daffodil Delight Stampin' Blends Combo Pack [ 154883 ]")
![Old Olive Stampin' Blends Combo Pack [ 154892 ]](https://assets1.tamsnetwork.com/images/EC042017NF/154892s.jpg "Old Olive Stampin' Blends Combo Pack [ 154892 ]")
![Pecan Pie Stampin’ Blends Combo Pack [ 161674 ]](https://assets1.tamsnetwork.com/images/EC042017NF/161674s.jpg "Pecan Pie Stampin’ Blends Combo Pack [ 161674 ]")
![Foam Adhesive Strips [ 141825 ]](https://assets1.tamsnetwork.com/images/EC042017NF/141825s.jpg "Foam Adhesive Strips [ 141825 ]")
![Mini Stampin' Dimensionals [ 144108 ]](https://assets1.tamsnetwork.com/images/EC042017NF/144108s.jpg "Mini Stampin' Dimensionals [ 144108 ]")
![Take Your Pick [ 144107 ]](https://assets1.tamsnetwork.com/images/EC042017NF/144107s.jpg "Take Your Pick [ 144107 ]")

![Ornamental Christmas Cling Stamp Set (English) [ 165991 ]](https://assets1.tamsnetwork.com/images/EC042017NF/165991s.jpg "Ornamental Christmas Cling Stamp Set (English) [ 165991 ]")
![Elegant Pine Snowflakes 12" X 12" (30.5 X 30.5 Cm) Designer Series Paper [ 166066 ]](https://assets1.tamsnetwork.com/images/EC042017NF/166066s.jpg "Elegant Pine Snowflakes 12\" X 12\" (30.5 X 30.5 Cm) Designer Series Paper [ 166066 ]")
![Cherry Cobbler 8-1/2" X 11" Cardstock [ 119685 ]](https://assets1.tamsnetwork.com/images/EC042017NF/119685s.jpg "Cherry Cobbler 8-1/2\" X 11\" Cardstock [ 119685 ]")
![Snowy Delights Bundle (English) [ 165809 ]](https://assets1.tamsnetwork.com/images/EC042017NF/165809s.jpg "Snowy Delights Bundle (English) [ 165809 ]")
![Pretty Peacock Classic Stampin’ Pad [ 150083 ]](https://assets1.tamsnetwork.com/images/EC042017NF/150083s.jpg "Pretty Peacock Classic Stampin’ Pad [ 150083 ]")
![Jet Black Stāzon Ink Pad [ 101406 ]](https://assets1.tamsnetwork.com/images/EC042017NF/101406s.jpg "Jet Black Stāzon Ink Pad [ 101406 ]")
![Pretty Peacock Stampin’ Blends Combo Pack [ 161676 ]](https://assets1.tamsnetwork.com/images/EC042017NF/161676s.jpg "Pretty Peacock Stampin’ Blends Combo Pack [ 161676 ]")
![Cherry Cobbler Stampin' Blends Combo Pack [ 154880 ]](https://assets1.tamsnetwork.com/images/EC042017NF/154880s.jpg "Cherry Cobbler Stampin' Blends Combo Pack [ 154880 ]")
![Smoky Slate Stampin' Blends Combo Pack [ 154904 ]](https://assets1.tamsnetwork.com/images/EC042017NF/154904s.jpg "Smoky Slate Stampin' Blends Combo Pack [ 154904 ]")
![Streaked Dots [ 165902 ]](https://assets1.tamsnetwork.com/images/EC042017NF/165902s.jpg "Streaked Dots [ 165902 ]")
![Love & Courage Cling Stamp Set (English) [ 165935 ]](https://assets1.tamsnetwork.com/images/EC042017NF/165935s.jpg "Love & Courage Cling Stamp Set (English) [ 165935 ]")
![Stampin' Cut & Emboss Machine [ 149653 ]](https://assets1.tamsnetwork.com/images/EC042017NF/149653s.jpg "Stampin' Cut & Emboss Machine [ 149653 ]")
![Pressed Flowers Embossing Folder [ 165614 ]](https://assets1.tamsnetwork.com/images/EC042017NF/165614s.jpg "Pressed Flowers Embossing Folder [ 165614 ]")
![Pool Party 12" X 12" (30.5 X 30.5 Cm) Two Tone Cardstock [ 166691 ]](https://assets1.tamsnetwork.com/images/EC042017NF/166691s.jpg "Pool Party 12\" X 12\" (30.5 X 30.5 Cm) Two Tone Cardstock [ 166691 ]")
![Pool Party 8-1/2" X 11" Cardstock [ 122924 ]](https://assets1.tamsnetwork.com/images/EC042017NF/122924s.jpg "Pool Party 8-1/2\" X 11\" Cardstock [ 122924 ]")
![Heartfelt Hexagon Punch [ 162888 ]](https://assets1.tamsnetwork.com/images/EC042017NF/162888s.jpg "Heartfelt Hexagon Punch [ 162888 ]")
![Pool Party Classic Stampin' Pad [ 147107 ]](https://assets1.tamsnetwork.com/images/EC042017NF/147107s.jpg "Pool Party Classic Stampin' Pad [ 147107 ]")
![White 1/4" (6.4 Mm) Ribbon [ 165562 ]](https://assets1.tamsnetwork.com/images/EC042017NF/165562s.jpg "White 1/4\" (6.4 Mm) Ribbon [ 165562 ]")