I love Silver and Navy together! It is so elegant and beautiful! Here I created this amazing card and it was quick and simple!!!!
I started with a Night of Navy card base and added a few strips of All is Calm Designer Washi Tape! Then I took a piece of Whisper White cardstock and stamped three of the trees from the Festival of Trees Stamp Set using my Silver Encore Ink Pad. NOTE: Allow this to dry for a bit because this ink takes a smidge longer to dry than your typical ink pad! Of course I added this piece to the card front with Stampin’ Dimensionals! Oh how I love those things! Done! Quick and Simple!!
Are you almost done or all done with your Christmas Cards? What about presents? If you still need gift ideas, you can give a Gift Certificate for Stampin’ Up through me OR one of my favorites – My Paper Pumpkin Subscriptions? Also, if you need gift packaging ideas, check out my Video Series!
Looking for a quick and simple Christmas Card? Didn’t get Christmas Cards out in time but would still like to send a little Winter note to your friends and family? This is the perfect one for you! All you need is a package of Note Cards & Envelopes, a package of All is Calm Washi Tape, some Rhinestones if you enjoy bling like me, and a greeting stamp set! The All is Calm Designer Washi Tape comes with 5 different styles for you to use!
I am loving this set of Washi Tape for lots of my projects! This simple card is just one of them! I added 3 strips of the Washi Tape and just ripped it off for that torn look (even better no scissors necessary)! I stamped the greeting from the October Promotional Stamp Set – Good Greetings in Pear Pizzazz! You can always use a greeting from Teeny Tiny Wishes or any other favorite greeting that you have! I thought it needed just a little something more so I added some bling – a Rhinestone! You can even add a little Washi Tape to the envelope as well or use it to seal the back! No licking necessary! 🙂 Be sure to order this before the Holiday Mini Catalog is over on January 5th! Also, the All is Calm Washi Tape would go great for your Holiday/Winter Scrapbooking as well so be sure to pick up another pack for that!
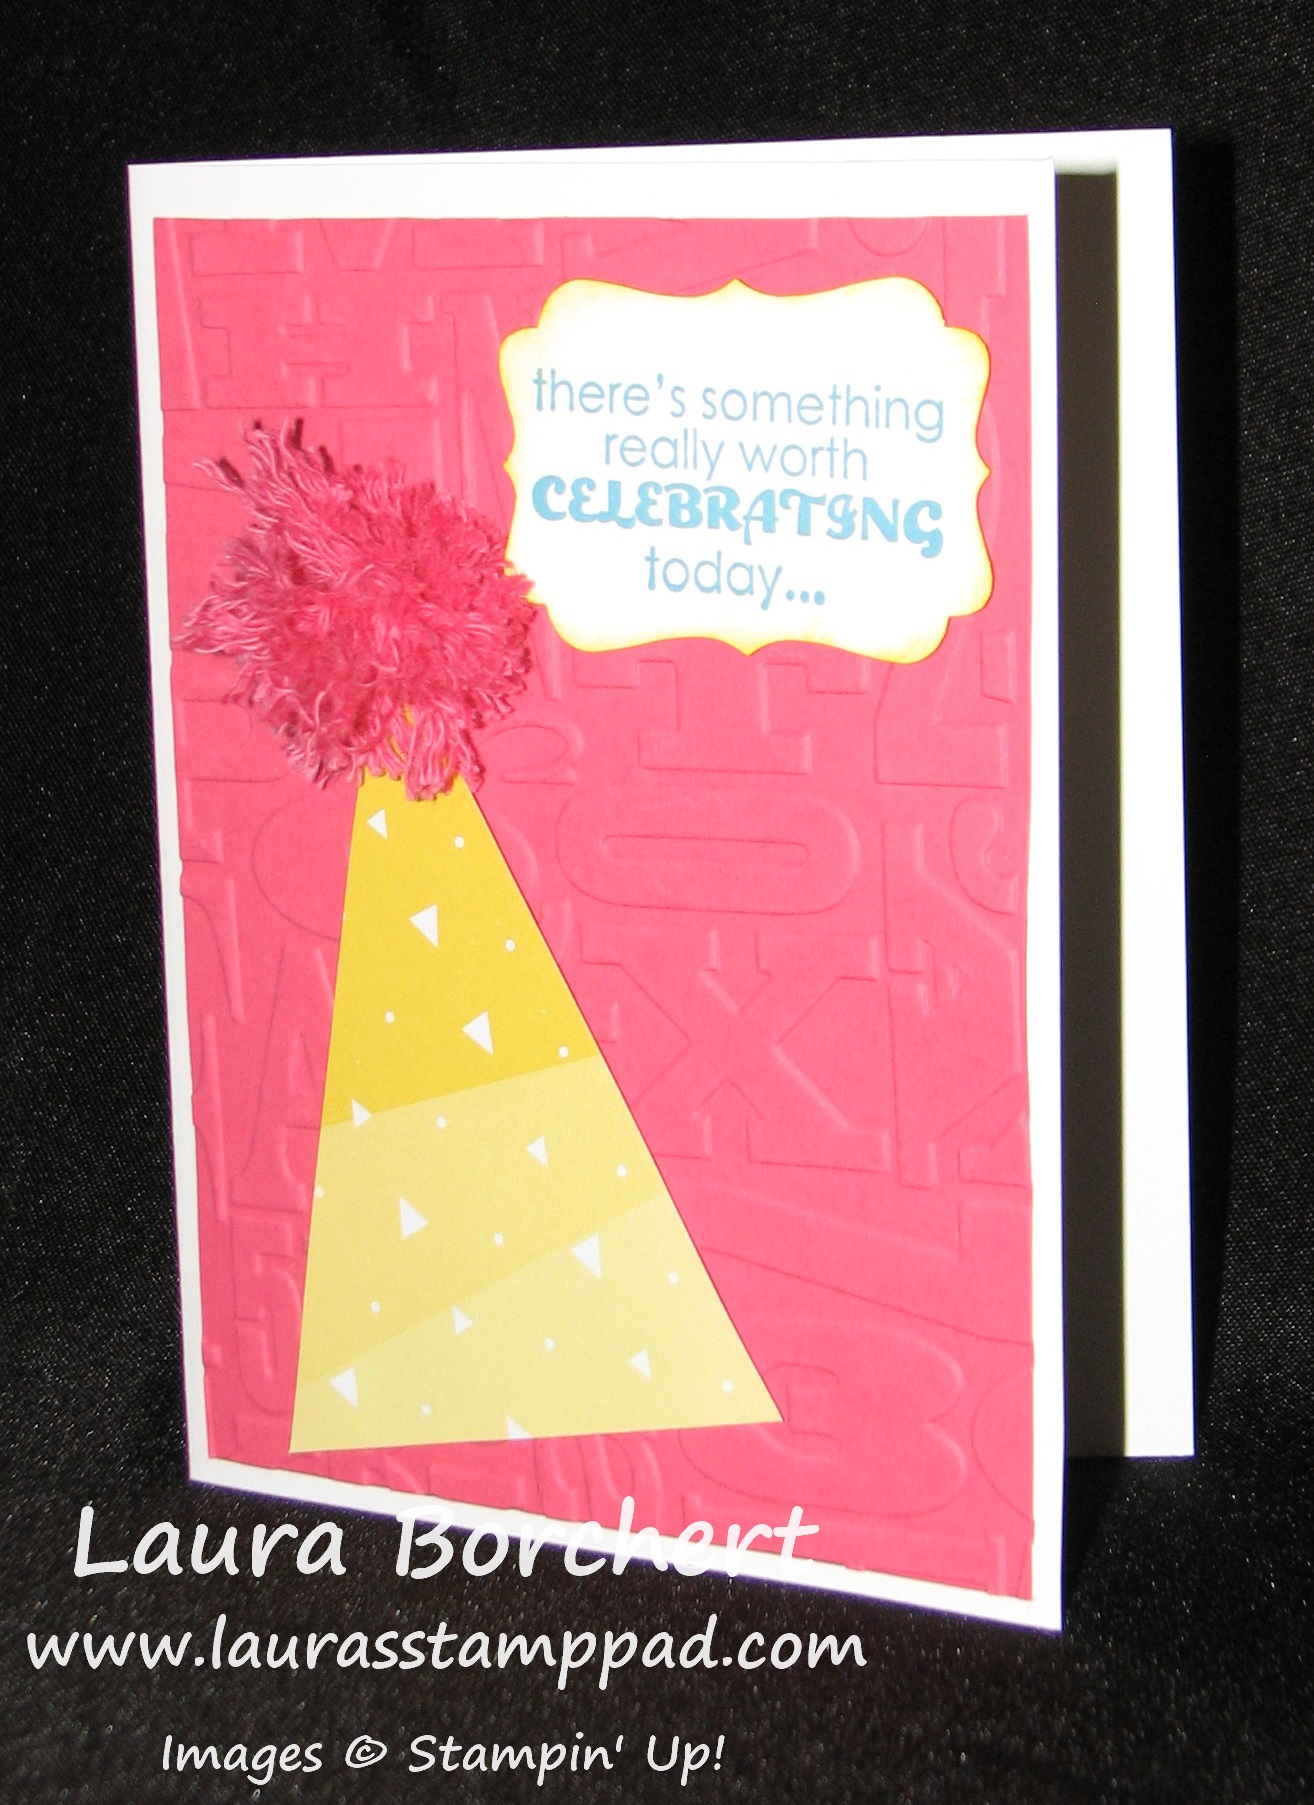
Happy Tuesday!!! That means I have a fabulous technique to share with you and today it is making cut little Pom Poms!!!!
I am loving the Pink little Pom Pom on that party hat!!!! It is just so fluffy!!! And fairly easy to make! Let’s get started!
Supplies Needed: Baker’s Twine (I prefer to use the Thick style), a fork or piece of scrap paper, and a needle
The supply list is short and a little odd but you will see! For this card, I used the Thick Strawberry Slush Baker’s Twine. Since I wanted a smaller pom pom, I just wrapped the twine around the tines of a fork about 10 times. Then you will take another piece of the twine and loop it through the middle tines and tie all of your loops together. Now you can slide the loops off of the fork and cut all of the loops. I do kind of like all of the loops too…super cute! Once you can have cut your loops, you can either stop there or take your needle and run it up each piece of Baker’s Twine to fray the ribbon into lots of smaller strands. This is the part that sometimes can take awhile and make you want to go crazy! Once you think you have done them all, you find another one. 🙂 Fluff all of the pieces and your Pom Pom is complete!!!! I attached the Pom Pom to the Sweet Taffy Designer Series Paper triangle with Stampin’ Dimensionals. I layered the party hat onto a piece of Strawberry Slush that I had run through my Big Shot with the Alphabet Press Embossing Folder! The greeting is from Remembering Your Birthday and I punched it out with my Decorative Label Punch!
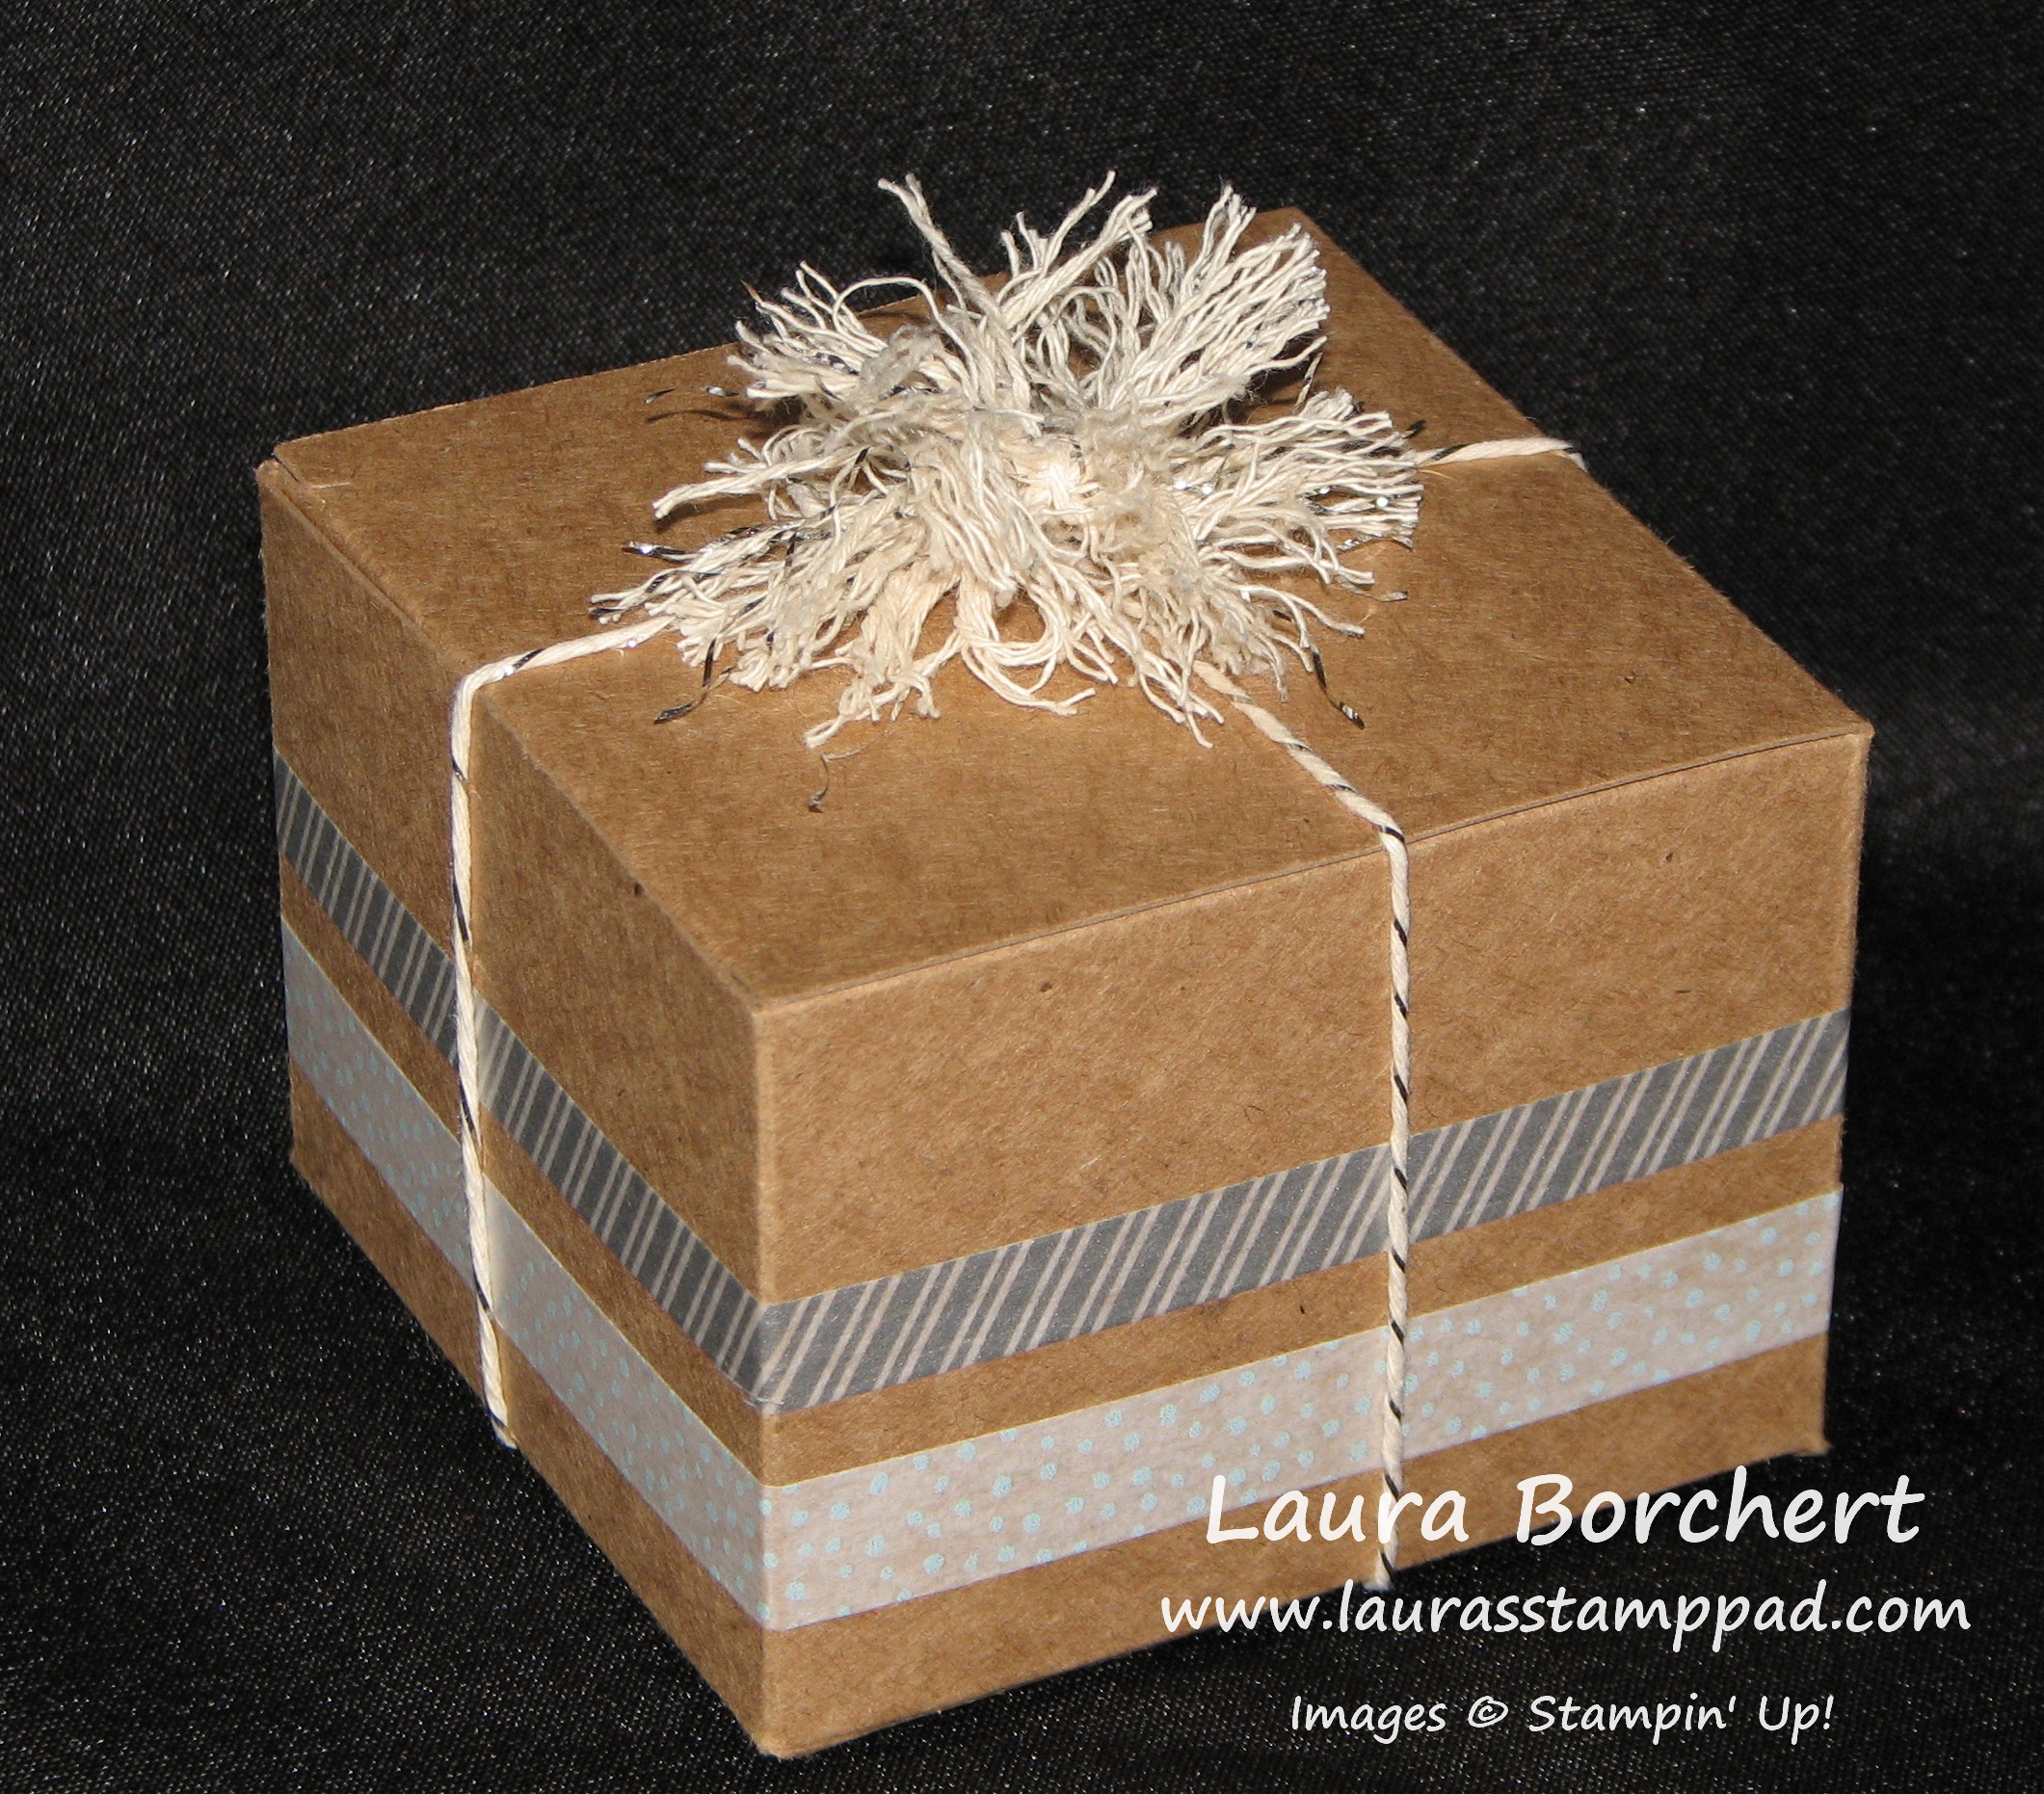
For this adorable gift box, I decorated it with the All Is Calm Designer Washi Tape which is super simple. Then I used the Silver Baker’s Twine for the pom pom. To make this one a little bigger, I wrapped the twine around a piece of scrap paper that was wider than the fork. Again 10 times around, slide it off and tie it in the middle, cut the loops and fray it!
To see this all in action, check out my Video Tutorial!!! Be sure to give the video a thumbs up if you liked it and don’t forget to subscribe so you don’t miss out on any future videos (like the one on Thursday 😉 )
There are so many times that you need a fabulous treat bag – school treats, teacher gifts, neighbor gifts, goodies for the Holidays, party favors, and gatherings!!! It is a must that it looks super cute, right? YES! And that it is super simple? YES! I’m here to save the day for all of your upcoming occasions or treat bag needs!!!
Boom…Problem Solved!!! How amazing is this treat bag!?!?!
All you need are some 4″ x 6″ Cellophane Bags, Washi Tape (I used Watercolor Wonder Washi Tape) and a tag! The Washi Tape on the bag is super simple because it tears so you don’t even need scissors and I just overlap mine on the back side! For the tag, I used my Chalk Talk Framelits, a strip of Washi Tape, and stamped Sweet Treats from the Teeny Tiny Wishes Stamp Set! I love how the Chalk Talk Tag is notched so you don’t need to attach it with ribbon but just notch it around the top of the bag!!! To close the bag, I used my Gold Baker’s Twine and then took a needle to the ends to fray it and make it look fuller!
Here is another fabulous treat bag! This one is decorated with an adorable tag using the Scallop Tag Topper Punch! I then decorated the tag with my Papillion Potpourri Stamp Set and greeting from my Perfect Pennants Stamp Set! I closed this bag with some Whisper White Baker’s Twine in a double knot. Then I added the tag with the ends of the Baker’s Twine in a loop! These fabulous treat bags were made for a Mother/Daughter Banquet! See….cute treat bags are needed everywhere!!!
Here is a video showing how to make these fabulous treat bags! Be sure to “Like” and “Subscribe” to the video because that would be fabulous!!! Also, leave a comment down below and let me know what you would like to see next!!!
How many different Gold items can you put on a card??? I think this fabulous card answers that question!!!! I used the Gold Fancy Foil Designer Vellum! I have found that the best way to adhere vellum to your project is to put Mini Glue Dots or Snail Adhesive behind the gold dots or behind the greeting tag. If you put adhesive on the vellum, you can see it show through to the front! Then I used my Watercolor Wonder Washi Tape on Brushed Gold Cardstock! I love Brushed Gold because it gives a subtle shimmer that is amazing! I used my Scallop Tag Topper Punch on the Brushed Gold and used Gold Baker’s Twine to tie to the two tags together (could I use another “T” word in that sentence 🙂 ) Then I used my Banner Framelits for my greeting tag and stamped an image from Perfect Pennants with GOLD ink! What other ink would I use on this Gold Card? I really love that saying too! It just means so much! It’s perfect! Here is another photo of this card so you can really see some of the shimmer!
You can really see it shine! I hope you like this card and try it some of the gold products! I hear gold is IN! You can check out some other samples here and here!!!
Have I ever told you how much I love Washi Tape??? Well I love love love it!!! You can make such amazing projects with it and it is quick, simple, and affordable!!! Look at all these amazing cards below and you can see more here and here!!!
This one was created with the Retro Fresh Washi Tape and I used a greeting from the Delightful Dozens Stamp Set! This stamp set is retiring so get it before it is gone! For the greetings, I stamped the middle one first and then without re-inking I stamped above and below for that gradual color fade!
Father’s Day is right around the corner!!! This card uses the Epic Day Washi Tape and the greeting from Delightful Dozens Stamp Set (retiring). This one is an amazing “man” card and we all know I have a hard time with those!
For more on these cards and to see just how quick and simple they are, check out this video where I timed myself on how long it takes to create Washi Tape Cards!
Let me know in the comments below what types of videos you would like to see next!!!
Happy Tuesday!!! You know what that means – I have a fabulous technique to share with you!!! This week I am showing you how to make a fabulous Shaker Card with Emboss!
How cute is that? I’m loving the bling (even though honestly, I’m more of a silver girl)!
Supplies Needed: Washi Tape, Cardstock, Window Sheet, Shaker items like glitter, punched circles or flower, etc, or sequins
You will need to cut your cardstock and Window Sheet to be the same size! This card is a 3″ Square! Then you will lay your 2 squares together and add Washi Tape (Watercolor Wonder Washi Tape) along the edges half way so that the other half can fold over to the back (holding your 2 pieces together). Trim off an access on the corner. Before putting Washi Tape on the 4th side, be sure to add in your shaker items. For this card, I placed Washi Tape on a scrap piece of Very Vanilla and then punched out 1/2″ Circles. You can use anything as your shaker items – punched circles, hearts, flowers, glitter, sequins, etc. After your shaker items are in there, you will seal up the final side with Washi Tape. Then you can put it on your card and decorate as you wish! As for the greeting, you can either stamp on your cardstock that is layered behind the Window Sheet or you can use Stazon and stamp on the window sheet or you can emboss a greeting onto the window sheet! I took the easy, quick drying route and stamped on my cardstock! 🙂
Once you have created your shaker piece, you can put it on your decorated card! For the one pictured above, I used Coastal Cabana and Whisper White Cardstock. I embossed the Whisper White with my Stripes Embossing Folder and added little banner tags! The banner tags were created with the Gold Fancy Foil Designer Vellum and Sequin trim! The stamp set I used for my greeting was Delightful Dozens (this one is retiring so get it before it is gone)! To watch a video tutorial on this technique, click here!
I, also, wanted to give a shout out and THANK YOU to everyone to participated in my Anniversary Special!!! Your goodies are on their way!!!!
Happy Friday All!!!! Today is a BIG Day because it is the last day for FREE SHIPPING on all Stampin’ Up orders with no minimum! It is also the last day for my Anniversary Special! When you place an online order with the HOSTESS CODE: XNYWCB4B, you will get a FREE gift from me!!!! I have Stamp Sets, Big Shot Dies, Ribbon, Designer Series Paper, and so much more that is just waiting to be in your stamp collection. But wait there’s more, I will also be drawing one lucky winner to get ALL of the Hostess Benefits!!!! Who doesn’t love FREE STUFF and FREE SHIPPING!! On top of all of that Stampin’ Up still has their Weekly Deals!
All of these items are on the retired list as well (except the Afternoon Daydream Digital Download)! So now is the time to stock up!!! You have seen lots of samples using the Afternoon Picnic DSP! You can check those out here, here and here! My other big favorite that I’m sad to see go is the Crochet Trim Victoria! I, myself, am not a huge fan of the vintage/rustic look but I know many of my brides and customers are and I have had fun using it to create amazing pieces! Check out samples here!
For the complete list of retiring items, click here!
What would make this Friday even better? Chocolate!!!!
If you have some extra Easter Candy that you need to get out of the house or End of the School Year Party or Teacher Appreciation Week (May 5-9), these treat bags are the perfect thing!!!!
I love playing with Washi Tape! There are so many ways you can use it and there is no need for adhesive because its sticky! Just apply in any direction, stamp a greeting and BOOM you are done!!! Check out these fabulous samples!
I used the Watercolor Wonder Washi Tape from the Occasions Mini Catalog on this card and layered it on Baked Brown Sugar! I love how the Baked Brown Sugar goes with gold very well!!! I used the Washi Tape as little banners and just ripped the ends off which makes it even better – no scissors necessary!
This card would be perfect for Graduation which is just around the corner. I used the Retro Fresh Washi Tape which is in the Occasions Mini Catalog as well. I stamped the greeting in Tangerine Tango in the middle and then without re-inking, stamped above and below the first greeting! There are so many colors you can get out of just one ink pad by stamping off!!!
Father’s Day is right around the corner as well! Man cards are always hard for me because I like the color PINK and flower stamps! This is quick and simple and is the perfect man card for any occasion. I used the Epic Day Washi Tape for this one!
I hope you enjoyed these fabulous samples. You can check out more here and here! Washi Tape is perfect when you need to make multiples because it is just $4.95 for 3 Rolls! Now that’s a steal. Also, don’t forget you can order it this week and take advantage of my Anniversary Special! To celebrate my 10 years with Stampin’ Up!, when you place an online order using the HOSTESS CODE: XNYWCB4B, you will get a FREE gift from me!!!! I have Stamp Sets, Big Shot Dies, Ribbon, Designer Series Paper, and so much more that is just waiting to be in your stamp collection. But wait there’s more, I will also be drawing one lucky winner to get ALL of the Hostess Benefits!!!! Who doesn’t love FREE STUFF! This special will end on April 25th!!!
Some may think this card is a bit much with all the colors and stripes but others may say it is colorful and amazing! I used the Retro Fresh Designer Series Paper for the background and Retro Fresh Washi Tape on both ends of my Deco Label greeting piece. I love coloring my flowers different colors with the markers and this image is perfect for that! The flowers and greeting
come from the Embellished Events Stamp Set! That is one of my favorites because it has great images and perfect greetings for all occasions! Added a little Chevron ribbon to the card to complete it! Let me know in the comments what you think!!!
The card here on the left is so simple and FABULOUS! I used the Retro Fresh Washi Tape and just layered them on Very Vanilla. Then I layered that onto Coastal Cabana and So Saffron! The greeting is from the Million and One Stamp Set…..love it because the other greeting says FABULOUS! 🙂