Technique Tuesday – Reflection Technique!!!

Posted on

Happy Tuesday!!! You know what that means? I have a fabulous technique to share with you today! It has a major WOW Factor and it is actually fairly simple to create!!! It makes great man cards too!! 🙂

Lovely As A Tree Reflection, www.LaurasStampPad.com

How cool is that? The reflection of the trees in the “pond”, or whatever water it is, is just stunning!! I love it! You can do this technique with lots of different images and not just trees! Now let’s get started!

SUPPLIES NEEDED: Sponge Daubers, Window Sheet, Stamp Set, and Ink

See I told you it was easy since the supply list is so short! I have a feeling you all doubt me on that! 🙂 The piece of Whisper White cardstock that I used for this one measures 4-1/4″ x 3-3/4″. I started by sponging my cardstock first. I saw this technique at Spring Into Stamping and Debbie advised to do that first! I used the Soft Sky Sponge Dauber for the very bottom (pond) with just a few passes back and forth. Then I used the Pool Party Sponge Dauber above that for the pond and at the top for the sky. The leftover (middle) section I filled in with the Wild Wasabi Sponge Dauber. I added the brown at the end; using the tree stamp as a guide for those marks! Once you have your cardstock all colored in, you will stamp the trees from Lovely As A Tree with Chocolate Chip Ink in the Wild Wasabi section of your card. Now ink up your stamp again and stamp it onto a piece of Window Sheet! Be very careful to press evenly and not slide all over. If it does, no worries, just wipe it off with a baby wipe or wet paper towel and do it again! Now you will take your window sheet, flip it over, and press it down to your cardstock either just below your already stamped trees or down further. You can do it either way, it also might depend on where your water starts. Once you lay the window sheet down, just gently press all over so the ink is touching the cardstock and soaking in! Now lift up and voila! That’s it!!! See I told you it was easy! After looking at the sample above, I decided it needed a little dirt at the pond’s edge so I went in with some brown and did a few passes!!! You could also use a darker green!

Lovely As A Tree Reflection, www.LaurasStampPad.com

Here is another sample that I created! My pond was much smaller so I could only fit half of the trees on there. I actually think I like this one better. The card at the top made me always wonder which way was up but with this one I know!

Sheltering Tree Reflection, www.LaurasStampPad.com

Here is another sample that I created with the Sheltering Tree Stamp Set. I really love this one because the reflection image is sort of fuzzy looking so it really looks like a reflection in the water. I think it came out like that because it is a more solid image and the ink pooled in places on the window sheet. The Lovely As A Tree Stamp is very fine and small so it came out more clear and crisp! For the card above, I stamped the tree first and then did the Window Sheet reflection of the tree. Then I did the leave and the reflection of the leaves. I added the grass and flower stems (for more texture) to the card and then just sponged Pool Party below the grass. So I actually sponged last for this card! I added the greeting from Teeny Tiny Wishes and punched it out with the Word Window Punch and layered it onto Wild Wasabi Modern Label Punch! I added the greeting to the card with Stampin’ Dimensionals! 

If you would like to see this technique in action, you can check out my Video Tutorial below! Don’t forget to give it a thumbs up if you liked it and subscribe to My Channel so you don’t miss out on future videos!

Let me know in the comment below which of these 3 you liked best! If you are planning on trying out this technique, let me know if you will be using a tree or another type of image! I can’t wait to hear all about it!

Happy Stampin’

~Laura


Easter Flowers!!!

Posted on

Easter Sheltering Tree, www.LaurasStampPad.com

Easter is a week and a half away!!!! I love Easter and it is my favorite holiday! I love the bright colors, the Spring weather, the joyfulness and fun of the low-key holiday! Of course, there is also the AMAZING candy at Easter time!!! Since I don’t do a lot of cards for Easter time, I don’t like to spend money on a Easter specific stamp set because I want something more versatile. You want versatile…..Teeny Tiny Wishes is the stamp set for you! I LOVE IT! It has a greeting for everything. That is the greeting I used here with my Modern Label Punch and Word Window Punch. For the flowers, I used the Sheltering Tree Stamp Set from the Occasions Mini Catalog! Love this set! You can see more samples here, here and here! I used Pear Pizzazz for the stems and the flowers are Crushed Curry, Rose Red, and Wisteria Wonder! I rounded the corners of the Whisper White to soften the edges. Want something even more soft? Try the Painted Blooms Cotton Twine! It is soft and easy to tie and not chunky on your card at all!

Let me know what you think of this card? Do you send Easter Cards? This would make a great spring card for any occasion. Also, let me know in the comment below what you favorite Easter candy is!!!!!

I don’t know if I have a true favorite……I love jelly beans, malted eggs, and peeps!

Happy Stampin’

~Laura


Keep Calm and Washi Tape!!!

Posted on

CAS Washi Tape Holiday, www.LaurasStampPad.com

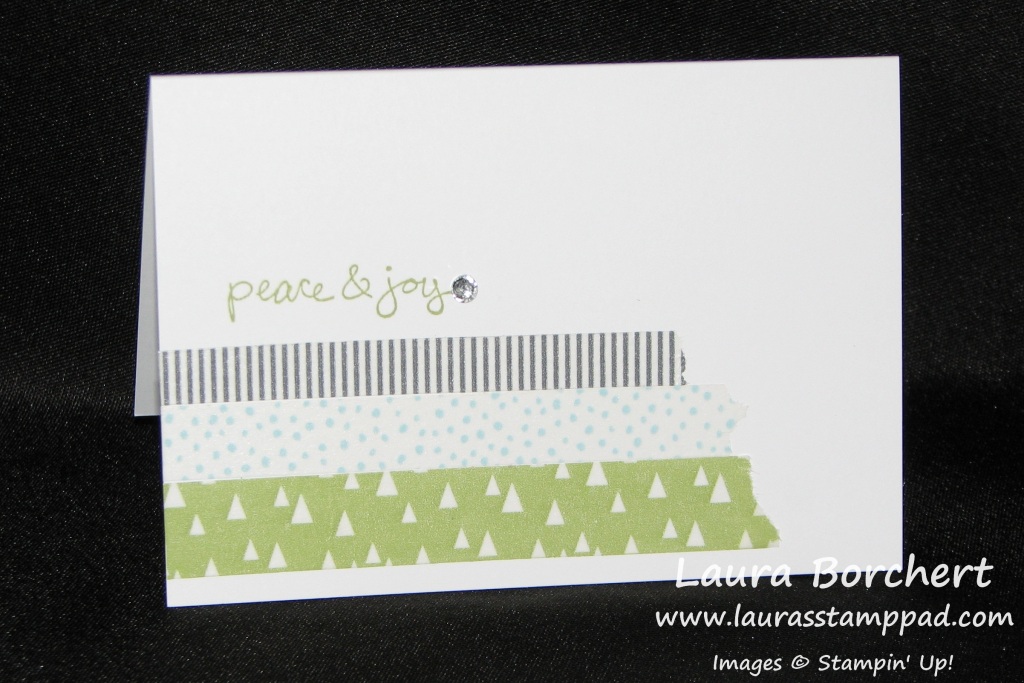
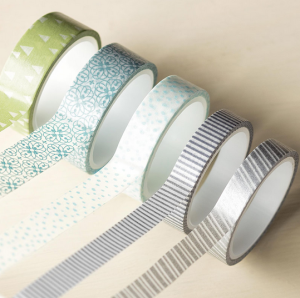
Looking for a quick and simple Christmas Card? Didn’t get Christmas Cards out in time but would still like to send a little Winter note to your friends and family? This is the perfect one for you! All you need is a package of Note Cards & Envelopes, a package of All is Calm Washi Tape, some Rhinestones if you enjoy bling like me, and a greeting stamp set! The All is Calm Designer Washi Tape comes with 5 different styles for you to use!

All is Calm Washi, www.LaurasStampPad.com

I am loving this set of Washi Tape for lots of my projects! This simple card is just one of them! I added 3 strips of the Washi Tape and just ripped it off for that torn look (even better no scissors necessary)! I stamped the greeting from the October Promotional Stamp Set – Good Greetings in Pear Pizzazz! You can always use a greeting from Teeny Tiny Wishes or any other favorite greeting that you have! I thought it needed just a little something more so I added some bling – a Rhinestone! You can even add a little Washi Tape to the envelope as well or use it to seal the back! No licking necessary! 🙂 Be sure to order this before the Holiday Mini Catalog is over on January 5th! Also, the All is Calm Washi Tape would go great for your Holiday/Winter Scrapbooking as well so be sure to pick up another pack for that!

Happy Stampin’

~Laura


Terrific Little Trees!!!

Posted on

Festival of Trees, www.LaurasStampPad.com

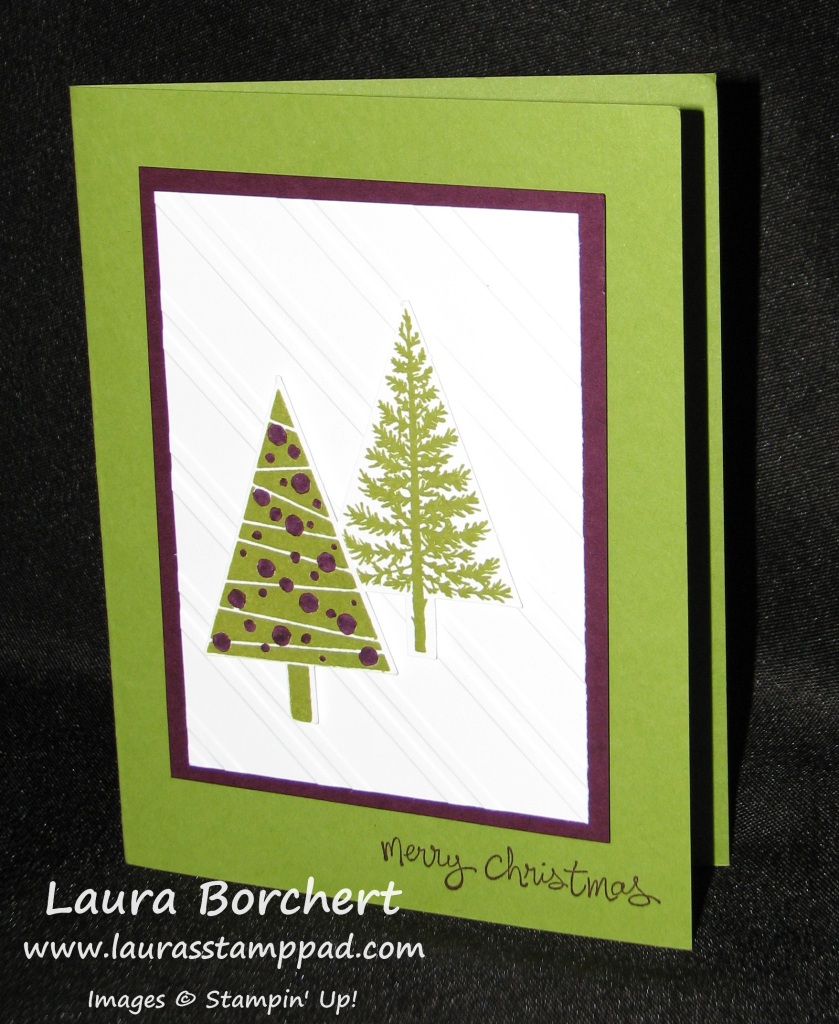
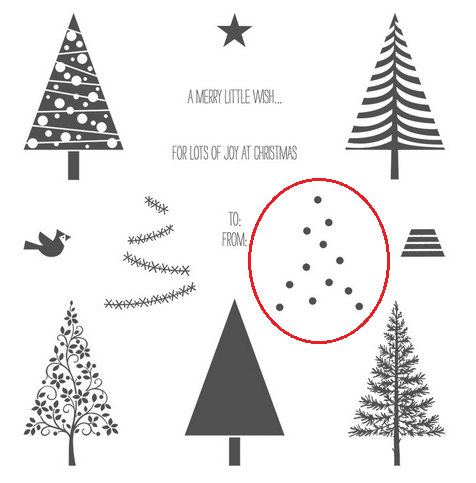
I love these little trees in the Festival of Trees Stamp Set and since they are Photopolymer you can see exactly where you are stamping! I decided to share this sample card with you to show off a little bit of my craziness! 😉 I’m a crazy stamper just like all of you! You will see that the little tree with the purple dots is REALLY covered in dots. That is because I stamped the tree and then took my Blackberry Bliss Marker and colored in all of the dots. Then about 3 samples later of playing with this stamp set, I realized “there’s a stamp for that.” NOTE: I used the stamp for that already as little snow dots on a background piece. So I had used the stamp but didn’t realize it was meant for the tree ornaments. (me shaking my head)

Festival of Trees, www.LaurasStampPad.com

Here is a photo of the stamps in the set. There is garland and the ornaments (dots) that you can use to decorate your trees. Of course the dots fit perfectly in the tree on the top left. Stampin’ Up! – 1, Laura – 0

Of course you can color in the dots on the trees with a marker but I will say it was quite tedious! 😉 Now for the card basics, I started with an Old Olive card base and added a 4-1/4″ x 3-1/4″ piece of Blackberry Bliss with Stampin’ Dimensionals. Then I took a piece of 3″ x 4″x Whisper White cardstock and ran it through my Big Shot with the Stripes Embossing Folder. You know how I love to add texture! I stamped the Merry Christmas greeting at the bottom in Blackberry Bliss. This greeting was from the October promotional set – Good Greetings. You could also use the Merry Christmas from Teeny Tiny Wishes or any other favorite set of yours! For the trees, I stamped them in Old Olive on some scrap Whisper White and then punched them out with the coordinating Tree Punch (Bundle & Save)! I attached them to the card with Stampin’ Dimensionals! Adorable!

I hope you enjoyed this card! You can see other samples using the Festival of Trees Stamp Set here!

Happy Stampin’

~Laura


Fall Wondrous Wreath

Posted on

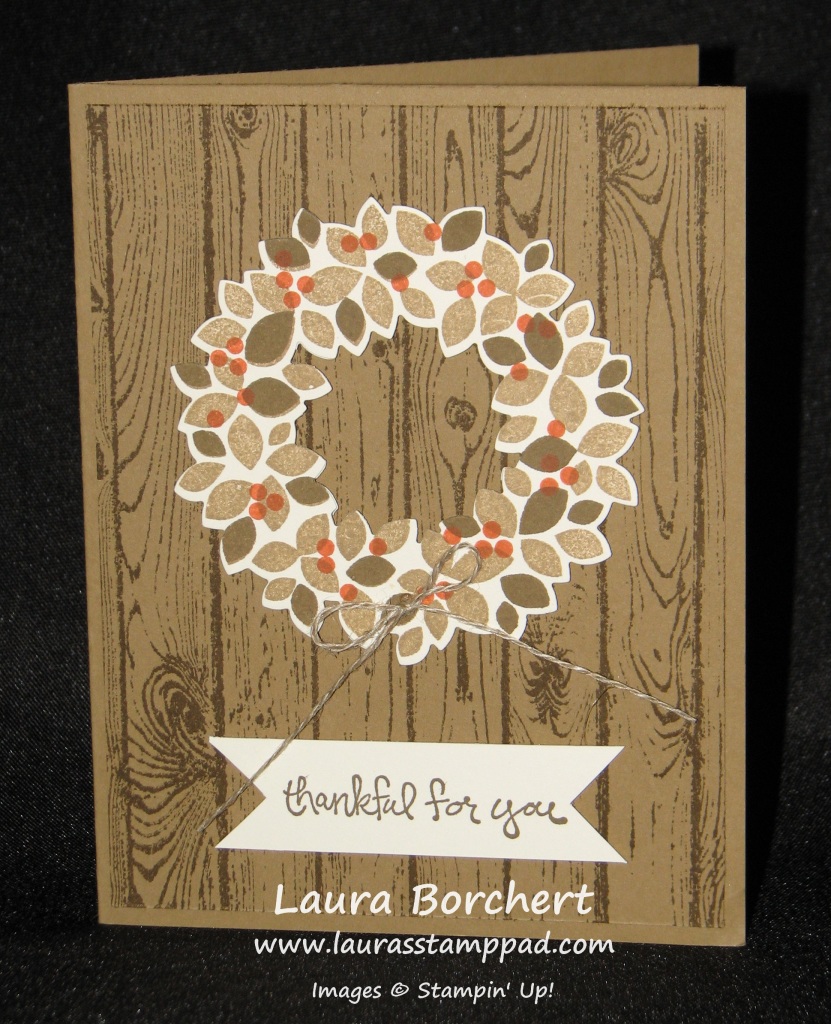
Fall Wondrous Wreath, www.LaurasStampPad.com

Like many of you, I like to have a wreath on my front door! I love driving up to my place and seeing that beautiful wreath and thinking I live here! I love it! It also helps my fellow stampers find my place! 🙂 The Holiday Mini Catalog has this amazing stamp set called Wondrous Wreath & coordinating Wonderful Wreath Framelits (Bundle) and the samples show this amazing holly wreath! While it is a stunning wreath, there are so many other ways you can use this stamp set just like there are so many different styles of wreaths you can put on your front door!

The card above is perfect for Fall! You can use this card for Fall Birthdays, Thank Yous, Thinking of You, and even Thanksgiving Day cards! I started off with a Soft Suede card base and then I cut out another piece of Soft Suede measuring 4″ x 5-1/4″. I used this second piece to stamp my Hardwood image on. You could stamp it right onto your card front but I found this to be easier because if I mess up (it happens) I can just flip over the piece of paper and try again! Thank goodness there are 2 sides to every piece of paper, am I right? The other thing I like about this is that it gives my card some dimension. After stamping the hardwood image, I adhered this piece with some Stampin’ Dimensionals! 🙂 For the Wreath, I used a piece of Very Vanilla cardstock and I stamped the super leafy image in Crumb Cake (being sure to note that the tab on the stamp is facing up). Now you will take your partial leafy image and ink it in Soft Suede and with the tab facing up stamp it right on top of the leaves. Finally, with the dots image, you will ink it up in Tangelo Twist and with the tab up, you will stamp it down. Note: With this one, the tab will be facing up, but you will want to center the stamp around the wreath. No worries, if this all sounds crazy to you, I created a Video Tutorial showing you what I mean! 🙂 Once you are done stamping, you will use the coordinating Framelits – Wonderful Wreath Framelits, you will cut out the stamped wreath! No need for any fussy cutting here! Woot Woot! I added a little bow of Linen Thread and attached it to the card with Stampin’ Dimensionals! For the greeting, I stamped it from the Good Greetings Stamp Set which was a promotional item in October! You can always use a greeting from Teeny Tiny Wishes or another favorite set you have!

Here is the Video Tutorial for you! Be sure to give it a thumbs up if you liked it and don’t forget to subscribe to my blog so you don’t miss out on any of the other samples you saw in the video! 🙂

Happy Stampin’

~Laura


I’m Dreaming of a Blue Christmas!

Posted on

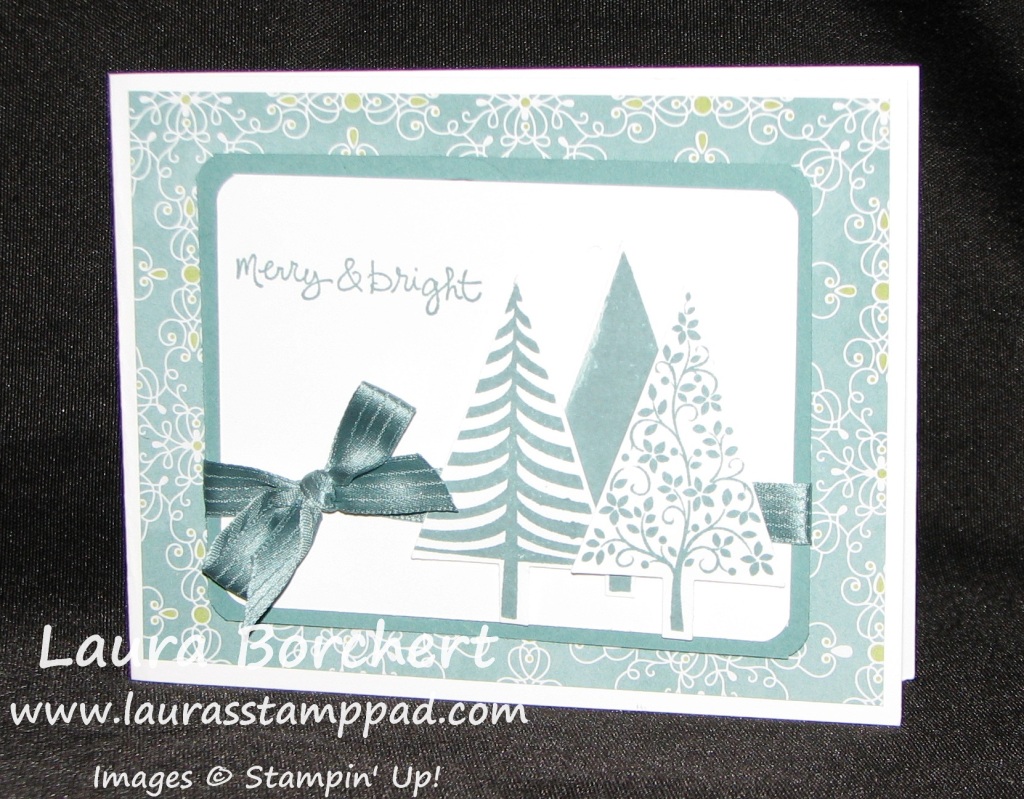
Festival Of Trees, www.LaurasStampPad.com

I am just loving the blues this years…in particular Lost Lagoon!! This card really shows that! 🙂 I started off with a card base of Whisper White and added a piece of All is Calm Designer Series Paper (4″ x 5-1/4″). I am loving the patterns and colors of this paper and have gone through a few packs already! Check out this sample and this sample! Next I stamped 3 different trees from the Festival of Trees Stamp Set in Lost Lagoon and punched them out with the coordinating Tree Punch (Bundle & Save)! I cut a piece of Lost Lagoon cardstock (4-1/4″ x 3-1/4″) and Whisper White cardstock (4″ x 3″) out and used my Corner Rounder Punch on all corners. My greeting is from the Good Greetings Stamp Set which was a promotional stamp set last month! You can always use a greeting from Teeny Tiny Wishes, Endless Wishes or any other favorite set you have. Adhere your Whisper White onto your Lost Lagoon and then tie a piece of Lost Lagoon Satin Stitched Ribbon around it. You can always just tie it into a knot or you can do a bow like I did. That one came out pretty good so I kept it, other times I pull it out and leave it as a knot! 😉 I adhered this piece to my card front with Stampin’ Dimensionals and then added my 3 trees. The solid tree was put on with Snail Adhesive and the other two were put on with Dimensionals! I love my dimensionals something fierce! Now you are all set and just a need to write in the inside and in the mail it goes!

Happy Stampin’

~Laura


Spooky Nights!!!!

Posted on

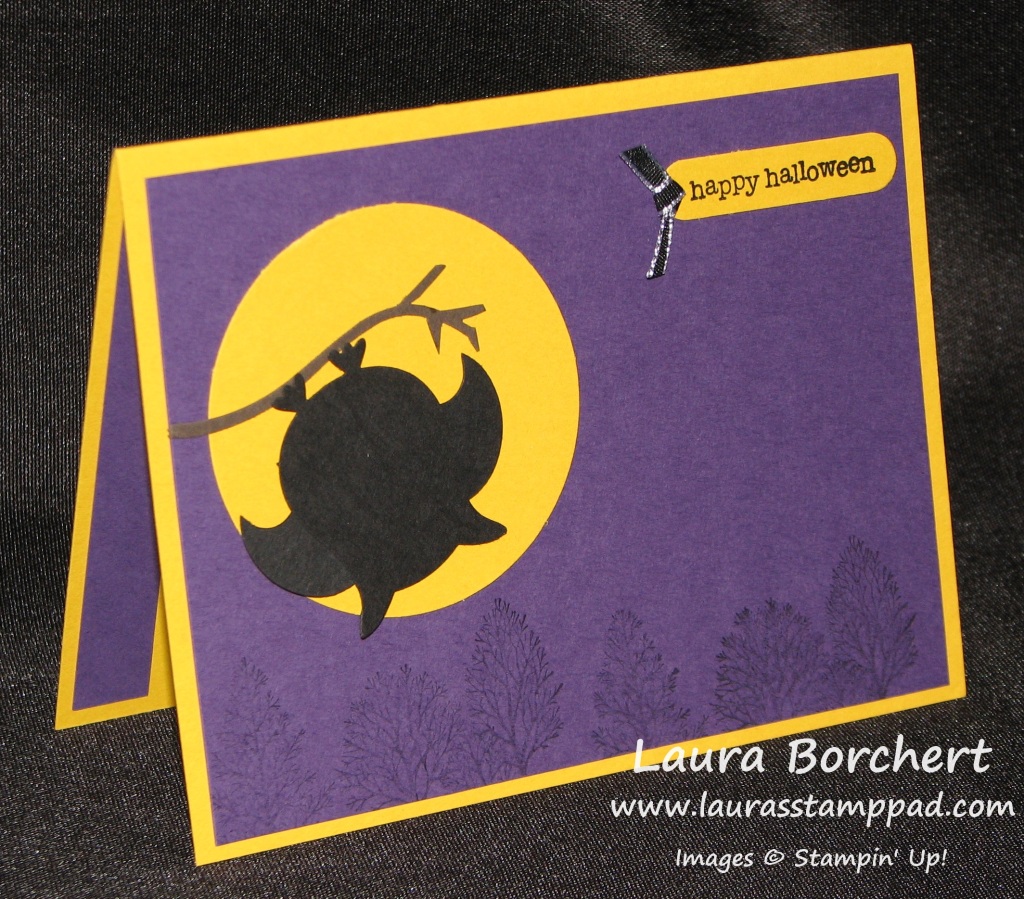
Bat, Owl Punch, Halloween, www.LaurasStampPad.com

Halloween is around the corner and spooky nights are here! I am not a huge Halloween fan……in fact I really don’t like it. (GASP) I heard that. 🙂 I am easily scared and dressing up has never really been my thing. I do like to make cute little treat bags for Trick or Treaters though!

So since I am not a fan of Halloween I don’t usually purchase Halloween Stamps but instead use some of my current stamps and punches to create a few fabulous cards to send to friends and family! Like this amazing card! I started with a card base of Crushed Curry and layered a piece of Elegant Eggplant on top. I used my Lovely As a Tree Stamp Set to stamp a few trees in Chocolate Chip along the bottom! For the moon, I used my 2-1/2″ Circle Punch to punch out some Crushed Curry cardstock! Then I punched out a branch from the Bird Builder Punch in Early Espresso cardstock. Using my Paper Snips, I cut the leaves of the branch to make it look more ragged and like a dead tree (not so cute and pretty). For the bat, I used my Owl Builder Punch for the base and the Small Oval Punch for the wings. I punched out to Small Ovals and then using the Word Window Punch, punched about a 1/4″ into the oval to create that notch. Of course he is adhered onto my card with Stampin’ Dimensionals. The greeting is from the Teeny Tiny Wishes Stamp Set and I punched it out with the Word Window Punch as well. I added a knot of Basic Black Taffeta Ribbon as well! Here is a quick Video Tutorial on the Bat pictured above as well as a bat in flight and more! Be sure to give the video a thumbs up if you liked it!!!!

Happy Stampin’

~Laura


More Cards using Sponge Daubers!!!!

Posted on

Okay, so if you have been following my blog for even a week you probably know I love the color PINK and my SPONGE DAUBERS! These are just the coolest things ever and can really make your project amazing!!! Check out some samples using them here and here. Then I did a Video Tutorial on using your sponge daubers here! Well today I thought I would show you a few more samples!!!!

Inking with your Sponge Daubers, www.LaurasStampPad.com

In the video, I showed you a sample using shades of green but then I created a shade of purple background! This is the completed card! I stamped the word Hello using the Epic Alphabet Stamp Set and my Stazon Ink and then I added some bling – Rhinestones! I layered that piece onto Wisteria Wonder (the lightest shade I used) and then placed it on a card base of Blackberry Bliss (the darkest shade I used)! I just love using multiple shades of one color because it really shows an amazing spectrum!

Inking with your Sponge Daubers, www.LaurasStampPad.com

This card was created by one of my stampers at Stamp Class and she used 5 different shades of green – Pistachio Pudding, Pear Pizzazz, Old Olive, Garden Green, and Mossy Meadow! She added the name Mike because his birthday was right around the corner! She also used the Epic Alphabet Stamp Set as well as A Dozen Thoughts (Wish Big) and Teeny Tiny Wishes (Happy Birthday)! I love how my stampers sometimes do exactly what I do and other times get creative and do their own thing! Together, we always come up with another great idea! I love it!!! I hope you try out this technique and feel free to leave me a comment below or send me your project. I would love to see it and share it!


Technique Tuesday – Sponge Daubers!!!

Posted on

Happy Tuesday!!! You know what that means…..I have a fabulous technique to share with you today!!! My Favorite Stampin’ Tool – SPONGE DAUBERS!!!! I’m sure you all knew that already! Well I’m here to show you why I love them so much and get you all to fall in love with them as well!!!

Sponge Dauber Color Swatch, www.LaurasStampPad.com

Isn’t this card just fabulous? That amazing ombre background is perfect for any type of card! You can create the look in many different colors or in a rainbow pattern….the possibilities are endless! Of course, I created this look with my SPONGE DAUBERS!

SUPPLIES NEEDED: Sponger Daubers, Ink, Cardstock (that’s it) 🙂

You always want to start with your lightest color first. I used Pear Pizzazz, Old Olive, Garden Green, and Mossy Meadow! Tap Tap Tap with your sponge dauber into your ink pad and then you will go back and forth over your cardstock. Be sure to go off the piece of paper so that your color goes all the way to the edge. Also, by going off the paper, you will have your darkest spots off the project and not have this darker edge, lighter center look (unless that’s what you are going for). Once you have achieved the look you want, move to the next color. You will want to overlap a little bit so that your colors blend well and you don’t have a distinct line between each color. Repeat until you have used all of your colors. How simple is that? Now you can embellish or stamp on it. I used the new Epic Alphabet Stamp Set for the name Luke! This card is for my nephew’s birthday…..no worries he is only going to be 8 and isn’t a blog follower….yet! I then wanted to add in a few birthday greetings so I used the Happy Birthday from my Teeny Tiny Wishes Stamp Set and the Wish Big from the A Dozen Thoughts Stamp Set! LOVE IT!

If you would like to see this in action, check out my Video Tutorial that I created using shades of purple!!! Be sure to Like and Subscribe to my channel so you don’t miss out on more fabulous video tutorials!

For more ways to use your sponge daubers, check out this Northern Lights post, this post and this one! You can also put Sponge Daubers into the Search bar and see the many posts I have done using these amazing things!

Happy Spongin’

~Laura


Tags and Bags!!!!

Posted on

There are so many times that you need a fabulous treat bag – school treats, teacher gifts, neighbor gifts, goodies for the Holidays, party favors, and gatherings!!! It is a must that it looks super cute, right? YES! And that it is super simple? YES! I’m here to save the day for all of your upcoming occasions or treat bag needs!!!

Watercolor Wonder Washi Tape Bag & Tag, www.LaurasStampPad.com

Boom…Problem Solved!!! How amazing is this treat bag!?!?!

All you need are some 4″ x 6″ Cellophane Bags, Washi Tape (I used Watercolor Wonder Washi Tape) and a tag! The Washi Tape on the bag is super simple because it tears so you don’t even need scissors and I just overlap mine on the back side! For the tag, I used my Chalk Talk Framelits, a strip of Washi Tape, and stamped Sweet Treats from the Teeny Tiny Wishes Stamp Set! I love how the Chalk Talk Tag is notched so you don’t need to attach it with ribbon but just notch it around the top of the bag!!! To close the bag, I used my Gold Baker’s Twine and then took a needle to the ends to fray it and make it look fuller!

Tag Topper Treat Bag, www.LaurasStampPad.com

Here is another fabulous treat bag! This one is decorated with an adorable tag using the Scallop Tag Topper Punch! I then decorated the tag with my Papillion Potpourri Stamp Set and greeting from my Perfect Pennants Stamp Set! I closed this bag with some Whisper White Baker’s Twine in a double knot. Then I added the tag with the ends of the Baker’s Twine in a loop! These fabulous treat bags were made for a Mother/Daughter Banquet! See….cute treat bags are needed everywhere!!!

Here is a video showing how to make these fabulous treat bags! Be sure to “Like” and “Subscribe” to the video because that would be fabulous!!! Also, leave a comment down below and let me know what you would like to see next!!!

Happy Stampin’

~Laura