I am loving the NEW Sitting Here Stamp Set and you all know I love the Rose Wonder Stamp Set! I paired them together and created this amazing card! It is so peaceful and perfect!
I started with a Dapper Denim (New In-Color) card base! Then I took a piece Whisper White measuring 3-3/4″ x 5″ and layered it onto the front. I used Crumb Cake for the main focal point measuring 3-1/2″ x 4-3/4″. I stamped the swing and bird from the Sitting Here Stamp Set in Crumb Cake Ink! For the greeting, I stamped it from the Rose Wonder Stamp Set in Dapper Denim onto scrap Whisper White. I punched it out with the Decorative Label Punch. I punched out a second one in Dapper Denim, cut it in half and added one half to the top and the other to the bottom. Check out this video tutorial on that! I looped some Linen Thread and adhered it to the back with Stampin’ Dimensionals! Love it!
This card would be perfect for any occasion. It is great for dropping a card in the mail to someone special!
If you would like to check out the New Catalog, you can do so here! Click here to order these New Products!
Happy Tuesday!!! You know what that means! I have a fabulous technique to share with you today. Creating an ombre butterfly, adding some splatters to your card and adding a hint of glitter with Wink of Stella! I love it all!!
Isn’t this card just beautiful?!?!?! It is so much better in person so be sure to check out the video tutorial below to take it all in! Let’s get started on this amazing card!
So remember last week when we die cut the white butterfly out for that beautiful card? Today we are using that white butterfly that was created with the Butterflies Thinlits! Using your Aqua Painter, you will color the butterfly with Watermelon Wonder. I started in the middle and worked my way to the tips of the wings. I got this amazing ombre look and LOVE IT!!! Just remember that each time you grab some ink, start in the middle and work your way out! Then I brushed the butterfly with the Wink Of Stella for that perfect shine! For the card, I used Tip Top Taupe for the base and added a layer of Mint Macaron (4″ x 5-1/4″). Then I took a piece of Whisper White (3-3/4″ x 5″) and added the splatter. I did this by squeezing the Aqua Painter a bit (just a bit) and picked up some Tip Top Taupe. I tapped the pen against my finger so it would splatter on the card. This is one of those techniques that isn’t going to be perfect. If you think you want a little more or some in a specific spot, don’t do it! 🙂 It might end up dripping too much water or just never hitting that spot. After all it is suppose to look messy! After your splatters, you are ready to add your washi tape. I used the It’s My Party Washi Tape and added some on the top left and bottom right. Then I stamped the greeting from the Greatest Greetings Stamp Set in Tip Top Taupe. Now you can add this piece to your card base. For the butterfly, I added Mini Glue Dots to the back down the middle. I wrapped some Gold Metallic Thread around 4 fingers about 10-15 times (up to you as to how much you want). I slide the thread off my fingers and twisted it in the middle into an 8 and then placed it on the Mini Glue Dots. You can add more Mini Glue Dots to the top of the thread if you need to or just add the butterfly like that to your card! LOVE IT!
To see this all in action, check out the Video Tutorial below or click here! Be sure to give it a thumbs up if you liked it and don’t forget to subscribe if you are new!
Happy Stampin’
~Laura
TODAY IS THE LAST DAY!!! Click here to get those Retiring Items!
I am loving this butterfly cut out look! It’s so elegant and amazing! That bling just makes it so much more fabulous as well! 🙂
I started with a Blackberry Bliss card base measuring 4-1/4″ x 11″! Then I took a piece of Whisper White (4″ x 5-1/4″) and die cut out the butterfly using the Butterflies Thinlits. I did my diagonal because butterflies are always on the move and I knew I wouldn’t get it perfectly centered! TIP: Save the white butterfly that you die cut out for another project that I’ll be posting on Tuesday! Now you will run the piece of cardstock with the die cut butterfly through the Big Shot in the Fluttering Embossing Folder. Now you have your base. You will want to adhere your piece of cardstock to the back of this piece covering the Butterfly hole. I used Hello Honey (2-1/2″ x 3-1/2″) but you can pick any color or let the Blackberry Bliss shine through and then do a Hello Honey butterfly. It is all up to you! Once you have your colored cardstock on the back, you can adhere it to your card base! Then I die cut a Blackberry Bliss butterfly with the Butterflies Thinlit and placed it right in the butterfly spot on the card. I only placed Mini Glue Dots down the center of the butterfly so the wings could pop up! Then I added a string of Rhinestones but I did Pearls on another one and that looked fabulous too! For the greeting, I took a piece of Hello Honey measuring 4″ x 1-3/4″ and stamped the greeting from the Crazy About You Stamp Set in Blackberry Bliss! Then I added it to my card front and tied some Whisper White Satin Stitched Ribbon around the card front between the greetings. When I was creating this card, I thought it was just stunning and then I added the greeting and I wasn’t as impressed. I didn’t really know what it was. At the stamp class where everyone made this card, they all loved it but mixed up the greetings. Some said “You Amaze Me. Happy Graduation.” and others said “Happy Birthday. You Amaze Me.” I loved how it turned out. I think I just don’t like the same greeting twice like I did on my card. Either way, I think it is stunning and you could do orange and yellow or black and orange or just about any color combination you wish! Love it!
If you would like to see this in action, check out my Video Tutorial below or click here! Be sure to give it a thumbs up if you liked it and be sure to subscribe so you don’t miss Tuesday’s video showing you how to use that White Butterfly piece! 🙂
Happy Tuesday!!! You know what that means…..I have a fabulous technique to share with you today! This isn’t a new one but it is with a new look! I know how much you all love my One Sheet Wonder Techniques so I am sharing another fabulous one!
Look at these beauties!!! You all know I love flowers and this paper from the Birthday Bouquet Designer Series Paper Stack is amazing!!! What better way to use this amazing paper than with a One Sheet Wonder Technique so you can use every bit of it and both sides!! I made 14 cards with this ONE piece of 12″ x 12″ paper. Here is the template!
I have modified it a little bit but cutting 2 pieces of 2″ x 5-1/2″ with that leftover gray piece on top. Also, I don’t always cut those little bits off in the second row either. You can do whatever you want to create these amazing cards!
These 6 cards were created with most of the bottom row on the template and those 2 pieces cut from the top gray portion. Quick and simple cards. I looked at the list of colors that are printed on the Designer Series Paper Pack for card bases – Blushing Bride, Mint Macaron, and Pool Party. I pulled out some scraps of each of those colors as well to use for layering and the greetings.
You can always leave the square pieces as strips if you don’t like this look. Here I took the little squares and backed them with cardstock for a little extra pop of color. I added some Linen Thread to the one in the middle.
Here I used some of the strips from the 2nd row on the template. You will notice that the Thoughts & Prayers image doesn’t fit in the Decorative Label Punch so I used that greeting when I could stamp it directly onto the card. I love how you can mix and match and create so many amazing cards so quickly!
If you would like to see this all in action, check out the Video Tutorial below or click here! Be sure to give it a thumbs up if you liked it and don’t forget to subscribe if you are new! I post every Tuesday and Thursday!
If you would like to see other One Sheet Wonder samples, click here, here and here! This technique is perfect for whipping up lots of cards quickly and beautifully!
You have noticed how I LOVE the Birthday Bouquet Designer Series Paper as I have been posted a lot of samples using it!! Check those out here, and here! Of course I had to do a cute card with the ice cream cones!! I LOVE a good waffle cone….more than the ice cream actually!!! Mmmmm.
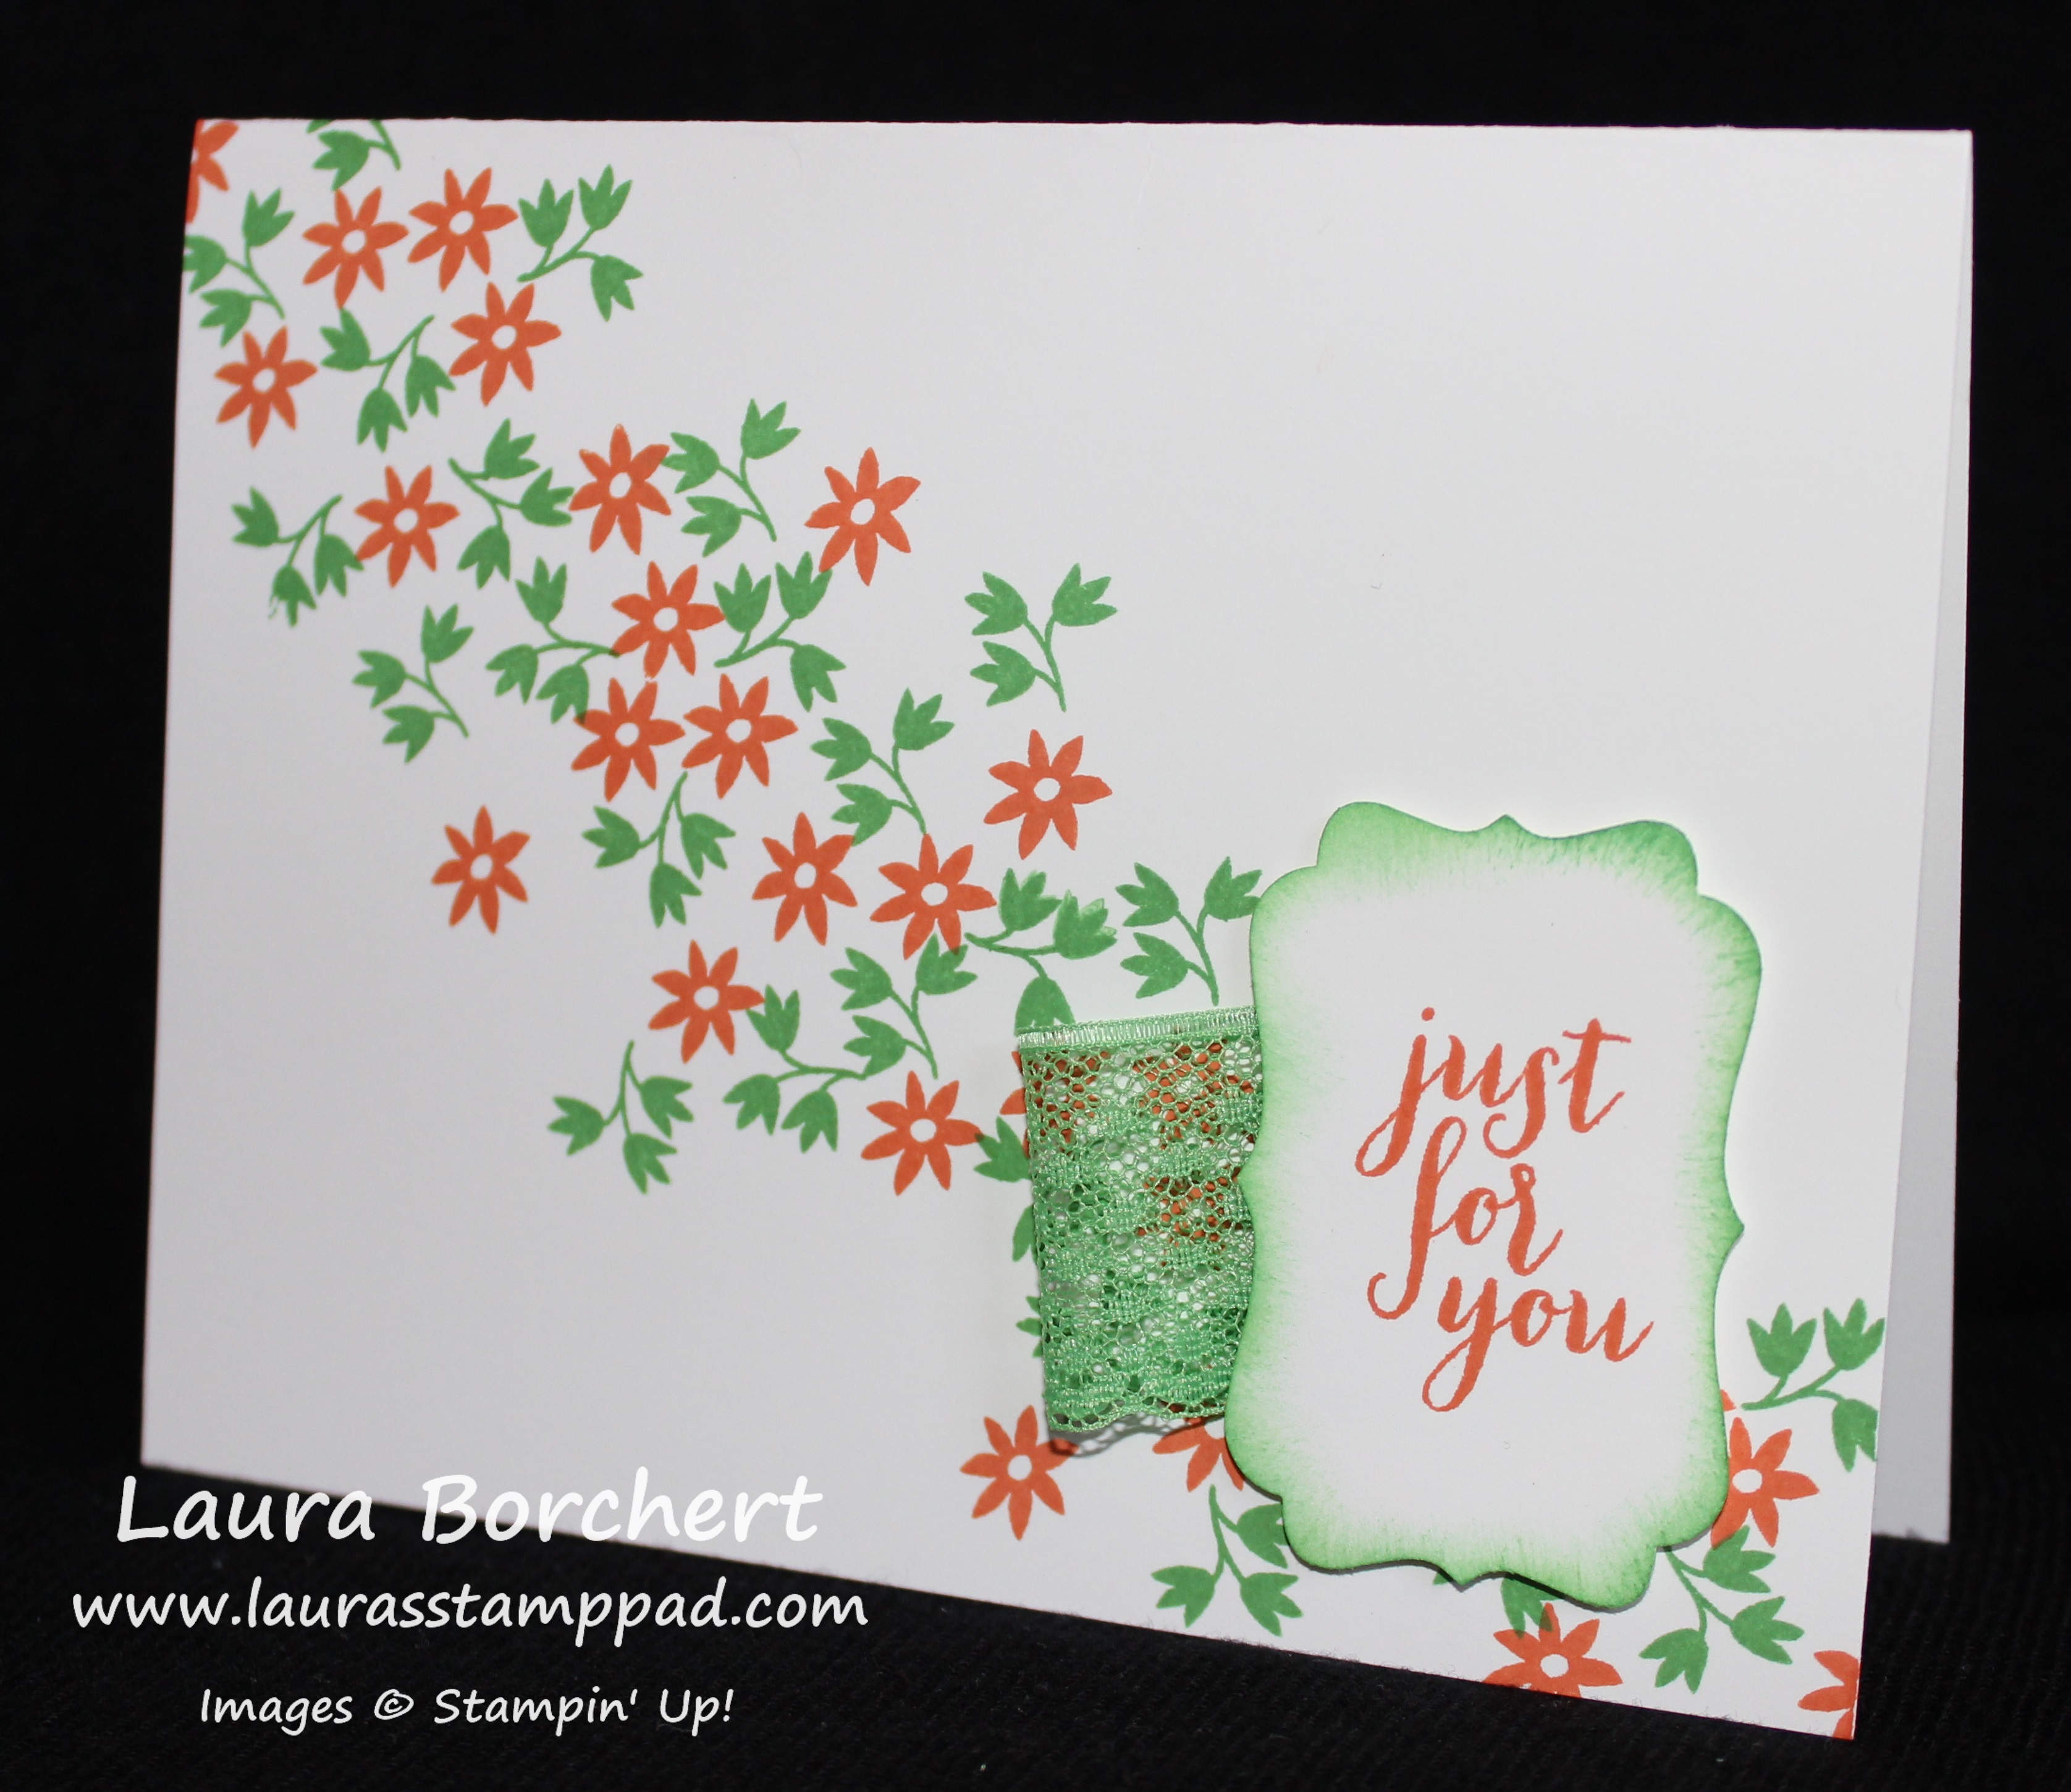
I don’t play with my Paper Pumpkin Stamp Sets much after I do the kit….it’s kind of sad isn’t it???? These sets are super fun and I love using them for the kit but then they go in a box and I forget about them! 🙁 I saw a sample similar to this one and just HAD to pull that stamp set back out of the box! I love it!!!! You can do this in soooo many different color combinations!
I started with a Whisper White card base and stamped the flower from the March Paper Pumpkin Kit in Tangerine Tango and the leaves in Cucumber Crush! I went across the card front diagonal and it totally looked like a twisted ribbon where it went wide every inch or so. The more I tried to fix it, the more it just looked the same only wider so I stopped. For the greeting, I used the same set and stamped it in Tangerine Tango. I punched it out with the Decorative Label Punch and the sponged the edges with Cucumber Crush and a Sponge Dauber! I wanted a little pop of color to off set the greeting. I added a little loop of Cucumber Crush Lace Trim behind the greeting and adhered it to the card with Stampin’ Dimensionals! Love it!
This card is quick and simple and fairly cheap to create since there aren’t any layers, not a lot of adhesive and scraps of ribbon and cardstock can be used for the greeting! You can change the colors to make the recipient’s favorite color!!! I can’t wait to try purple!
What color would you use to create this card? Let me know in the comments below! If you want to see more samples of Paper Pumpkin, click here! If you would like to get your own Paper Pumpkin Kit, click here to get signed up for the June Kit!
Happy Stampin’
~Laura
Be sure to check out the Retiring Items before they are gone at the end of May!
I know you all love my One Sheet Wonders as much as I do! It is a great way to make A LOT of cards quickly and with your favorite Designer Series Paper. This sheet that I used above from the It’s My Party Designer Series Paper Stack is AMAZING. I started screaming the moment I saw it and knew I needed to save it for a special project. The One Sheet Wonder Technique is perfect because there is very little leftover and I can use both sides! I got all 14 of these cards out of one sheet of 12″ x 12″ Paper.
I love the little squares and think they look super fun! You could always leave them in a strip and use it like the samples above! The Hello greeting on the far left is from the Watercolor Wishes Stamp Set!
These 2 cards use the largest piece (4-1/4″ x 5-1/2″) and I ripped it diagonally! Love the bright colors.Here is the template that I use. I always like to modify it up and have fun with it. On these cards, I didn’t cut off each of those little slivers on the second row. Also, I cut the top gray portion into 2 pieces measuring 5-1/2″ x 2″. That is how I got the full 14 cards!
I love how you can create quick and simple cards with just a few colors of cardstock, 1 sheet of Designer Paper, your favorite greeting set and some embellishments!
If you would like to see this in action, check out my Video Tutorial below or click here! Be sure to give it a thumbs up if you liked it and don’t forget to subscribe if you are new!
Let me know which Designer Series Paper you can’t wait to try this technique out with in the comments below! Stay tuned as I have another set of cards coming soon using paper from the Birthday Bouquet Pack!
Happy Stampin’
~Laura
Be sure to check out the Retiring Items before they are gone at the end of May!
Happy Tuesday!!! That means I have a fabulous technique to share with you today! We are stamping all kinds of images and lots of different colors and adding texture. It is (was) not really my style but I think I’m starting to love it and I have figured it out!!!
Isn’t this beautiful??? My favorite is that amazing background!!! Let’s get started on this amazing card!
I started with a Pool Party card base and stamped the floral image from Timeless Textures all over in Whisper White Craft Ink. You want to do this first so you can set it aside to dry. I didn’t go in any specific pattern, just stamped all over. Then I die cut one of the labels from the Lots of Labels Framelits and cut off the top bubble piece. This created a beautiful banner or tag. It is a super fun way to use the larger framelits on a card as well! Love it! I started with the greeting which is from One Big Meaning Stamp Set. I used my markers to color in the words – Bermuda Bay and Delightful Dijon. I stamped that down and then stamped the floral image right on top of it in Pool Party (stamped off once for a lighter look). Next, I took the tea cup stain image and inked it up in Crumb Cake Ink but then stamped off twice before stamping on my label. Collage stamping is all about the balance of colors and images. If everything was loud and bright it would look like a mess so you need those layers of colors and images. The final image I used is the little dots, again from the Timeless Textures Stamp Set and Tangerine Tango Ink. I stamped a few all around in the full strength. You could always stamp off a bit or even stamp a few times on your project for even more color variation.
Now your greeting piece is all done and it is time to add texture. I added a little piece of the White Tea Lace Doily to the top of the label and I added strips of Pool Party Cotton Ribbon to the back. I added it to my card front with Stampin’ Dimensionals. Of course, I thought a little bling would be perfect so I placed a few pearls randomly around the greeting as well! I love it!
Do you like collage stamping? Do you think it looks messy or crowded? It’s okay I do too a bit but it’s super fun too!!! Have you tried it out? I challenge you to play around with a few images and try it out. If you would like to see this all in action, you can check out my Video Tutorial below or click here! Be sure to give it a thumbs up if you liked it and don’t forget to subscribe if your new!
Happy Stampin’
~Laura
Be sure to check out the Retiring Items before they are gone at the end of May!
I love the colors in this card and the adorable greeting! I am really loving the patterns in the Have a Cuppa Designer Series Paper Stack! The colors are fun and the patterns are subtle enough that you can layer them and use them as a great background!
I started with a Whisper White card base and added a piece of the Have a Cuppa Designer Series Paper measuring 4″ x 5-1/4″. Then I wrapped some Crushed Curry Baker’s Twine around twice and tied it into a bow. I always double knot it before creating the bow so that it is nice and tight on my card! I stamped the cup from the A Nice Cuppa Stamp Set in Crushed Curry onto Whisper White and die cut it with the coordinating framelits that are no longer available. Have no fear, the lines are pretty easy and fussy cutting won’t kill you! 🙂 After cutting it out, I stamped the little heart from the same set twice on the cup to add a little subtle design since it is Crushed Curry on Crushed Curry.
I added another piece of the Designer Series Paper measuring 2-1/2″ x 3-3/4″ to the card front and then placed the cup on top with Stampin’ Dimensionals! Then I took a scrap piece of the Designer Series Paper that is 1/2″ wide and I ripped both ends to make it look like Washi Tape! How cute is that? It is a great way to use up little scraps of Designer Series Paper. Love it! For the greeting, I stamped it from the A Nice Cuppa Stamp Set in Basic Gray. I cut it with the Washi Label Punch (sold out as well). Once you punch it out on one end, you can slide it back in the punch to make the image shorter. How cool is that? I added the greeting to the card with Stampin’ Dimensionals as well! Simple, fabulous, and a great way to use lots of Designer Series Paper!
Happy Stampin’
~Laura
Be sure to check out the Retiring Items before they are gone at the end of May!
My husband owns a small company business here in town and they asked me to create some Thank You Notes for their clients! They wanted something in green because that is their company color. They also wanted something coffee themed since they are putting a Starbucks Gift Card in with the card! This is what I came up with and I love it! Simple and fabulous!
I kind of wish I would have saved all of the sample photos I created to get this perfect look. I tried green mugs and black lettering and green cardstock with a white layer. There were probably 8 different samples before we reached this one! I love the challenge of coming up with the perfect look that someone has imagined!
Have a fabulous weekend and Happy Friday, the 13th! See you back here on Monday!
Happy Stampin’
~Laura
Be sure to check out the Retiring Items before they are gone at the end of May!