Technique Tuesday – Doing The Smack Down!!!

Posted on

Happy Tuesday!!! You know what that means??? It means I have a fabulous technique to share with you and that is doing the Smack Down Technique!!! Check this out!!!

Doing The Smack Down, www.LaurasStampPad.com

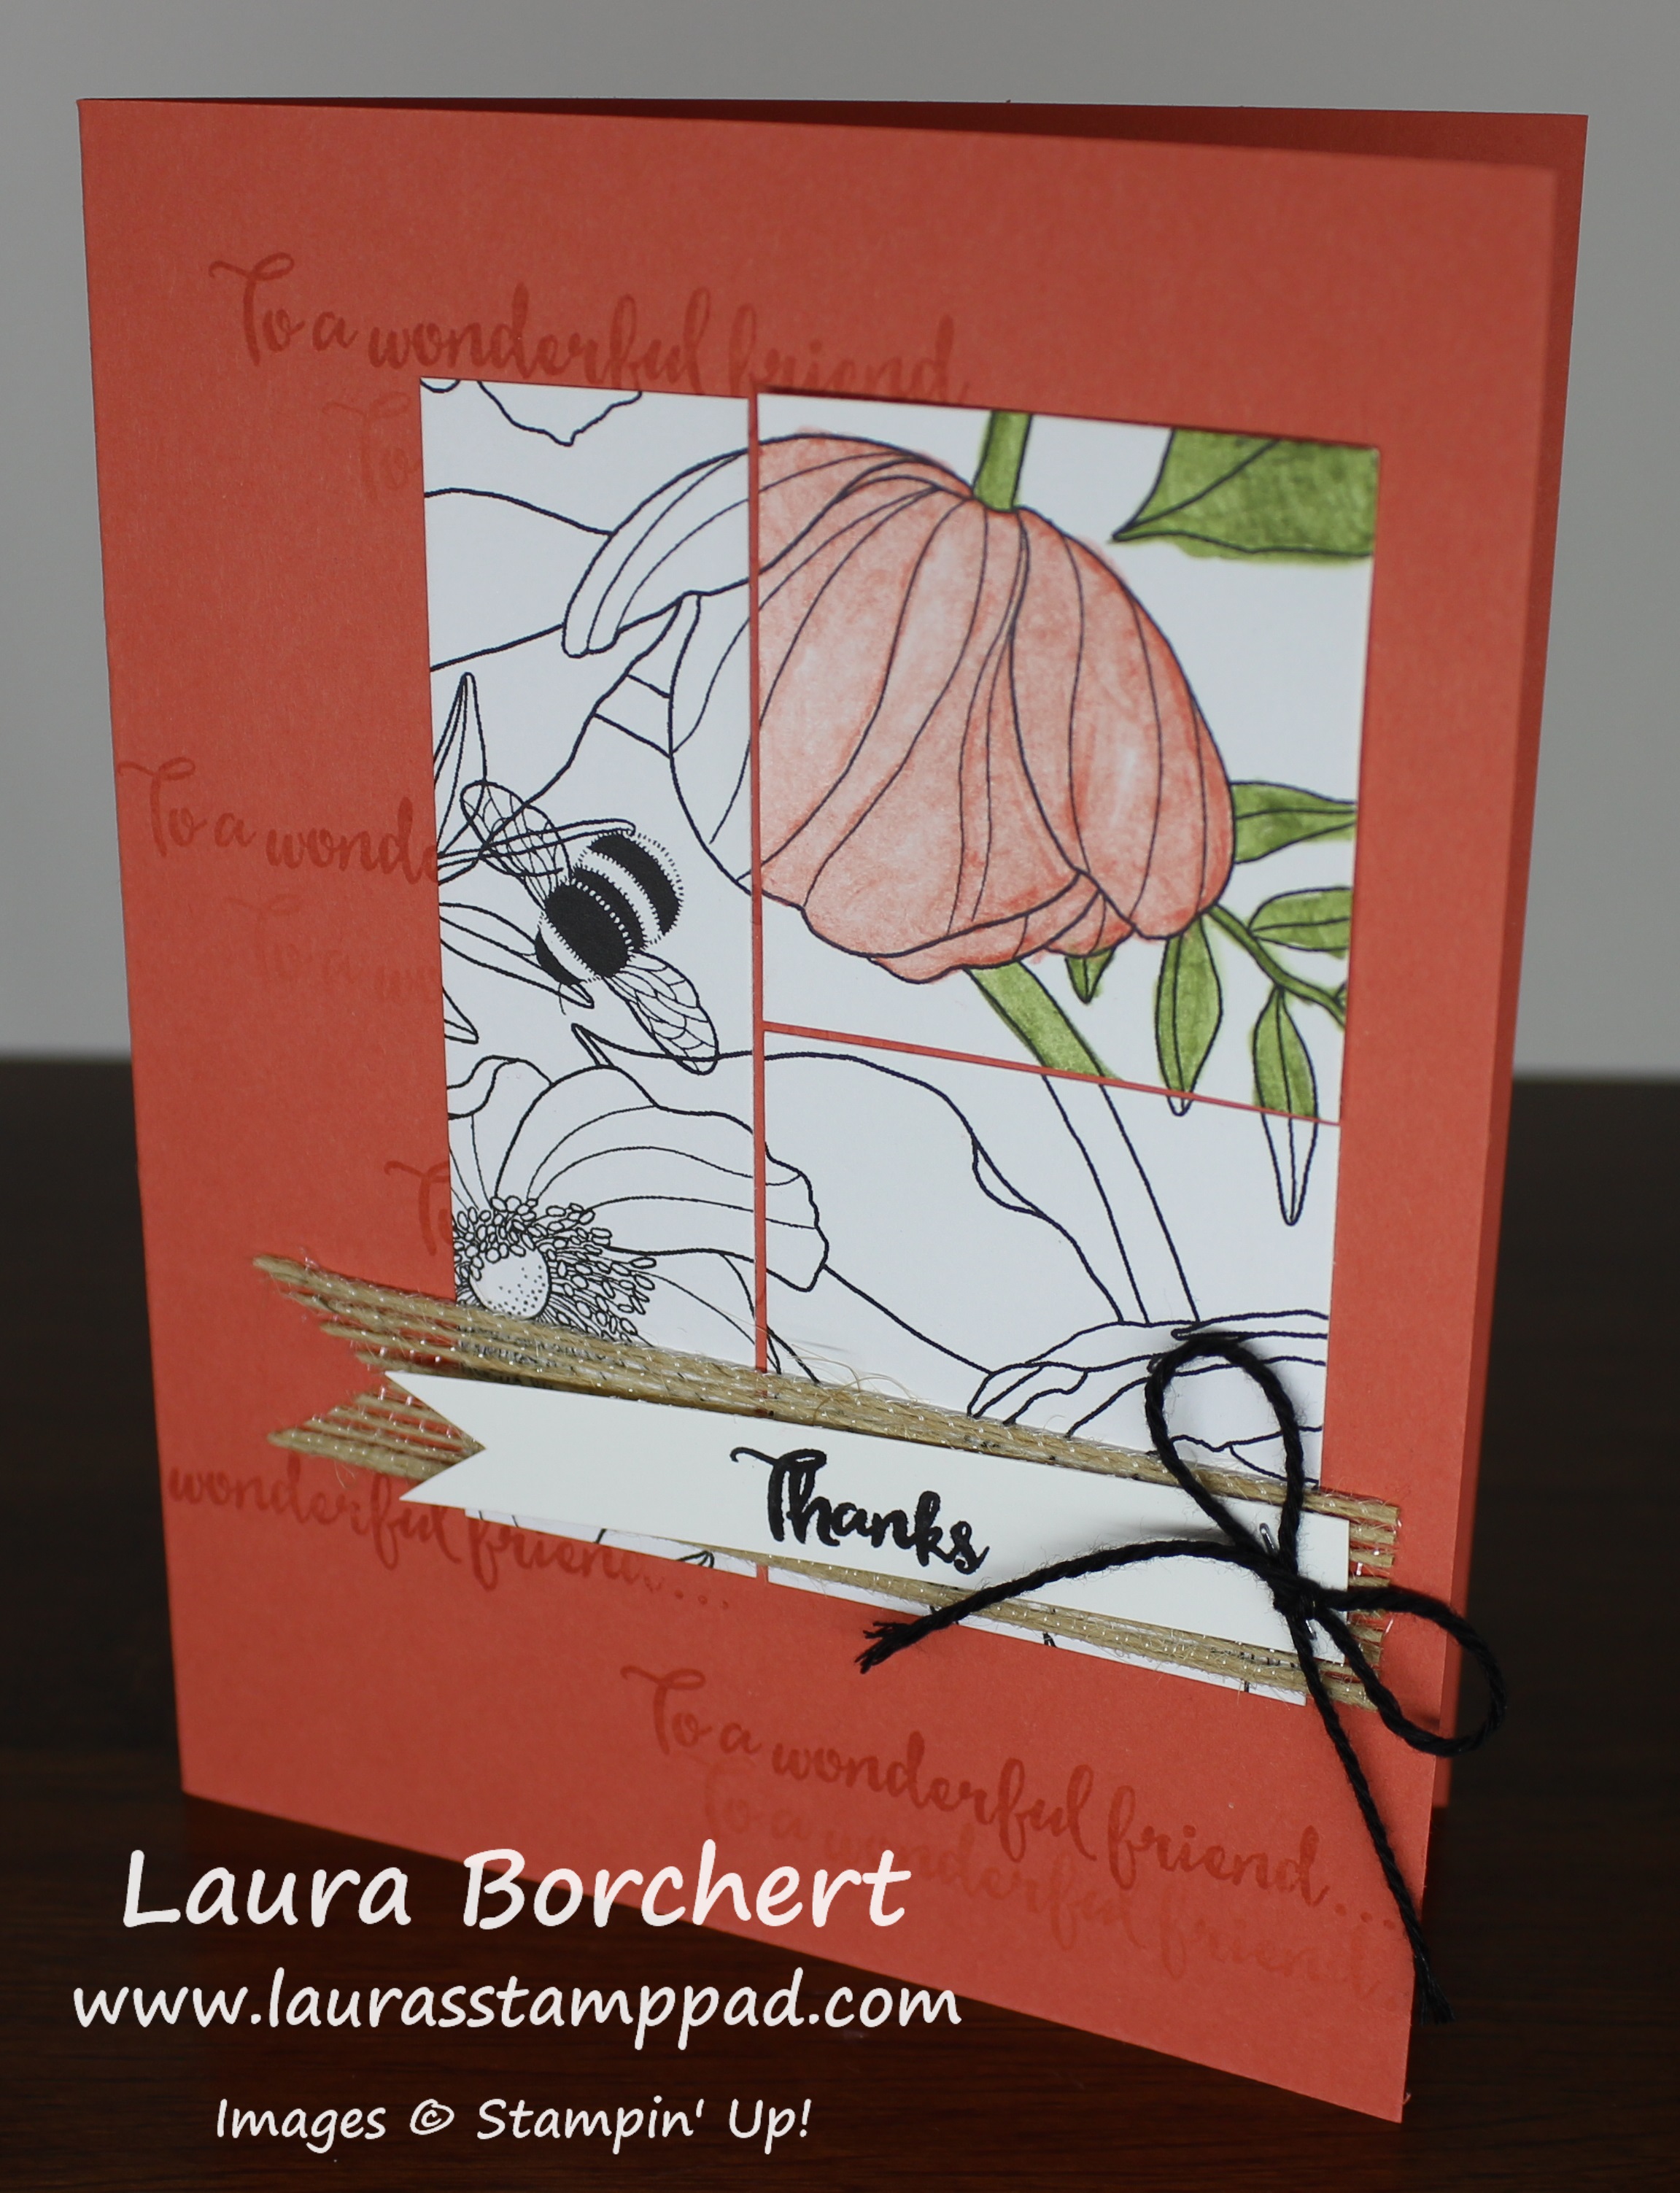
I know I love flowers a lot a lot but this technique is amazing with these flowers. How can you not love this card?!?!?! I got this technique from fellow demonstrator – Mary McNeely! I love sharing ideas with others stampers!

This card starts with a Island Indigo card base. Then I took a piece of Whisper White (3-3/4″ x 5″) to create this masterpiece. Using the Flower Patch Stamp Set, I stamped down the largest flower (Rose Red Ink) down. Then without going back to the ink, smack down the stamp all around that original stamped flower. Just pound, pound, pound it all around. Then go back to the ink, stamp another flower and then smack down all around it. I did the next flower (pointy one) in Peekaboo Peach Ink and the smaller rounded petal flower in Island Indigo Ink. The leaves were done in Pear Pizzazz Ink. I’m telling you this card is so much fun to create and lets out any and all stress you might have. Stamping is such amazing therapy!

After stamping all the flowers, I layered this onto a piece of Pear Pizzazz (4″ x 5-1/4″). Next, I wrapped some Peekaboo Peach Ruched Ribbon around it and tied it into a knot. I added this piece to my card base with Stampin’ Dimensionals so it would be nice a smooth with that ribbon! I finished off the card with a few White Perfect Accents in the middle of the large flowers!

For the greeting, I used the Suite Sentiments Stamp Set and stamped it onto Whisper White. I punched it out with the Decorative Label Punch! Next, I punched out another one in Rose Red and cut it in half to layer a piece to the top and a piece to the bottom for that perfect layered look. I added the greeting to the card front with Stampin’ Dimensionals.

If you would like to see this all in action, check out the Video Tutorial below or click here! This is my 300th Video!!! Be sure to give it a thumbs up if you liked it and don’t forget to subscribe if you are new!!! I post a new video every Tuesday and Thursday!

Happy Stampin’

~Laura


A Beautiful Watercolor Sky!!!

Posted on

Watercolor Sky, www.LaurasStampPad.com

This amazing watercolor sky is perfect with so many different stamped images – trees, flowers, scenery, hot air balloons, birds, etc. It was super easy to create and oh how I love that deep blue color!! Now let’s get started on how I created this!

I started with a piece of Pacific Point measuring 4-1/4″ x 11″ for my card base. Typically I just see what I have in my scraps section and pull out a piece so that is why sometimes it is 4-1/4″ x 11″ and sometimes 8-1/2″ x 5-1/2″! This one works perfectly for the ribbon to go around the card up and down! Then I took a piece of Watercolor Paper measuring 3″ x 3-3/4″ and colored rather dark/hard all down the middle with the Pacific Point Watercolor Pencil. Let me preface by saying that I’ve always colored really hard so this was easy for me. You can always go lighter and add in more color if you wish! Once you are finished adding color to the paper, I took an Aqua Painter and brushed back and forth. You want to make sure it is nice and wet (not dripping/soaked but wet and moving the color around.) You can take the color all the way to the edge or just keep it down the middle. Of course, the cool…or maybe frustrating…..thing about watercolor is that no two come out the same. You just never know what you will get. Now set it aside to dry!

Once it was all dry, I stamped the hot air balloons from the Lift Me Up Stamp Set in Basic Black. PS: if you have no patience for it to dry like me, you can use your Heat Tool to speed it up! 🙂 Next, I layered this onto Whisper White (4″ x 3-1/4″) to really make it POP. I placed it onto the card front on the left side! Then I wrapped some of the Succulent Garden Ribbon around and tied it into a knot! For the greeting, I stamped using the Lift Me Up Stamp Set onto Pacific Point. Using the Layering Oval Framelits, I die cut the greeting and scallop oval. Next, I added the greeting to the card front with Stampin’ Dimensionals so it would look smooth over the ribbon! I thought it looked a little empty in the upper right corner so I added a few White Perfect Accents! That was the perfect fix!

Do you love to watercolor? Let me know your favorite watercolor tools in the comments below – Blender Pens, Aqua Painters, etc? To see more samples using watercoloring, check them out here, here, and here!

Happy Stampin’

~Laura


Technique Tuesday – Rock ‘N Roll!!!

Posted on

Happy Tuesday!!! I have this fabulous Rock ‘N Roll technique to share with you today!!! It can be used with many different images and it’s super fun!!!

Rock 'N Roll, www.LaurasStampPad.com

How cool are these flowers with the dark tipped petals?!?!?! It is a super fun and cool technique that you can do with any of your favorite images! Let’s get started!

I started with a Wisteria Wonder card base and layered on a piece of Elegant Eggplant (4″ x 5-1/4″). Next I took a piece of Whisper White (3-3/4″ x 5″) to stamp these beautiful flowers on. Using the Avant Garden Sale-A-Bration Stamp Set, I took the flower and placed it on Block B. You will want to use the smallest block to you can use on your image because otherwise your rock ‘n roll will just ink up the block and not your image if it’s much larger. I inked it up in the light color – Wisteria Wonder Ink and then I took Elegant Eggplant Ink and did the Rock ‘N Roll Technique. Just roll the edges of the images around on the darker color, avoiding the middle of the image.

Check out the video below to really see how this works as I’m not so sure I’m explaining it well! 🙂 Once you have inked it up, stamp it down on the cardstock towards the top and to the left side. I actually stamped it twice to get that lighter and darker shade. Also, then I didn’t have to do this whole thing 3 times. I do find that cleaning the stamp in between is good since you can’t really Rock ‘N Roll exactly the same each time.

Rock & Roll Flowers, www.LaurasStampPad.com

After doing the 3 flowers, I stamped the stem and leaves in Cucumber Crush Ink. Some of them are stamped twice for that variation in color too! TIP: Use a mask to cover the bottom portion when you are stamping your flower stems so that they don’t go below the ribbon. Then you can cover up all of the overlaps of the stems with the ribbon! I used the Cucumber Crush Mini Striped Ribbon! I used the greeting from the Avant Garden Stamp Set and stamped it in Elegant Eggplant. Next, I added this to the card front with Stampin’ Dimensionals! To finish it off, I added little Elegant Eggplant Enamel Shapes.

If you would like to see this all in action, check out my Video Tutorial below or click here! Be sure to give it a thumbs up if you liked it and don’t forget to subscribe if you are new. I post a video every Tuesday and Thursday!

If you would like to see more samples using the Avant Garden Sale-A-Bration Stamp Set, click here, here, and here! You can get this stamp set for FREE with a $50 order till the end of the month! Don’t forget that the items are while supplies last so hurry up! You will also be earning Laura’s Loyal Stampers Stickers too!!!

Happy Stampin’

~Laura


I think I can! I think I Can!

Posted on

I think I can, www.LaurasStampPad.com

How adorable is this card?!?!?! First of all, it screams little boy but it screams so much more too! I Think I Can….I Knew You Could is perfect for a graduate, getting a job, getting a promotion, doing well in sports, for a child getting a report card, and so much more!!! It’s so adorable and simple and that’s why I love it so much!

I started with a Mint Macaron card base and layered on a piece of the Carried Away Sale-A-Bration Designer Series Paper (4″ x 5-1/4″). There are so many fun prints that it is hard to pick one! For the greeting, I die cut one of the squares from the Stitched Shapes Framelits. These have been my go-to ever since I got them! I love that little extra flare on the edge! Next, I stamped the greeting from the Designer Tee Sale-A-Bration Stamp Set. Super cute set and while it coordinates with the Custom Tee Bundle in the Occasions Mini Catalog, it’s super fun alone too! The greeting was stamped in Night of Navy Ink and added to the card front with Stampin’ Dimensionals. Finally to add a little extra flare and texture, I placed a few White Perfect Accents randomly on the card!

Have It Eat It Do It All, www.LaurasStampPad.com

I mixed it up a little and created another fabulous card. This time I used a different greeting from the same set! It is super fabulous still and fits the same square! I centered this greeting rather than off to the side. Next I added loops of the Metallic Gold Thread to the back of it! I love the added texture those simple loops create! You can see it better here!

Metallic Gold Loops, www.LaurasStampPad.com

Which one is your favorite – the White Accents or the Metallic Loops?? Let me know in the comments below!

Don’t forget there is still time to get your FREE Sale-A-Bration items with every $50 order! You can get the adorable I Think I Can set (Designer Tee) and the Carried Away Designer Series Paper!! There are lots of others to pick from as well! You can check out more samples using these products here and here!

Happy Stampin’

~Laura


Falling In Love Suite!!!

Posted on

Falling In Love, www.LaurasStampPad.com

I’m falling in love with the Falling In Love Suite from the Occasions Mini Catalog! The Designer Paper, bling-y embellishments, stamps and framelits!!! I typically don’t care for the little embellishments but when I saw these in person, I was blown away. They are just so beautiful! Let’s get started on this beauty!

I started with a Soft Sky card base and added a piece of Falling In Love Designer Series Paper to the front! Using the flowers from the So In Love Stamp Set, I stamped a few onto the designer paper. I used Soft Sky Ink. This gives a fun little texture and pattern to the background! Next, I die cut the little belly band in Very Vanilla with the So Detailed Thinlit Dies. Technically, this piece is for a belly band to slide onto the card but I used just the front portion. I simply cut off the little tabs and adhered it to the card front. Using the coordinating So In Love Stamp Set, I stamped the greeting in the center of the belly band.

Detailed Jewels, www.LaurasStampPad.com

I finished off the card with a bow using the 1/4″ Very Vanilla Satin Ribbon. It was adhered to the card using Mini Glue Dots!!! For the little bling, I tied some Metallic Gold Thread around it and then around one of the loops on the belly band. That little Falling In Love Embellishment is just so beautiful! It is rather chunky and might not go through the mail very well but it’s fabulous! I love it!!!

You can purchase the So In Love Bundle (stamp set and thinlits) and save 10%!!! Click here for the set in clear! Click here for the set in wood! As if save 10% wasn’t enough, you can pick out a FREE Sale-A-Bration item when you get the wood bundle and if you add another item for $2.50 or more to the clear bundle! In fast, just get that amazing Falling In Love Designer Paper or Embellishments. Woot Woot! How amazing!!!! Don’t forget that Sale-A-Bration ends on March 31st and the items are while supplies last so get them before they are gone!

Have a wonderful weekend and I’ll see you back here on Monday!!!

Happy Stampin’

~Laura


Something You Always Should Have On Hand!!!

Posted on

You Always Should Have On Hand, www.LaurasStampPad.com

Sympathy and Thinking of You cards aren’t always what I think to create but they are ones that you always should have on hand. These are the cards that you can’t always plan for like Birthdays so it’s always good to have a few on hand for when you need one. I really like sending out Thinking of You cards. I send them out when someone is nervous about a project at work, dealing with a lot of craziness in life, or just because to brighten their day! You can also use thinking of you cards for sympathy as well.

This card is quick and simple and easy to whip up lots of them in no time at all. I started with a Very Vanilla card base measuring 4-1/4″ x 11″. I cut a piece of Sweet Sugarplum (4″ x 4″) and layered on some Falling In Love Designer Series Paper (3-3/4″ x 3-3/4″). That is layered and placed near the top of the card. Next, I stamped the greeting from the Flourishing Phrases Stamp Set in Sweet Sugarplum Ink. Another great set that I like to use is the Thoughts & Prayers Stamp Set. To finish off the card, I added some ribbon around the card. This is why I went with the 4-1/4″ x 11 card base!!! I used the Metallic Gold Ribbon which comes in the Sale-A-Bration Ribbon Pack with Metallic Silver Ribbon. You can pick this as one of the free items when you order $50!

I created 9 of these cards in no time at all with just that 1 sheet of the Falling In Love Designer Paper! You can see a few other samples using this card style here and here! I love One Sheet Wonders because I never want to waste my Designer Series Paper. Also, when making multiples with one sheet of paper, you can mix and match and use both sides. This takes the stress out of it and wondering which side you are going to glue down! 🙂 Let me know your favorite in the comments below!

Happy Stampin’

~Laura


Technique Tuesday – Coloring with the Fine Tip Glue Pen!!!

Posted on

Happy Tuesday!!! That means I have a fabulous technique to share with you today. It’s a fabulous one today – coloring with the Fine Tip Glue Pen!!! Check out this glossy frog…or toad!

Coloring with the Fine Tip Glue Pen, www.LaurasStampPad.com

How adorable is he? I colored him with some re-inker in my Fine Tip Glue Pen! I got this idea from the fabulous Sara Douglass, Stampin’ Up! CEO. Let’s get started!

~ Card Instructions ~

All you need for this technique of coloring with your Fine Tip Glue Pen is the glue and the color of your choice in Ink Refills! I have a few bottles of Fine Tip Glue so to not make a big batch, I poured as much as I could into the other 2 bottles. There was maybe 1/3 of the bottle left and I did 10 drips of Cucumber Crush and it was BRIGHT! I ended up adding some glue back to it. I would go with maybe 3-5 drops and then add more if you want a bolder color! You can always add more but you can’t take it out! 🙂 Shake well and then color with the fine tip! It’s super fun and simple because you are literally coloring with the fine tip and can get into small spaces too!

Glossy Toad, www.LaurasStampPad.com

For this card, I stamped the toad from the You’re Sublime Stamp Set in Basic Gray Ink onto Whisper White. Then I took the colored Fine Tip Glue and filled him in. I actually did his eyes in regular/uncolored Fine Tip Glue. Allow this to dry. It will take at least an hour depending on how thick it was applied. As it dries you will notice the color is darker in certain spots! I love how that works! Coloring with the Fine Tip Glue Pen is super fun and there are endless possibilities! For my card base, I used Cucumber Crush and layered on a piece of Pacific Point that I ran through the Big Shot with the Seaside Embossing Folder. I added a few loops of Whisper White Baker’s Twine to the back of the toad and added it to the card front with Stampin’ Dimensionals.

If you would like to see this all in action, check out my Video Tutorial below or click here! Be sure to give it a thumbs up if you liked it and don’t forget to subscribe if you are new! I post every Tuesday and Thursday!

What color would you add to your Fine Tip Glue Pen?? Let me know in the comments below! I’m thinking I need to do Melon Mambo and do the tips of flowers for that dew and highlighted look! How amazing would that be?!?!?

Happy Stampin’

~Laura


Inside the Lines Designer Series Paper!!!

Posted on

Inside the Lines, www.LaurasStampPad.com

When I first saw the Inside the Lines Sale-A-Bration Designer Series Paper, I thought it looked beautiful but a little intimidating! That is a lot of coloring…..and time consuming….at least for me who isn’t a big fan of coloring. I enjoy coloring a little bit but only to make 1 card or only a small amount. Then I got this idea from Stampin’ Up back in November when I attended the OnStage Event. You only have to color one small square and it looks AMAZING!!!

~Card Instructions~

I started with a Calypso Coral card base and stamped the greeting from the Avant Garden Sale-A-Bration Stamp Set in Calypso Coral Ink all over the background. I stamped a few times to get those various shades. It is super fun that you can read some and others are falling off. It is a super cool look and adds more meaning to the card!

Next, I took a piece of the Inside the Lines Designer Series Paper measuring 2-3/4″ x 3-1/2″. You will want to cut a 1″ strip from the left side (or right, it doesn’t matter either way). With the leftover piece, I cut it in half creating two 1-3/4″ squares. Now it’s time to color and you can pick whichever section you would like. I colored mine with the Watercolor Pencils and Blender Pens. I adhered the designer paper to the middle of the card and added some Basic Black Baker’s Twine to the left hand side, tied into a bow. For the greeting, I die cut the circle from the Stitched Shapes Framelits (smallest one) and stamped the greeting from the Avant Garden Stamp Set. I added the greeting to the card front with Stampin’ Dimensionals. Love it!!!

To A Wonderful Friend, www.LaurasStampPad.com

This is the card I created at the Stampin’ Up! OnStage Event. We did the greeting a little differently with some of the Burlap Ribbon and banner tips! I just decided to mix it up and go with my own take on it! Both are super fabulous and have the same concept!

Which one is your favorite??? Let me know in the comments below – stitched shape greeting or burlap banner greeting!!! Don’t forget that you can get the Inside the Lines Designer Paper for FREE through the end of March as your Sale-A-Bration item! Every $50 order, earns you a Free item from the brochure. Remember that there are 3 new items that were released at the end of February! You can check those out here! Click here to start shopping!

Happy Stampin’

~Laura


Technique Tuesday – Creating a Marbled Background!!!

Posted on

Happy Tuesday!!! You all know what that means!!! I have a super fun technique to share with you – creating a marbled background!!! Check this out!!

Best.Guy.Ever., www.LaurasStampPad.com

Isn’t the background super cool?? It is super easy as well. All you need are ink pads and baby wipes!!! I got this technique from fellow demonstrator, Sandy Jacobson! I love sharing ideas!!!

SUPPLIES NEEDED: Ink Pads, Baby Wipes

For creating the marbled background, I started with a piece of Shimmery White cardstock measuring 4″ x 5-1/4″. You can use regular Whisper White or Very Vanilla cardstock if you wish! It works the same with all but I liked the little hint of shimmer! Next, I took a wet baby wipe and balled it up and very lightly tapped it into an ink pad and then pounced all over the cardstock. I used Bermuda Bay Ink, Cucumber Crush Ink, and Pumpkin Pie Ink. You can pounce with each color as little or as much as you wish. It’s as simple as that! Super fun and comes out different each time. You can mix and match any color combination!

To finished the above card off, I placed it onto a Bermuda Bay card base. I stamped the birthday greeting in the lower right corner from the Balloon Adventures Stamp Set. The die cuts came from the Stitched Shapes Framelits in Cucumber Crush and a t-shirt from the T-Shirt Builder Framelits in Bermuda Bay. I stamped the front of the shirt with the Suite Sentiments Stamp Set. Next, I added the t-shirt to the square with Stampin’ Dimensionals to make it look a little more 3D. I added loops of Whisper White Baker’s Twine to the back of the square, securing it with Stampin’ Dimensionals and then adding it to the card front! Perfect Man Card!

Razzleberry Dress, www.LaurasStampPad.com

I used Wisteria Wonder Ink and Rich Razzleberry Ink for this one. For the decoration, I stamped the lady from the Beautiful You Stamp Set in Basic Black and her dress in Rich Razzleberry. The greeting was done in Wisteria Wonder. I went over her dress with a Wink of Stella Pen which added a little shine and blended it together a bit. I used the leftover bit of ink on the tip to color in her hat. Then, I layered this piece onto Silver Foil Paper and added it to the card front. To finish it off, I added a few White Perfect Accents. Love it!

If you would like to see this all in action, check out the Video Tutorial below or click here! Don’t forget to give it a thumbs up if you liked it and be sure to subscribe if you are new! I post every Tuesday and Thursday!

Have fun trying this out yourself! What color combination will you use? Let me know in the comments below!

Happy Stampin’

~Laura


Watercoloring Flowers in Bright Colors!!!

Posted on

I just love any and all flowers and even more during this time of year! Spring is near and flowers will start blooming and shining bright! The colors of it all are just stunning! Watercoloring flowers in bright, fun colors is even more fun!!!

~ Card Instructions ~

For this card, I started with a Tip Top Taupe card base measuring 4-1/4″ x 11. You can create this card on it’s side like I did or up and down! It’s all up to you! Also, I went with a neutral base so that I can color the flowers in any color and it would match! I took a piece of Very Vanilla (4″ x 5-1/4″) and stamped the flowers and greeting from the Avant Garden Sale-A-Bration Stamp Set. This is one of the sets you can get for Free with every $50 order which is even better! I stamped the images in Basic Gray Ink which is great for watercoloring and it’s not as bold as black is! Not it is time to color. I used the Watercolor Pencils to color in the flowers. For the card above, I did the watercoloring flowers with Pumpkin Pie, Daffodil Delight, and Calypso Coral. I colored the stems and leave in Old Olive. The easiest way to color these is you add color on the lines/dark spots of the flowers and then blend the colors around with a Blender Pen.  Pink Lillies, www.LaurasStampPad.com

For this one, I used Melon Mambo and Old Olive! It might not be so obvious in these photos but after I blended the flowers, I went back through with the pencil and colors on the dark centers again to add shadows and texture to them! Once I was finished coloring, I added this to the card base! Finally I finished it off with some Metallic Ribbon which comes in both gold and silver! This is another one of the Sale-A-Bration items that you can pick as your FREE item! Get those items on your wish list and stock up on cardstock and adhesive so you can pick out tons of fabulous Sale-A-Bration items now till the end of March!

You can see more samples using this set and ribbon here and here!

Happy Stampin’

~Laura