Technique Tuesday – Stamp Resist!!!

Posted on

Happy Tuesday!!! I hope you are all having an amazing week! I have a fabulous technique to share with you today!!! I am in love with this card so hard – the colors, the sweet greeting, and the amazing look!!! I hope you love it too!

Spread The Love, www.LaurasStampPad.com

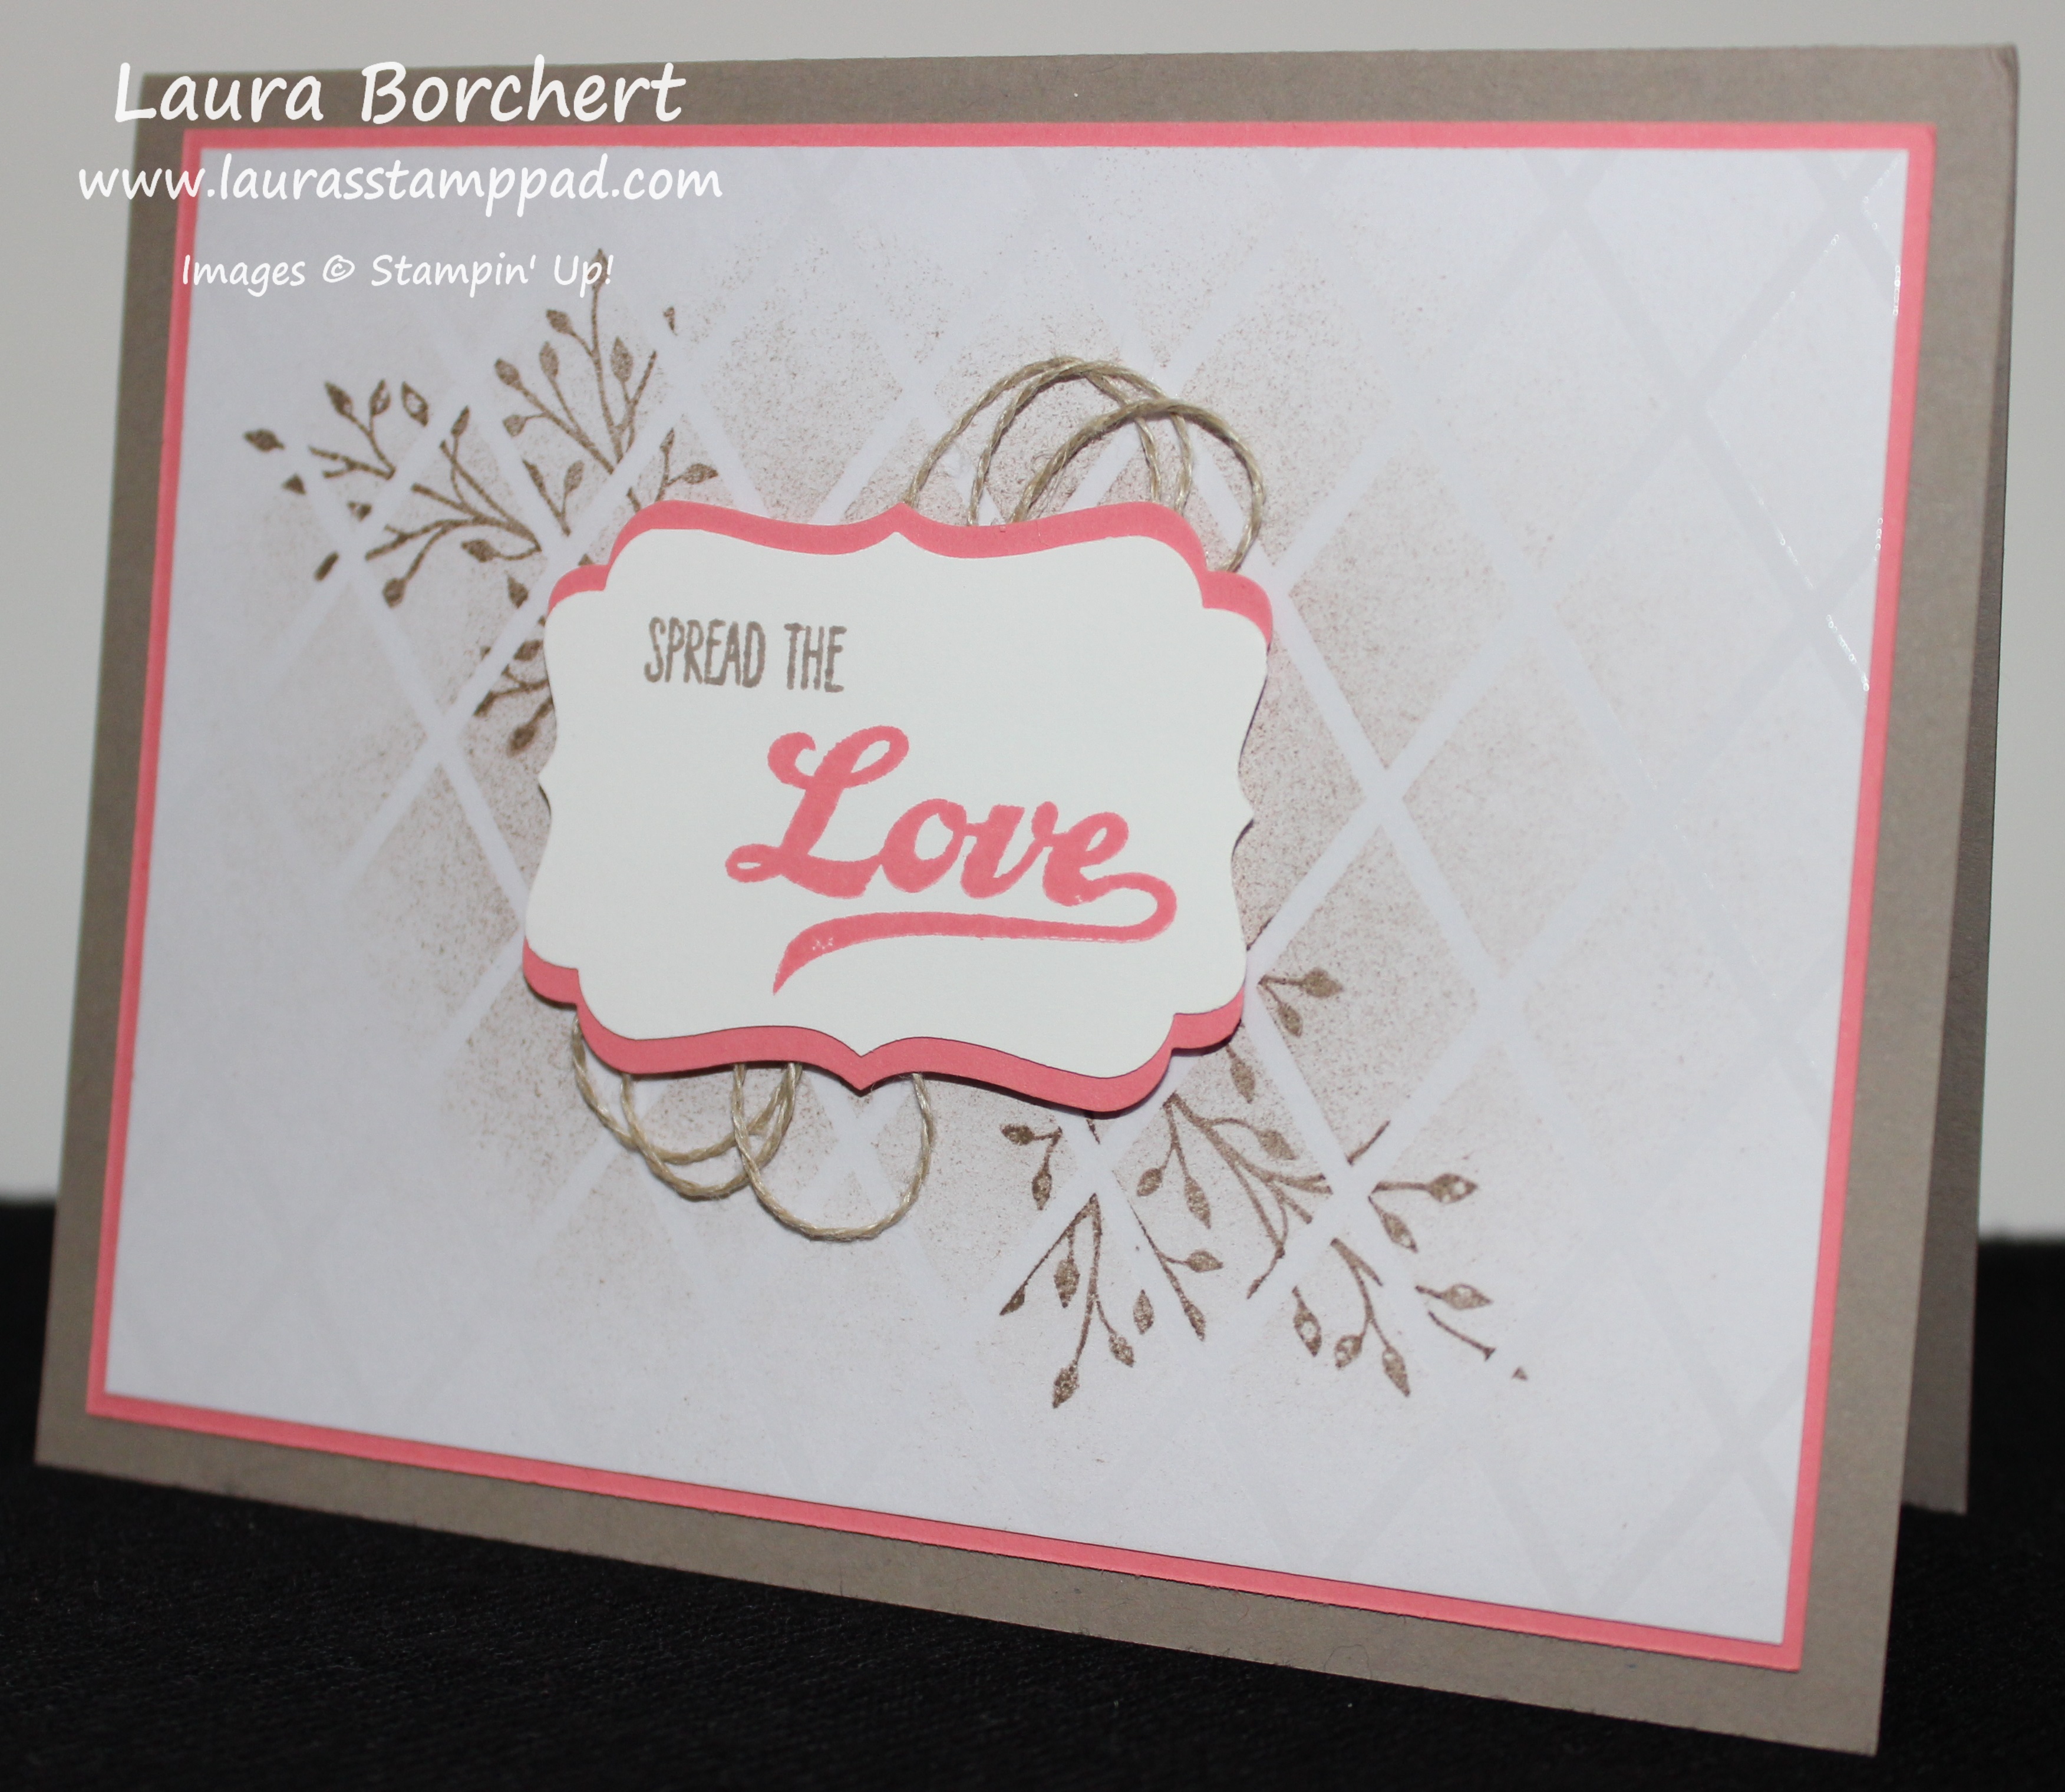
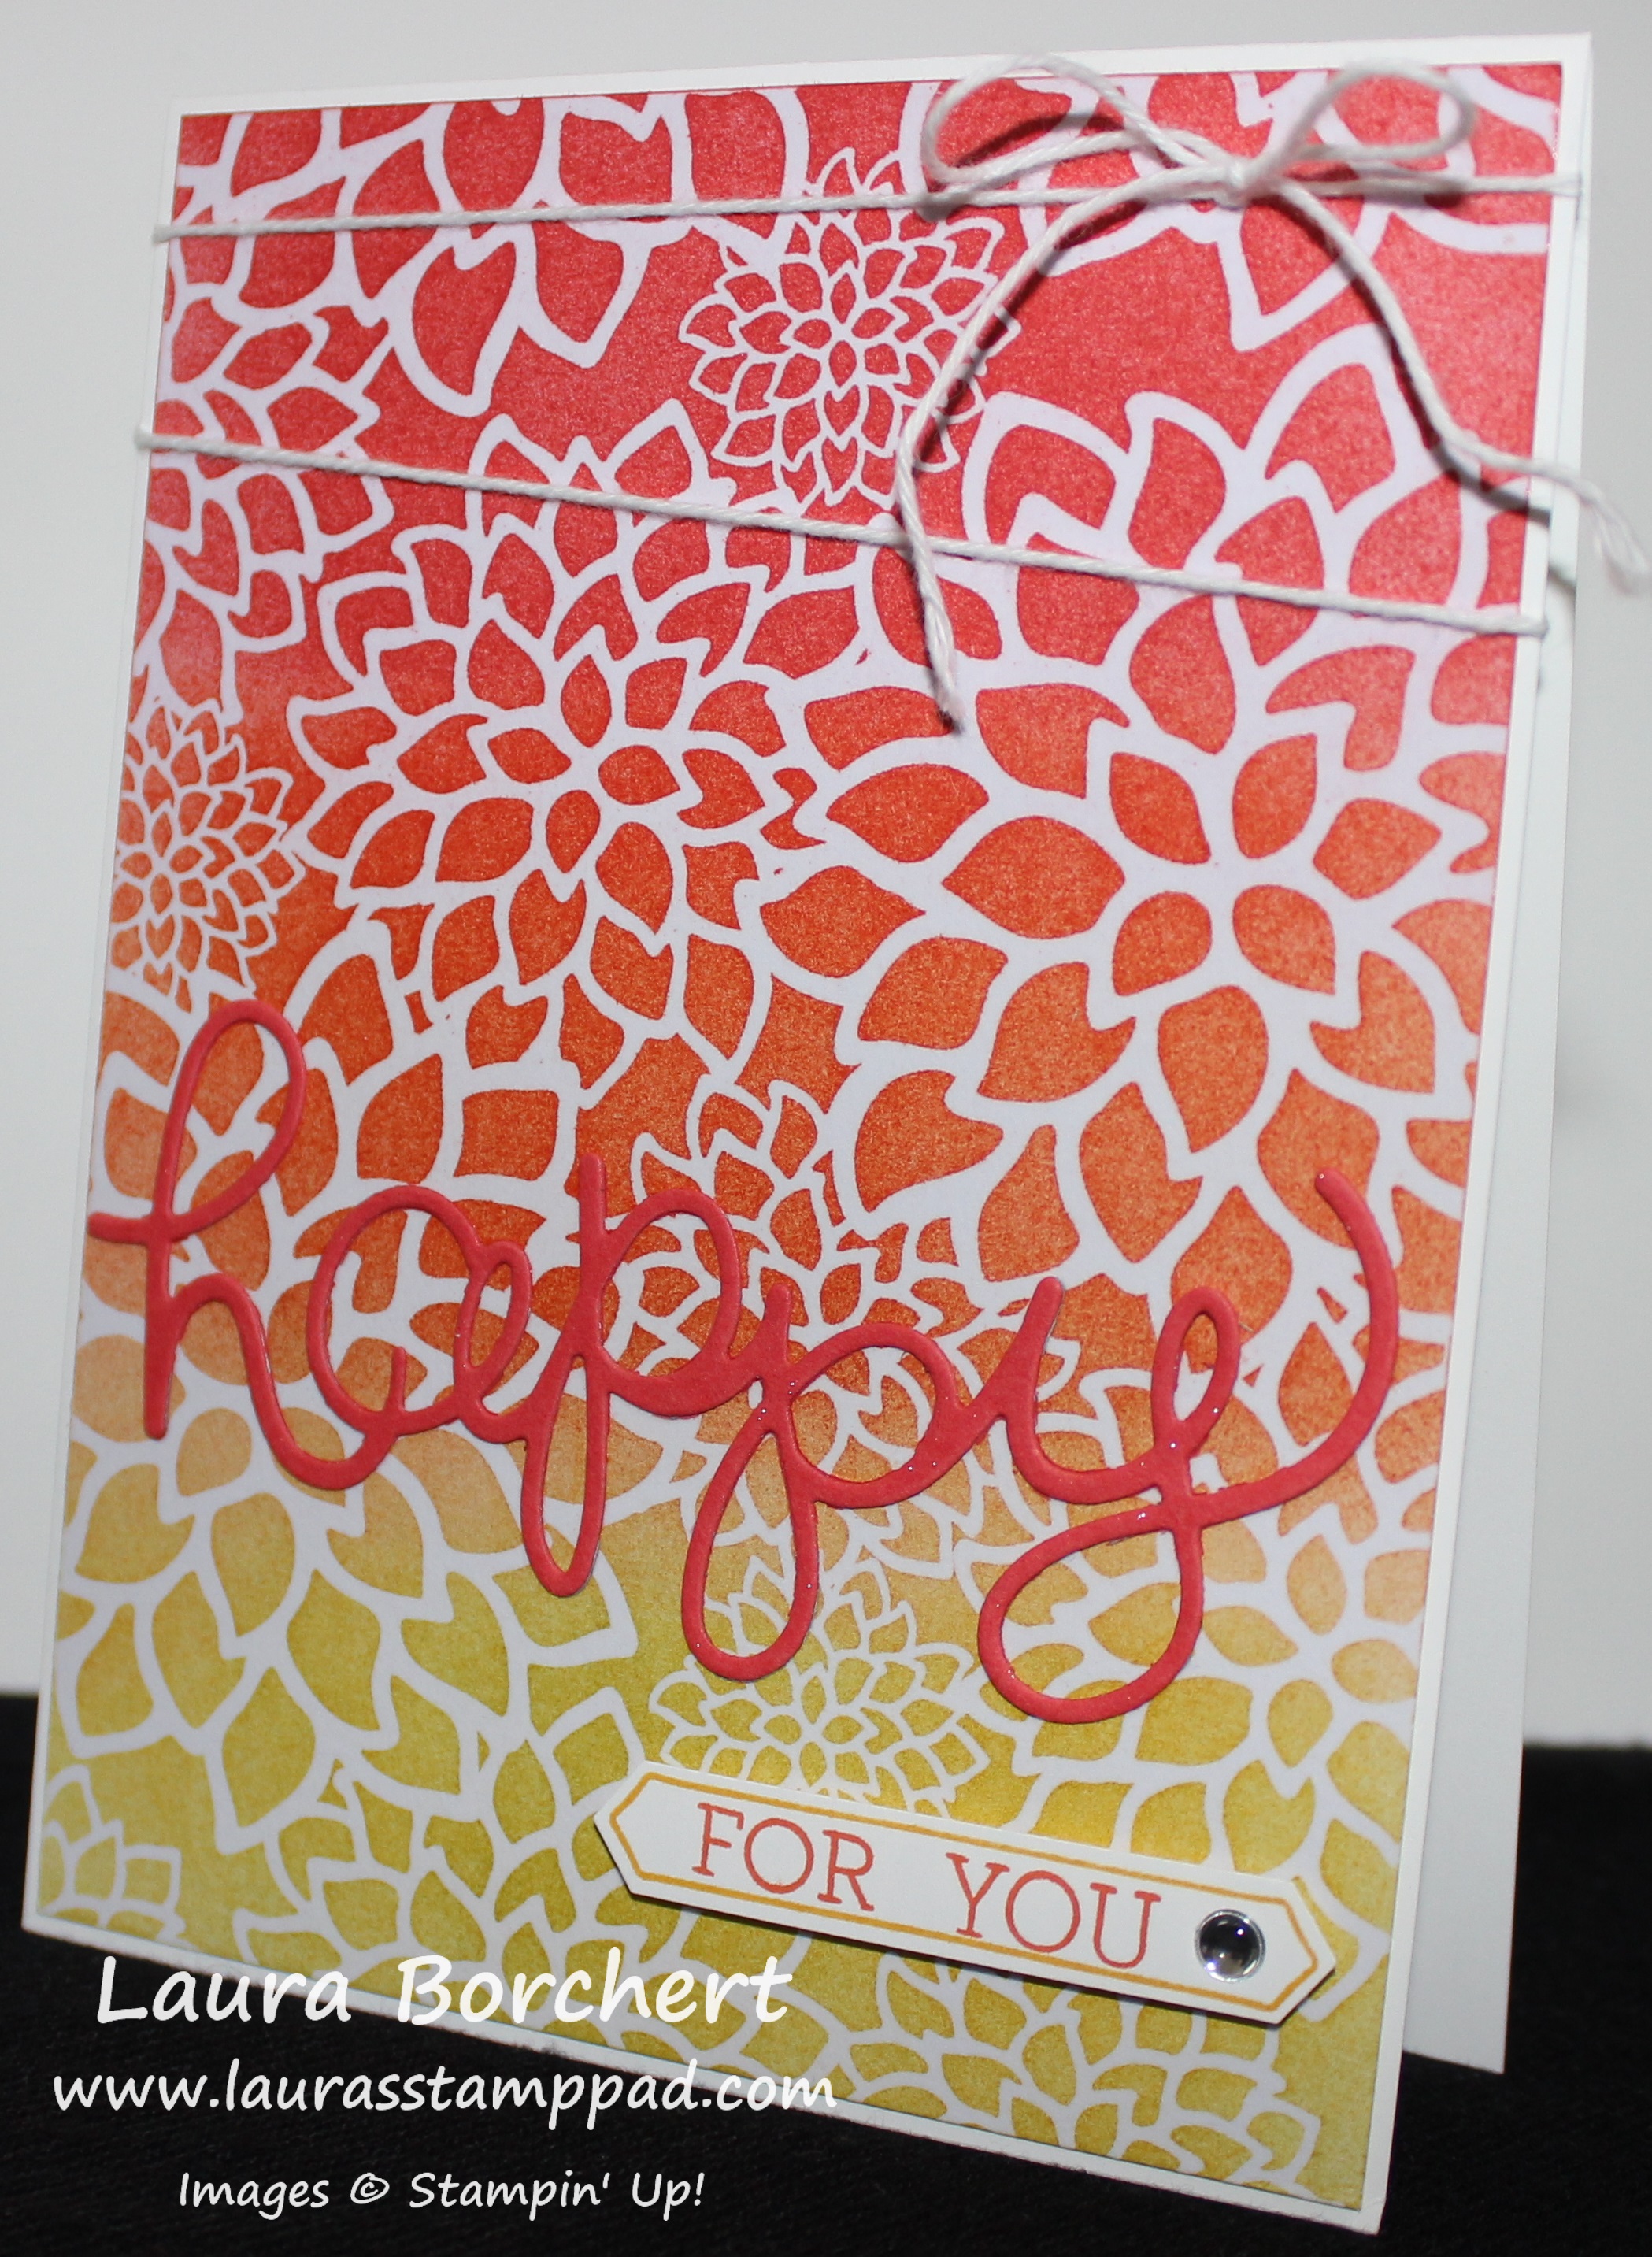
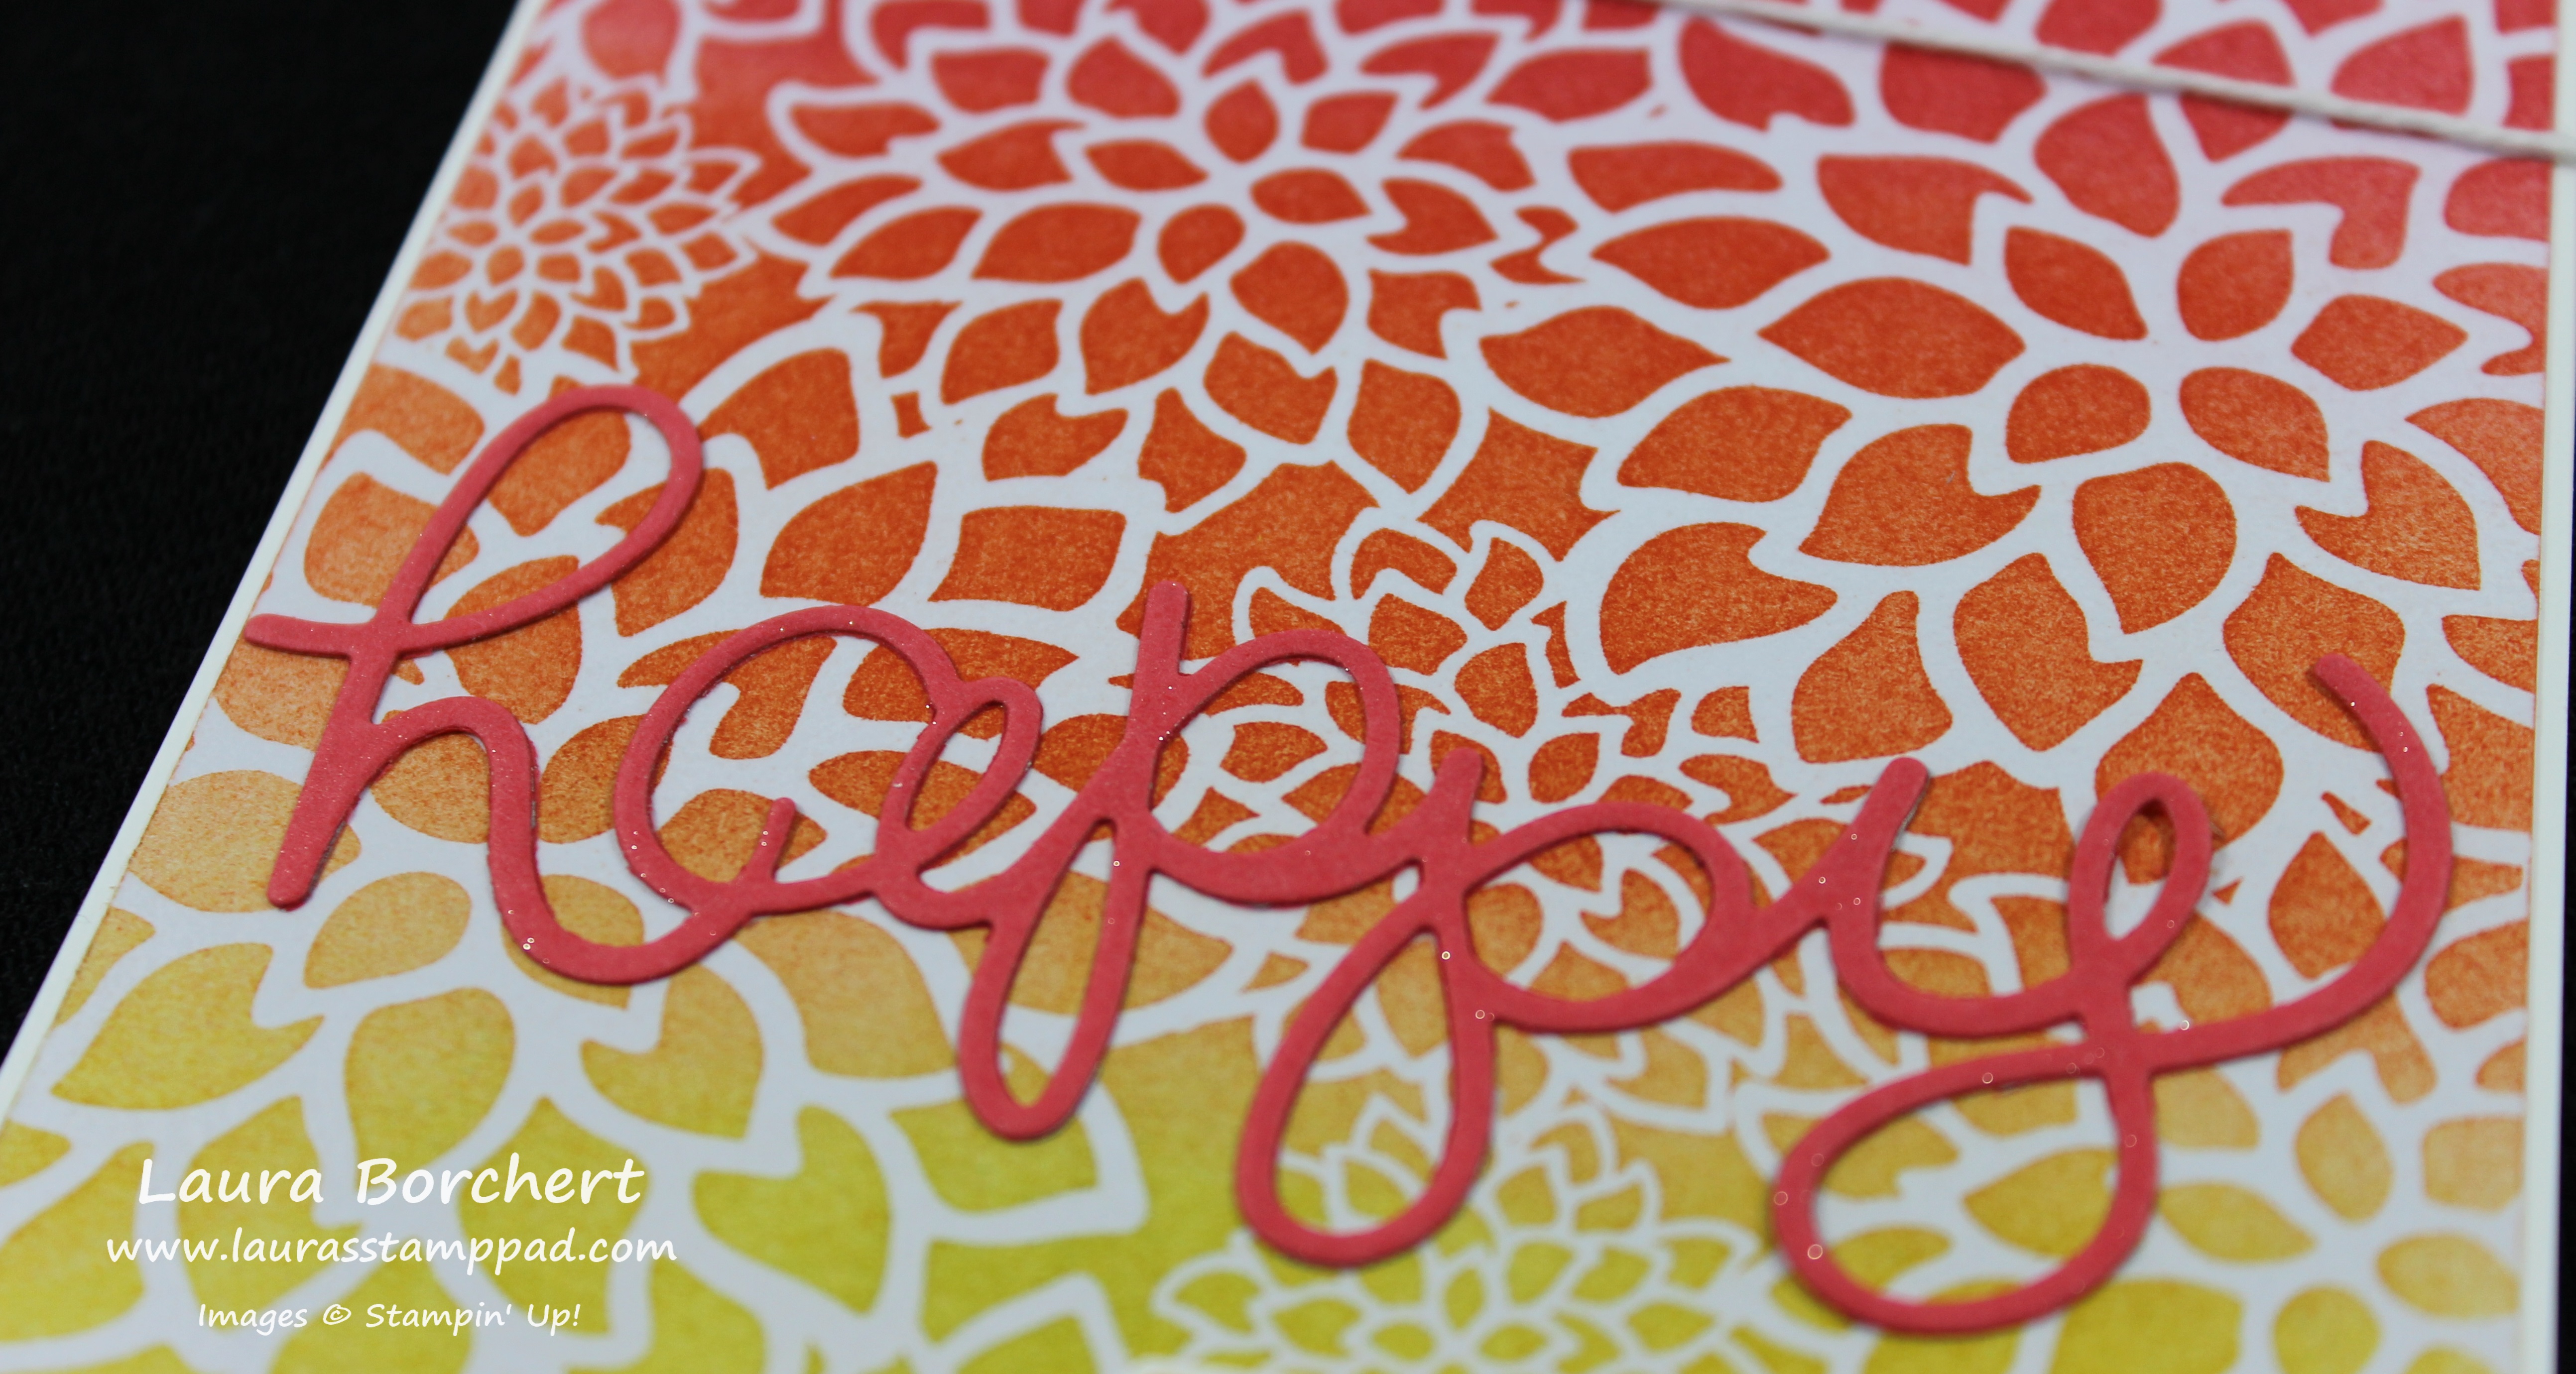
Isn’t it amazing??? I love how the branches look like they are behind a fence or something with that emboss resist!! Let’s get started on how simple this card is!

SUPPLIES NEEDED: Irresistibly Yours Designer Series Paper, Sponge Brayer, Greetings & Embellishment of Choice

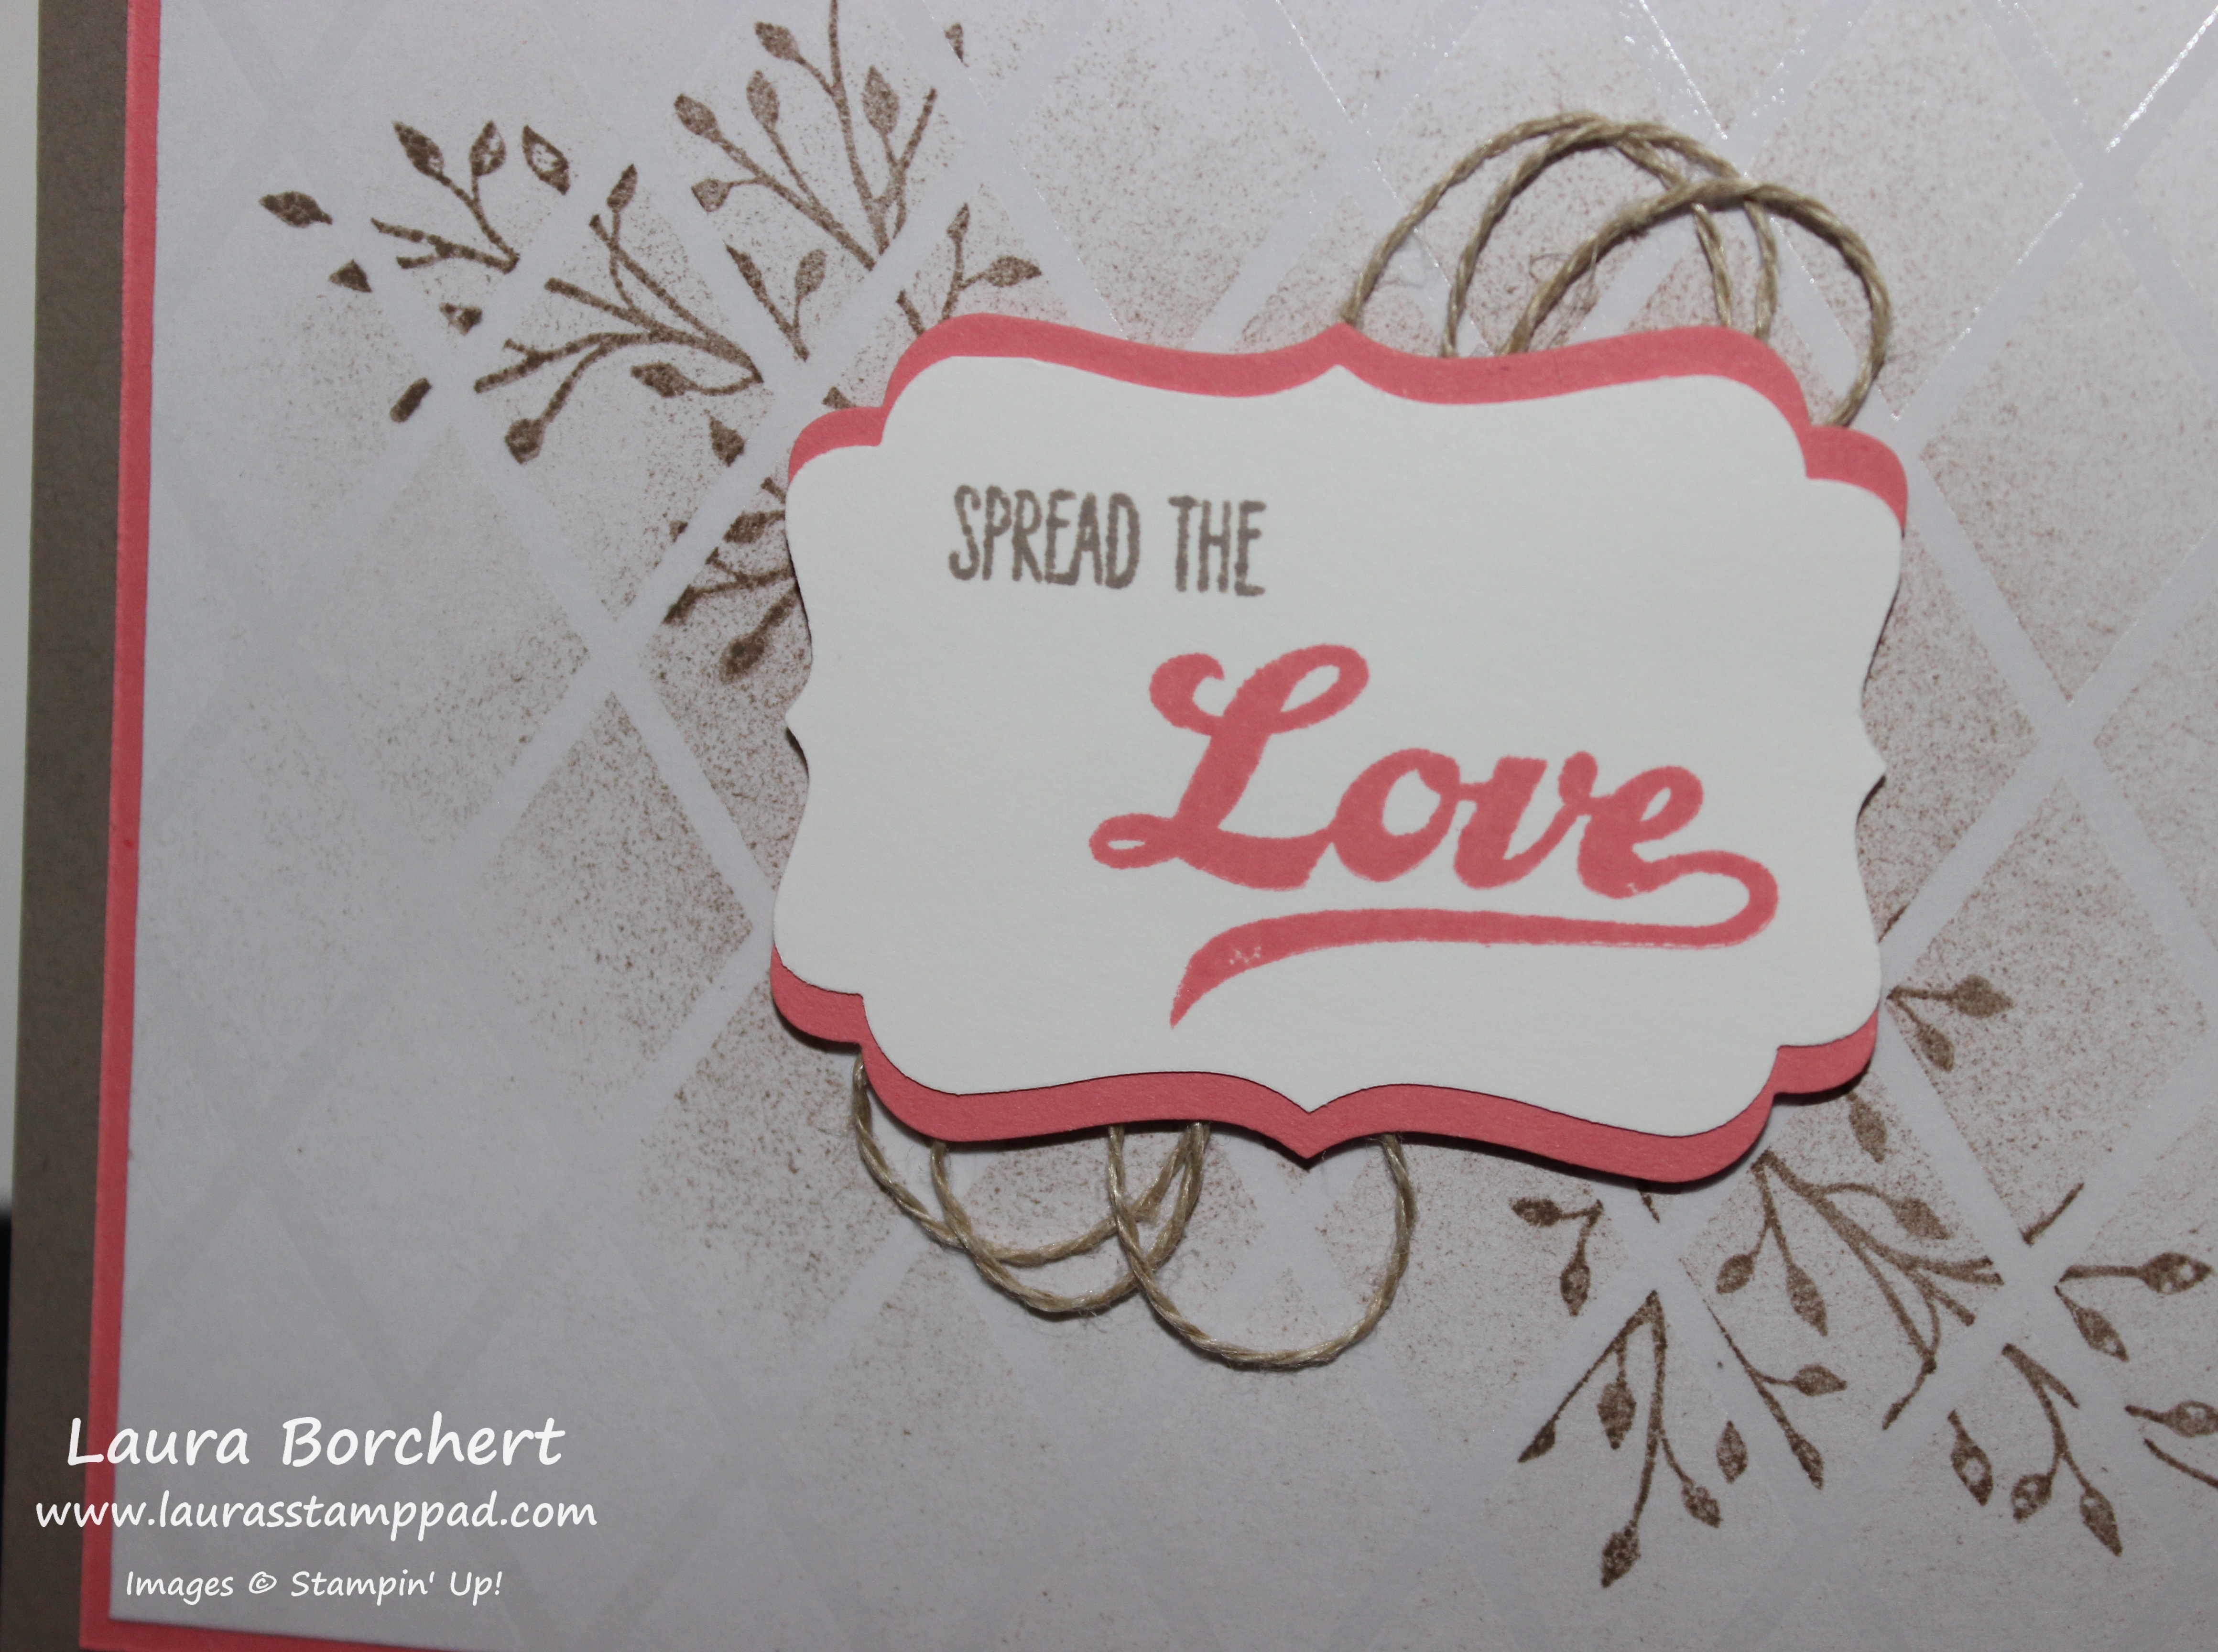
I started with a piece of the Irresistibly Yours Designer Series Paper measuring 5″ x 3-3/4″ and Tip Top Taupe Ink. Using a Sponge Brayer, you will start in the middle and roll out half way, turn, start in the middle and roll out half way. This is how I got that rustic/dirty center but kept the edges fairly clean. I went all the way around the card from the middle and then at the end I lightly went over the entire piece of cardstock just for a light look. Then I used the branch from the Jar of Love Stamp Set and inked it up in Tip Top Taupe and stamped it diagonal to the upper left and lower right. You will want to make sure that the entire tail end of the branch doesn’t stamp down because it might show on the other side of your greeting. If you go with a larger greeting, you will be fine. Be sure to wipe off any excess ink with a paper towel as it sometimes pools on top of the embossed portion. Then I layered it onto a piece of Flirty Flamingo (5-1/8″ x 3-7/8″) and then onto a Tip Top Taupe card base. Now you can add your greeting of choice. I went with the Jar of Love Stamp Set since it was already out. I stamped the “Love” in Flirty Flamingo and the “Spread The” in Tip Top Taupe onto Whisper White scraps. I punched it out with the Decorative Label Punch and added a layer of Flirty Flamingo behind it. Click here to see how easy it is to do that. I added a few loops of Linen Thread behind the greeting and secured it with Stampin’ Dimensionals. I love it for that rustic, sweet, messy look!!!

Emboss Resist, www.LaurasStampPad.com

If you would like to see this in action, check out the Video Tutorial below or click here! Don’t forget to give it a thumbs up if you liked it and be sure to subscribe if you are new!!!

If you would like to see more samples using the Irresistibly Yours Designer Series Paper, stay tuned. I have been playing with this paper a lot and have some great samples to share!!!

Happy Stampin’

~Laura

Click here to start shopping and earning Bonus Bucks through the end of July!

Bonus Days


Incredible In-Colors!!!

Posted on

Circle, Circle, Dot, Dot, www.LaurasStampPad.com

New Stampin’ Up In- Colors are always fun but also takes some time to get used to. When I first saw the colors, I thought they looked nice but wasn’t in love. Then I started to play with them and really started to fall in love. You all know I love Pink so Flirty Flamingo is super fun. I have been really surprised that Peekaboo Peach has been a favorite of mine! I didn’t really think I would love that color as much as I do but I think it is because we don’t have anything close to that color. The other 2 colors, Emerald Envy and Dapper Denim have been lots of fun together. They are the perfect man card color combination!!!

For this card, I started with a Whisper White card base and stamped the dots from the Timeless Textures Stamp Set all over the background in all 3 colors – Flirty Flamingo, Sweet Sugarplum, and Peekaboo Peach. One thing you want to keep in mind when stamping a background is to fall off the cardstock. You want the pattern to look like it continues on rather than just being in the middle of your card. Then I punched out circles in each of the colors with the 2″ Circle Punch, 1-3/4″ Circle Punch and 1-1/2″ Circle Punch. I added all of the circles to the card front, overlapping a bit. Then for the greeting, I used the Thoughtful Banners Stamp Set! I stamped the border in Sweet Sugarplum, the little arrow in Flirty Flamingo and the greeting in Peekaboo Peach. Thank goodness for photopolymer stamps so you can see exactly where you are stamping! I punched out the greeting with the Classic Label Punch and added it to the card with Stampin’ Dimensionals. Remember you can use the outside border of the Dimensionals and just trim off the amount that you need. Those thin little border pieces are perfect for a skinny little greeting like this. To finish off the card, I added a few pop of bling with Rhinestones! Love it!!!

This card could be used for lots of different occasions and with different color combinations. Let me know in the comments below what 3 colors you would use! I would love to hear your favorite combos so I can try them out as well!

Happy Stampin’

~Laura

Bonus Days

Bonus Days are still going on!!! For every $50 you spend, you will earn $5 to use from August 2nd – 31st!!! Click here to start shopping!!!


Flower Pots on a Shelf!!!

Posted on

Flowers on a Shelf, www.LaurasStampPad.com

This card is just stunning – the coloring, pink, flowers, and that cool texture of the wall! Doesn’t the background look like wall paneling? I sure do and love the added texture! So let’s get started on this beautiful card!

I started with a Flirty Flamingo card base and added a piece of Dapper Denim measuring 5″ x 3-3/4″. Then I took a piece of scrap Very Vanilla and stamped the flower pots from the Sitting Here Stamp Set in Basic Gray Archival Ink. I used this ink so that it wouldn’t bleed when I watercolored the image and because I wanted a lighter shade than black. I used an Aqua Painter to color using Dapper Denim for the pots, Emerald Envy for the greenery and Flirty Flamingo and Crushed Curry for the flowers. If you would like to see a Video Tutorial on coloring with Aqua Painters, check this out! Set the flowers aside to dry before cutting them out. While they are drying, you can die cut the background with the Lots of Labels Framelits. To add the lines for a panel look, I placed it in the Stampin’ Trimmer and scored every 1/2″ inch. You could also use a straight edge and a Bone Folder. I added this to the card front!

Flower Pots, www.LaurasStampPad.com

For the shelf, I took a scrap piece of Chocolate Chip cardstock and stamped the bottom of the swing from the Sitting Here Stamp Set in Chocolate Chip. Then I cut off that bottom piece of the swing below the cushion. This gives the shelf some texture and wood look! I added the shelf to the “wall” and then I added the potted flowers with Stampin’ Dimensionals. For the greeting, I used the Thoughtful Banners Stamp Set. I stamped the border in Crushed Curry and the greeting in Flirty Flamingo. I punched it out with the Classic Label Punch. I added the greeting the to the card with Stampin’ Dimensionals! Love it!!!!

Do you love flower cards as much as me too? Do you like watercoloring? Let me know in the comments below if I’m all alone here or if you all love it too!!!

Happy Stampin’

~Laura

Bonus Days

Bonus Days are here!! For every $50 you spend, you will earn $5 to use from August 2nd – 31st!!! Click here to start shopping!!!


A Happy Hello!!!

Posted on

Swirly Background, www.LaurasStampPad.com

Bright and fun colors are always my favorite and for this card I tried a new color combination – Marina Mist, Wild Wasabi, and Peekaboo Peach!!! I’m really digging it! What about you??

I started with a Wild Wasabi card base and layered on a piece of Marina Mist (4″ x 5-1/4″). Then I took a piece of Whisper White cardstock (3-3/4″ x 5″) and stamped the swirls from the Swirly Bird Stamp Set all over to create a fun background. When creating a background be sure to fall off the edges of your paper so that it looks like the pattern continues on and on rather than stamping just in the middle. I added this piece to the card front! Then for the greeting, I stamped it from the Tin of Cards Stamp Set in Peekaboo Peach onto scrap white cardstock. I punched it out with the Decorative Label Punch. I added a small piece of Peekaboo Peach Ruched Ribbon folded in half to the back of the greeting. I secured it with Stampin’ Dimensionals and placing it onto the card. This is a great way to add a little texture and use those little scraps of ribbon you have left over from another project or the end of the spool. Simple and fabulous! You could mix up the colors for any occasion!!!

If you would like to see more samples using the Swirly Bird Stamp Set and coordinating Swirly Scribbles Thinlits (Bundle & Save 10%), click here, here and here!

Happy Stampin’

~Laura


Technique Tuesday – Using a Sponge Brayer!!!

Posted on

Happy Tuesday!!! I hope you are all having an amazing week! I have a fabulous technique to share with you today!!! I am showing you how to use the New Sponge Brayer on the Irresistibly Floral Designer Series Paper so you can get this fabulous look!!!Happy For You, www.LaurasStampPad.com

I am having so much fun with the Irresistibly Floral Designer Paper because it has FLOWERS and there are so many different fun ways to add color. I love it!!!

SUPPLIES NEEDED: Irresistibly Floral Designer Series Paper, Sponge Brayer, Ink Colors of Choice

I started with a piece of the floral image from the Irresistibly Floral Designer Series Paper measuring 4-1/8″ x 5-3/8″. I didn’t want much of a border on my card front, just the beautiful flowers! I started with the lightest color – Daffodil Delight and rolled the Sponge Brayer over the ink pad. The sponge won’t pick up the ink like your are mopping up color, it will just be ever so slightly colored. Then I rolled it over the end of the Designer Paper – back and forth. The color will start to appear and you can continue until you have the desired shade. You will want to go about 1/3 of the way across the paper. Using a paper towel, you will want to wipe off any excess ink as it tends to sit on top of the embossed image. Then I changed out the sponge to a new one and did the same with Tangerine Tango. You will want to go over the top of the yellow a bit on that overlap portion so that it doesn’t look like stripes but instead like it fades into the next color. Wipe off the excess ink with the paper towel and then change out the sponge and finish off the Designer Paper with Watermelon Wonder. Be sure to go over that Tangerine Tango just a bit so your colors fade into each other! Wipe off the excess ink and you are all done!!! You can wash out your sponges with water and just keep squeezing them until they run clean and allow them to dry.

HAPPY, www.LaurasStampPad.com

To finish off the card, I added this piece to a Whisper White card base and tied some Whisper White Baker’s Twine around the top of the card. For the greeting, I die cut the Happy from the Hello You Thinlits. I brushed some Wink of Stella over the top for a little shimmer and added it to the card front with the Fine Tip Glue Pen! If I would have planned this card out a little better, I would have put the yellow on the top of the card and placed the greeting up there so it popped some more. I already had it adhered to the card so I just went with it! I stamped the Crushed Curry border from the Thoughtful Banner Stamp Set and added the greeting from the Crazy About You Stamp Set (it coordinates with the Hello You Thinlits). I punched out the greeting with the Classic Label Punch and added it to my card with Stampin’ Dimensionals. I added a little Metallic Enamel Shape for a little more bling! This card is so bright and cheery and could be used for any occasion!

If you would like to see this in action, check out the Video Tutorial below or click here. Don’t forget to give it a thumbs up if you liked it and be sure to subscribe if you are new. I post every Tuesday and Thursday!

Happy Stampin’

~Laura


Hello Friend!!!

Posted on

Hello Friend, www.LaurasStampPad.com

You all know I love flowers and bright colors! This card is super amazing! Plus I am loving the Ruched Ribbon like sooooo much!!

For this card, I started with a Daffodil Delight card base. Then I cut a Flirty Flamingo piece (4″ x 5-1/4″) and a piece of the Affectionately Yours Designer Series Paper (3-3/4″ x 5″)! I adhered the designer paper to the pink and tied some Dapper Denim Ruched Ribbon around it and tied it into a knot. Then I added this to the card base. For the greeting, I stamped the banner image in Dapper Denim and the greeting in Flirty Flamingo from the Thoughtful Banners Stamp Set. Then I punched it out with the Duet Banner Punch (Bundle & save 10%)! I added the greeting to the card with Stampin’ Dimensionals! I punched out flowers in Dapper Denim and Flirty Flamingo with the Petite Petals Punch! I added the flowers with Stampin’ Dimensionals as well! I placed a Daffodil Delight Enamel Shape in the middle of the flowers for a little POP!

This card is perfect for any occasion so you can always change up the greeting for whatever event you need! What occasion would you use this card for? Let me know in the comments below!

Don’t forget that all online order of $25 or more earn Laura’s Loyal Stampers Points!!! Click here to start shopping!

Happy Stampin’

~Laura

Click here to start shopping and earning Bonus Bucks!!!

Bonus Days


Celebrating with Balloons!!!

Posted on

Fabulous Balloons, www.LaurasStampPad.com

Balloons are perfect for any celebration! These are super fun with the words on each balloon from the Thoughtful Banners Stamp Set! I love it!!! I also love the Black and White with a pop of Sweet Sugarplum!

I started with a Sweet Sugarplum card base. Then I cut a Basic Black piece (4″ x 5-1/4″) and Whisper White piece (3-3/4″ x 5″). I stamped the balloon strings from the Balloon Celebrations Stamp Set in Basic Black. For the balloons, I used Sweet Sugarplum Ink and stamped full strength and then again for a lighter shade. Then I went back to the ink pad for more ink; that is how I got the 2-toned balloons! I stamped various greetings from the Thoughtful Banners Stamp Set in full strength Sweet Sugarplum. For the word Friend, I actually placed a piece of scrap paper over the balloon to stamp the “fr” on so it would look like it was hiding behind the other balloon. Then I adhered this piece to the Basic Black layer and placed a strip of the Sweet Sugarplum Ruched Ribbon across the card. I tacked it on the back side with Stampin’ Dimensionals and added more to the corners. Then I placed this piece onto the card front. For the greeting, I stamped the banner image in Basic Black and the greeting in Sweet Sugarplum from the Thoughtful Banners Stamp Set. Then I punched it out with the Duet Banner Punch (Bundle & save 10%)! I added the greeting to the card with Stampin’ Dimensionals! I love it!

You could create this card in wedding colors, school colors for graduation, pink or blue for a baby card, and so much more! You could always go for multiple colors rather than black and white with a single color. What colors would you use? Let me know in the comments below!

Don’t forget that all online order of $25 or more earn Laura’s Loyal Stampers Points!!! Click here to start shopping!

Happy Stampin’

~Laura


Ice Cold Lemonade!!!

Posted on

Ice Cold Lemonade, www.LaurasStampPad.com

Happy Monday & 4th of July!!!! That calls for some kicking back and ice cold lemonade! Now I have to add the disclaimer that some of these items are retired but I still wanted to share this for those that have these items or would like to recreate the idea!

I started with a Whisper White card base and layered a piece of Crushed Curry on top (3-3/4″ x 5-1/2″). I layered a piece of the A Nice Cuppa Designer Series Paper on top of that (3-1/2″ x 5-1/2″). The greeting was stamped in Crushed Curry from the Greatest Greetings Stamp Set onto scrap Whisper White. I cut the banner tips into the ends. The trick to perfect banner tips is to cut up in the middle of the end. Then you will cut diagonal from the corner to the end of that center cut on both sides! 🙂 I added the greeting to the card front with Stampin’ Dimensionals! For the glass of lemonade, I took a piece of Whisper White measuring 1-1/2″ x 2-1/2″ and rounded the bottom 2 corners with the Corner Rounder Punch. For the top, I used the 1-1/2″ Circle Punch! I stamped the heart from the A Nice Cuppa Stamp Set. The lemon is also from that set and then I fussy cut it out! I added the cup to a Crushed Curry Lots of Label with the top trimmed off. I attached it with Stampin’ Dimensionals and slipped the lemon slice over the top. For a little bling and shine on the cup, I brushed it with Wink of Stella Pen! Then I added this piece to the card front! I love the bright colors and summer look!!!

Lemonade, www.LaurasStampPad.com

I hope you all have an amazing day! Stay safe, keep cool, and have fun!

Happy Stampin’

~Laura


Swirly Bird!!!

Posted on

Hello Swirl, www.LaurasStampPad.com

The Swirly Bird Stamp Set and coordinating Swirly Scribbles Thinlits (Bundle & Save 10%) look a little odd at first glance. When you start playing with the images, you realize how many crazy different looks you can get – flowers, bears, flags, sailboats, kites, and even the 60’s era with the swirls and fun! 🙂 Be sure to subscribe to my blog on the right hand side bar so you don’t miss all these amazing ideas!

Swirly Bird Stamp Class, www.LaurasStampPad.com

Now let’s get started on today’s creation. I started with a Emerald Envy card base. Then I took a piece of Whisper White measuring 4″ x 5-1/4″ and I stamped the solid swirl image from the Swirly Bird Stamp Set a little to the right side in the middle in Emerald Envy. Then I stamped the splatter dots in the same color diagonal from the bottom left to the upper right. I inked the image up, stamped, rotated 90 degrees and then stamped again (skipping over the swirl). This gave a variation of color and a wider pattern. I thought it needed a little bling so I took my Wink of Stella Brush and squeezed it a little to allow more glitter on the tip. Then I tapped the pen on my finger over the project to allow splatter of glitter. You can see a large drop of it in the bottom right corner….it is a technique you can’t predict or control. 🙂 Now you are done with the background and can add this piece to your card base. Using the swirl from the Swirly Scribbles Thinlits Set, I die cut one in Emerald Envy with the Big Shot. On the left hand side, I tied some Emerald Envy Ruched Ribbon around the swirl. The best way to add this piece to your card is with the Fine Tip Glue Pen. Just add a little in spots around the swirl and place it over the stamped swirl, hold a few seconds and you are golden! For the greeting, I stamped the banner from the Thoughtful Banners Stamp Set and punched it out with the Duet Banner Punch (Bundle & save 10%). Then I stamped the greeting in the middle and added it to my card front with Stampin’ Dimensionals!

I love the monochromatic look of this card so it would be great to make with your favorite color or the color you have tons of paper in. It was hard not to add in another color. I think making it 2 colors would be super fabulous as well!!!

If you would like to see a video showcasing the Swirly Bird Bundle, check out the video tutorial below or click here. Be sure to give it a thumbs up if you liked it and don’t forget to subscribe. I post videos every Tuesday and Thursday!

Happy Stampin’

~Laura


Pop of Pink Suite!!!

Posted on

Hello, www.LaurasStampPad.com

I am in love with the Pop of Pink Suite!!! The Pop of Paradise Stamp Set, the Pop of Pink Designer Paper, the Melon Mambo Thick Baker’s Twine, and a touch of gold just make it amazing!!! I love it all!!! You can see more samples using these products herehere and here!

For this card, I started with a Basic Black card base measuring 4-1/4″ x 11″. I picked this size because I wanted to wrap the Melon Mambo Thick Baker’s Twine around the card and this size requires less twine! 🙂 Then I cut 2 Whisper White pieces measuring 4″ x 5-1/4″, one for the front and one for the inside since black is hard to write on. I stamped the leaves from the Pop of Paradise Stamp Set all over the front and in the corners of the inside piece. I used Melon Mambo and Basic Black for the leaves. I adhered these 2 pieces onto my card base. Then I took some strips of the Pop of Pink Designer Series Paper and added banner tips with the Banner Triple Punch and layered them onto the front of the card. You could really use any of the patterns in the pack which makes this card fun and versatile when making multiples! I tied some of the Melon Mambo Thick Baker’s Twine around the card and tied it into a bow. To fray the ends a bit, I just ran my finger nail down the ribbon ends and it untwisted and frayed out like that! For the greeting, I used the Hello from the Pop of Paradise Stamp Set. I stamped it in VersaMark Ink onto scrap white cardstock. I added Gold Embossing Powder and heated it with the Heat Tool to melt. Once it cooled, I punched it out with the 1-3/8″ Circle punch! I added the greeting to the card with Stampin’ Dimensionals – partially because I wanted to make the greeting POP and because I placed it over the twine and didn’t want it to look bumpy. With the Stampin’ Dimensionals, it is nice and smooth onto of the twine! I love it!

What is your favorite suite in the new catalog – Pop of Pink? Festive Birthday? A Little Foxy? Affectionately Yours? Floral Boutique?? Or one of the many others? Let me know in the comments below!

Happy Stampin’

~Laura