Do you love scroll-y things?? What about delicate, intricate, fabulous paper?? Do you want quick and simple without getting out the Big Shot?? You need to check out this Beautifully Detailed Designer Paper!!! It is amazing!
This paper is actually Petal Pink on one side and white on the other. This makes it super versatile because while the pink is fabulous, the white can be colored any color you wish! Just use a spritzer, sponge, or marker to add color! There are 8 total sheets – 4 each of the 2 designs. The design on the right is a full sheet of that fabulous filigree. It can be used as the full sheet, cut into smaller pieces or even cut into individual filigree pieces. There are so many different ways! The sheet on the left has detailed strips as well as 6 rectangles. The rectangles are perfect for a card front! Just stunning! Don’t worry about wondering how to adhere this delicate paper. Check out this video for that!
If you would like to see the full sheet of these, check out the video below or click here! Be sure to give the video a thumbs up if you liked it and don’t forget to subscribe if you are new. If you would like a notification when I post a new video, be sure to click the bell right next to the subscribe!!!
Valentine’s Day is around the corner…..okay more like around this corner and that corner. BUT that means you still have plenty of time to create some fabulous cards for those you love or treats for kid’s classmates and teachers. Some like to think that Valentine’s Day is all hearts and chocolates for your significant other. I like to think of Valentine’s Day as a day to share your love with those around you…..like everyone. Also, I prefer cupcakes over chocolate! 🙂 This card saying You Are Loved is perfect for anyone!
Tell me this….how do you feel when someone says I love you to you?? For me, I feel warm and fuzzy. I feel like I matter and someone cares about me and that makes me very happy. Since that is the way I feel, I like to think others feel the same. This is why we should always send or share our love! I’m pretty sure my brother would roll his eyes if I said I love you to his face. So to spare the embarrassment, I send a card…after all I do love him and every other member of my family. My sister doesn’t roll her eyes! 🙂
This card is quick and simple. I started with a Whisper White card base and stamped the hearts down the left side. The hearts are from the Forever Lovely Stamp Set in the Occasions Mini Catalog and they are stamped in Flirty Flamingo!! Next, I took a 3″ square piece of the All My Love Designer Series Paper and layered it onto Flirty Flamingo cardstock. I added this to the card front!
For the greeting, I stamped it from the Forever Lovely Stamp Set onto Whisper White and punched it out with the Pretty Label Punch. I added the greeting to the card with Stampin’ Dimensionals for a little bit of texture! Using the Flirty Flamingo Ribbon from the All My Love Ribbon Combo Pack, I tied a bow and added it with a Mini Glue Dot. On the bottom of the card, I added a few Clear Epoxy Hearts. The perfect card for Valentine’s Day…..or any day of the year!
Want to create some of these cards to send out? Click the supplies listed below! Purchase all of them and earn a FREE Sale-A-Bration item!!! Don’t need all of those items? Add a few other favorites like Stampin’ Dimensionals, Whisper White Cardstock, Envelopes, and more!
Project Kits are awesome because all the supplies are pre-cut and prepared for you to just relax and create! The Incredible Like You Project Kit is even more fabulous because it has bright colors and fabulous designs. The moment I saw it, I knew I had to have it. You all know I love bright colors!!!
They are so beautiful and really simple to assemble. I love the greetings in the coordinating Incredible Like You Stamp Set! Perfect for any type of card/occasion!
A few tips I wanted to share as I put this kit together. First off, I’m not a fan of Multi-purpose Liquid Glue. I tend to use to much and make a big mess. I used the Fine Tip Glue Pen instead. Also, you do not need to add adhesive to every spot of the die-cut pieces. I did the corners on the left two cards (adding Snail to the center of the blue floral one). For the oranges/lemons card, I did the corners and then a few random dots here and there. Click here to get your kit!!
Stamp all of your greetings at once and then start your assembly. This will make it all go much faster. The last tip is to have fun with it. Feel free to use other favorite greetings of yours or different colors. Enjoy it!!!
If you would like to see all the goodies in the Incredible Like You Project Kit, check out the video below or click here! Be sure to give the video a thumbs up if you liked it and don’t forget to subscribe if you are new. If you would like a notification when I post a new video, be sure to click the bell right next to the subscribe!!!
It’s Friday!!!! The Occasions Mini Catalog and Sale-A-Bration have begun!!! Now let’s hear a drum roll for the January 2019 Free Stamp Set of the Month…….
I have been having a lot of fun with the Piece of Cake Stamp Set because cake goes perfect for any occasion even to celebrate Friday. I love love love the greeting that says Cake is the Answer….Who cares what the question is! Come on now, isn’t that amazing???? There is a coordinating punch to this stamp set so if you don’t like to fussy cut images out, be sure to add that to your order!!! If you order totals $75 before tax and shipping, you will earn this set for FREE!!!! This offer is exclusive through me – Laura Borchert. You can earn this with online orders or in person at an event or emailing me your order! Click here to start shopping!
Have an amazing weekend! Happy Stampin’
~Laura
My Girls Night Out Stamp Event is this coming Thursday, January 10th at 10 a.m. and 6:30 p.m. If you live local or want to drive, come on over to see lots of new product and samples from the Occasions Mini Catalog & Sale-A-Bration! Click here to RSVP!
Is it January 3rd yet???? The Occasions Mini Catalog is comes out then and it is AMAZING!!! If you are a customer of mine, your copy of the catalog should be arriving in the mail any day now!! Today, I’m sharing the How Sweet It Is Designer Series Paper!!! This paper my favorites. It has all the bright colors and fun patterns. Bring on the candy!!!!
Isn’t it so pretty??? Do you love bright color like me?? This paper has these fun candy prints which I think will be make super fun kid cards but also adult cards. Everyone loves candy after all, right? Even if you aren’t a candy fan, the other side has fun bright print that are more solid and simple. Also, I think the colors scream Lisa Frank and that reminds me of my childhood. Any other Lisa Frank lovers out there?? Let me know in the comments below!
If you would like to see all of these sheets as a full 12″ x 12″ rather than the little swatch in the catalog, check out the video below or click here! Be sure to give the video a thumbs up if you liked it and don’t forget to subscribe if you are new. I’ll be posting more of the paper from the Occasions Mini Catalog soon!!! If you would like a notification when I post a new video, be sure to click the bell right next to the subscribe!!!
The Occasions Mini Catalog is coming out on January 3rd. There are so many goodies so I just can’t wait till then to start showing you everything!!! Today, I’m sharing the Needlepoint Nook Designer Series Paper!!! This paper is so pretty and detailed. It seriously looks like needlepoint which is so cool!
Isn’t it so pretty??? I love that this paper includes like every color and not just a specific shade of a color. Pinks, Greens, Blues, Purple, Red, and Pink are all in this paper pack. That gives this paper a nice variety and so many different options to go with as your base color to coordinate. Even if you aren’t a fan of some of the needlepoint looks, the other side of the paper is fabulous with simple solid color prints. It is so versatile.
If you would like to see all of these sheets as a full 12″ x 12″ rather than the little swatch in the catalog, check out the video below or click here! Be sure to give the video a thumbs up if you liked it and don’t forget to subscribe if you are new. I’ll be posting more of the paper from the Occasions Mini Catalog soon!!! If you would like a notification when I post a new video, be sure to click the bell right next to the subscribe!!!
The Occasions Mini Catalog is coming out on January 3rd and I’m so excited!!! I wanted to start sharing some of the goodies with you. Today, I’m sharing the All My Love Designer Series Paper!!! This paper is perfect for Valentine’s Day but there are lots of great prints for Anniversaries, Birthdays, Weddings, and more. It’s got flowers so you all know I’m in love!
Isn’t it so pretty??? I love all the shades of pinks and reds and everything in between! The other thing that I love about Stampin’ Up’s designer paper is that one side is usually holiday themed or a specific design but the other side is simple like stripes/dots/etc. This makes it perfect to use up all of the paper even if you don’t use it for that holiday. I will probably use some of the hearts for Valentine’s Day but then use the rest for other occasions. It’s perfect!
If you would like to see all of these sheets as a full 12″ x 12″ rather than the little swatch in the catalog, check out the video below or click here! Be sure to give the video a thumbs up if you liked it and don’t forget to subscribe if you are new. I’ll be posting more of the paper from the Occasions Mini Catalog soon!!! If you would like a notification when I post a new video, be sure to click the bell right next to the subscribe!!!
As a demonstrator, we get to pre-order items from catalogs before they come out! I love this because it’s like getting to know the secret before everyone else. I get to see and play with these goodies now. If you know me at all, you know I am not a fan of winter so getting to play with Spring stuff as early as possible is perfect for me. If you want to get it on this amazing secret and see the goodies early, join my Stampin’ Up Fabulous Friends Team by clicking here! Now let’s see some of these amazing products in my 2019 Occasions Mini Pre-Order Haul!!!
There are so many pretty designer papers, bling, stamps and framelits! Flowers galore and apparently buffalo check/gingham is HOT HOT HOT! I think I missed that bandwagon. That is why my Free Stamp Set for orders of $75 for the month of December get the Buffalo Check Stamp Set! Just preparing for all the fun projects in 2019! I can’t wait to start playing with all these goodies and dreaming of spring!
If you would like to see all of these products as I unbox them, check out the video below or click here! Be sure to give the video a thumbs up if you liked it and don’t forget to subscribe if you are new. If you would like a notification when I post a new video, be sure to click the bell right next to the subscribe!!!
What are you most excited about??? Let me know in the comments below!
Happy Tuesday!!! You know what that means…..I have a fabulous technique to share with you today! It is a 6″ x 6″ One Sheet Wonder as I know how much you all love One Sheet Wonders!
Quick and simple pattern and super easy to change up the greeting to whatever you need the most. I made up this style of One Sheet Wonder to use up some Designer Paper I had on hand but also ribbon and embellishments! I love how they all turned out. Today, I’m sharing this pattern but tomorrow I will be showing a more options with different colors, paper, and embellishments!
Starting with a 6″ x 6″ piece of Designer Series Paper, cut at 2″. Then trim that 2″ x 6″ piece at 5-1/4″ for a nice long detailed piece which I cut a laying piece to match measuring 5-1/4″ x 3″. Next, with the 4″ x 6″ piece, I cut along the 6″ at every 1-1/2″. This creates 4 pieces measuring 4″ x 1-1/2″ and then I cut layering pieces to match measuring 4″ x 2″. This creates 5 pieces for 5 cards with the only waste being a small 2″ x 3/4″ piece. How amazing is that?? If you are using a 12″ x 12″ sheet, that means you can get 20 cards from the full piece. If you are using a 6″ x 6″ Designer Series Paper Stack, it’s 5 cards per sheet!
I made up these packets so I could use up supplies and have cards ready to create. I used some Fresh Fig Finely Woven Ribbon and Perfect White Accents for this set of cards! The greeting is from the Love What You Do Stamp Set which is in the Share What You Love Bundles available this month! One ink pad and one stamp set makes these cards even more quick and simple! I love it!
If you would like to see all of this in action, check out the Video Tutorial below or click here! I hope you found this super useful. Be sure to give the video a thumbs up if you liked it and don’t forget to subscribe if you are new. If you would like a notification when I post a new video, be sure to click the bell right next to the subscribe!!!
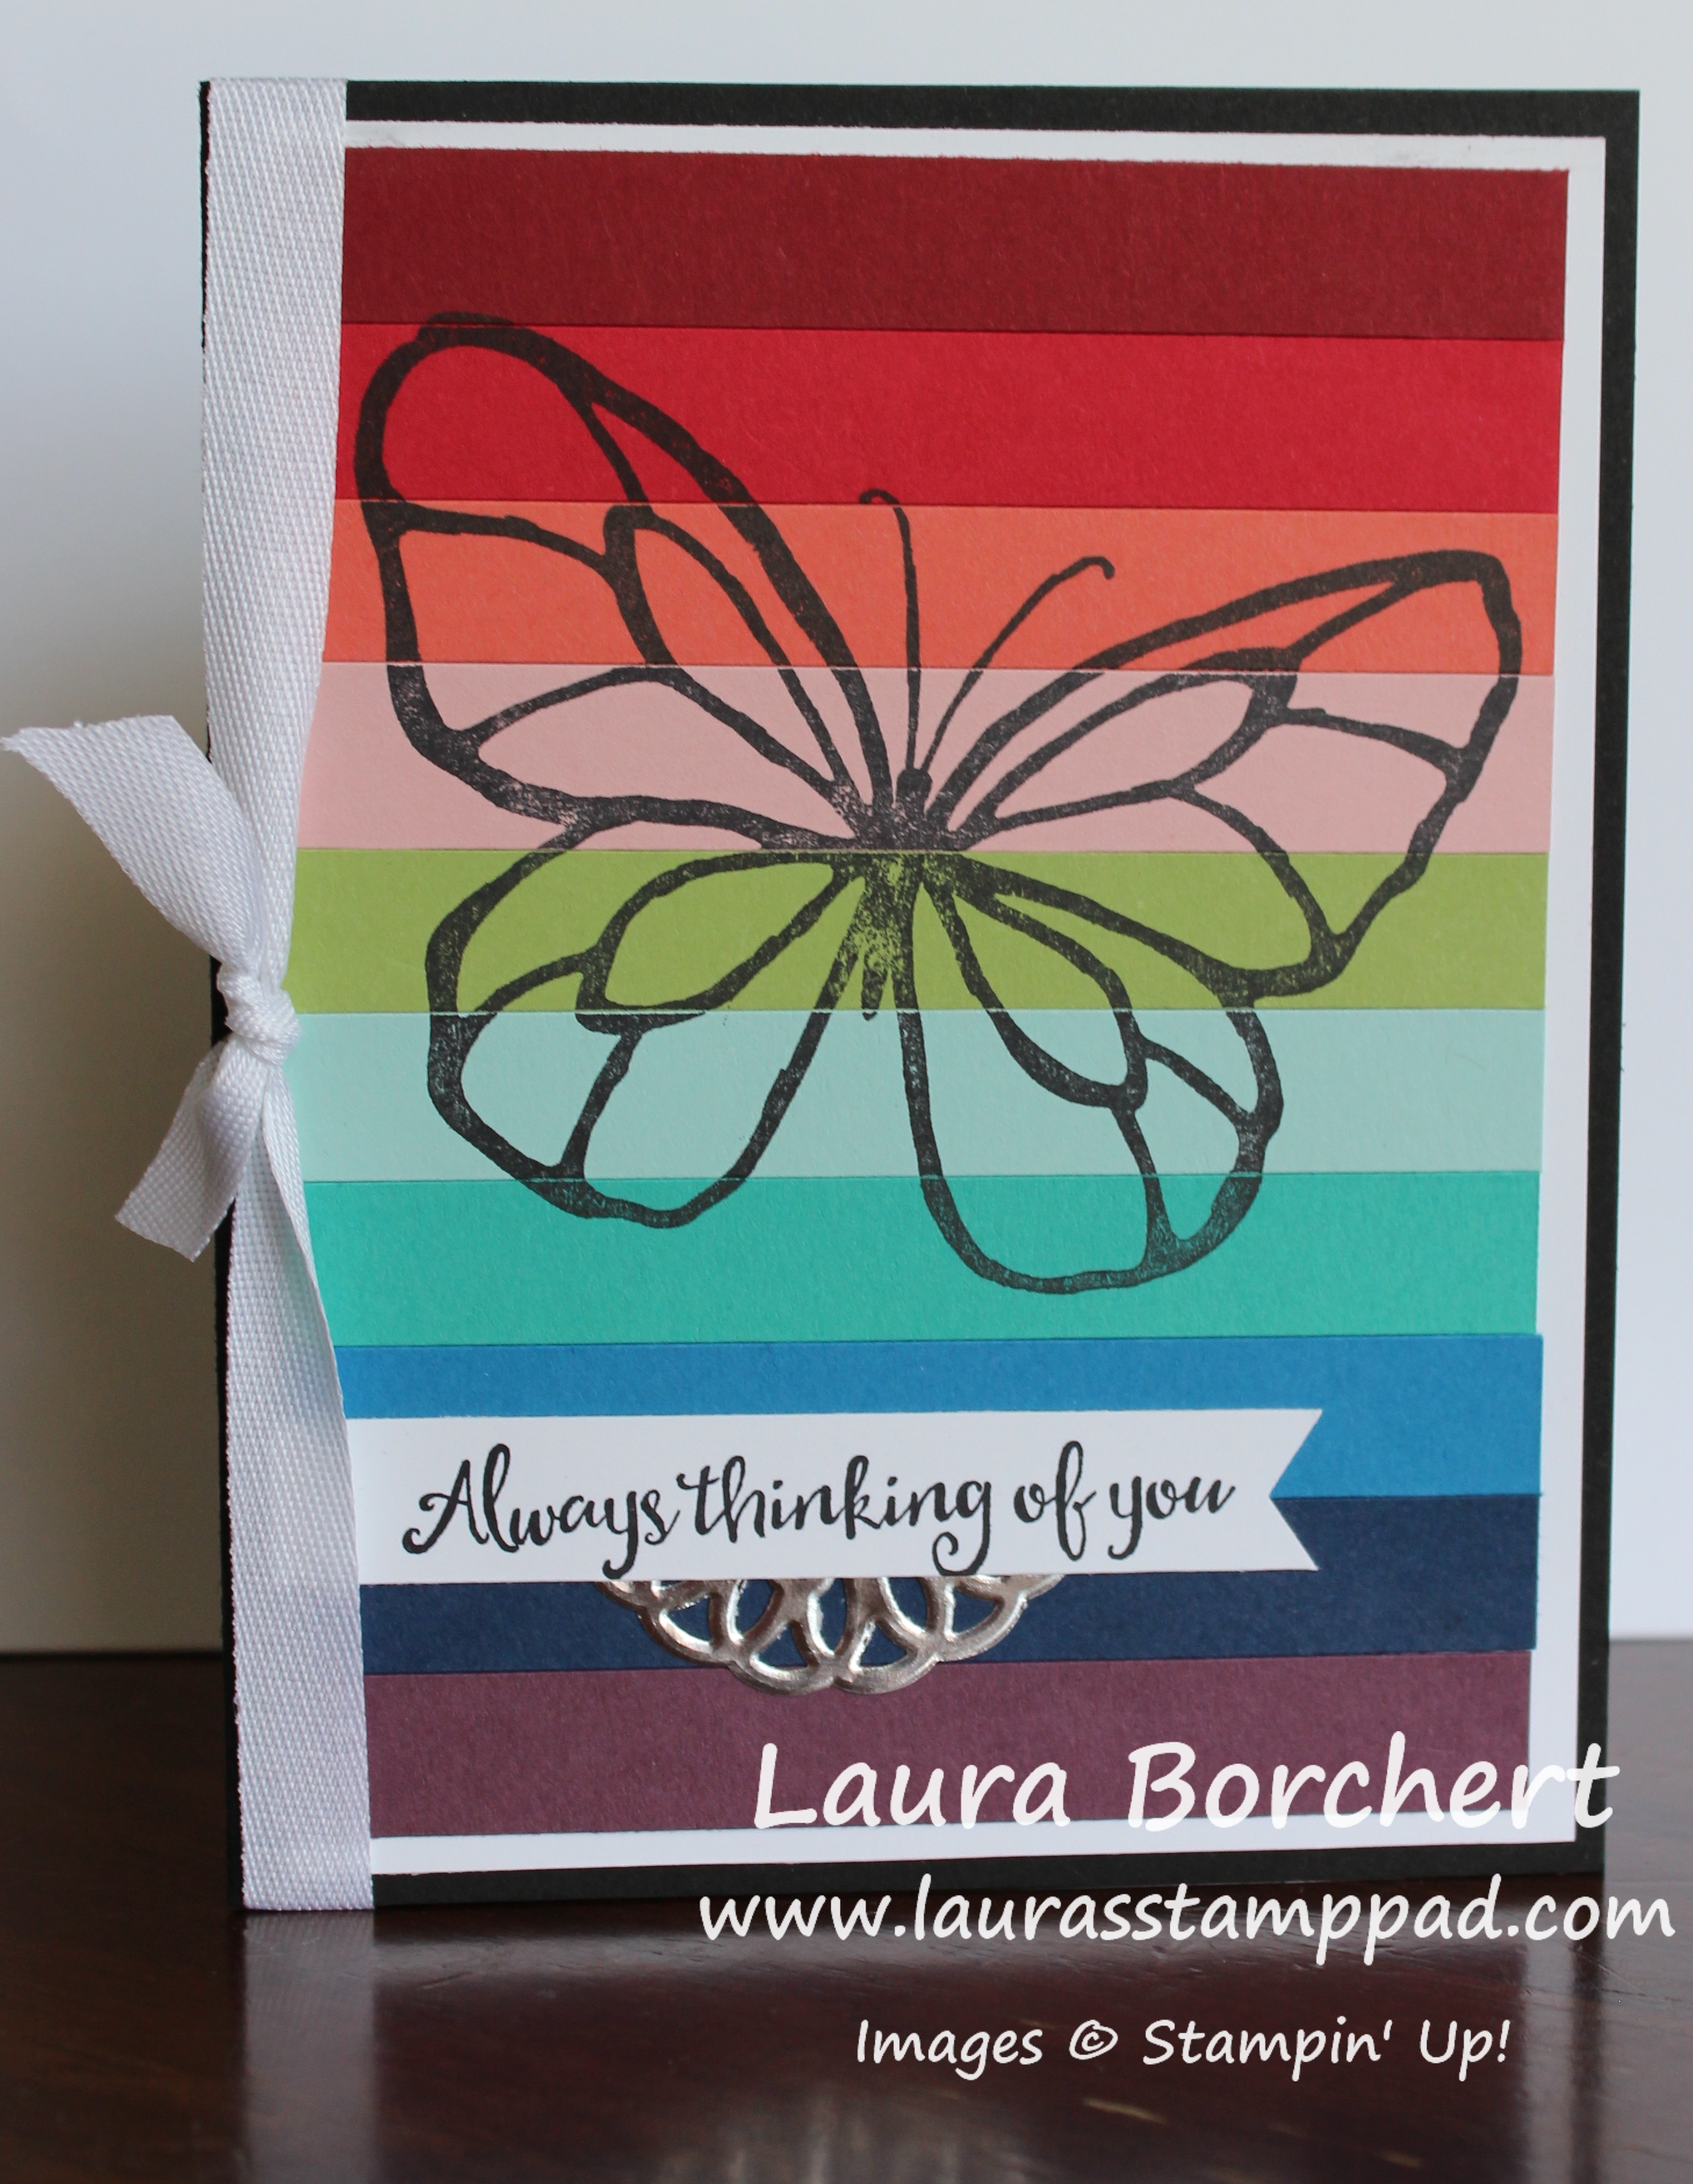
Happy Monday!!! I hope you all had a wonderful weekend! You all know I love bright colors and this card just makes me so happy. You could always change up the greeting because the image is so versatile. This Butterflies & Rainbows card could be done with lots of colors or just a few. It’s a great way to use up scraps too!
Rainbows & Butterflies are a sign of Spring to me and I just love Spring so much! It’s my favorite season for sure! A sign of new life and bright beginnings! I am so excited for our little rainbow baby to arrive and start that new adventure this Spring! 🙂
I started this card with a Basic Black card base. Next, I cut 2 pieces of Whisper White cardstock measuring 4″ x 5-1/4″. One is for the front and the other is for the inside to write on since black is hard to see. Then I added strips of cardstock that measured 1/2″ x 3-3/4″. The colors from top to bottom are Cherry Cobbler, Real Red, Calypso Coral, Powder Pink, Pear Pizzazz, Soft Sky, Bermuda Bay, Pacific Point, Night of Navy, and Rich Razzleberry.
TIP: Add 3 lines of adhesive up and down to the white piece and then just place the strips on top. This makes it easier rather than adding adhesive to each little piece. The other tip is to roll with the punches for this card. Spacing and all might not come out perfect for each card because cutting 1/2″ to the inside of the line is smaller and to the outside is larger. With so many pieces and slightly different measurements, it could be off a little. Simple trim the white to not exist or be smaller or leave off a color if you need to! It’s all okay and still made with love! Also, it’s okay if you leave out a color. It happens! 🙂
After getting the background all created, I stamped the butterfly from the Beautiful Day Stamp Set in Basic Black. BIG TIP: I used the Stamparatus for stamping the butterfly in my class so we could stamp it a few times for a nice darker look. You will notice on my sample above, it is not a crisp solid black butterfly. This tends to happen when you have a rough surface or solid stamped image. With the Stamparatus, simple stamp it, ink it up again, and stamp again. It is always in the same spot so no worries about it not lining up. I love that tool!
For the greeting, I used the same stamp set and stamped on a Whisper White piece and then cut banner tips on the right side. I added the greeting to the lower portion of the card. To finish off the card, I tied some Whisper White Classic Weave Ribbon around the spine of the card. This is for a little texture and to cover up any problems with spacing on the strips. 🙂
Let me know in the comments what colors you would use for this card! Would you stick with shades of one color? Rainbow? 2-3 of your Favorite Colors? Whatever you have the most scraps of? I would love to hear your ideas!


 Designer Series Paper")