You Wonderful Thing You!!!

Posted on

Thank You Wonderful Thing, www.LaurasStampPad.com

I loved the You’re So Lovely Project Kit (see here) and coordinating You’re So Lovely Stamp Set so I thought I would see what else I could create with that same set! I love how this card turned out!!! After all it is pink and has some bling on it so who wouldn’t??

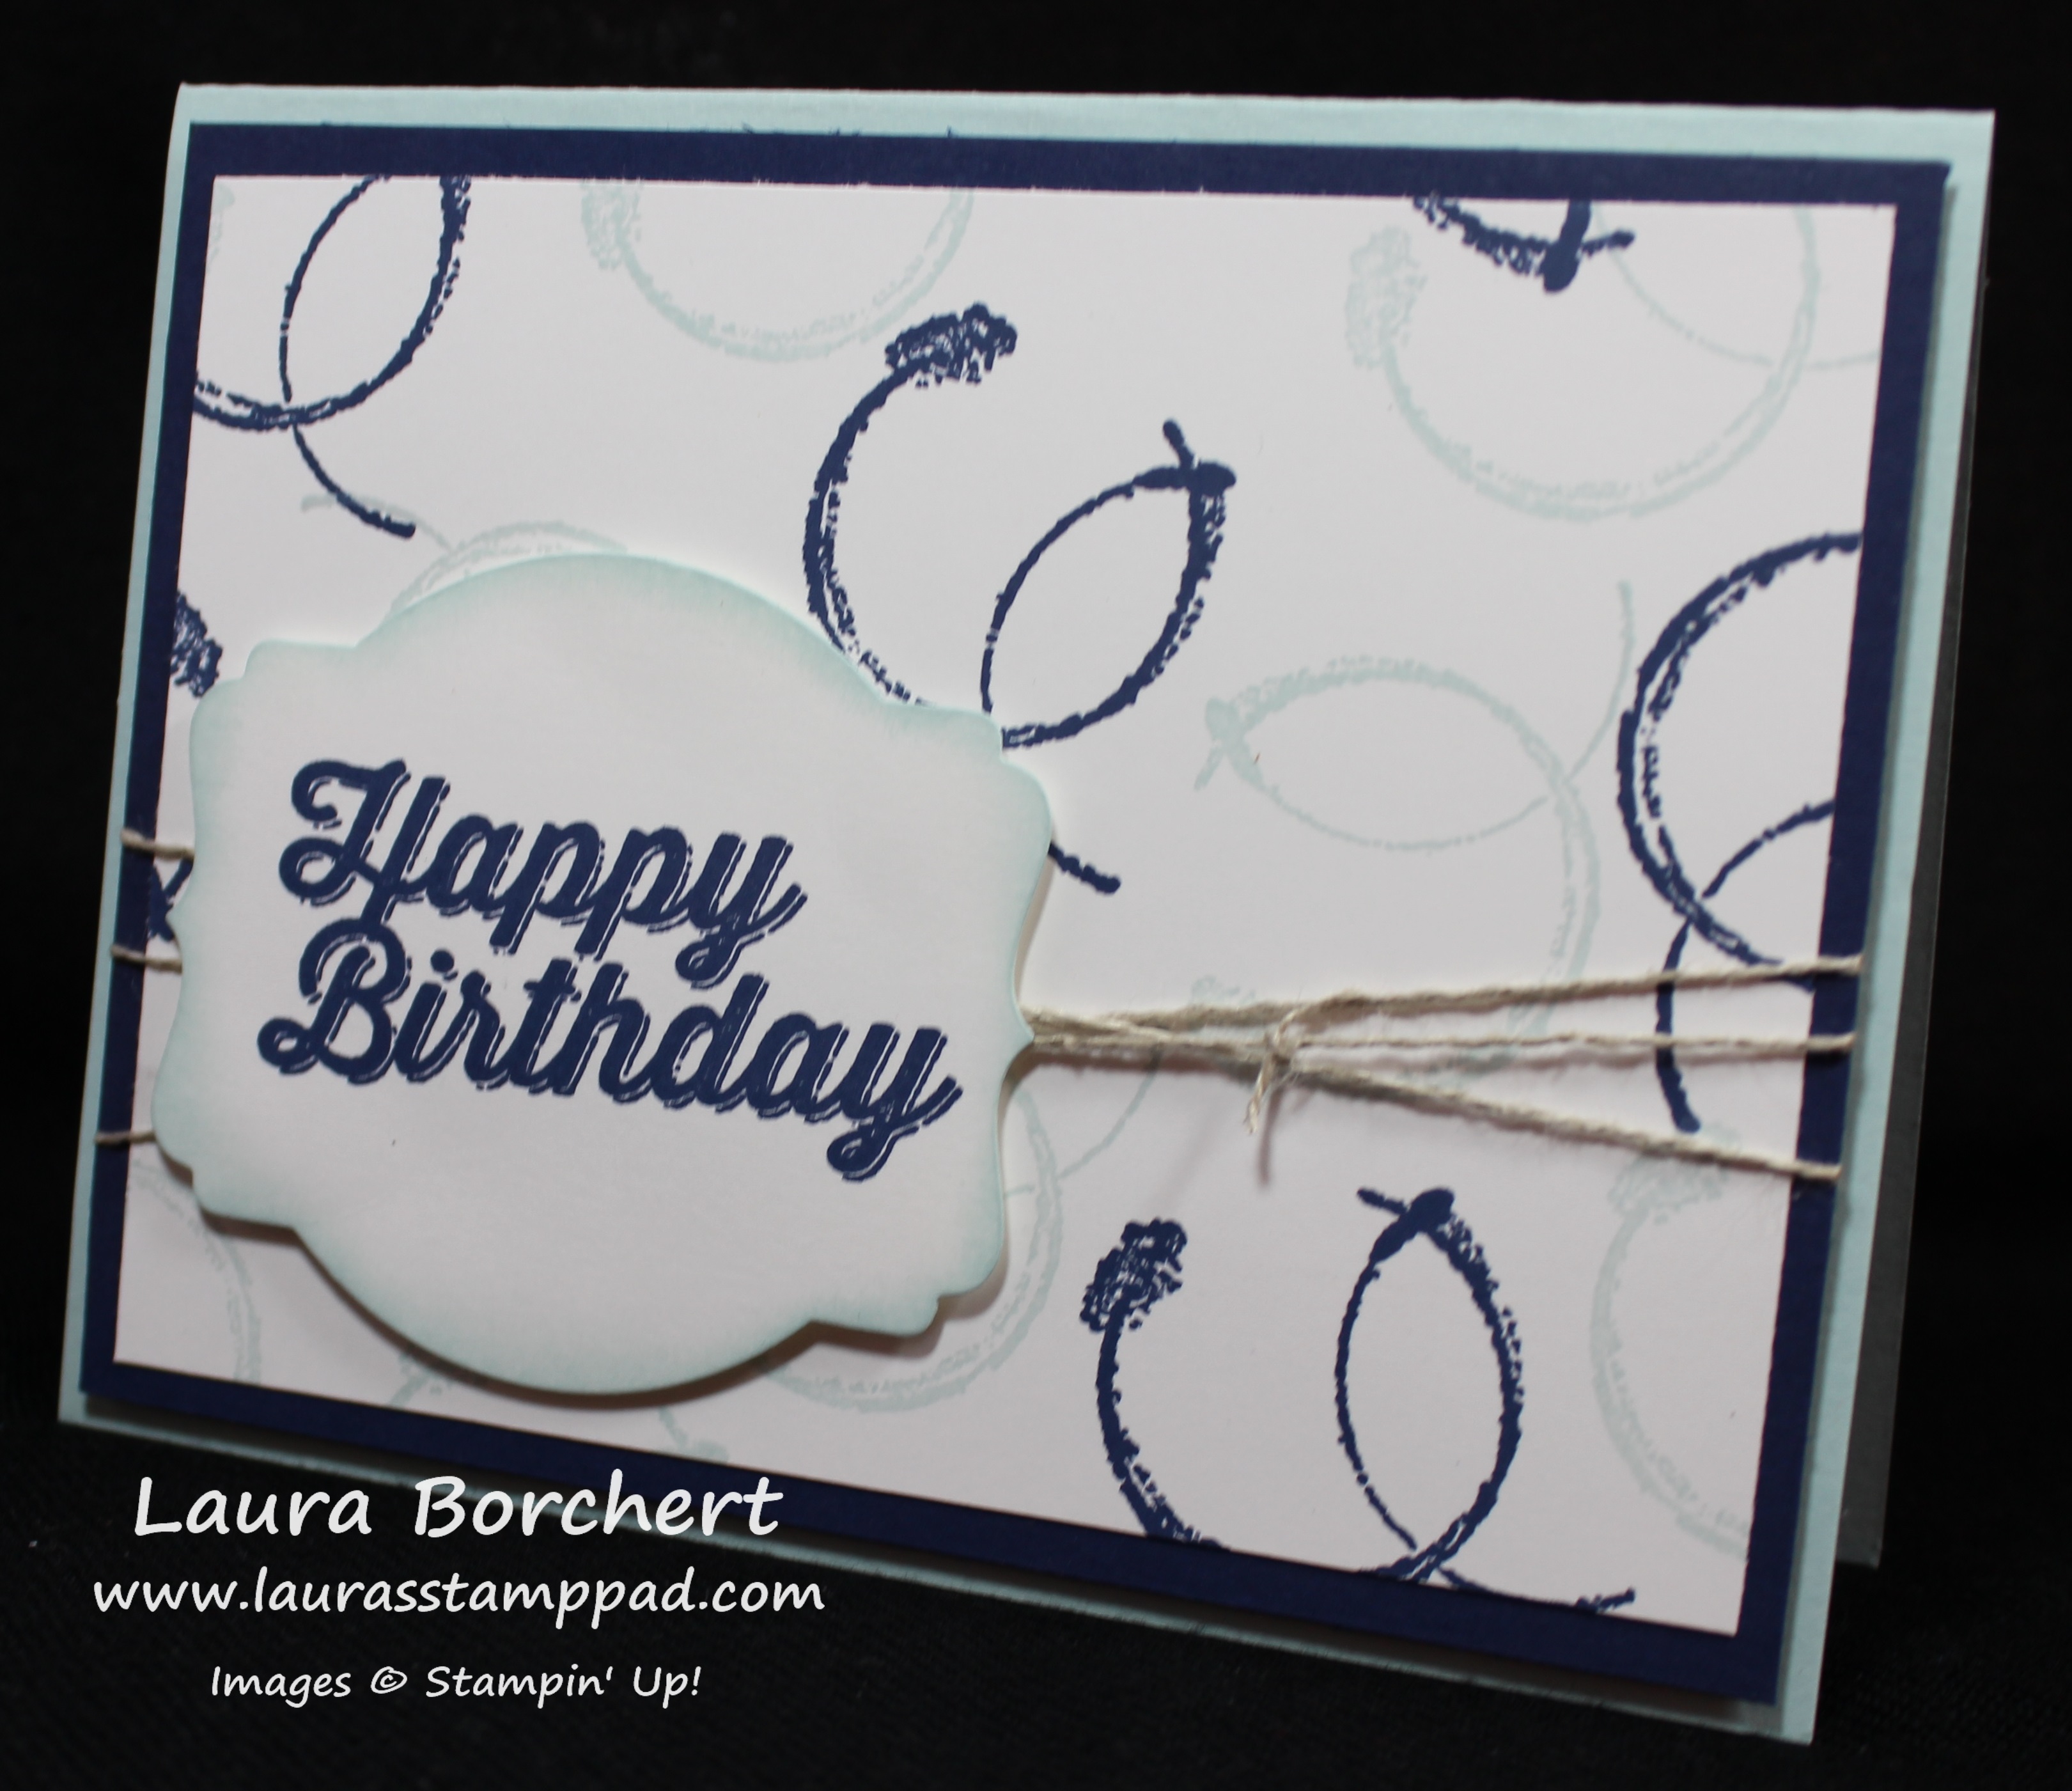
I started with a Melon Mambo card base and stamped the stars from the You’re So Lovely Stamp Set in Smoky Slate and Melon Mambo randomly along the edges. Then I took a piece of Whisper White measuring 3″ x 5-1/2″ and stamped randomly on there making sure to leave a spot for the greeting. Then I took the circle wreath image and stamped in multiple times moving it slightly with each stamp. It looks like barbed wire kind of….or a wreath! I stamped the greeting from the same set in Melon Mambo. I love that greeting. I added the stamped piece to the card base and added some Silver Glitter Tape along both sides. The Glitter Tape was a Sale-A-Bration Item so if you have that you can use it. If you don’t, you can always use a thin strip of Silver Glimmer Paper! That bling really adds the final touch! Love it!

What color combination would you use for this card? Pink like me or perhaps Purple, Blue, Yellow Green??? Ohhh Black and White with that pop of Silver….that would be fabulous!!! Let me know your ideas in the comments below!

Happy Stampin’

~Laura

Ribbon Retire

Be sure to check out the Retiring Items before they are gone at the end of May!


Background Blues!!!

Posted on

Birthday Boy Card, www.LaurasStampPad.com

You all know how I struggle with a good man card because I just love flowers, ribbons and bling! Well check out this one!!!! I love it and I think it’s a perfect Man Card!!! I will be making multiples of this one to have on hand!!!

I started with a Soft Sky card base. Then I cut a piece of Night of Navy measuring 4″ x 5-1/4″ and White White measuring 3-3/4″ x 5″. On the Whisper White, I stamped the tea cup stain image from the Timeless Textures Stamp Set all over in Soft Sky and Night of Navy. Just randomly stamp and be sure to fall off the sides to make it look like the pattern continues. I adhered this piece to the Night of Navy and then wrapped some Linen Thread around the 2 pieces a few times and tied a knot (no bow since it’s a Man Card)! 😉 I added this piece to the card base with Stampin’ Dimensionals. You all know I love those things and I like to use them when there is ribbon (or something wrapped around) because it allows for it to still look smooth! For the greeting, I stamped the Happy Birthday in Night of Navy and die cut with the Deco Label Framelits. I brushed the edges with a Sponge Dauber and Soft Sky Ink and attached it with Stampin’ Dimensionals as well! Just perfect!!!!

What do you like to use for your Man Cards? Let me know in the comments below! I always need help with Man Cards! Also, if you would like to see more samples using the Timeless Texture Stamp Set, click here and here!

Happy Stampin’

~Laura

Project Life Retire

Be sure to check out the Retiring Items before they are gone at the end of May!


In The Meadow!!!

Posted on

Deer in the Trees, www.LaurasStampPad.com

I really struggle with Man Cards so when I saw the In The Meadow Stamp Set, I though I need that set!!! It is the perfect masculine look. I have lots of family and friends who are outdoorsy so this is perfect!!!

I started with a piece of Very Vanilla cardstock measuring 3-1/2″ x 4-1/2″ and I stamped the deer and trees with Basic Gray Archival Ink. I like the lighter look of gray over black for this card! You can always add in a little bit of the grass to fill in if you would like to. All of the images are from the In The Meadow Stamp Set from the Occasions Mini Catalog. The greeting was stamped in Chocolate Chip from the Rose Wonder Stamp Set! I colored in the images with an Aqua Painter! I did the deer in Crumb Cake, the grass and leaves in Old Olive, and the tree trunk in Chocolate Chip. You can always make one of the deer a different color to off set them a little more. I’m really starting to like coloring with an Aqua Painter! I took a Crumb Cake card base and added a piece of the Corrugated Cardstock (4″ x 4″) with opposing corner touching the sides. I thought I would do an off set look rather than just layering it on there. I added the Very Vanilla to the card front with Stampin’ Dimensionals. This adds texture and dimension to the card but also makes for a smooth look on the corrugated paper. Love it!

I plan on making lots of these for Father’s Day, Birthdays, and maybe even Sympathy. If you would like to see this in action, check out my Video Tutorial below or by clicking here! Don’t forget to give this video a thumbs up if you liked and be sure to subscribe if your new!

Happy Stampin’

~Laura


Blue Botanicals!!!

Posted on

Just for You, www.LaurasStampPad.com

You all know how much I love flowers! 🙂 I just can’t get enough of them! Here I used the Botanicals Bundle from the Occasions Mini Catalog. The greeting is from the coordinating Botanicals For You Sale-A-Bration Stamp Set (promotion ended in March). You could use this card for any occasion!!!

I started with a Pool Party card base and then took a piece of Whisper White measuring 4″ x 5-1/4″ and stamped on it. I stamped the greeting from the Botanicals For You Stamp Set in Basic Gray. The little flowers are from the same set and I stamped them in Crushed Curry. For the main flowers, I used the Botanical Builder Framelits and Botanical Blooms Stamp Set. The leaf is done in Pear Pizzazz and I stamped the vein in the same color. The larger flower is Pool Party with a Bermuda Bay smaller flower and Crushed Curry mini flower. I added the leaf with regular Snail Adhesive. I popped up the big flower with Stampin’ Dimensional. I layered the rest of the flowers on top with the Fine Tip Glue Pen. Love it!!!

You could mix up the colors to be your favorites or whatever color you have on hand. With the simple Just For You, it could be used for just about anything!

Happy Stampin’

~Laura


Enjoy The Little Things!!!

Posted on

Enjoy The Little Things, www.LaurasStampPad.com

I got the Enjoy The Little Things Project Kit and Enjoy The Little Things Stamp Set months ago. I opened up the kit and thought it was very detailed and pretty! You can see all the supplies here! I just couldn’t decide what I wanted to do with this kit. I loved the little chalkboard easel and I loved all of the cards but I just didn’t think I would display this or have a place for it. So I held off all of these months and finally decided to just make it into cards! I always need cards and I loved the designs. I got 13 cards out of the kit and used only my own Whisper White for the card bases! I could have easily made many more cards with all of the supplies but instead made the cards just like the samples for the home decor piece! Here are more photos!

Cards For All Year, www.LaurasStampPad.com

There is a card for every occasion, season, and moment throughout the year! I love all the intricate details and pieces!

Golden Cards, www.LaurasStampPad.com

These 4 are my super favorites! I really like all of them but these are the best! I love the colors, the golden accents, and the designs!!! Let me know what you favorites are in the comments below!

Happy Stampin’

~Laura


My Love For Dimensionals!!!

Posted on

Birthday Boy Balloons, www.LaurasStampPad.com

You all know how much I love Stampin’ Dimensionals!!! Well today I am showing all the fabulous ways to use them and some of the reasons why I use them! One of the reasons is so that my cards looks smooth when I add Ribbon or Linen Thread to a card like the one above. I wrapped the Linen Thread around the cardstock three times and added it to the card base with Stampin’ Dimensionals rather than Snail Adhesive so it wouldn’t be all bumpy over the thread! See!!! Perfect!

So for this card, I used a Mint Macaron card base. Then I took a piece of the Birthday Bouquet Designer Series Paper from the Occasions Mini Catalog (3-3/4″ x 5″) and adhered it to a piece of Lost Lagoon (4″ x 5-1/4″). I wrapped some Linen Thread around 3 times. I think this is the perfect Man Card ribbon! 🙂 I added this piece to my card base with Stampin’ Dimensionals. For the greeting, I used the Party Wishes Stamp Set and Lost Lagoon Ink. Also, I brushed the edges of the greeting with Lost Lagoon and a Sponge Dauber. I added the greeting to the card with Stampin’ Dimensionals too! Again, I like using them when placing on top of ribbon so that it’s nice a smooth. This is a great man card in a paper pack full of flowers and other beautiful patterns!!!

If you would like to see an Up Close & Personal on Dimensionals and other ways I use them, check out the video tutorial below or click here!! Don’t forget to give it a thumbs up if you liked it and be sure to subscribe so you don’t miss any other videos!

Do you all love Stampin’ Dimensionals as much as me? Or do you think you will start using them more now?? I sure hope so! 🙂

Happy Stampin’

~Laura


Black and White Elegance!!!

Posted on

Happy Anniversary, www.LaurasStampPad.com

I am in love with this card! I feel like I could make hundreds of these for all occasions!! You all know how I love Black and White. I did want to add a pop of color with the ribbon but then I thought I would keep it basic…..and I just couldn’t figure out which color to pick. I will be making tons of these in an assembly line. That is the fastest way!

For this card, I started with a Whisper White card base. I cut a piece of Basic Black measuring 4″ x 5-1/4″ and a piece of Whisper White measuring 3-7/8″ x 5-1/8″. On the piece of white, I stamped the floral image from the Timeless Textures Stamp Set. The best way is to stamp it randomly……start anywhere you wish and then move to the right and up and stamp again. Then stamp again to the right and lower. This gives sort of a cross pattern….or however you would like to call it. Once it was all stamped, I adhered it to the Basic Black. I wrapped a piece of Basic Black Satin Stitched Ribbon around the card and tied it into a knot. I added this piece to the card front with Stampin’ Dimensionals. For the greeting, I used the Teeny Tiny Wishes Stamp Set and stamped in black onto white. I punched it out with the Large Oval Punch! I layered it onto black Scallop Oval Punch and adhered it to the card with Stampin’ Dimensionals! When I add a piece to my card that has texture like embossing or ribbon, I like to use Dimensionals because they fit into the grooves.

What occasion would you use this card for – Wedding, Anniversary, Birthday, Sympathy or something else? Let me know in the comments below!

Happy Stampin’

~Laura


Technique Tuesday – Drapery Fold!!!

Posted on

Happy Tuesday!!! That means I have a fabulous technique to share with you today!!! This one is super fun because you can use every bit of the Designer Series Paper AND you can see both sides of this fabulous stuff!!! No worries on deciding which side to use!!!

Drapery Fold Cards, www.LaurasStampPad.com

Look how fabulous these cards are!!! You can see both sides of the It’s My Party Designer Series Paper and you can create 2 cards from each piece!!! I got the idea for these cards from fellow demonstrator Margo Richardson at the last Team Meeting! I love sharing ideas with others! Let’s get started!

SUPPLIES NEEDED: Designer Series Paper, Stampin’ Trimmer, Simply Score Tool

You will start with a piece of Designer Series Paper measuring 4″ x 11-1/2″. I used the It’s My Party Designer Series Paper from the Occasions Mini Catalog. Then using either the Score Blade on your Stampin’ Trimmer or the Simply Score Tool, you will score at 3″, 4 “, 6″, 7″, 9″, and 10″ along the long side. Then on the right short side, you will make a mark 1” down from the top. Then using a ruler and scissors or your Stampin’ Trimmer, you will cut a diagonal line from the 1″ down mark to the 3″ score line you created. Now you have your two pieces for the cards above!

It's My Party Drapery Fold, www.LaurasStampPad.com

Now you will fold the Designer Series Paper in a zigzag pattern so that you can see both sides of the paper. I placed this larger piece on a Melon Mambo card base. I added adhesive on the back and on a few of the folds. The top and left side are right to the edge of the card. I stamped the greeting from the Tin of Cards Stamp Set in Basic Black in the right corner. I added some Crushed Curry Baker’s Twine around the top and as the balloon strings. The balloons were punched out from the Balloon Bouquet Punch and I put them on with Stampin’ Dimensionals. I added the little white mark for a glossy look on the balloons with the Chalk Marker! I added a few of the It’s My Party Enamel Dots for a little POP!!

Balloon and Candles, www.LaurasStampPad.com

With the other piece that you cut off, you can create another fabulous card! I used a Mint Macaron card base for this one. When I punched out the balloons for the last card, I punched all three colors with both sizes of balloons. I used one big and two smalls for the Melon Mambo Card and I used the two big ones and one small for the Mint Macaron Card. I stamped the greeting from the Party Wishes Stamp Set in Basic Black and finished it off with a few It’s My Party Enamel Dots!

If you would like to see this technique in action, check out the Video Tutorial below or click here!! Be sure to give it a thumbs up if you liked it and be sure to subscribe so you don’t miss any future videos!

Happy Stampin’

~Laura


Love Blossoms!!!

Posted on

Silver Wedding Card, www.LaurasStampPad.com

You all know I’m loving the Rose Wonder Bundle! Here is another fabulous sample using the Rose Wonder Stamp Set and coordinating Rose Garden Framelits (Bundle & Save 15%)!!

For this card, I started with a Whisper White card base! Then I took a piece of the Love Blossoms Designer Series Paper (3-7/8″ x 5-1/8″) and layered it onto Smoky Slate (4″ x 5-1/4″). This gives a very small border but still sets it off and makes it stand out more. Then I placed a piece of Silver Satin Ribbon across the middle of the paper and wrapped the ends to the back before adhering it to the card base. For the greeting, I stamped the frame image from the Rose Wonder Stamp Set in VersaMark Ink and poured Silver Embossing Powder over the top. I set the powder with the Heat Tool and let it cool before die cutting it with the Rose Garden Framelits. Then I stamped the greeting in Blushing Bride in the center. I also die cut out two flowers with the Rose Garden Framelits in Silver Foil Paper. I added the flowers to the card front with the Fine Tip Glue Pen and the greeting with Stampin’ Dimensionals! Love it!

You can check out other samples using the Bundle here, here, and here! More samples using this Designer Series Paper Stack can be seen here, here and here!

Happy Stampin’

~Laura


A Little Mishmash!!!

Posted on

Timeless Textures, www.LaurasStampPad.com

This card was very difficult for me because it’s just a little mishmash of images all stamped together! I used the Timeless Textures Stamp Set from the Occasions Mini Catalog!!! It is a lot of fun and I created a really cool look but I have a tendency to over do it. I stamp a little here and there and then think it needs more over here and then over there. I really need to stop after the here and there!!

I started with a Smoky Slate card base. I cut a piece of Whisper White measuring 4″ x 5-1/4″ and stamped on this piece. I used Elegant Eggplant, Perfect Plum and Smoky Slate ink for the various images from the Timeless Textures Stamp Set. Some of the images I stamped off once to get a lighter shade. Don’t worry about making it perfect….that’s the point of this card – a random mishmash. This is why I struggle. 🙂 The greeting is actually from the Party Pants Sale-A-Bration Stamp Set. That promotion ended last month. You could always use any greeting of your choice. This card would be great for lots of different occasions!!! To finish it off, I added a few Rhinestones for some bling!!

If you would like to see this in action, check out my Video Tutorial below or click here! Be sure to give it a thumbs up if you liked it and don’t forget to subscribe to my channel so you don’t miss out on any future videos. I post every Tuesday and Thursday…..and sometimes one here and there! 🙂

What color combination would you use? Blue and Gray? Green and Black? Pink and Brown? Endless possibilities!!! Let me know in the comments below!

Happy Stampin’

~Laura