This simple and fabulous flower card is just stunning! It is one of those quick cards that you can whip up in no time before that party this weekend!!!
I started with a Crumb Cake card base! I layered a piece of the Affectionately Yours Designer Series Paper (3-3/4″ Square) onto Night of Navy cardstock (4″ Square) and placed it on the bottom portion of the card front. Then I took a piece of Crumb Cake measuring 1″ x 3-3/4″ and stamped the greeting and flower from the Love & Affection Stamp Set in Night of Navy Ink. I layered that onto Night of Navy cardstock measuring 1-1/4″ x 4″ I added this to the top of the card front. All set! I let the fabulous designer series paper do all the work on this amazing card! I love the color combination and simplicity!!!
Do you prefer quick and simple cards like this or detailed, layered, intricate cards?? I would say I’m more on the quick and simple side of the spectrum – sometimes I like to get a little more detailed for those really special cards!!! Let me know your thoughts in the comments below!
I am loving these cards…..and not just because of the yummy cupcakes! I love the bright colors, simple style and those Enamel Shapes. I made lots of these cards and of course every pack of Enamel Shapes only comes with so many in each color but you can mix and match them for every card! I love that.
I started with a Very Vanilla card base and added a strip of Playful Palette Designer Series Paper (2″ x 5-1/2″). You can get 3 of these strips from 1 sheet of the Designer Paper since this pattern comes in a 6″ x 6″ stack! I stamped the cupcake liners and icing from the Sweet Cupcake Stamp Set. I then die cut them out with the coordinating Cupcake Cutouts Framelits (Bundle & Save 10%). You can check out more about the 3-step stamping of the cupcakes here! I used Tip Top Taupe for all 3 on the liner. For the icing, I used Sweet Sugarplum stamped off, full strength Sweet Sugarplum, and then Rich Razzleberry. I added the cupcake to the card with Stampin’ Dimensionals. I stamped the greeting from the Sweet Cupcake Stamp Set in Rich Razzleberry. To finish off the cards, I added Brights Enamel Shapes and In-Color Enamel Shapes. The packs come with dots, stars, and hearts. There are only so many of each so if you are using 3 per card and making multiples, you need to mix and match. I think they all look amazing on the same style of card! Love them!
If you would like to see the Enamel Shapes up close and a fabulous way to store them, check out my Video Tutorial below or click here! Don’t forget to give it a thumbs up if you liked it and be sure to subscribe if you are new!
Do you have a fabulous tip on organizing your craft room? I would love to hear about it. Let me know in the comments below!
Happy Stampin’
~Laura
Don’t forget about the Paper Pumpkin BOGO Sale for new subscribers!!! Click here to get started and be sure to enter the Promo Code: BOGO
This is so me right now!!! My Birthday Month is in full swing. I just got home from a fabulous family vacation at the lake. Demonstrators can pre-order Holiday Mini Catalog items!!! PS: If you can’t wait till next month, you can join Stampin’ Up and pre-order Holiday Mini items in your Starter Kit. Click here to get more information or reach out to me any time! 🙂 August makes me ridiculously happy!!!!
For this card, I started with a Crushed Curry card base. Then I cut a piece of Elegant Eggplant measuring 4-1/8″ x 5-3/8″, a piece of Irresistibly Yours Designer Series Paper measuring 4″ x 4″ and Whisper White measuring 4″ x 1-1/4″. I stamped the greeting from the Love & Affection Stamp Set onto the Whisper White piece. Then I added some flowers to either side which are from the Falling Flowers Stamp Set. This stamp set has the same flower images as the Designer Series Paper. I added the Whisper White to the top section of the Elegant Eggplant. Then I took the Irresistibly Yours Designer Paper and colored in the flowers with my markers – Elegant Eggplant, Crushed Curry, and Emerald Envy. I thought it needed more color so I lightly rolled over the entire piece with the Sponge Brayer and Emerald Envy Ink. Afterwards, I thought I shouldn’t have done that over the Crushed Curry because it turned it sort of dirty. I let all of my class attendees know this and many used an orange or pink rather than the yellow and they turned out amazing!!!! I love how you can add color in so many different ways to this paper. Don’t forget to wipe off excess ink with a paper towel. Now that you are done coloring, you can adhere this piece to the lower portion of the eggplant cardstock (overlapping the white). I added a piece of Emerald Envy Ruched Ribbon around the split in paper and then added it to the card front! I love it!
I love cupcakes sooooo much! They are my favorite dessert by far! I love plain ones, ones without icing, and ones that had icing and cookie crumbles and goody on top! I love them all!! When I saw the Sweet Cupcake Stamp Set, I was in love. The details of the liner and the icing make it so real. The coordinating Cupcake Cutouts Framleits (Bundle & Save 10%) cut out the images so perfectly! I love it all!!!!
I started with a Whisper White card base and added a piece of Pop of Pink Designer Series Paper to the front! The simple black and white polka dots gives texture but doesn’t take away the focus of the colorful cupcakes!!! Then I tied some of the Melon Mambo Stitched Ribbon around the top and into a bow! Now it is time for cupcake creations! I suggest pulling out all of those white scraps you have and just start playing with different color combinations. The Sweet Cupcake Stamp Set is actually a 3-step stamping set where the icing and liner are 3 different images all layered on top of each other!
You can use 3 different ink colors or just 1 or 2. I found that 1 or 2 ink pads were my favorite. If you use 1 ink pad, you will ink up image 1, stamp off twice and then onto your white cardstock. Take image 2, stamp off once, and then onto the first image. Take image 3 (the smallest one), ink it up and stamp if onto the others full strength. This goes for both the liner and the icing. Here are a few I played with.
I preferred a more tan/brown liner but you could always go with a color as well!
Once you have your cupcakes complete, you can die cut them with the Cupcake Cutout Framelits. I added the cupcakes to the card front with Stampin’ Dimensionals….of course! 🙂 I used the framelits for the banner as well. The banner framelit cuts out the banner and creates little score lines for it to pop out like the sample above. I stamped the greeting from the Sweet Cupcake Stamp Set in Bermuda Bay Ink and added it to the card with Stampin’ Dimensionals. To finish it off, I added a little Enamel Shape!
If you would like to see this all in action, check out the Video Tutorial below or click here. Don’t forget to give it a thumbs up if you liked it and be sure to subscribe if you are new! I post every Tuesday and Thursday!
This is a super beautiful card because of that amazing Affectionately Yours Designer Series Paper! I mean just look at that little shiny flower reflection in the right corner. Ahhh, it’s so beautiful! I am loving the new copper foil!!! You might be thinking this card looks fairly plain and simple but just wait till you open it up!!!!
That is the inside!!! This card pops up and stands which shows off all of that gorgeous paper. I always think that cards like these are perfect for someone’s desk, bedside table or hospital room during their stay or recovery, or even to send to someone with a photo on the right side to display in their home. This is for sure a card you will want to display for a long time and not just read it and set it aside! So let’s get started!
You will start with an 8-1/2″ x 8-1/2″ piece of Watermelon Wonder cardstock and score it in half on both sides (4-1/4″). This will then create 4 equal squares on your card. Then turn your square diagonal in your Stampin’ Trimmer and score one of the squares from the outside corner to the center corner. You can always use a ruler and Bone Folder if you wish! Now you will fold on all score lines. With the diagonal fold in the upper left corner, you will cut the right side square apart on the score line. For the folding magic, you will fold the diagonal line in half making a triangle in that square, then fold the back square up, the front square up and that last square will fold around. Here is a little diagram to help!
Now it is time to decorate!!! I used the Affectionately Yours Designer Series Paper for the front and one of the inside panels. Those pieces measure 4″ x 4″. For the greeting on the front, I used a scrap strip of Whisper White and stamped the greeting from Love & Affection Stamp Set in Cucumber Crush. I added the banner tips by cutting up the center of the end of the paper and then diagonal from the corner to that center cut line! I went with a basic front since the Designer Series Paper (DSP) does all of the work and the inside is so fabulous as well. I attached the DSP to the right side. For the left side, I cut a piece of Whisper White (4″ x 4″) and added some of the Affectionately Yours Designer Washi Tape to the top and bottom and stamped in the middle with the Love & Affection Stamp Set!
Once you get the folds down, it is a really simple but WOW card!! You can create this card with lots of different looks for any occasion! I love it!!! Here is one more photo!
I want to give a big shout out to my amazing upline, Meg Loven for this amazing idea! She is a wonderful stamper and shared this idea. I couldn’t wait to create it with my favorite Designer Series Paper! She also did a Video Tutorial on this as well so you can check that out here! Thanks, Meg!!!
If you love the Affectionately Yours Suite as much as me, check out these other samples here, and here!
Happy Tuesday!!! That means I have a fabulous technique to share with you today and this one is super fun!!! It is a great way to show off Designer Series Paper or have a greeting slowly reveal itself. Check this out!!!
Look at all of these color and amazing look!!! The magic happens when you pull the ribbon tab at the bottom – each square moves up and flips over to reveal the one below it. Then a message pops out as well – “Just as sweet as can be”! This style of card is called a Waterfall Card!!! Let’s get started!
You will need the following pieces:
Three 2″ x 2″ Squares – I used Watermelon Wonder Peekaboo Peach, and Daffodil Delight.
Three 1-3/4″ x 1-3/4″ Designer Series Paper (or Whisper White to stamp on) – I used the Fruit Stand Paper.
1-3/4″ x 8-1/2″ piece of Crumb Cake, scored at 1-3/4″, 2-3/4″ and 3-3/4″ for the waterfall base
1″ x 4-1/4″ piece of Dapper Denim to go across the card and hold your waterfall in place
8-1/2″ x 5-1/2″ Dapper Denim card base
4″ x 5-1/4″ piece of Designer Series Paper for background. I used the Fruit Stand Paper.
Okay now we are ready to get started assembling. If you prefer to stamp and image or greeting on each of the squares, you will want to do that first. If you are using Designer Series Paper like I did above, let’s get started! Adhere each of the 1-3/4″ Squares to the 2″ Solid Cardstock Squares. Now you will take the strip of Crumb Cake and fold on each of the score lines. You will see there are 3 rectangles created with the score lines. You will add adhesive to each of the rectangles. Then starting at the end (last rectangle), place one of the squares centered side to side and covering the entire rectangle. Continue to do this with the other 2 squares as well. Your waterfall will have each of the squares on the front with a long piece going down the back. Underneath the squares will be where you will want to stamp a greeting if you wish! I stamped a greeting from the Sweet Stack Stamp Set. You will also want to add your ribbon for the pull tab. You can punch a hole with the 1/8″ Handheld Punch or you can always staple a piece of ribbon folded in half! I used the Dapper Denim Ruched Ribbon. Now your waterfall is complete. Fold your card base in half and adhere the Fruit Stand Designer Series Paper to the front (4″ x 5-1/4″). Now to assemble your waterfall to your card. You will adhere the end (end with the Fruit Stand Square on it to the center of the Dapper Denim (1″ x 4-1/4″) and allow the other end of the Crumb Cake (end with the ribbon) to go behind the Dapper Denim. Now you will add adhesive to the either end of the Dapper Denim cardstock and adhere to your card. Make sure to use a strong adhesive like Fast Fuse or Tear & Tape since people will be tugging at the waterfall and you don’t want it to pop off. Also, make sure you only add the adhesive to the outer edges and not in the middle or your waterfall won’t……fall! I added some Daffodil Delight Enamel Shapes to either side for a little texture!
Don’t worry if you are completely lost on how I created this card because I did a Video Tutorial so you can see the magic and how it all comes together. You can check that out here or click below! Don’t forget to give it a thumbs up if you liked and be sure to subscribe if you are new!!!
I have been having lots of fun with the Affectionately Yours Suite! The papers are beautiful, the stamp set greetings are perfect for generic cards, and the embossing folders are detailed! This card is fairly simple but has lots of details and texture to still give it that WOW look!!!
I started with a Mint Macaron card base and layered on a piece of the Affectionately Yours Designer Series Paper (4″ x 5-1/4″). I tied some of the Mint Macaron Sheer Linen Ribbon around the top of the card and into a knot. Then I took a piece of Crumb Cake cardstock (4″ x 2-1/2″) and ran it through the Big Shot in the Floral Affection Embossing Folder. These little folders are perfect for a great accent piece on your project! I added this piece to the card front. Then for the greeting, I used a scrap piece of Whisper White and stamped the greeting from the Love & Affection Stamp Set. I punched the banner tips on either end of the greeting with the Triple Banner Punch and attached it to the card with Stampin’ Dimensionals. To finish off the card, I added some Dapper Denim Enamel Dots to either side of the greeting! I love all of the textures and the colors!!!
You all know how much I love my flowers. You can check all the flower creations I have made by clicking here. Let me know your favorite stamp image – textures? backgrounds? greetings? flowers? in the comments below!!!
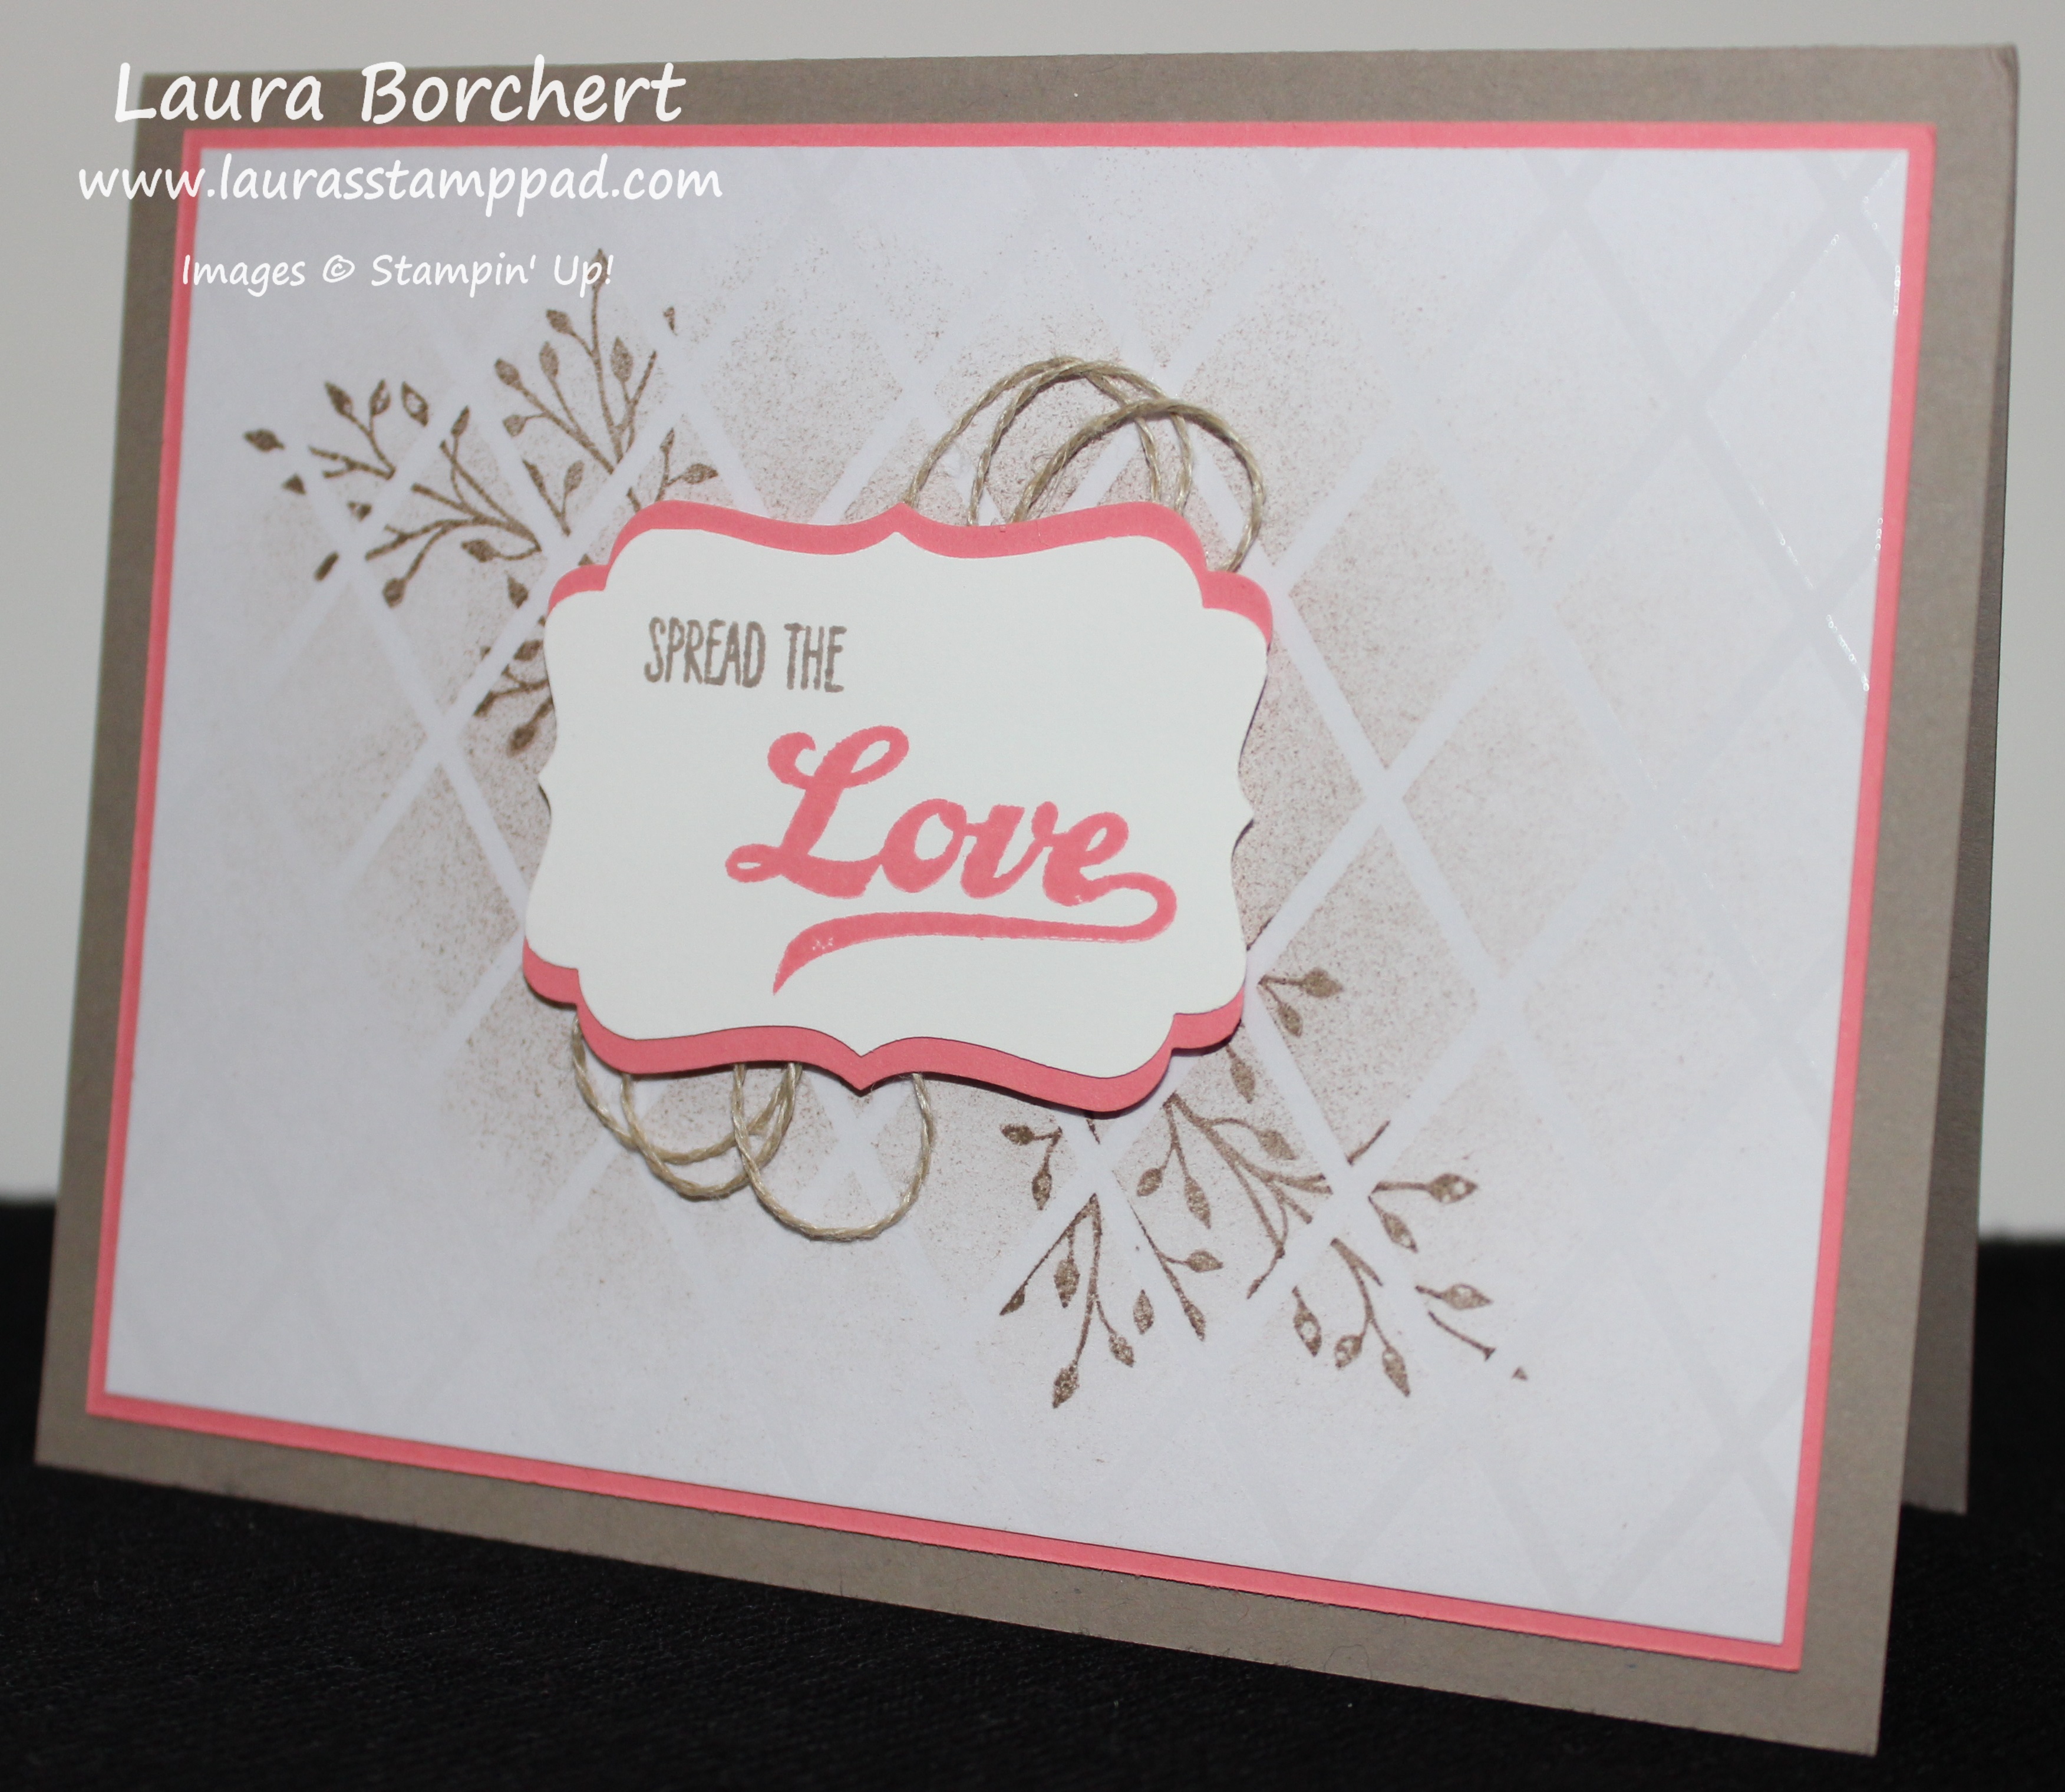
Happy Tuesday!!! I hope you are all having an amazing week! I have a fabulous technique to share with you today!!! I am in love with this card so hard – the colors, the sweet greeting, and the amazing look!!! I hope you love it too!
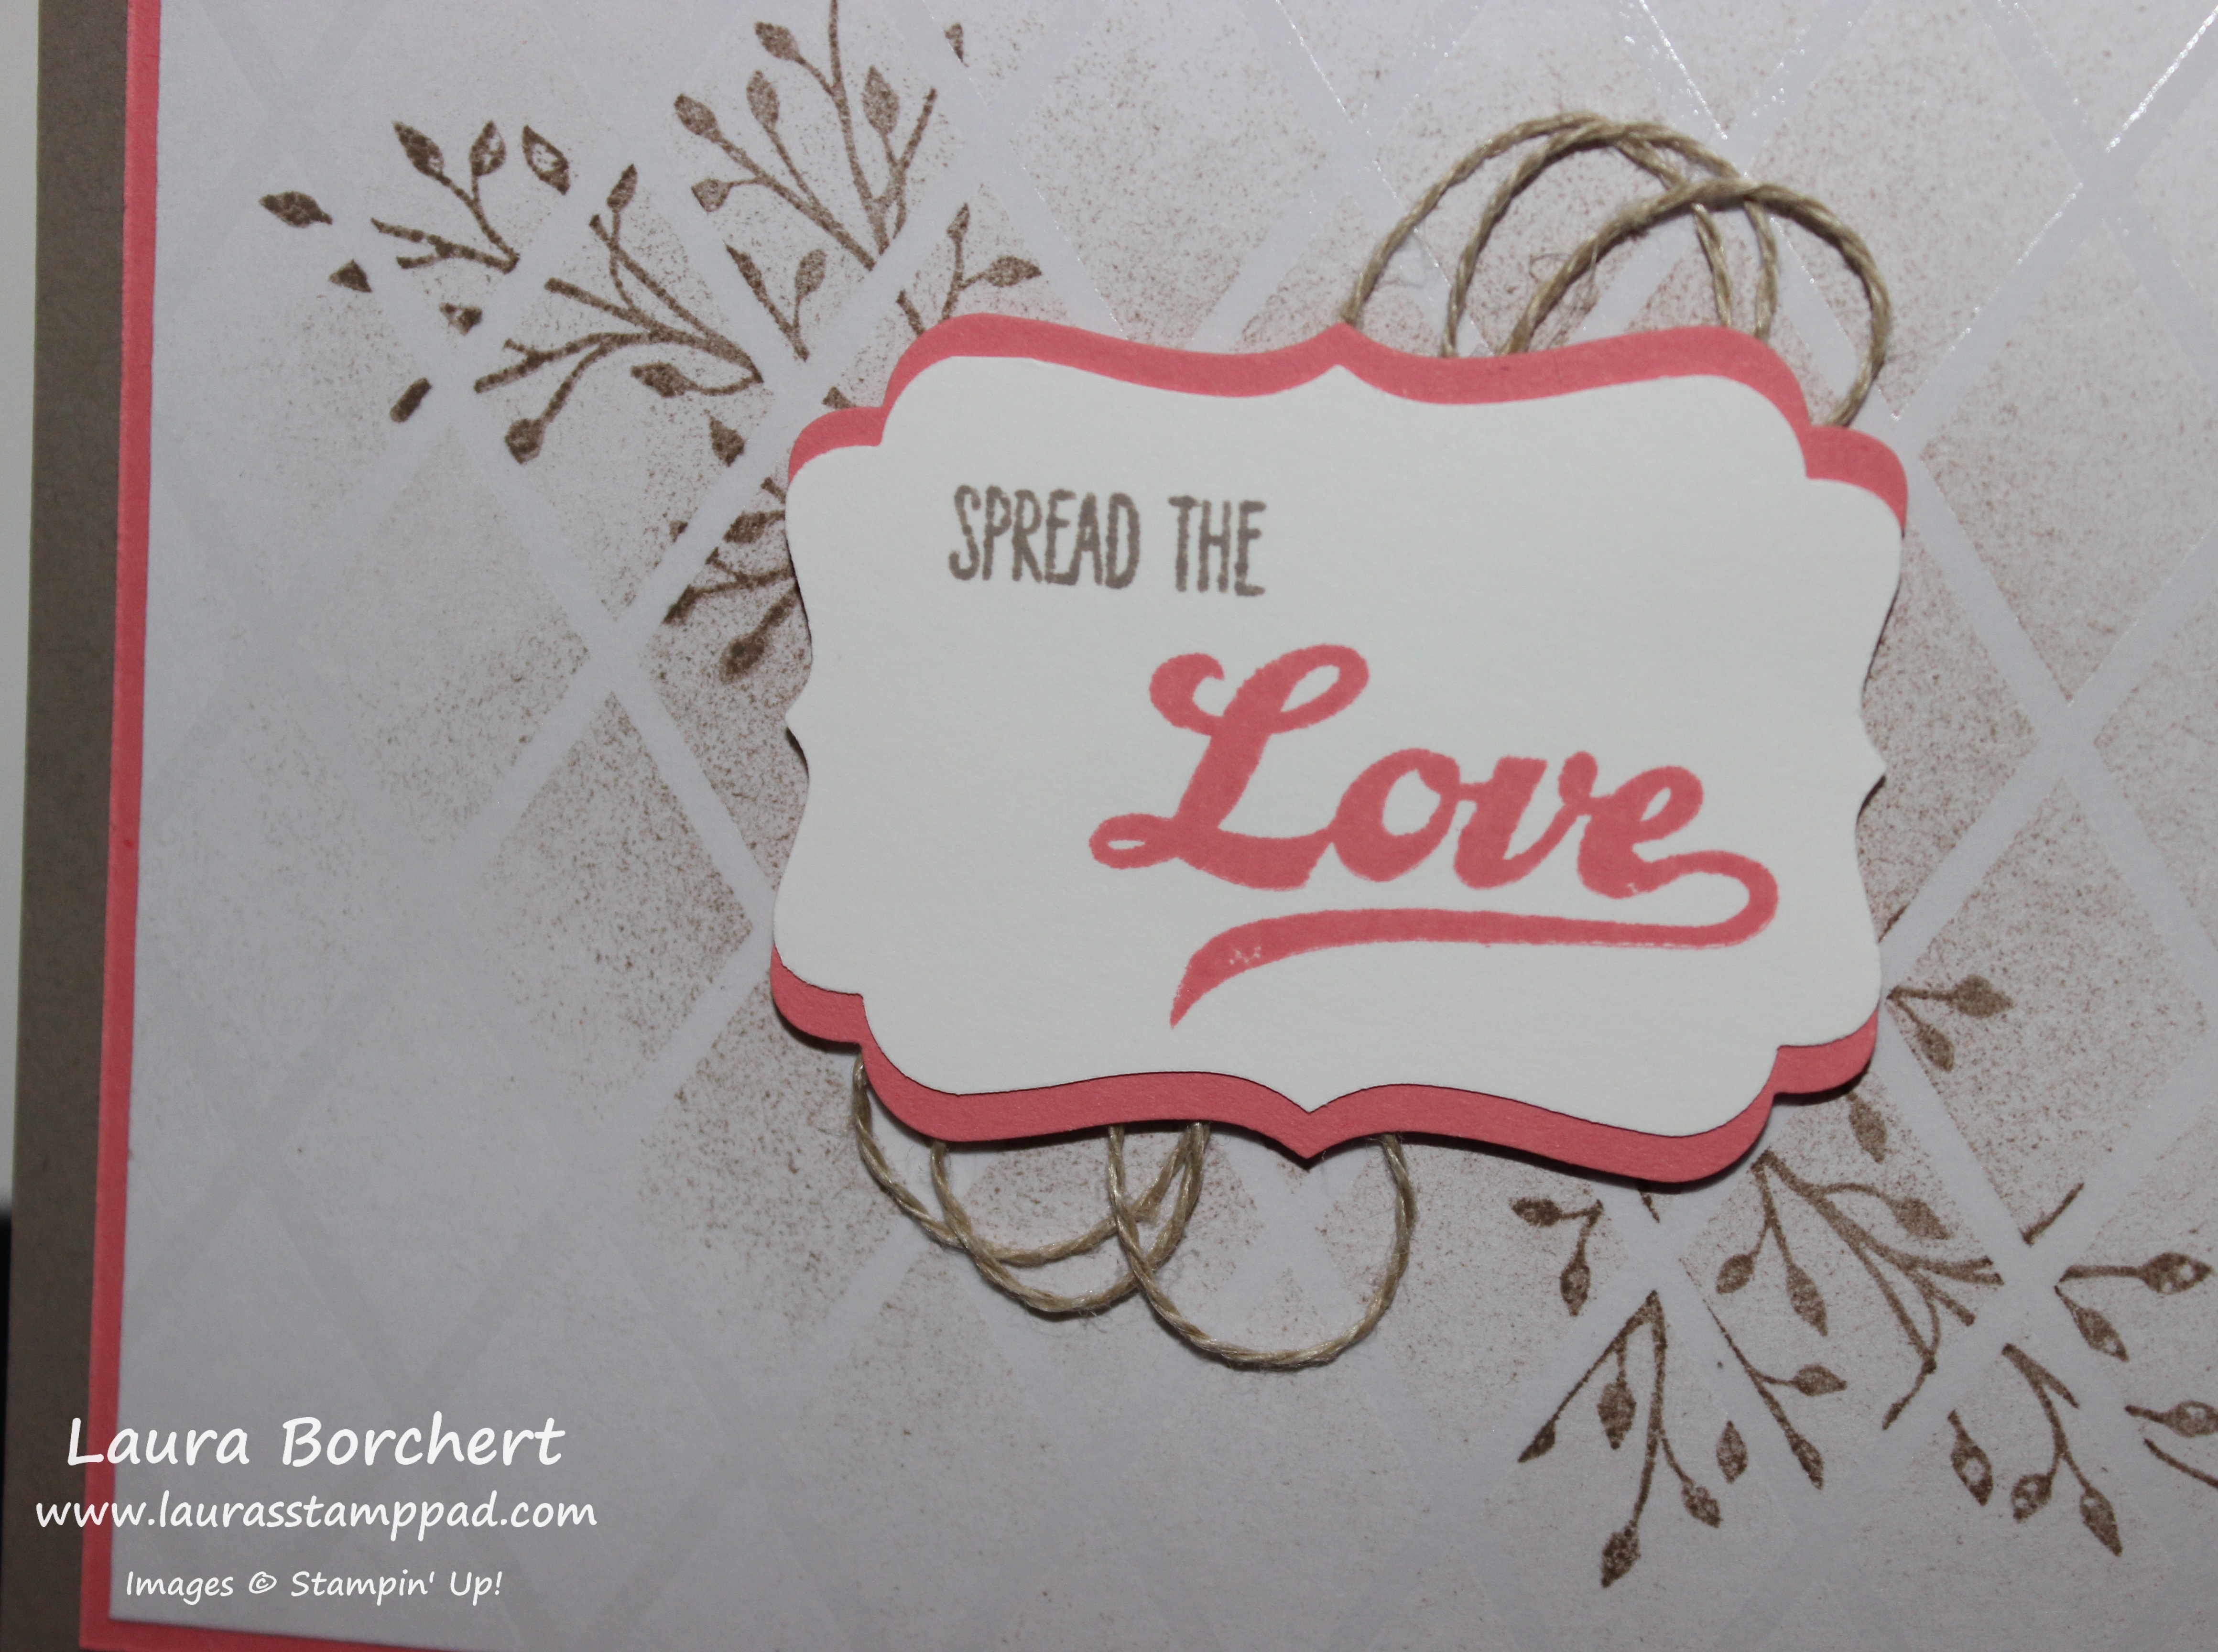
Isn’t it amazing??? I love how the branches look like they are behind a fence or something with that emboss resist!! Let’s get started on how simple this card is!
I started with a piece of the Irresistibly Yours Designer Series Paper measuring 5″ x 3-3/4″ and Tip Top Taupe Ink. Using a Sponge Brayer, you will start in the middle and roll out half way, turn, start in the middle and roll out half way. This is how I got that rustic/dirty center but kept the edges fairly clean. I went all the way around the card from the middle and then at the end I lightly went over the entire piece of cardstock just for a light look. Then I used the branch from the Jar of Love Stamp Set and inked it up in Tip Top Taupe and stamped it diagonal to the upper left and lower right. You will want to make sure that the entire tail end of the branch doesn’t stamp down because it might show on the other side of your greeting. If you go with a larger greeting, you will be fine. Be sure to wipe off any excess ink with a paper towel as it sometimes pools on top of the embossed portion. Then I layered it onto a piece of Flirty Flamingo (5-1/8″ x 3-7/8″) and then onto a Tip Top Taupe card base. Now you can add your greeting of choice. I went with the Jar of Love Stamp Set since it was already out. I stamped the “Love” in Flirty Flamingo and the “Spread The” in Tip Top Taupe onto Whisper White scraps. I punched it out with the Decorative Label Punch and added a layer of Flirty Flamingo behind it. Click here to see how easy it is to do that. I added a few loops of Linen Thread behind the greeting and secured it with Stampin’ Dimensionals. I love it for that rustic, sweet, messy look!!!
If you would like to see this in action, check out the Video Tutorial below or click here! Don’t forget to give it a thumbs up if you liked it and be sure to subscribe if you are new!!!
If you would like to see more samples using the Irresistibly Yours Designer Series Paper, stay tuned. I have been playing with this paper a lot and have some great samples to share!!!
Happy Stampin’
~Laura
Click here to start shopping and earning Bonus Bucks through the end of July!
Happy Tuesday!!! You all know that means I have a fabulous technique to share with you!!! Today the technique is super fun and simple and uses every inch of your 12″ x 12″ Designer Series Paper (not for 1 card though). Check out this cool card!
SUPPLIES: Designer Series Paper of choice (DSP), Stampin’ Trimmer
You will need a 4″ x 4″ square of Designer Series Paper. I used the Affectionately Yours Designer Series Paper for mine. The awesome thing about this size is that you can get 16 squares 9 squares (CORRECTION) from 1 sheet of the paper with no leftover scraps. I love that!! Place the square diagonal on your Stampin’ Trimmer and cut. This doesn’t have to be exact or at any specific spot. Just a diagonal from side to side. I love that part too. 🙂 When I created mine, I just placed the Designer Paper on a piece of Whisper White (4″ x 5-1/4″) and stamped first. This way if I messed up my stamping, I could get another piece of white and not mess up my Designer Paper as well. So place your pieces on the white and stamp your greeting and design in that split opening. I used the Love & Affection Stamp Set. I stamped the greeting in Night of Navy Ink and the leaves in Cucumber Crush Ink. Then I adhered the DSP to the top and bottom and attached it to a Night of Navy card base! To finish it off, I added a few Night of Navy Enamel Shapes for a little POP! Simple and fabulous and this design is great for using up Designer Paper or whipping up a ton of cards quickly!!! Love it!
If you would like to see this in action, check out the Video Tutorial below or click here! Be sure to give it a thumbs up if you liked it and don’t forget to subscribe if you are new! I post every Tuesday and Thursday!
Happy Stampin’
~Laura
Don’t forget about Bonus Bucks this month! Spend $50 and earn $5 to spend in August!!! Click here to start shopping and stocking up on all of the Designer Series Paper!
The Pineapple….many see it as a fruit, some see it as tropical, and others see it as a sign of hospitality and friendship. Did you know that the pineapple is a symbol of warmth, welcome, friendship and hospitality?? It makes it even more fabulous for a hand-stamped card or any home decor piece!
For this card, I started with a Whisper White card base and added a of Pop of Pink Designer Paper to the top (4-1/4″ x 1-1/2″) and bottom (4-1/4″ x 2″). By splitting it up, you don’t have to waste Designer Paper on your card when it will be covered! Then I took a piece of Whisper White measuring 4-1/4″ x 2-1/4″ and stamped the pineapple from the Pop of Paradise Stamp Set in Melon Mambo (center) and then in Pink Pirouette on either side. I added Snail Adhesive along the top and bottom of this piece and placed a small piece of Gold Foil Paper on the top and bottom. This is a great way to use your scraps or just a smaller piece. My Gold Foil pieces are only 3/4″ wide rather than 2-3/4″ if I did the entire back of the Whisper White piece. I placed this piece onto my card front between the two pieces of Designer Paper (filling that gap)! I stamped the Thank You greeting from the Pop of Paradise Stamp Set onto scrap white paper in Basic Black….then I fussy cut it out! It wasn’t the most fun thing to cut out but it was small and quick! 🙂 I added it to the card with Stampin’ Dimensionals! To finish off the card, I ripped a little bit of the Pop of Pink Designer Washi Tape and added it above the pineapples. I love the little gold bling and added texture!
I love the Pop of Pink Suite and those little pineapples are so fitting for a thank you card! I love it! Are you loving the Pop of Pink Suite or do you prefer one of the other suites? Let me know your favorite in the comments below!
Happy Stampin’
~Laura
Click here to start shopping and earning Bonus Bucks!!!