All The Layers!

Posted on

You all know I love bright colors and flowers! Here I created a card that is just that and I just want to make a million of them! It’s actually really easy and a fun way to use Designer Paper! Check it out with all the layers!

All the Layers Hues of Happiness, www.LaurasStampPad.com

Isn’t it just stunning?!?! Are you ready for all the measurements to layer together?!?!

Daffodil Delight – 4-1/4″ x 5-1/2″, Melon Mambo – 4″ x 5-1/4″, Daffodil Delight – 10″ x 3-3/4″, scored at 3″ and 8″. All of these pieces are layered onto each other! Then the Hues of Happiness Designer Series Paper measures 1-3/4″ x 3-1/2″ for the top piece and 2-3/4″ x 3-1/2″ for the bottom piece! You could use the same pattern for these 2 pieces or use coordinating pieces.

For the greeting, I used the amazing Something Fancy Stamp Set and coordinating dies. I love how the dies have layering labels! There is nothing better than a good label set and even better when they layer for a fabulous look like this!

Fun Fold Hues of Happiness, www.LaurasStampPad.com

This inside greeting is like the best ever. I love it so much because it’s so perfect to send to someone to brighten there day! This greeting could be stamped inside every card in my opinion!

I hope you enjoyed this card with all the layers! It’s so beautiful and easy to create! Try it out!

Happy Stampin’

~Laura


Gold Foil One Sheet Wonder!

Posted on

There is something about Gold and Navy that just looks stunning!!! Check out this fun Gold Foil One Sheet Wonder card that I created! It uses the NEW Naturally Gilded Specialty Designer Paper that came out this month!!!
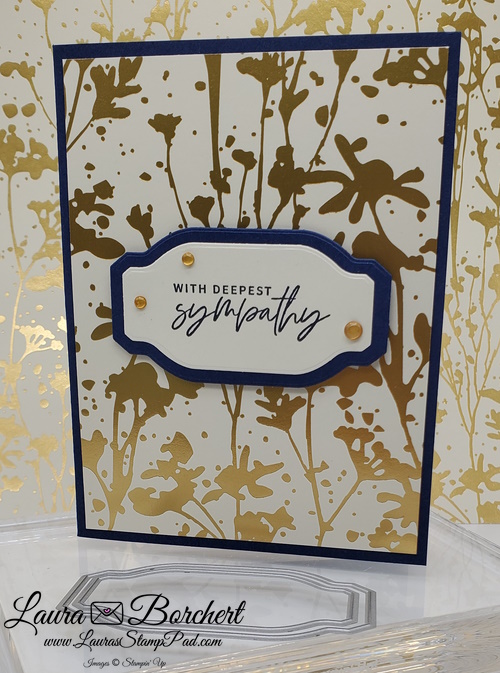
Gold Foil One Sheet Wonder, www.LaurasStampPad.com

The Naturally Gilded Paper has sheets of Gold, Copper, and Silver! These prints are basic nature images which is perfect for any occasion! I paired it with the Something Fancy Stamp Set and Dies for a quick and simple card!

One Sheet Wonder

Now for the amazing One Sheet Wonder part where you can create 6 cards! Let me share the measurements so you can use every inch of the 12″ x 12″ Designer Paper. After all this paper is gorgeous and you don’t want to waste any. First, cut at 5-1/4″ creating a 5-1/4″ x 12″ strip. Then cut another strip at 5-1/4″. Now you should have 2 strips measuring 5-1/4″ x 12″ and 1 strip measuring 1-1/2″ x 12″. With both 5-1/4″ x 12″ strips, cut across every 4″ creating 6 pieces measuring 5-1/4″ x 4″. These will be used on the card fronts of 6 cards! Now with the 1-1/2″ x 12″, simply cut that in half at 3/4″ creating 2 strips of 3/4″ x 12″. Then cut across every 4″ creating 6 pieces measuring 3/4″ x 4″ which will be used inside the card!

One Sheet Wonder Something Fancy, www.LaurasStampPad.com

For the inside of this card, I brushed some Night of Navy Ink on the bottom of the Very Vanilla just to make the Designer Paper POP some more! I really love how it turned out!!! Of course, then I stamped the greeting crooked but it’s all good! 🙂 Check out all of the supplies below so you can recreate these gold foil one sheet wonder cards!

Happy Stampin’

~Laura

Product List

Thanks A Bunch!

Posted on

I DO NOT HAVE A GREEN THUMB! I am the youngest of 3 kids. My Mom is a major gardener in both flowers and vegetables and my oldest sister is the same! My brother does have a vegetable and then there is me with nothing. Thanks a bunch, apparently it all ran out by the time I came along! I can barely keep a house plant alive. I either over water it or forget about it. What I do enjoy doing is stamping with flowers and vegetables though if that counts?! 🙂

Thanks A Bunch Stampin' Up Sale-A-Bration Stamp Set - Laura's Stamp Pad

The Thanks A Bunch Sale-A-Bration Stamp Set has these adorable carrots and some super fun SPRING greetings! You all know how much I love Spring so I’m overjoyed. If you are new here, Welcome! My name is Laura and I LOVE SPRING!

For this card, I used Pumpkin Pie and Pear Pizzazz Ink! When stamping the carrots, I stamped off once with the full solid carrot piece in Pumpkin Pie Ink and then stamped it on the scalloped rectangle. Then I stamped full strength Pumpkin Pie for that detailed right side image. NOTE: I always find it easier to stamp the lighter image second because it is easier to line up an image through a lighter ink (stamped off ink). That would mean stamping the right side detailed image first in this case. The problem here is that spacing would be difficult! It is doable if you start with the center one and work your way out.

I have another tip for the carrot tops too! The solid leaf was stamped in Pear Pizzazz and stamped off. As for the other greenery piece, that one is stamped in full strength. I also felt that the stem was super long so I simply curved it around the clear block to shorten the image!

Check out the supplies listed below to recreate this fabulous card using the the Thanks A Bunch Stamp Set that you can get for FREE through Sale-A-Bration!

Happy Stampin’

~Laura

Product List

Dainty Flowers!!!

Posted on

Have you seen the Dainty Flowers Designer Paper that is one of the $50 Level Sale-A-Bration items?!?!? It is so beautiful! I know I am a flower girl already but this paper is just amazing! It is also perfect for making quick and simple cards too!

Dainty Flowers Designer Paper Sale-A-Bration, www.LaurasStampPad.com

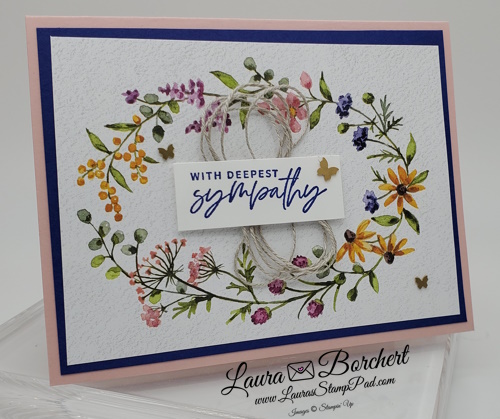
The colors of this card (Blushing Bride & Starry Sky) are a beautiful combination. Add the layer of Dainty Flowers Designer Paper for a quick and simple card. All I did next was add a greeting with some Linen Thread for texture and then some Brass Butterflies. This card could be used for many different occasions! Which occasion would you use it for?!?!?

Linen Thread Loops for Texture on A Card, www.LaurasStampPad.com

For those Linen Thread Loops, I simply added a dab of adhesive to the middle of my card. Then I wrapped some Linen Thread around 4 fingers. I try to end my loop around the same spot as where the starting end is. Then slide the loops off your fingers and twist into a figure 8. This makes the ribbon fan out a bit. Then place this down with the center of your figure 8 on that dab of adhesive in the center of your card. Add the greeting over the top of the loops with Stampin’ Dimensionals! Feel free to pull the loops a bit to fan them out for more texture! This can be done with Baker’s Twine and other thin threads and ribbon! I hope you will try it out too!

Sale-A-Bration ends on February 28th so don’t wait to place your order and earn lots of Free Sale-A-Bration goodies. The Dainty Flowers Designer Paper has been a popular one so I could see it running out perhaps!

Happy Stampin’

~Laura

Product List

All the Fall Colors!!!

Posted on

The Fall colors this year are just stunning. Those shades of yellow and green into oranges and then the POP of red! I love it all!!! Here I did a little Fall coloring with Blending Brushes!

Ombre Fall Colors with Blending Brushes, www.LaurasStampPad.com

First, start with the lightest color and blend the Crushed Curry on the bottom and up about 1/2 way. Next, take Pumpkin Pie and blend in the middle. Work you way down into the Crushed Curry and up about 3/4 of the way! Finally, using Cajun Craze blend from the edge into the Pumpkin Pie. TIP: Always start your blending brush off of your project and then slide onto it. Work in a circular motion

Fall Leaves Thinking of You Card, www.LaurasStampPad.com

Once you have the background complete, simply stamp an image over the top in Memento Black Ink! I used a few leaves and a greeting on the bottom! You could always add in some acorns and different types of leaves. You could also do this same design with other colors and stamp flowers, animals, party hats, etc. This card design is perfect for all year long and any occasion!

If you would like to see this Fall Colors Blending Technique in action, check out my video tutorial below!

Happy Stampin’

~Laura


Splendid Day!!!

Posted on

I LOVE Summer but this one has been HOT HOT HOT! I’m kind of over it. Any day that it is still in the 80’s at 10 a.m. now is a splendid day! I can’t believe it will be cold soon though. That makes me sad. If you are staying inside because it’s hot, here is the perfect thing for you – August Online Card Class!!!

Splendid Day Suite Stampin Up, www.LaurasStampPad.com

Here is one of the cards that we will be creating at the August Online Card Class – Splendid Day! The colors Soft Seafoam, Pool Party, Calypso Coral, and a foil shine are the perfect combination! Honestly, I loved creating these cards and looked at all 5 of them and thought this is so not my style but I love them! Just goes to show that sometimes you need to mix it up and try new colors, styles, and designs!

This class uses the Spendid Thoughts Stamp Set and coordinating dies. There are a few fun card techniques and styles thrown in there too! Don’t forget that it is FREE for anyone to watch the Online Card Class on YouTube or Facebook. You can also stamp along with me by purchasing the card kit or the PDF Tutorial! Click here for all of the details on how you can participate.

If you would like to check out past months Online Card Classes or purchase the PDF Tutorials, check out my Online Card Class tab here on my blog!

I hope to see you on Friday, August 19th at 7:30 p.m. CT which is when the August Online Card Class is going to be. Stamp with me, chat with me, or just watch me! It will be loads of fun and full of stamping tips and ideas! Share with your friends so they can join in the fun too!

Happy Stampin’ and have a Splendid Day!

~Laura


Christmas in July!

Posted on

WHAT?!?!?!?! I am so not ready for Christmas but that is why this is called Christmas IN JULY! It’s never to early to get started on your holiday cards after all! The July-December Mini Catalog launched this month and my Online Stamp Class is Christmas in July – Lights Aglow!

Christmas in July, Lights Aglow, www.LaurasStampPad.com

This stunning cards uses products from the Lights Aglow Suite! It is one of the 5 cards that I will be making in the July Online Card Class! This class takes place on Friday, July 22nd at 7:30 p.m. CT on Facebook and YouTube Live! Anyone can watch for FREE! In fact, you can check out past Online Card Classes here! Share with all of your friends because I love chatting and stamping with everyone as if we were all in the same room together!

If you would like to stamp along with me there are 2 options for you to pick from! You can purchase the PDF Tutorial for instant download and cut the cardstock and supplies yourself OR you can purchase a card kit and I will mail it all out to you! No die cut/punched images or stamped images will be provided. You will need the Lights Aglow Bundle or stamp set of your choice! Click here for all of the details and to get registered!

The In Person Class for this one has filled up fast so I’m super excited to do it online with all of you as well! Save the Date for the Christmas in July – Lights Aglow Online Stamp Class on June 22nd at 7:30 p.m. CT!

Happy Stampin’

~Laura


Father’s Day Cards!!!

Posted on

Father’s Day is this coming Sunday so let’s be sure to spoil all of the men in our lives as we honor them for their love, guidance, and support! This card is awesome for any designer paper you might have. It also works for many different occasions too!

Father's Day Cards, Artfully Composed, www.LaurasStampPad.com

Isn’t this the perfect look for a Father’s Day card?!? Even a birthday or retirment card! The strips of Artfully Composed Designer Series Paper measure 1-1/4″ x 3-3/4″ and there are endless options with double sided paper! You could use 2 different sheets of paper from the pack or 4 different sheets. This is also the perfect card for when you love both sides of the paper and just can’t decide which one to use! Just use both sides!

I stamped off for the leaves in Pear Pizzazz Ink and used Evening Evergreen Ink for the greeting so it would POP! I did the same on the inside with some leaves in the corner and Happy Father’s Day in the center! You could always flip flop the greetings if you wanted to!

Check out the supplies listed below if you would like to recreate these cards! This video tutorial has all of the details and measurements so be sure to check that out as well! Also, another big shout out of Happy Father’s Day to all the men this weekend! Enjoy your day and know that you are appreciated!

Happy Stampin’

~Laura

Product List

Uniquely Artistic!!!

Posted on

I got the Uniquely Artistic Stamp Set for free from Stampin’ Up! when I attended OnTour in April! It was a fun virtual event where demonstrators gathered to chat, learn and see new catalog product. Of course there were goodies involved too like this stamp set! It’s flowers so of course I was super excited!!!

Uniquely Artistic Stampin Up Stamp Set, www.LaurasStampPad.com

I created this card with 2 new In Colors – Parakeet Party and Starry Sky! I love the darkness of Starry Sky with the bright neon Parakeet Party! It really makes the 2 colors POP!

Card Instructions:

I started with a piece of Thick Basic White measuring 4-1/4″ x 11″ as the the card base. Next, I added a strip of In Color Designer Series Paper to the top and bottom measuring 1″ x 4-1/4″. Then in the middle I added a piece of Parakeet Party cardstock measuring 4″ x 4-1/4″.

Handmade Floral Birthday Card Stampin' Up, www.LaurasStampPad.com

Now for the stamping!!! I took a piece of Basic White cardstock measuring 3-1/2″ x 4-1/4″ and started with stamping the flowers. The Uniquely Artistic Stamp Set flowers are stamped in Starry Sky Ink and the leaves in Parakeet Party Ink. TIP: Stamp the flowers in a triangle with the edges close together in middle but not completely overlapping. It’s okay if the middle looks messy because the greeting will cover it up! After stamping the flowers, I added the leaves in between! For the greeting, I cut a piece of Smoky Slate cardstock measuring 1″ x 1-1/2″. This piece could be bigger or smaller depending on your greeting of choice. I added the greeting to the card front with Stampin’ Dimensionals! Then, I finished off the card with a few Iridescent Rhinestones!

Stampin' Up In Colors Birthday Card, www.LaurasStampPad.com

The fun part about this card is all of the different patterns in the In Color Designer Series Paper Pack. Do you like the stripes or polka dots better?!? Let me know in the comments below!

Also, if you are loving the In Colors as much as me, you can get them for FREE this month with the In Color Starter Kit! Join Stampin’ Up before the end of May for just $99 (plus tax). You get to pick out $125 in any product that you would like and you will also get the 5 In Color Ink Pads, In Color Designer Series Paper Pack, In Color Cardstock Pack, and In Color Grid Paper in your kit! Free shipping with the Starter Kit too! WOOT WOOT! Click here if you want this amazing deal!

Happy Stampin’

~Laura

Product List

I can’t get enough!

Posted on

I know that I have plenty of flower stamp sets and paper! I am just drawn to them like a moth to a flame. When the new catalog came out and I saw the Hues of Happiness Suite, I had to have it, no questions asked! I can’t get enough flowers! If you are like me, you need this suite too!

Can't Get Enough Flowers - Hues of Happiness Suite, www.LaurasStampPad.com

This card was one of the samples for my New Catalog Launch Party! It just screams LAURA!!! I love it! The awesome thing about it is that I was able to use the Hues of Happiness Designer Series Paper to create over 40 card kits to send out for the party! These card kits were all different but yet the same style! I love it!

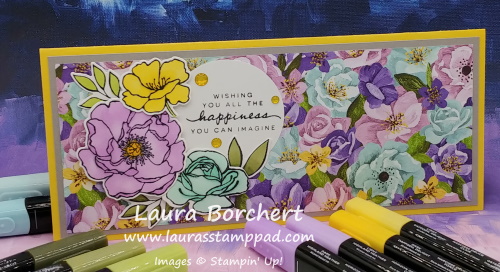
For the card base, I used Coastal Cabana, Gorgeous Grape, Daffodil Delight and Melon Mambo! Next, I embossed Granny Apple Green cardstock with the NEW Fern Embossing Folder for each card. Then I added a strip of floral designer series paper along the left side. Some of these floral pieces were blues and purples and some were more pinks and yellows. A simple punched out Basic White for the greeting and then a coordinating flower to accent! There are 2 different prints in the designer paper pack that have large flowers all over. These flowers can be fussy cut out or die cut with the coordinating dies. This makes for a quick and fabulous card! I love it!!! I finished it off with a few Glossy Dots!

Here are some more color options!

Happiness Abounds Bundle Stampin Up, www.LaurasStampPad.com

If you are like me and can’t get enough flowers, check out the supplies listed below for quick and simple shopping so you can create cards of all colors!!!

Don’t forget I also have the Hues of Happiness Online Card Class this month! Click here for all the details!

Happy Stampin’

~Laura

Product List