Technique Tuesday – Making Multiple Cards!!

Posted on

Happy Tuesday All!!! You know what that means, I’m sharing a Technique with you! I get asked a lot of time how long it takes for me to make cards! Well I am going to share with you this card that I created a total of 400 and it only took me a few hours on 2 different days!!!

Lots of Thank You Cards, www.LaurasStampPad.com

This is what 400 cards looks like (and yes it was hard for me to mess them up to take this picture rather than keep them in their perfect stacks of 25 🙂 ) So I’m sure you are wondering how I made 400 of them in just a few hours on 2 days. I used Very Vanilla and Whisper White Cardstock. TIP: Use Washi Tape for fun and fabulous quick cards! I didn’t cut the 8-1/2″ x 11″ cardstock in half for the typical card size until after I put the Washi Tape on, this way I only had to grab my scissors to cut the Washi Tape every 2 cards (so only 200 times, rather than 400). So I had a stack of cardstock and put the 2 strips of Washi Tape on the cardstock and then cut it in half on the 8-1/2 side like you see below!

Washi Tape Card, www.LaurasStampPad.com

Then I stamped my name on the back of all the cards and folded them in half. Thank you Bone Folder for helping me fold 400 cards in half and not having to use my thumb! Then I stamped the various Thank You greetings from the Lots of Thanks Stamp Set! TIP: Making multiples of 1 card is much easier than making 400 different cards! These cards were super simple and affordable to make! Washi Tape also comes in so many fabulous styles too so your possibilities are endless! I made these cards for all of the amazing Brides that I met with at the Gateway Bridal Fair last week!

Happy Stampin’

~Laura


Decorated Mason Jars!!!!

Posted on

Mason Jars are so cute to me and what is even better is how useful they are!!! I have done lots of decorated mason jars for various gift ideas like adding layered cookie mixes, adding actual cookies or candy, adding a few gift items like nail polish and a nail kit, and so many more fabulous ideas! Another great idea is to use them at parties. You can create a layered dessert in them, add some of the items listed above as a party favor or use for the drinks at the party! The possibilities are endless!

Decorated Mason Jars, www.LaurasStampPad.com

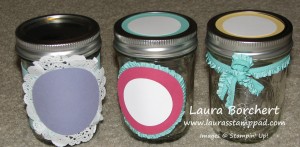
How cute are these? I have decorated the one on the far left with a Tea Lace Paper Doily and then a punched circle piece of cardstock! The middle one is decorated with punched circles of cardstock on the lid and layered on the side with Ruffled Ribbon around the edge! Super adorable! The one on the right is the same Ruffled Ribbon tied around the jar and into a bow and some punched circles for the lid! You could add any type of greeting on the side to match you Bridal Shower, Wedding, Birthday or Gift theme! Greetings such as Thank you for coming, Happy Birthday, Enjoy your treats, and so many more! You can check out some of my other decorated mason jars here!

Happy Stampin’

Laura


Who likes Party Favors??

Posted on

Party favors are given out at all types of ocassions like Birthdays, Weddings, Showers, and all other kinds of get-togethers! Why not make your next party be the talk of the town with an adorable gift box, bags, or packaging? Here are a few fabulous items that I had out at a recent Bridal Fair that I participated in!

Gift Boxes

The Gift Boxes and Tags on the left were created with the Tag A Bag Gift Boxes and Tag A Bag Accessory Kit! You can get both kits as a bundle and save. Check it out here! And you can earn this kit for FREE plus the bags from now till the end of August! Check out my post about that!  I added in the Glimmer Paper for some bling. You all know how I love my bling! 🙂

Baroque Treat Boxes 2

The little boxes on the right side were created in the Eastern Elegance Designer Series Paper! Oh how love that design and Coastal Cabana is my NEW favorite color!!!! You can put treats in the boxes and set them on all of the tables, you can put your party favor in there, or you can put your goodies in a cellophane bag and tie the Ruffled Ribbon around the top and drop it in the adorable box!!!! So many fabulous ways!!!

Pink Box 2

So have you guessed yet that I am loving the new Ruffled Ribbon and did I mention it is stretchy! Eeee I know how fabulous!!! Anyway….the box on the left is decorated with the fabulous flower on the top, Taffeta Ribbon wrapped around with the greeting punched out on the front. Okay so back to the fabulous flower on the top! I used a Jumbo Sticky Round and then pressed the Ruffled Ribbon onto the sticky from the outside to the inside! I finished it off by putting a Vintage Faceted Designer Button with a Large Rhinestone in the middle!

Mason JarMason Jars are so HOT right now! I recently helped a friend create tags for her Mason Jar desserts at a Bridal Shower. They looked very similar to this jar on the right but instead of the wedding bells, we had cute little saying that combined the dessert type with the Bride and Groom (Oreo Dessert said Greg’s Fishing Bait because he is a fisher). How fabulous! You can also put little take home gift in there like a dry cookie recipe, candy, or other cute little items like nail polish, sunscreen, and so much more!!!

If you need help with any party favors or gift packaging for an upcoming event, feel free to reach out to me! I would love to help you!! Just send me an email!

Happy Stampin’

~Laura