Technique Tuesday – Floating Watercolor!!!

Posted on

Happy Tuesday!!! I have a super fun technique to share with you today!!! It includes watercoloring so remember that each one will turn out differently and it requires some patience….but the look is AMAZING!!! Check this out!!!

Blue Roses, www.LaurasStampPad.com

I honestly think this blue one is my favorite even though I don’t know if I have ever seen a blue rose like this. I just love it!!!

Okay so let’s get started. You will need a piece of Shimmery White cardstock for the rose. This cardstock is thicker than regular Whisper White but not as thick as Watercolor Paper so it works perfectly. It always has that beautiful shimmer which is fun! I stamped the rose from the Rose Wonder Stamp Set in VersaMark onto the cardstock. No need to worry about the leaves since you will cut them off. Then you will pour White Embossing Powder over the it and using the Heat Tool, set the powder. Now you will need to pick your colors and add a little drop of re-inker to a clear block or press the block into the ink pad to get some color. Then you are all set with your image, you will spritz the heck out of it with water. I mean like puddles on top of your image. Using an Aqua Painter, lightly touch the ink and then touch the tip of the Aqua Painter into one of the puddles on the flower. You can start with a light color on the outside or inside whichever you prefer. For the rose above, I used Bermuda Bay, Island Indigo, and Night of Navy. When you touch the color to the water, you will see it spread out all over. If it doesn’t but instead seem really dark and like it soaked into the paper, you need more water. You can either squeeze the Aqua Painter or spritz again. Add color as much as you would like. A good tip for myself is….If you think it needs a bit more, STOP! I tend to do a little more here and then there and it ends up messing up. Also, it will dry differently then it looks right now too! You can either set it aside to dry OR you can tip it a bit and allow it to dry like that. This allows the excess water to run to one side and dry darker in those spots. I prop it up on a clear block.
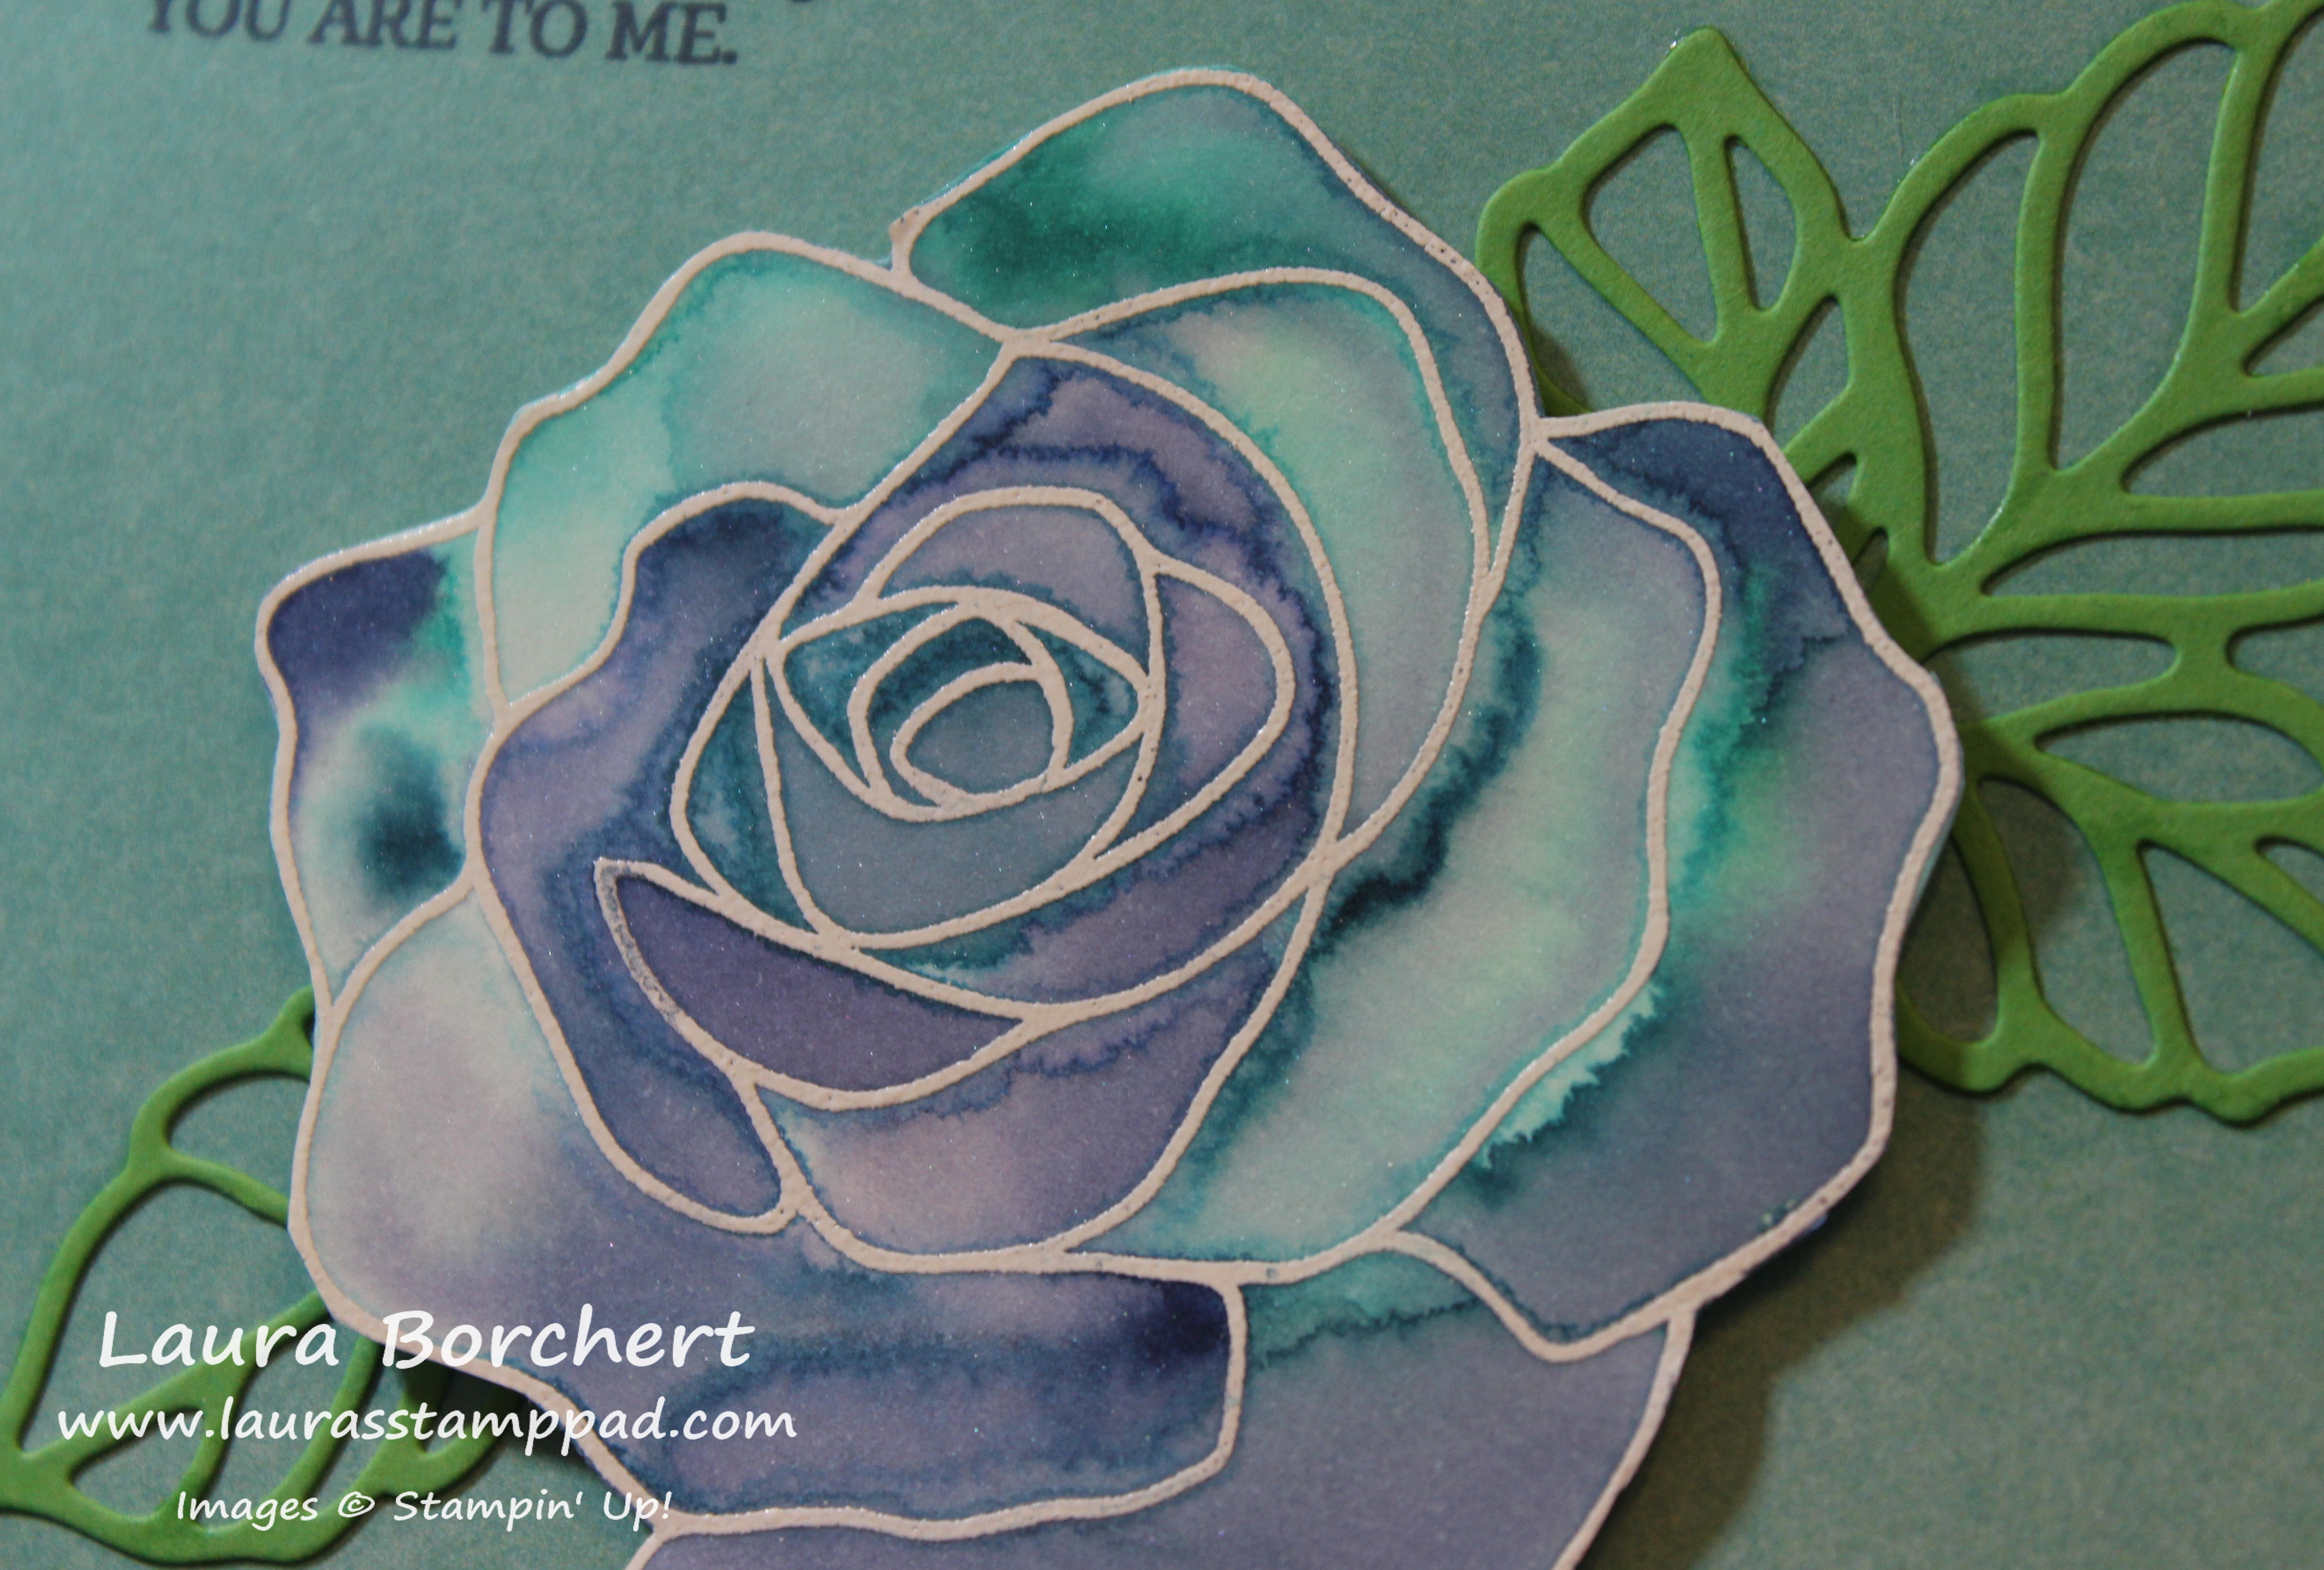
Floating Watercolor, www.LaurasStampPad.com

Once it is all dry, you can cut it out along the border of the embossing flower and add it to your card front. I used the Rose Garden Framelits (Bundle & Save 15%) to die cut the leaves in Cucumber Crush. I used a Whisper White card base and some of the Artistically Yours Designer Series Paper from Sale-A-Bration! I stamped the greeting from the Rose Wonder Stamp Set!
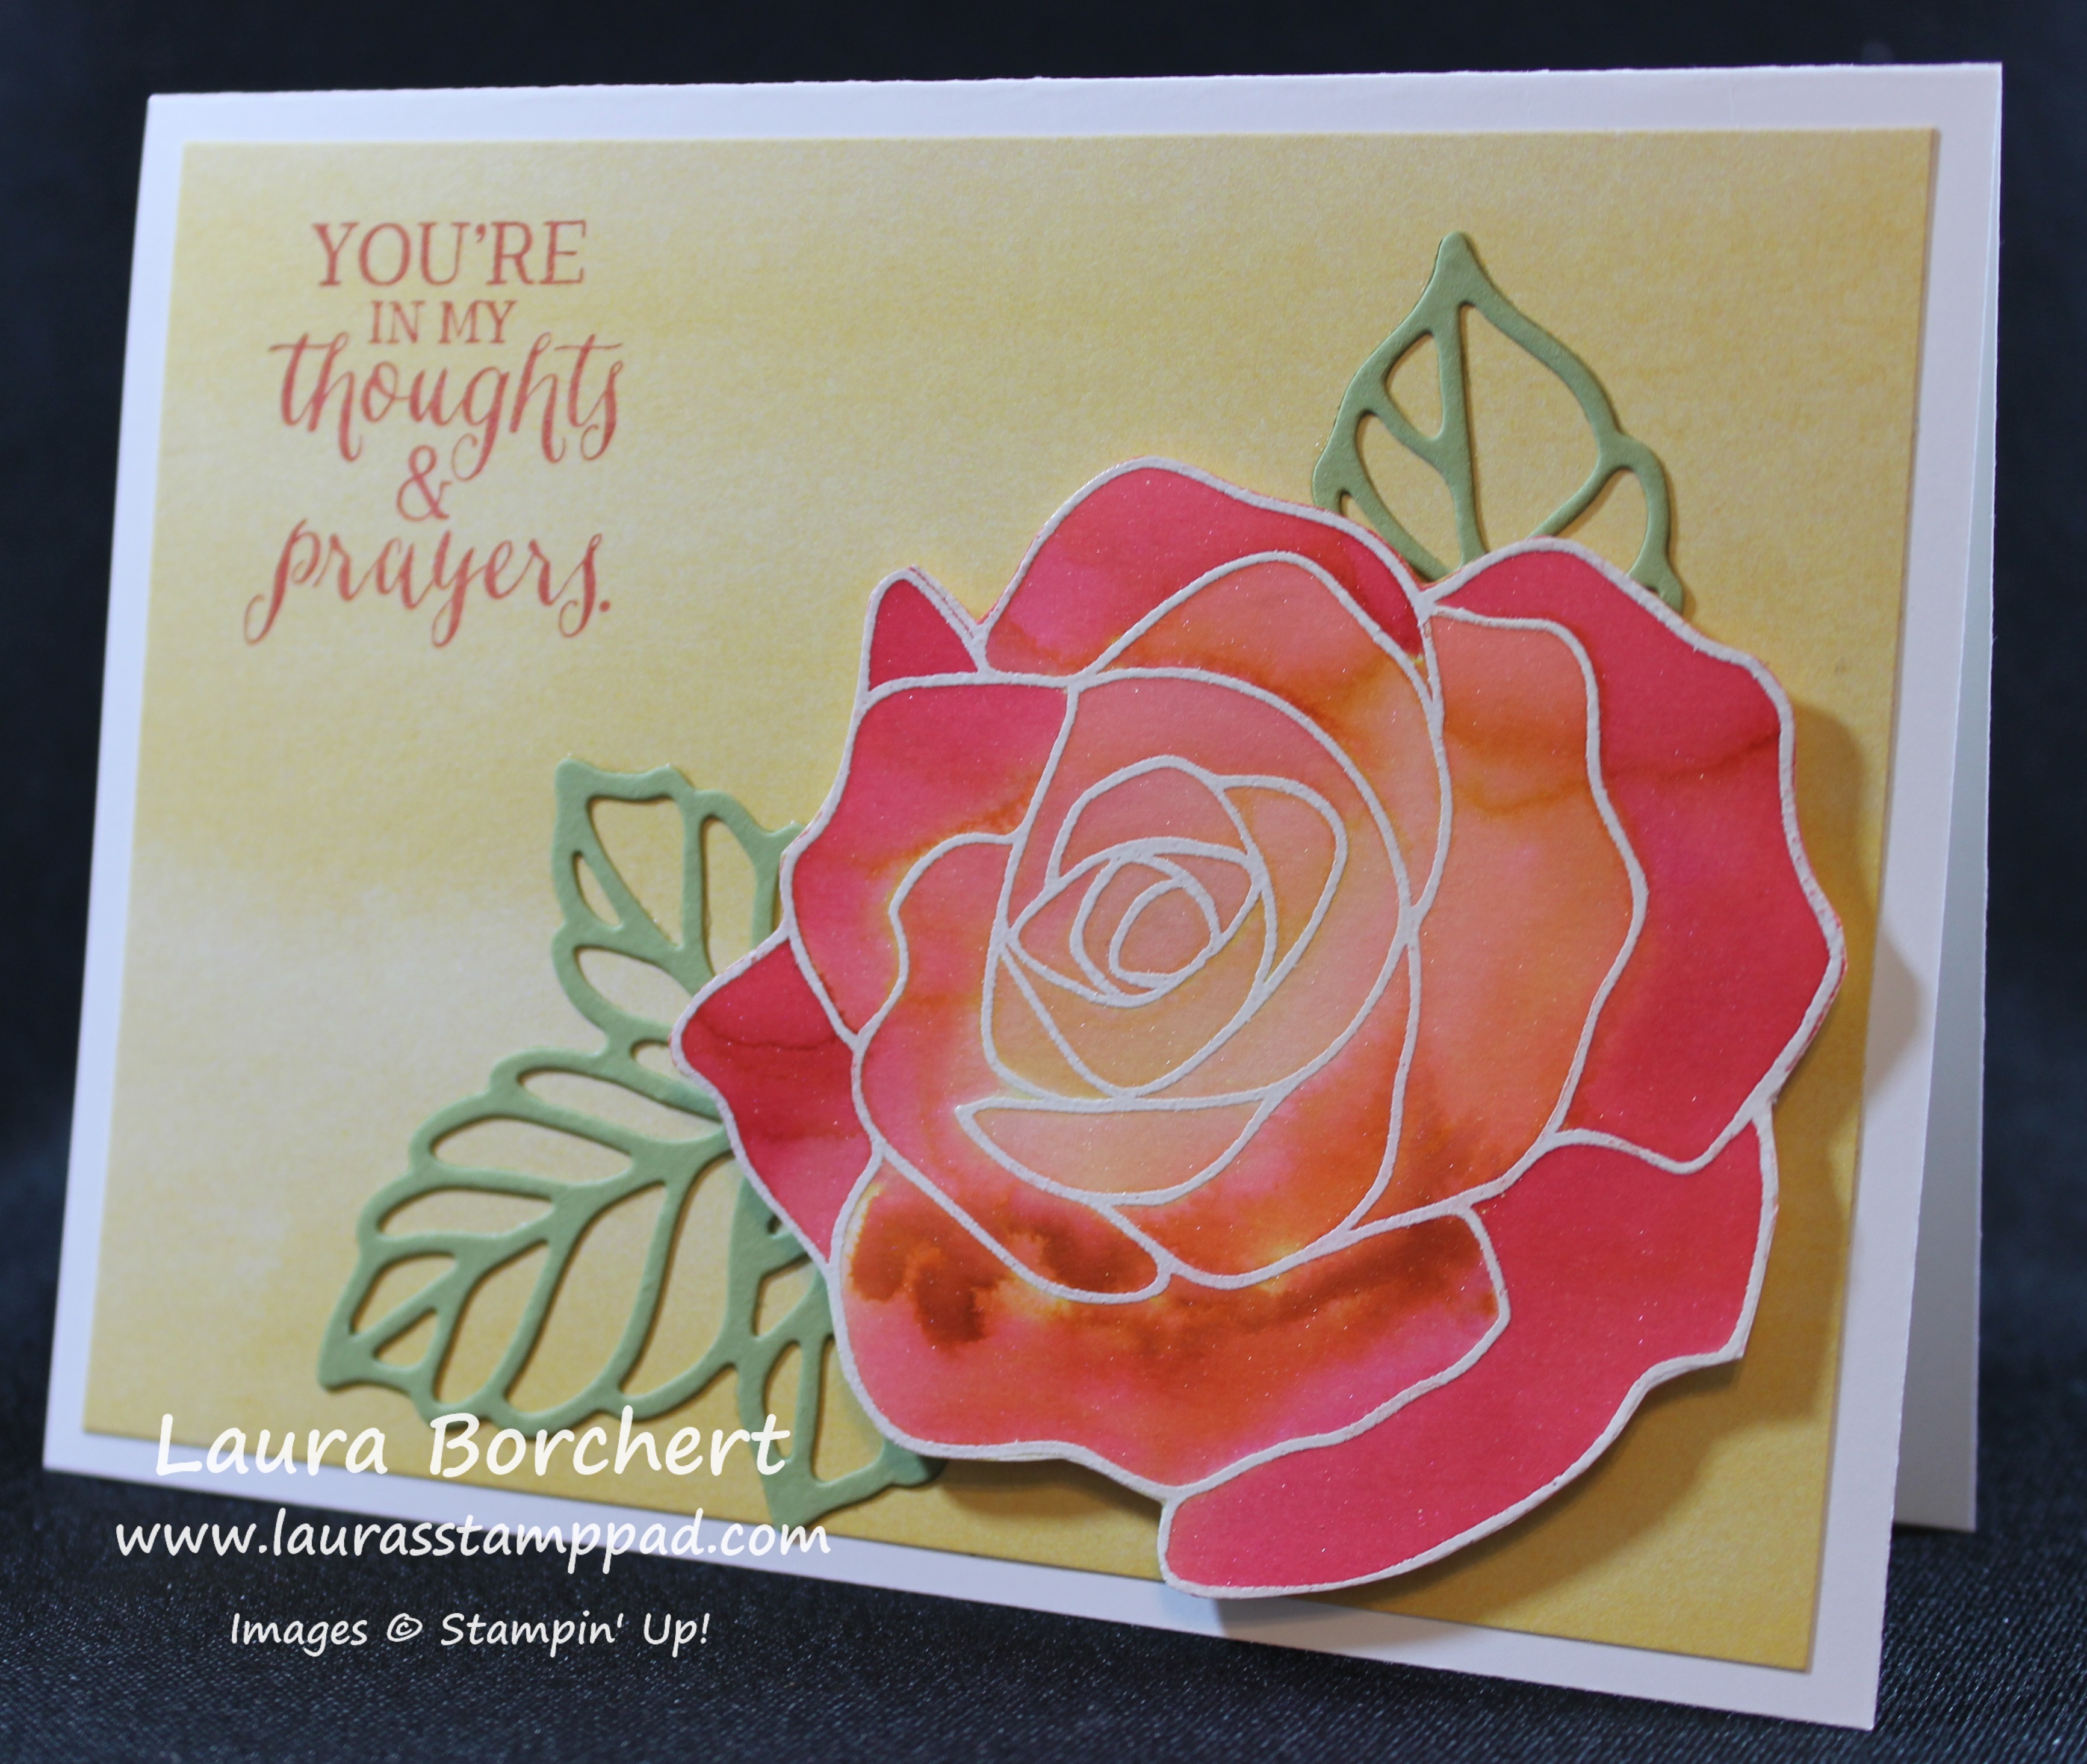
Red Roses, www.LaurasStampPad.com

For this rose, I used Real Red, Tangerine Tango and Daffodil Delight. I love how it turned out. The leaves on this one were die cut in Pear Pizzazz!
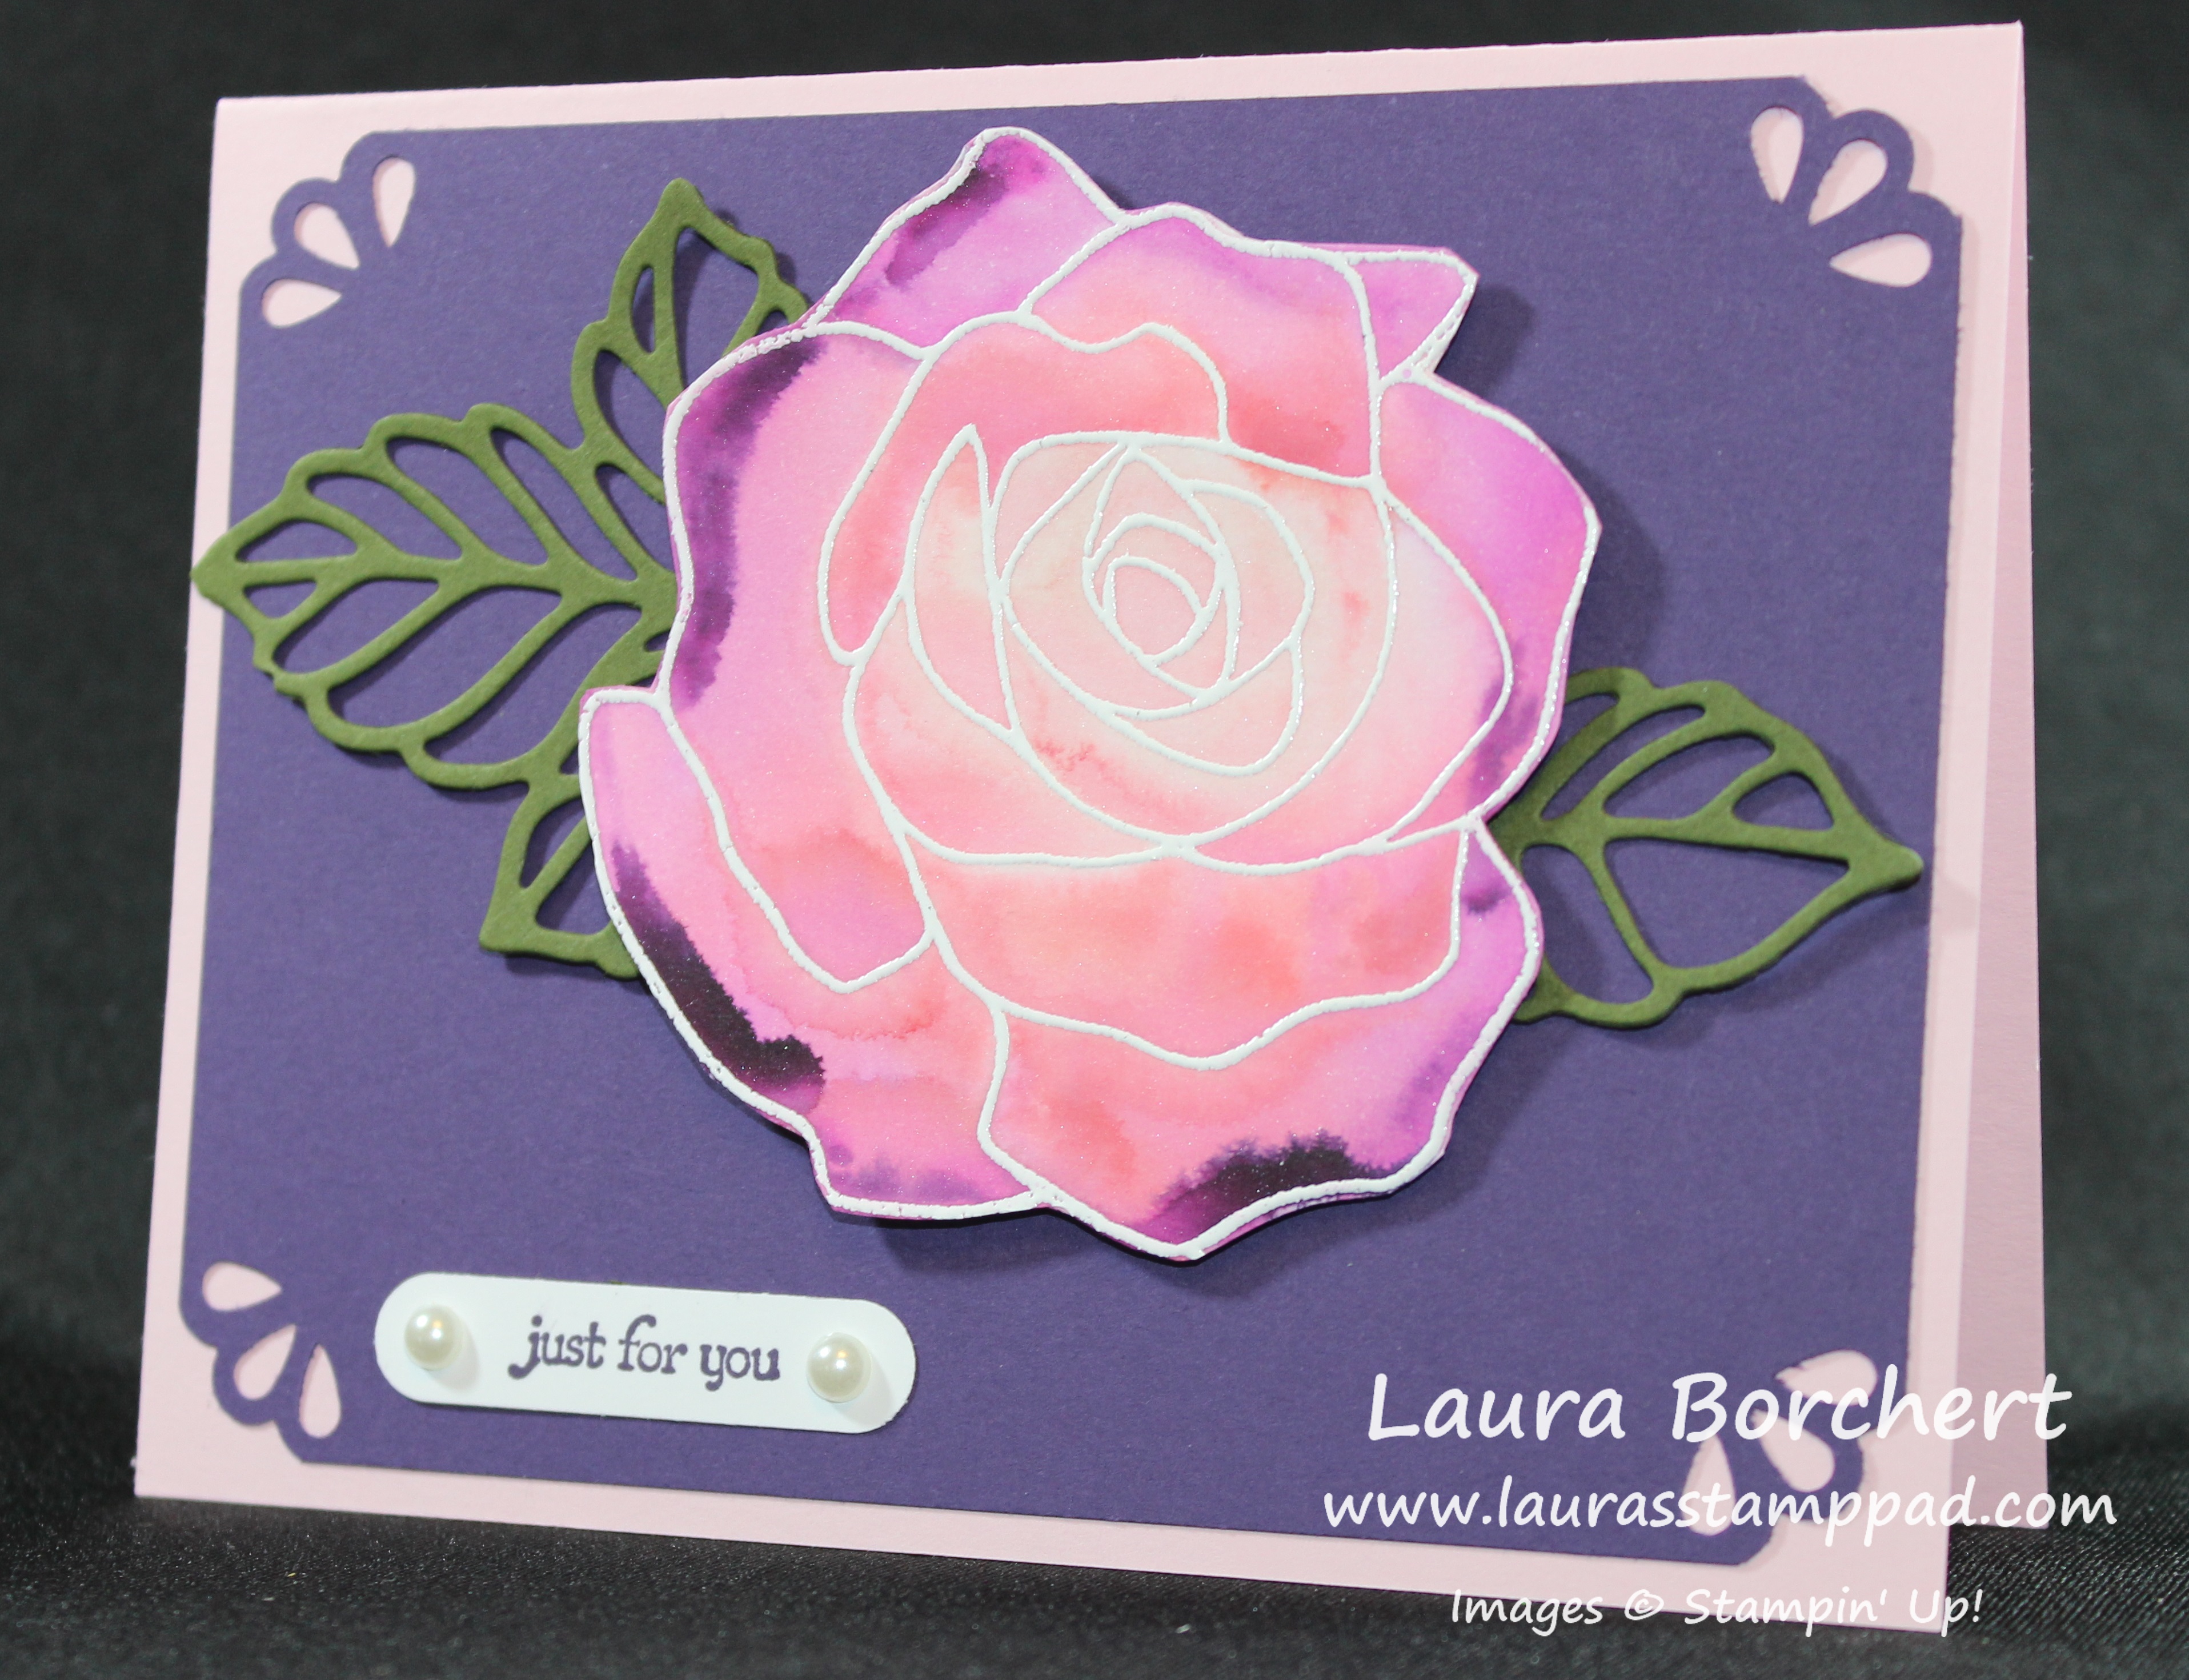
Watercolor Technique, www.LaurasStampPad.com

For this one, I used Blushing Bride, Watermelon Wonder, and Elegant Eggplant. You can see those really dark purple spots….that was where I didn’t have enough water and the paper just soaked up the color strongly. I used Mossy Meadow for the leaves on this one. I also used the Curvy Corner Trio Punch as well.

If you would like to see this technique in action, check out the video tutorial below or click here. Don’t forget to give it a thumbs up if you liked it and subscribe so you don’t miss any future videos!

Which color combination is your favorite? Let me know in the comments below! The blue one is my favorite!

Happy Stampin’

~Laura

Built for Free Using: My Stampin Blog


Masked Bouquet of Flowers!!!

Posted on

Masked Bouquet of Flowers, www.LaurasStampPad.com

I just love flowers and everything you can create with them. A simple single flower, a bouquet in a vase, a full arrangement, and so much more! It is just so much fun and the color combination is endless. I used the What I Love Sale-A-Bration Stamp Set for these flowers as well as a little masking!

I took a piece of Whisper White measuring 3-3/4″ x 5″ and placed a 1-1/2″ strip of scrap paper in the center. You can add a dab of adhesive to hold it in the place if you wish. Then I stamped the flowers above and below that scrap piece of paper. Not so high that it doesn’t touch the scrap piece. You really want them close to that center line. I only used the flower outline (stamp 1) and the big solid piece (stamp 2) for these flowers. I also only used one color per flower – full ink for the outline and stamped off once for the inside. The colors I used for the big flowers were Daffodil Delight, Melon Mambo, Pumpkin Pie, and Island Indigo! The little flower that I stamped around was done in Perfect Plum and the greenery was done in Old Olive. All of these images are from the What I Love Stamp Set that you can earn through Sale-A-Bration with a $50 order. Once you are done with your flower bouquet, you can remove the mask. For the greeting, you can use the one in that set but I decided to use the greeting from the Rose Wonder Stamp Set since it was a bit bigger. The greeting was stamped in Basic Black. For the greenery on either side of the greeting, I stamped off once to get a lighter shade. I just love how clean and simple that center line is. Love it!!! I layered this piece onto Basic Black (4″ x 5-1/4″) and then using Stampin’ Dimensionals placed it on a Whisper White card base.

What colors would you use for your bouquet? Let me know in the comments below! If you would like to see this in action, check out this Video Tutorial. You can also see the other sample shown in the video here!

Happy Stampin’

~Laura


Fabulous Friday!!!

Posted on

Happy Friday!!!! It has been an exciting of week of stamping, playing and working with Brides! I finally got a chance to play with the Botanicals Bundle and I am in love!!! 🙂 Did you know that when you purchase that bundle, you earn a FREE Sale-A-Bration item? Totally go for the Botanicals For You Set because then you have greetings, images, framelits, and Designer Series Paper! I totally didn’t know those went together until like this week. I always thought that set should have been called Just For You and now I get it.

Airplane Stamp, www.LaurasStampPad.com

Speaking of Sale-A-Bration, the last 3 items in the brochure are retiring on Monday!! This includes The Sky Is The Limit (airplane stamp), Artistically Yours Designer Series Paper (shown above) and Hello Stamp Set. If you would like any of those, be sure to place your $50 or more order before the end of the day on Monday! On Tuesday, 3 NEW items are coming out – Glitter Tape, Pedal Pusher Stamp Set, and Party Pants Stamp Set. Check those out here – Sale-A-Bration Part 2!

The fabulous card above was inspired by a sample I saw from Cindy Brown! I love it and just had to re-create it! I used the Artistically Yours Designer Series Paper. I stamped the airplane from the Sky Is The Limit Stamp Set and die cut it with the Ovals Collection Framelits!

Stampin' Up Award, www.LaurasStampPad.com

Also, I wanted to send out a big THANK YOU to all of my fabulous customers! Check out this new “flare” I got from Stampin’ Up! for reaching $100K in Sales! That is a lot of stamps, ink, and paper!!! Yet, we all still don’t feel like we have enough!!! 🙂

Weekly Deals 2.9

Of course it wouldn’t be Friday without the Weekly Deals!!!

I hope you all have a wonderful weekend and Happy Valentine’s Day!!!! You are so loved, never forget that! 🙂

See you back here on Monday!

Happy Stampin’

~Laura


It’s My Party Birthday Card!!!

Posted on

Birthday Washi Card, www.LaurasStampPad.com

We all love the layered, embellished, and detailed cards but every once in awhile the quick and simple ones look just as fabulous!!! I love creating this quick and simple Washi Tape cards and make lots of them! I use this same style for making Thank You cards to pass out at Bridal Fairs with my contact information on them! Love it!!!

TIP: Start with a full piece of 8-1/2″ x 11″ cardstock and place the two stripes of washi tape across the bottom 1/3 of the cardstock along the 8-1/2″ side. Once the washi tape is down, then cut the cardstock in half at 4-1/4″! By doing this, you are eliminating extra cuts of the washi tape! I used the It’s My Party Washi Tape for this card. After cutting it into a card, I folded it and used my Bone Folder for that nice strong crease. For the greeting, I used the Happy Birthday Everyone Hostess Stamp Set in Melon Mambo ink! You can create multiples of these in no time at all.

Check out my video tutorial, below or here, on this card and see how quick and simple it is! Be sure to give it a thumbs up if you liked it. Don’t forget to subscribe to my Channel – Laura’s Stamp Pad so you don’t miss out on any of my video tutorials.

Do you love Washi Tape? What are your favorite ways to use it? Let me know in the comments below!

Happy Stampin’

~Laura


Peacock Perfection!!!

Posted on

Peacock Wedding Invitation, www.LaurasStampPad.com

As many of you may know, I do wedding stationary as well as my Stampin’ Up business! You can check out some of my work here – Weddings.LaurasStampPad.com. I always forget to share some of my work on here but thought I would today. This is one of my favorites because you all know I love Bermuda Bay! Plus the colors and elegance are just amazing!!!

For this invitation, I created a belly band with Gold Glimmer Paper and added some Whisper White Organza Ribbon over top. I used the Elegant Eggplant Re-Inker to dye the ribbon. When you have white ribbon and re-inkers, you have every color you ever wanted!!! TIP: Hot glue works best for adhering Glimmer Paper together since it is so chunky, most other glues don’t work well. I added the Monogram letter in the middle and punched it out with the Artisan Label Punch which was one of my favorites. It retired last year. 🙁 You could always use your favorite punch – circle, oval, scallop circle, Decorative Label Punch, or even Framelits! For the invitation base, I used Bermuda Bay and Elegant Eggplant. I even embossed the Elegant Eggplant flap with the Fancy Fan Embossing Folder to add a little texture! The feather on the inside was printed on a color printer but if you prefer a stamped image, the Perfect Peacock Stamp Set would be perfect!

I really enjoy working with Brides to make their wedding day that much more special. I just love WEDDINGS!!!! Let me know in the comments below if you would like to see more of my wedding stationary posted on here!

Happy Stampin’

~Laura


Technique Tuesday – Rose Wonder!!!

Posted on

Happy Tuesday!!! You all know what that means….I have a fabulous technique to share with you today!!! I loved the Rose Wonder Stamp Set and coordinating Rose Garden Framelits (Bundle & Save 15%) once I first laid eyes on them! I love the beautiful flowers and the greetings…..oh my goodness. I reach for this stamp set for every card I create because the greetings are PERFECT!!!

Thoughts & Prayers, www.LaurasStampPad.com

This is a very simple and yet so beautiful card that is perfect for many different occasions!!! I created this one as a Sympathy and Thinking of You and the other sample is Birthday! I love it!!! You can also play with different colors for even more fun! Let’s get started!

For this card, all you need is cardstock, ink, Fine Tip Glue Pen and the Rose Wonder Bundle! I cut a piece of Very Vanilla Cardstock measuring 4″ x 5-1/4″ and placed it on the Precision Base Plate. I placed the large rose die on the paper where both of the leaf ends are very close to the edge or falling off. Then run this through the Big Shot. You can run it through 1-2 times to make sure you have that nice even cut. Then the best way to get the image out of the die and to pop out all of the cut out piece, you will want to use the Die Brush. Check out how amazing it is here! That thing is best thing ever! Love it!!! You will want to keep the negative/corner of the cardstock of the Rose as well. I used a Lost Lagoon card base and adhered the corner piece to the top right hand corner of the card front. Then using the Fine Tip Glue Pen, I add adhesive to the Rose and placed it right next to that corner piece. In some places it is closer and in others, it is farther away and that’s okay. You don’t need to coat the entire back of the rose. I mostly did the edges and a few spots in the middle, then placed it down and held it for 15-30 seconds. Then if there are a few spots still popping up, just add a little underneath and press it down again. I used Lost Lagoon ink for the greeting from the Rose Wonder Stamp Set! Here is another sample!

Birthday Roses, www.LaurasStampPad.com

I thought it would be fun to use two colors – Elegant Eggplant and Pink Pirouette. I love how it turned out. I think a light and dark blue would be fabulous as well! Since the cardstock is so dark, I decided to add the greeting to the bottom left corner! I also added a few pearls in the center of the rose for a little bling! I love it!

If you would like to see this in action, check out the video below or click here! Don’t forget to give it a thumbs up if you liked it and be sure to subscribe so you don’t miss out on Thursday’s video as well! 🙂

Let me know in the comment below which color combination you like the most or what color combination I should try next!

Happy Stampin’

~Laura


Rainbow of Balloons!!!

Posted on

Rainbow of Balloons, www.laurasstamppad.com

You know how I love bright colors and I just can’t help but create a rainbow of balloons!!! I LOVE IT!!! I used the balloons from the Party Wishes Stamp Set and punched out a few with the coordinating Party Punch Pack (Bundle & Save 15%). I love this set. You can see a few more samples using this set here and here!

I started with a Bermuda Bay card base. Then I took a piece of Whisper White measuring 4″ x 5-1/4″ and added some It’s My Party Washi Tape on the top and bottom. Can’t go wrong with some black and white and bright colors!!! For this sample, I actually stamped the greetings at the end but you can do it now if you would like. I made another one and my balloons were up to high that I could only stamp the greeting down low. It’s all up to you. The greeting is from the Greatest Greeting Stamp Set! Now for the balloons…..it is all up to you. For this sample, I stamped a string and then added the balloon, stamped another string and on and on. You can also stamp all 7 of the strings and then add in the balloons. Every other balloon was stamped on scrap paper and then punched out with the Party Punch Pack and attached with a Stampin’ Dimensional! I used Real Red, Pumpkin Pie, Daffodil Delight, Cucumber Crush, Pacific Point, Bermuda Bay, and Elegant Eggplant (ROY G BIV)!

Balloons, www.LaurasStampPad.com

You could use this card for all types of Occasions – Graduation, Birthday, a Promotion, Engagement and so much more! Do you love bright colors and rainbows of color like me? Let me know your favorites in the comments below!

Happy Stampin’

~Laura


Fabulous Friday!!!

Posted on

Happy Friday, everyone! It’s the weekend again and let’s enjoy it to the fullest. Who would rather stamp than watch the Super Bowl???? I know I would since I’m not a huge football fan! 🙂

Ronald McDonald Donation, www.LaurasStampPad.com

First of all, I wanted to thank Julia D. and Joanna Z. for their generous donation of cards for the Ronald McDonald House!!! If anyone else would like to send cards (hand-stamped or not), I would love to include them in my box of goodies which will be sent out in the next few weeks. Our little Tab House has room for a few more tabs so I’ll wait till it’s super full. I have also been thinking about signing up to cooking/serving another dinner over there. It was about a year ago when I did it the last time and it was so much fun. If you are local and would like to join in, I would love to have you join us!

Weekly Deals 2.2

Of course it wouldn’t be a Friday without the Weekly Deals!!! If you don’t have the Decorative Label Punch, NOW IS THE TIME!!! Just scroll a few days through my blog and you will see it a few times. LOVE that punch and just bought a second one 2 weeks ago. Then it goes on sale this week……should I get a third??? My first one is like punched out….I tried tin foil and all and it just seems a little dull on the points but after years of punching with it, I understand he’s just tired. Don’t forget that you can earn Sale-A-Bration goodies on the Weekly Deals and even the Clearance Rack!!!

Don’t forget to check out my Botanical Bundle Up Close and Personal that went up yesterday! Lots of great tutorials and reveals on my YouTube Channel!

I hope you all have a wonderful weekend!! I’ll see you back here on Monday!!

Happy Stampin’

~Laura


Cute Conversations Paper Pumpkin Kit!!!

Posted on

January 2016 Paper Pumpkin, www.LaurasStampPad.com

The January 2016 Paper Pumpkin Kit arrived and as always I was super excited to rip it open. You can check out my excitement here! It is called Cute Conversations and after playing with it, I totally get it. They are little conversation hearts. I love it! I will admit though when I first opened it and saw the banner and treat bags, I was a little skeptical. I didn’t really want to create a banner that would only be up for a week or two and I only needed a few treats….or so I thought. I started to play with the kit and create the treats like the instructions where you adhere two hearts together.

You're Sweet, www.LaurasStampPad.com

I didn’t really like the way they turned out. The opening was really small and the treats weren’t staying in. Also, if you put a few kisses in there, they will be spilling all over. So I put the candy in some cellophane bags, used the Mint Macaron Baker’s Twine to tie them up and added them to the hearts.

Be Mine, www.LaurasStampPad.com

I needed treats for all of my nieces and nephews so I started with those. I put the candy into a Cellophane Bag. I stamped on the conversation heart with the stamps and Watermelon Wonder ink. I adhered the heart to the front of the bag and clipped a clothespin on with a little piece of sequins. On the little banners, I stamped To/From and wrote their names. I added adhesive to the back of it and adhered it to the left side. I love how they turned out!! I had so much fun making these, I made a few more that say You’re Sweet so I could pass them out to random people at the Post Office, Bank, Store and other places I go to. Why not share a little love?? 🙂Valentine's Treat, www.LaurasStampPad.com

I had lots of the little banners left over and still some candy that I had to get packaged up before I ate it all. I wrapped the little banner on a cellophane bag and tied some ribbon on the top. Super cute and simple!!!

Conversation Heart Cards, www.LaurasStampPad.com

I wanted to create a few cards as well to send out for Valentine’s Day so here are my Conversation Heart Cards. I just added a few hearts and stamped. I added some of the loose sequins to the card with the Fine Tip Glue Pen! They are super cute and I love how they turned out. I still have some banner left and tons of ribbon and sequins. I love how these kits come with so much goodie!

If you would like to sign up for Paper Pumpkin and get the February Kit, be sure to do so before the 10th!!! Click here to sign up now! I can’t wait to see what it is. You can also purchase a Pre-Paid Subscription for 1,3,6, and 12 months. Starting at 3 months, you can earn Sale-A-Bration goodies! Woot Woot!

Can’t wait to see the February Kit!

Happy Stampin’

~Laura


You’re So Lovely!!!

Posted on

You're So Lovely Kit, www.LaurasStampPad.com

The You’re So Lovely Project Kit in the Occasions Mini Catalog peaked my interest the moment I laid eyes on it. The little foam roller just looked like so much fun…..and the diamonds!!! 🙂 I got the kit and opened it up with all of you. Check that out here! I was a little confused/worried about the foam roller and thinking how is that going to press into the template enough to make a mark. Well let me tell you I found out right away and there was nothing to worry about. I had so much fun rolling all afternoon, I couldn’t stop myself. It was super easy and the ink showed up perfectly with minimal pressure. I was so impressed! I loved it!

Treat Bag In Action, www.LaurasStampPad.com

Look at me going to town. You can see that the top portion has been rolled over the bottom hasn’t. The whole thing looks pink because I had done several of them. Another fabulous point, the foam roller hardly has any ink on it at all. It’s not all squishy and dripping (I’m a press dark, go dark type of person) and messy. You could probably touch it and it wouldn’t even barely leave ink on you. Once you are done with the templates, you can rinse them off or clean them with a baby wipe.

Template Trick, www.LaurasStampPad.com

Speaking of template, I have a BIG TIP for you. Using a Sharpie Marker, write this side up or Front on your templates so that all of the die-cut images fit correctly. In the card below, the star is off-set because I did it with the template backwards so the die-cut star didn’t fit perfectly.

Stars Template, www.LaurasStampPad.com

I loved the star image on the gold foil star card front. All of the supplies on these cards are from the kit!!! I did get the coordinating You’re So Lovely Stamp Set for all the greetings and that banner outline! Also, I decided I liked the black chalkboard banners better than the kraft ones. I thought the kraft ones looked too rustic for the gold foil and star bling. There are enough of both to do all of the cards so it wasn’t a problem at all!

Butterfly Template, www.LaurasStampPad.com

Oh how I loved the butterflies and just couldn’t decide which color I liked best. I squealed with excitement at the placement of the Gold Dots down the center of the butterfly. Love it!!!!

Diamonds are a Girls Best Friend, www.LaurasStampPad.com

Diamonds are a Girls Best Friend!!! I started with the diamond and was having so much fun, I couldn’t stop. Then I realized I needed to play with the others as well. I did the full template with the far left, then I did the reverse template with the next one and for the far right, I laid the die-cut image down and wheeled over it. Wait till you see the treat bag with the Watermelon Wonder Diamond on it! Eeeeee So much fun!!!

Circles Template, www.LaurasStampPad.com

I played with these circles so much that I totally forgot about the wreath die-cut. I tell you that I had so much fun with this kit, I didn’t even know what I was doing.

Die Cut Pieces, www.LaurasStampPad.com

Look at all of these leftover pieces. There are tons of the wreaths since I didn’t use them. The image in far bottom right is the center of the wreath that looks like a Disk Blade. With my family being farmers, I thought I might be able to use them for a Man Card!

Treat Bags, www.LaurasStampPad.com

Here are a few of the treat bags. The kit creates 12 cards and 12 treat bags with tags! I really enjoyed this kit and can’t wait to use the templates and foam roller for many more projects! I hope you enjoyed all of these pictures. I’m telling you this is a fabulous kit and always remember that YOU’RE SO LOVELY!!!

Happy Stampin’

~Laura