Online Extravaganza!!!!

Posted on

The Online Extravaganza has begun!!!! Today only there are a few Doorbusters that you don’t want to miss!!!

Punch Board Sale

The Gift Box Punch Board is 30% off TODAY only!!! Click here to get yours!

Card Kit Bundle

I love Card Kits and they make amazing gifts to someone who loves crafting or to someone who needs greeting cards (that’s like everyone)!!!!! Today only you can get the Everyday Occasions Card Kit AND the Hip Hip Hooray Card Kit at 30% off!!!

Embossing Folders Sale

You know how I LOVE LOVE LOVE Embossing Folders! TODAY is the day to get all of the ones I don’t have. Select Embossing Folders are just $5.00 (all except Stylish Stripes, Chevron, Beautifully Baroque, and Woodgrain)! I love it!!!!! Click here to get yours today!!!

For the complete list of the rest of the items that are on sale this week, click here -> Online Extravaganza!!!!

Happy Shopping!!!

~Laura


SALES, SPECIALS, & A Request!

Posted on

HAPPY FRIDAY and it is just that!!!! I have so much to share with you!!!! Let’s get started with the Weekly Deals because what is a Friday without them!

Weekly Deals 11.17

Are you ready for this? Stampin’ Up is having a fabulous Online Extravaganza!!!! Starting on Monday there will be select items and bundles on SALE! Plus, there will be limited-time DoorBusters on both the first day, Monday, the 24th and Monday, December 1st. You don’t want to miss this!!!  The items are while supplies last. Be sure to check back on Monday for the full details or better yet just subscribe in the upper right corner and you will a reminder right in your email!!!! Get your wish list ready and you can place your order online or send it to me!!!!

Have you ever thought about joining Stampin’ Up For the discount, for the fun, for the friends, for the extra cash? Well now is the time!!! This is the best deal I have ever seen!!!! The Starter Kit is 25% off which means it is $74.25 plus tax, shipping is free! You still get to pick out $125 worth of product but pay less! AMAZING! But that isn’t all, you also get a 5% Cash Back Bonus on all sales in December. Woot Woot!!!! Everyone loves a bonus and you can use your new discount on buying gifts for those hard to buy for people on your list or those craft lovers! Everyone could use a card kit, a return address stamp, gift packaging items, and even My Paper Pumpkin!!!! And you will get a 5% Cash Back Bonus on those gifts!!!! You can learn more by clicking here or you can always reach out to me with any questions you may have!!! This special is only from November 24th to December 2nd so don’t wait too long!

My husband’s Birthday is right around the corner and I always do an About Me on our Birthdays so if you have any questions you would like to ask him or know about him, leave me those in the comments below! 🙂

Happy Stampin’ and have a fabulous weekend!!!
~Laura


Holiday Holly!!!

Posted on

Wondrous Wreath Planter, www.LaurasStampPad.com

Last week I showed you how to use the Wondrous Wreath Stamp Set and matching Wonderful Wreath Framelits (Bundle & Save) for a Fall and Winter Wreath and Tuesday I showed you how to make garland! Today I’m going to show you how to make a window planter full of holly!

You will start with a piece of Garden Green cardstock measuring 4-1/4″ x 11″ and score along the 11″ side at 2-3/4″ and 8-1/4″ and fold those in. This created your gate fold card base! Next you will need 2 piece of the Plaid Designer Series Paper from the Trim the Tree Paper Stack measuring 2-1/2″ x 4″. Put some adhesive on the back of one piece of Designer Series Paper and attach one end of your Cherry Cobbler Sheer Linen Ribbon (7″) to the edge (outside edge, centered from top to bottom, see photo above). Now add additional adhesive and place it on the left side panel of your card base. Adhere the right side panel as well. Now you will pull the ribbon around to the front and next to the edge of the inside portion of the panel you will apply 2 strips of Sticky Strip as shown below! Cut the end of the ribbon diagonally or with banner tips!

Instruction Photo, www.LaurasStampPad.com

Now it is time to create the window! Just like on Monday’s sample, you will start with a 3-1/2″ x 3-1/2″ piece of Early Espresso cardstock and run it through the Big Shot with your Woodgrain Texture Embossing Folder! This adds a little texture to your window! Then place four 1″ Square Punched pieces on top to resemble a window! These will be your guide! You can punch your squares out of Post-It notes on the sticky end or just use some scrap paper and add a small dab of Snail Adhesive. Now using your 1″ Square Punch, you will slide the white square in and line up those scrap squares and punch! Now you have your window!

Now to create the curtain you will need some of the Garden Green checked Designer Series Paper from the Trim the Tree Designer Paper Stack. You will need three Large Oval Punches and you will cut one in half! Turn your Window frame over (face down) and apply Snail adhesive to the back side! You will place the two full ovals on the top two windows diagonally with the green check face down and then you will add the halves to the two bottoms. These bottoms ones are only slightly diagonal. Turn over your window and it should like to curtains (see photo above). Now you can pull the Sticky Strip backs off of your card base and center your window to the front of your card. Your window should only be adhered to your card on the left side so that your card can still open!

 Now for the planter, you will need a piece of Garden Green cardstock measuring 3/4″ x 3″ and you will cut a diagonal from both ends to give the shape of the planter. Then using your Sponge Dauber, brush the edges of the planter with Early Espresso. Place two Stampin’ Dimensionals on the back of the planter (towards the bottom, so your holly and be tucked under) and place it on your window. You will need 1 wreath for all of the holly in the planter. I used Wild Wasbi, Garden Green, and Cherry Cobbler for my wreath and Cherry Cobbler for the Ribbon! Check out this Video Tutorial to see how to stamp and die-cut your wreath!

Now you will cut the wreath into sections about 1″ or less long. You will want to cut along the leaves so it looks like real holly and leaves. Place 2-3 of your pieces in the planter (left, center, right) with Snail Adhesive. Then take the other 2 pieces and place them in between with Stampin’ Dimenionals to add texture and dimension. Adhere the ribbon to the center of your planter and you are all done!!!

Window Wondrous Wreath, www.LaurasStampPad.com

I hope you enjoyed this technique on another way you can use your Wondrous Wreath Stamp Set! Be sure to check back on next week to see more fabulous ideas!

Happy Stampin’

~Laura


Santa Hershey Bars!!!

Posted on

Tis the Season for gifting and why not make the packaging just as special as the person you are giving it to!? You can check out some of my other posts and videos in this Gift Packaging Series by clicking here, here, and here! Today I’m going to show you how to decorate a Hershey Chocolate Bar (or any other large candy bar)!

Santa Hershey Bars, www.LaurasStampPad.com

How cute are these? They would make a cute, yet affordable gift for teachers, neighbors, co-workers, friends and family! Also, great stocking stuffers! I started out with a piece of Real Red cardstock measuring 5-1/2″ x 6-1/2″. You will place Sticky Strip along the 6-1/2″ side and wrap it around the Hershey Bar. WAIT….before wrapping it around, run it over your Bone Folder or over the edge of a table to break down the fibers of the paper a little and allow it to curve better. Then you will take a piece of Whisper White cardstock measuring 1-3/4″ x 5-1/2″ and using your Scallop Border Punch, punch both sides! Adhere this piece to the front of your Hershey Bar with Snail Adhesive. Using your 1/2″ Circle Punch, you will punch out 4 in Basic Black and adhere to your Whisper White piece (3 on top, 1 on the bottom) and you will leave space between the 3rd and 4th one for your Santa Belt. For the Belt, you will need a piece of Basic Black measuring 3/4″ x 6-1/2″. Again you will want to run it over your Bone Folder to break down the fibers and attach it to the Bar with Sticky Strip. I overlap the ends in the front so I can hide it behind the buckle, but you can put it in the back as well. Now for the buckle, I prefer the one of the right which was a piece of Silver Glimmer Paper punched out with the Curly Label Punch. Then I took the Petite Curly Label Punch and punched a black one to layer on top! The bar on the left was done with a square piece of Crushed Curry that has the Petite Curly Label Punch punched out of the middle. I did a few like that and then was browsing Pinterest and saw the other option on a project and fell in love. You know me and my bling! 🙂 You are all set now!!! To see this in action, check out the Video Tutorial below! Don’t forget to give it a thumbs up if you liked it!

Thank You Hershey Bars,  www.LaurasStampPad.com

Here are a few others that I created for Fall/Thanksgiving! I used the Color Me Autumn Designer Series Paper and added some Mossy Meadow Satin Stitched Ribbon. For the greeting, I used the Lots of Thanks Stamp Set and Curly Label Punch!

Birthday Hershey Bars, www.LaurasStampPad.com

Here are a few Hershey Bars that I created with some of the Sweet Taffy Designer Series Paper and Big News Stamp Set. The bottom right one was done with the Back to Black Designer Series Paper and Pool Party Cotton Ribbon! I love these because of the bright colors and MELON MAMBO!!!!

Baby Hershey Bars, www.LaurasStampPad.com

 Everyone loves Chocolate especially someone who just had a baby! What a great little treat to bring to the new parents or grandparents! These were done with the Lullaby Designer Series Paper and Label Love Stamp Set (Artisan Label Punch)!

I hope you enjoyed these cute little chocolates and use them for your next occasion! Let me know in the comments below which one is your favorite!

Happy Stampin’

~Laura


Technique Tuesday – Garland in the Window!

Posted on

Happy Tuesday!!! That means I have a fabulous technique to share with you!!!! When I get a Stamp Set, I enjoy stamping with it in the obvious ways (click here and here) but I always like to see how I can use it in other ways! In ways that you might not think of right away! In ways that give you so many more options! So today I’m going to show you just that!!!!

Wondrous Wreath Garland, www.LaurasStampPad.com

Last week I showed you how to use the Wondrous Wreath Stamp Set and matching Wonderful Wreath Framelits (Bundle & Save) for a Fall and Winter Wreath!!! Today I’m going to show you this fabulous garland card!

Supplies Needed: Wondrous Wreath Stamp Set, Wonderful Wreath Framelits, Woodgrain Texture Embossing Folder, Big Shot, X Large Oval Punch, and 1″ Square Punch

Let’s get started! I used a piece of Soft Sky as my card base and added a piece of 4″ x 5-1/4″ Whisper White cardstock after running it through the Big Shot with my Woodgrain Texture Embossing Folder. Next you will take a piece of Whisper White cardstock measuring 3-1/2″ x 3-1/2″ and place four 1″ Square Punched pieces on top to resemble a window! These will be your guide! You can punch your squares out of Post-It notes on the sticky end or just use some scrap paper and add a small dab of Snail Adhesive. Now using your 1″ Square Punch, you will slide the white square in and line up those scrap squares and punch! Now you have your window! Then I took a piece of 3-1/2″ x 3-1/2″ Soft Sky cardstock and stamped the holly berry wreath image all over in Whisper White Ink. This created a snowy look as you gaze out the window! Once that is dry (craft ink takes a bit longer), you will adhere that to you Whisper White window frame with Stampin’ Dimensionals. By using dimensionals, it adds depth to the window and outside! You can adhere your window to the top 3/4 of your card; allowing room on the bottom for your greeting. For the garland, you will need to stamp and die-cut 2 wreaths! I used Wild Wasbi, Garden Green, and Cherry Cobbler for my wreath and Cherry Cobbler for the two Ribbons! Check out this Video Tutorial to see how to stamp and die-cut your wreath!

Now you will cut one of your wreaths in half and adhere it across your window (the across swag). With your other wreath, you will cut it in half but this time you will want to actually cut around the leaves. Since these leaves will be showing you don’t want to just cut across but actually in and around the leaves. Now you can adhere those two pieces to your window as well, pointing the ends of the garland out from the window (see picture above). I used Snail Adhesive for the Ribbons as well. For the greeting, I stamped the Happy Wonderful Christmas on a piece of scrap Whisper White cardstock and punched it out with my X Large Oval Punch! I adhered this to my card with Stampin’ Dimensionals! For the final touch, I cut out a holly berry with a few leaves from the leftover wreath pieces and adhered that next to my greeting!

I hope you enjoyed this technique on another way you can use your Wondrous Wreath Stamp Set! Be sure to check back on Thursday to see another fabulous idea!

Happy Stampin’

~Laura


Terrific Little Trees!!!

Posted on

Festival of Trees, www.LaurasStampPad.com

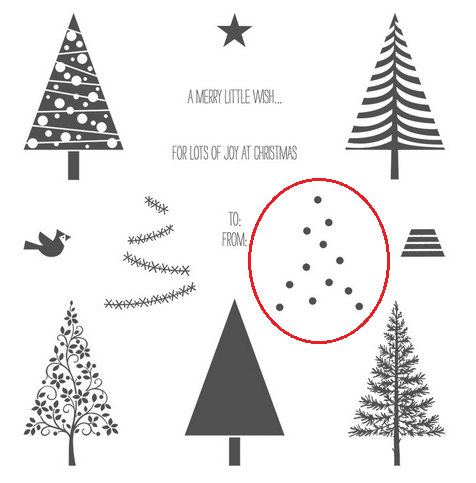
I love these little trees in the Festival of Trees Stamp Set and since they are Photopolymer you can see exactly where you are stamping! I decided to share this sample card with you to show off a little bit of my craziness! 😉 I’m a crazy stamper just like all of you! You will see that the little tree with the purple dots is REALLY covered in dots. That is because I stamped the tree and then took my Blackberry Bliss Marker and colored in all of the dots. Then about 3 samples later of playing with this stamp set, I realized “there’s a stamp for that.” NOTE: I used the stamp for that already as little snow dots on a background piece. So I had used the stamp but didn’t realize it was meant for the tree ornaments. (me shaking my head)

Festival of Trees, www.LaurasStampPad.com

Here is a photo of the stamps in the set. There is garland and the ornaments (dots) that you can use to decorate your trees. Of course the dots fit perfectly in the tree on the top left. Stampin’ Up! – 1, Laura – 0

Of course you can color in the dots on the trees with a marker but I will say it was quite tedious! 😉 Now for the card basics, I started with an Old Olive card base and added a 4-1/4″ x 3-1/4″ piece of Blackberry Bliss with Stampin’ Dimensionals. Then I took a piece of 3″ x 4″x Whisper White cardstock and ran it through my Big Shot with the Stripes Embossing Folder. You know how I love to add texture! I stamped the Merry Christmas greeting at the bottom in Blackberry Bliss. This greeting was from the October promotional set – Good Greetings. You could also use the Merry Christmas from Teeny Tiny Wishes or any other favorite set of yours! For the trees, I stamped them in Old Olive on some scrap Whisper White and then punched them out with the coordinating Tree Punch (Bundle & Save)! I attached them to the card with Stampin’ Dimensionals! Adorable!

I hope you enjoyed this card! You can see other samples using the Festival of Trees Stamp Set here!

Happy Stampin’

~Laura


Banner Blessings!!!

Posted on

Happy Friday everyone!!!! Today I am excited to share with you a new Photopolymer Stamp Set that Stampin’ Up released just this week! I am really loving giant greetings on cards and then just adding a little punched flower or some Rhinestones or mounting that on top of some embossed cardstock (like these)! Simple, yet fabulous! This Banner Blessings Stamp Set is perfect for that too! Click here to get yours today!

Banner Blessings, www.LaurasStampPad.com

Of course, what is a Friday without the Weekly Deals too!

Weekly Deals 11.10

I hope you have a fabulous weekend and why not stamp in the coziness of your home this weekend because Brrrrr, it’s cold outside! Share with me what projects you are working on in the comments below!

Happy Stampin’
~Laura


Winter Wondrous Wreath

Posted on

Winter Wondrous Wreath, www.LaurasStampPad.com

So on Monday, I showed you a fabulous Fall Wreath and today I’m going to show you this fabulous Winter Wreath!

The card above is perfect for Christmas or even just Winter if you changed the greeting! Again, you can use this card for Winter Birthdays, Thank Yous, Thinking of You, and even Christmas cards! I used the Wondrous Wreath Stamp Set & coordinating Wonderful Wreath Framelits which also come in a Bundle and you save 15%!

I started off with a Whisper White card base and then I cut out another piece of Whisper White measuring 4″ x 5-1/4″. I used this second piece to stamp my Hardwood image on. You could stamp it right onto your card front but I found this to be easier because if I mess up (it happens) I can just flip over the piece of paper and try again! Thank goodness there are 2 sides to every piece of paper, am I right? The other thing I like about this is that it gives my card some dimension. After stamping the hardwood image, I adhered this piece with some Stampin’ Dimensionals! 🙂 For the Wreath, I used a piece of Whisper White cardstock and I stamped the super leafy image in Wild Wasbi (being sure to note that the tab on the stamp is facing up). Now you will take your partial leafy image and ink it in Garden Green and with the tab facing up stamp it right on top of the leaves. Finally, with the dots image, you will ink it up in Cherry Cobbler and with the tab up, you will stamp it down. Note: With this one, the tab will be facing up, but you will want to center the stamp around the wreath. Once you are done stamping, you will use the coordinating Framelits – Wonderful Wreath Framelits, you will cut out the stamped wreath! You will also want to stamp the Ribbon in Cherry Cobbler on a piece of scrap Whisper White and cut that out with the matching Framelit. No need for any fussy cutting here! Woot Woot! I attached the wreath to the card with Stampin’ Dimensionals and the ribbon to the wreath with regular Snail Adhesive! For the greeting, I stamped the Happy Wonderful Christmas from the Wondrous Wreath Stamp Set and punched it out with my Large Oval Punch and adhered it to my card with more Stampin’ Dimensionals! You can never have enough of those on hand!

In case my instructions above got you all lost and confused, I created a Video Tutorial for you! Be sure to give it a thumbs up if you liked it and don’t forget to subscribe to my blog so you don’t miss out on any of the other samples you saw in the video! 🙂

Happy Stampin’

~Laura


My Digital Studio – 2014 Scrapbook!!!

Posted on

Last year I did my scrapbook digitally with My Digital Studio and I after seeing how easy and fun it was, I have decided to do my 2014 Album the same! You can check out my 2013 Album here and here!

2014 MDS Album, www.LaurasStampPad.com

I love love love the Olympics! 631 more days till the 2016 Summer Olympics!!!!! I enjoy all of the sports, the energy, excitement and fun of the entire event! There have been many time I have been brought to tears seeing how proud the Olympians are, how far they have come, hearing the National Anthem! I just love it all! I take notes and enjoy the “phrases” that they use! This year for the 2014 Winter Olympics I took notes of these funnies and amazing moments to document in my scrapbook! I really love how this page turned out and to remember those amazing weeks!

2014 MDS Album, www.LaurasStampPad.com2014 MDS Album, www.LaurasStampPad.com

These pages document our annual shopping trip for my niece’s birthday! We always have a great time and laugh till our bellies hurt! I always enjoy capturing the fun of the day and my niece growing up! As you can see my pages are fairly simple with some patterned paper as the background! I layered all of the pictures on coordinating colored cardstock and I rounded the corners for a soft look! Also, I journal A LOT more with my digital album because typing is so much easier and if I mess up, I can just hit backspace rather than find a sticker or punched flower (etc) to cover it up! 🙂 Come on….you have all done that, right?

2014 MDS Album, www.LaurasStampPad.com

Is she not the most precious little girl ever? For this page, I actually grabbed the color of her hair bow and dress to use as the colors for the background and photo layering. That is a super fabulous feature in My Digital Studio when none of the other patterns or solids seem to work! Simple yet focuses on that adorable face which is the most important thing for me! I prefer simple pages with lots and lots of photos! That is just my scrapbooking style! If you prefer one focal photo with some embellishments in the corner or along the bottom, you can do that too! There are so many different options with My Digital Studio! Check out these….

2014 Scrapbook-0172014 MDS Album, www.LaurasStampPad.com

For these pages, I added some “washi tape” to the corners of the photos which adds a fabulous look! I love the simple and playful look it gives. Again you can see I love putting lots of photos on my pages! 🙂 My Digital Studio comes with LOTS of photo layouts that include any where from 1 to 15 photos on a page. You can always download more like these or this baby album here! Don’t worry if you don’t like all of the pages or layouts, you can always create your own or delete out 1 photo from a page or even add a photo! There is so much flexibility to My Digital Studio! You can try out My Digital Studio for 30 Days for Free by clicking here and if you want to purchase the software you can here! There are new downloads every month so be sure to check those out if you are looking for something specific or a certain type of album that you would like to create!

I’ll be sharing more of my 2014 Album soon so be on the lookout!

Happy Scrapbookin’

~Laura


Technique Tuesday – Joy & Noel!

Posted on

Happy Tuesday!!!! You know what that means….I have a have technique for you…..or trick/tip for you! So let’s get started on this amazing tip!

Wonderful Framelits, www.LaurasStampPad.com

So the trick I have for today focuses on the JOY in this card! These small little word Framelits can be difficult to pop out of the die because they are so thin and delicate. Of course there are little holes that you can use to poke through to pop it out but sometimes that leaves little dots on your letters. TIP: Lay a piece of wax paper on top of your Silver Foil Sheet and then the Die on top of that. Run it through the Big Shot and when it comes to popping it out – Easy Peasy! 🙂

For the rest of the card…..I started with a Cherry Cobbler card base! I added a 2-1/2″ x 4″ piece of Flower Pot Designer Series Paper on the bottom portion. The top portion of Whisper White measures 3-1/2″ x 4″ and I used my Lucky Stars Embossing Folder to add a little pop and texture! I added some Cherry Cobbler Seam Binding to cover the overlapping of the white and Designer Series Paper. I stamped a few of the flowers from the Wondrous Wreath Stamp Set and used the coordinating Wonderful Wreath Framelits (Bundle & Save) to cut them out. No fussy cut necessary! 🙂 Of course I had to add a few Rhinestones for some bling! Then for the Joy, I used the Silver Foil Sheets (and some wax paper)! Beautiful and Amazing!!!

Of course you can use this trick for all of your little Framelits and not just the Wonderful Wreath ones! Let me know what you think of this trick and if it worked well for you in the comments below!

Also, I can’t do this post with making sure to say Happy Veterans Day! Thank you so much to all of the men and women who fight for our country!

Happy Stampin’

~Laura