I think I’m really starting to like Gray a little more lately! Do you ever have a color that you don’t use for awhile and then when you do, you find yourself reaching for it a lot??
For this card, I used a Whisper White card base. I took a piece of Bermuda Bay and ran it through the Big Shot with the Polka Dot Embossing Folder. Then I took my Sponge Dauber and colored the raised dots a little for a darker look!!! I love sponge daubers! I added that to the card front. I used the Banner Triple Punch to create the banner tips in the gray striped paper from the Neutrals Designer Series Paper Stack!!! For the circles, I used the Circle Framelits which layer so perfectly together. I stamped the Dude greeting from the April Paper Pumpkin Kit in Bermuda Bay and then stamped it a second and third time without re-inking the stamp. I love the ombre look! After stamping the Dude, I added in the Hey! Of course the circles were added to the card with Stampin’ Dimensionals! I thought it needed a little something more so I added the little bow with some Basic Gray Baker’s Twine! Does this mean it isn’t manly anymore?? Let me know in the comments below!
Happy Friday!!!! The rain is temporarily gone and oh my goodness the summer heat has arrived!!! Here in Illinois it has been in the upper 90’s with heat index way over 100. The worst part is the humidity and threat for storms. The best part is I don’t feel bad for staying inside in my Stamp Room because it’s too hot outside!!!! I hope you had a wonderful week and here’s to an amazing weekend but first the Weekly Deals!!!!
You may have noticed that Stampin’ Up! has added more items to the Weekly Deals each week but they have also put a cap on the amount of items they will sell at that sale price so be sure to shop early to get these amazing deals!!!
I also thought I would share some fun that I had recently with a great group of girls!!!
This groups of ladies had some family in town that wanted to stamp so we had a private class with some of the cards she had picked out from my bog!!! Some of the cards used retired product so I re-created them with some current stuff! Love it!!! We had an amazing time with lots of laughter and stamping!!! The Butterfly card can be seen here! I love the purple version and so does Debbie since that’s her favorite color!!! The Flip Flad card using the new Bohemian Designer Series Paper can be seen here! That adorable box card can be seen here! I think I love it more with the Cherry On Top Paper Stack!!!
If you would like to have a private class with you and your friends, just let me know and we can pick and date and time that works best for you – your place or mine!!!
Okay everyone, you know I like to be honest with you on Stampin’ Up’s kits…..some are hard but still rewarding and some are not my style and some are amazing!!! PS: I still have the flower bouquet in my kitchen and I love it but memories of putting it together still haunt me. Oh my that was a long process! With the new Stampin’ Up Catalog came LOTS of kits and I couldn’t wait to try them all out!!! You can check out the Tin of Cardshere which was lots of fun and the tin is adorable! Then there is the Sweet Stack Kit which I have assembled and will be posting about that next week but until then you can check out this video! Then there is the Watercolor Wishes Project Kit…….I LOVE this one for a couple of reasons. 1. It includes everything you need in the kit – stamps, embellishments, and ink!!!! 2. The Stamp Set is amazing. You know I’m a sucker for a scroll-y font!!! Then I made all 20 of the cards in 65 minutes and really fell in love!!! Here they are for you to check out and fall in love!
I used the provided instructions a little bit but then added my own flare on a few of them. For example, I didn’t embellish that Hello card in the middle at all. Also, I LOVE ombre so I had to do that a few times as well! I think I mixed up almost all of the die-cut stickers as well because I didn’t like one of the color combinations and so that threw them all off.
Okay so looking back at that center card, I’m even more in love. It is just STUNNING in it’s simplicity and with a little bling from the sequins! Another card that I changed up was the one on the far left. I left off the heart wooden accents because I thought it looked like a great Man Card.
Here is the final set of all 20 cards…..by the way did you notice that it is 20 different cards and not X number of X style. Yeah, twenty different styles. LOVE IT!!! I did time myself just to see how long it took to do this kit and at the hour mark I still had 2 more to go so it ended up taking 65 minutes. That isn’t bad at all. The other awesome thing is look at all of these leftovers!!!!
Stampin’ Up always provided so much product in each of the kits. I still have Stampin’ Dimensionals, flowers, stickers, tons of Washi Tape, wooden accents and sequins left. Also, don’t forget I still have a fabulous stamp set and 2 ink pads. LOVE IT! To see all of the goodies in this kit, you can check out my Unboxing and Reveal Video here!!!! (Be sure to subscribe to my YouTube Channel because I’m almost at 1,000 and I will be doing a fabulous give-away when that happens)
Have you tried any of the kits? Which one is your favorite and why??? Let me know in the comments below!
I love Punch Art and the many things you can create like my little lion, Kirby, Cozy Coupe, and Princess Peach!!! Today it is Legos!!!! Believe it or not, I did not make this card specifically for my husband (like all of the video game ones above). He does love Legos and could play with them for hours so it might end up going to him!!!
I started with a Whisper White card base and then took a piece of Basic Black (4″ x 5-1/4″) and ran it through the Big Shot with the Decorative Dots Embossing Folder! This gave the background the look of the lego board with all of the dots in it! For all of the lego pieces I used the 1″ Square Punch and the smaller circle from the Owl Builder Punch! I added the squares to the card with Stampin’ Dimensionals to give it some more texture. For all of the little dots on top, I used Mini Glue Dots! You can place them on the card in any pattern you wish! The colors I used were Pacific Point, Real Red, Daffodil Delight, and Cucumber Crush! To finish off the little lego pieces, I took the White Chalk Marker and added a little swish to make it look like it had shine! It is as simple as that!!!
Happy Tuesday, stampers!!! I hope your week is going well! Today is Tuesday so that means I have a fabulous technique to share with you. I’m loving this one because of the amazing colors!!! Of course you could pick any 2 colors to do this technique! I picked Melon Mambo and Rich Razzleberry!!!! Let’s Rock and Roll!!!!
So I have always known this technique as the Rock and Roll Technique where you in the stamp up in a lighter color and then rock and roll the stamp on a darker color in pad to get those edges inked up. Welcome to Laura’s Stamp Pad and the love of Sponge Daubers….this is now called Ink & Pounce! I can make up any name for it, right? Let’s get started!
SUPPLIES NEEDED: Background stamp or any large solid stamp, 2 ink pads, Sponge Daubers
I used the background image from the You’ve Got This Stamp Set and inked it up in Melon Mambo. Then I sat the stamp down and took my Sponge Dauber and Rich Razzleberry Ink and pounced all around the edges!!! I prefer this method because then any excess Melon Mambo ink is going into my sponge dauber and not my ink pad. Also since this image isn’t perfectly round or the exact shape, I don’t have to worry that a spot didn’t get any Rich Razzleberry. Once you have both colors on your stamp, flip it over and stamp it down onto some Whisper White cardstock! It’s that simple! You could always add in more colors, create an ombre look going light to dark, or camouflage with a few colors. You can have fun with it and create lots of different looks! I stamped the greeting from Lovely Amazing You in the center with Stazon Black Ink. For the ribbon, I used the New Melon Mambo Satin Stitched Ribbon and tied it around a piece of Rich Razzleberry cardstock (1″ x 4″). I added that to the white carsdtock and then placed it on the Melon Mambo card base! Simple and yet super fabulous! Who else is loving these colors???? What colors would you pick?? Leave me a comment down below!
To see this in action, check out my Video Tutorial below! Don’t forget to give it a thumbs up if you liked it!!!
I love weddings and being in love and gathering with friends and family. That is exactly why I had an amazing weekend celebrating the love of my two friends at their Bridal Shower!!!! I mentioned it on Friday and many of you requested photos so I will share (even though it was done with the retired Something Borrowed Designer Series Paper)! I loved the neutral color of the paper so I thought this was my opportunity to add in Pool Party for that look I’ve been dreaming to create!!!
Here are the invitations for the Bridal Shower! I printed the inside on a Whisper White card base. I layered a piece of the Something Borrowed Designer Series Paper (3-3/4″ x 5″) onto Pool Party cardstock (4″ x 5-1/4″). I added a 4-3/4″ piece of Whisper White Cotton Ribbon across the paper, adhering the ends to the back. Then I layered this onto the card base. I created the little bow with Pool Party Cotton Ribbon and the Fork Bow Technique! Click here to see the video tutorial! I added the bow to the card with a Mini Glue Dot! The greeting was punched out with the Large Oval Punch and layered onto a punched Scallop Oval Punch! I added that to the card with Stampin’ Dimensionals! I stamped a little flower from the Sprinkles of Life Stamp Set on the envelope to make it just as adorable!
Here is a close up of the invite!!! Now on to decorations!
To keep the theme going with the Something Borrowed Designer Series Paper (DSP) and Pool Party colors, I stamped some greetings from the Endless Birthday Wishes Stamp Set onto Pool Party cardstock. I punched these out and layered them onto a scallop circle of the DSP. I put two of them back to back with a toothpick between and some Stampin’ Dimensionals to place in the cupcakes! I also punched lots of different sizes of circle punches in Whisper White, Soft Sky and Pool Party cardstock to lay all over the dessert table! Also, I created little food tags with a piece of 4″ x 4″ Pool Party cardstock folded in half and a little 1/2″ x 2″ piece of the DSP on the left side! It was really cute!!! Of course I had to add in a photo of the beautiful Bride and I! 🙂
My gift was a Project Life 12″ x 12″ Album which had pictures from our dress shopping adventure. I will be creating pages for the Shower and all of the other events leading up to and including the wedding. I’m use the Love Story Card Collection which is perfect for her album because she is using Black, White and a pop of Red! This collection is black, white and gray so I only need to add in the red!!! I added in the Journal Pens and these coordinating Thank You Notes as well!
It was a wonderful afternoon!!! I can’t wait to celebrate even more in October!!!
This is a new color combination I reached for and I am loving it!!! I know I’m usually a Brights Girl but every once in awhile I go light!! This card uses Mint Macaron and Blushing Bride! The soft colors make this card perfect for weddings, baby, sympathy, thinking of you, birthday, and everything in between! I love it!!!
I started with a Mint Macaron card base and just started adding layers. The Blushing Bride layer is 4″ x 5-1/4″ and the Whisper White layer is 3-3/4″ x 5″. I used the You’ve Got This Stamp Set for the images and Endless Birthday Wishes for the greeting! I adhered the white stamped piece to the Blushing Bride and then I wrapped the Mint Macaron Lace Trim around and tied a double knot. I am really loving this lace trim and I’m not really a lace person. This stuff is super easy to use, adorable and yet elegant, stretchy and thin so it lays flat. It is awesome!!! I layered the decorative piece on the card with Stampin’ Dimensionals!
What do you think of the color combination? What occasion would you use this card for? Let me know in the comments below!
Happy Friday everyone!!! This was a great week of getting things done! A little more sun and a lot less rain would have been nice but I guess you can’t have it all! 🙂 I’m super excited for the weekend because we will be celebrating the upcoming wedding of my best friend!!! Her Bridal Shower is this weekend and I can’t wait to see it all unfold. I did her Invitations, Decorations, and Thank You Notes with the, now retired, Something Borrowed Designer Series Paper from the Occasions Mini Catalog. Once I saw that paper, I knew it would be perfect. Do you want to see it all even though it is retired? Leave me a comment down below and maybe I’ll share!
But first, it isn’t a Friday without the Weekly Deals!!!
I love that Stampin’ Up has added so many goodies to the weekly sale list!!! There is something for everyone in there. My favorite this week has to be the Whisper White Stitched Satin Ribbon!!! This is just a gorgeous ribbon as it is but you can always your your spritzers to make it any color you wish!!! I love that!!! My second favorite is the Floral Framelits!!! You can see some samples using them here and here!
Also, do you love punches as much as me??? I did a Video Tutorial this week with some tips on how to use your Stampin’ Up Punches!!!! You can check that out here!!!
I hope you have a wonderful weekend!!!! See you back here on Monday!
I think my favorite part of this card is the color combination – Pool Party, Black and White!!! LOVE IT!!!!!
I started with a Pool Party card base and stamped the greeting from the Happy Birthday Everyone Hostess Stamp Set! I love the font of the Happy Birthday!!! I recommend stamping first……I did it last and made a boo boo but apparently I’m the only one who can see it!!! Leave me a comment down below if you know where it is! 🙂 For the shirt, I used a 3″ Whisper White square and put a little mark in the center along the top. Then I took my 1″ Square Punch and slide the cardstock in diagonal with that center marking in the middle. This is how I got that triangle cut out! I layered the white on a black square of cardstock measuring 3-1/4″. For the Bow Tie, I used the Bow Builder Punch and some of the Neutrals Designer Series Paper Stack! I used Mini Glue Dots to assemble the bow and adhere to the card! To finish it off, I added a few Pool Party Candy Dots!!! Pearls would have been fabulous as well!!!
What do you think? Loving the color combo like me? Would you use Pearls, Candy Dots, or Rhinestones? Let me know in the comments below!!!
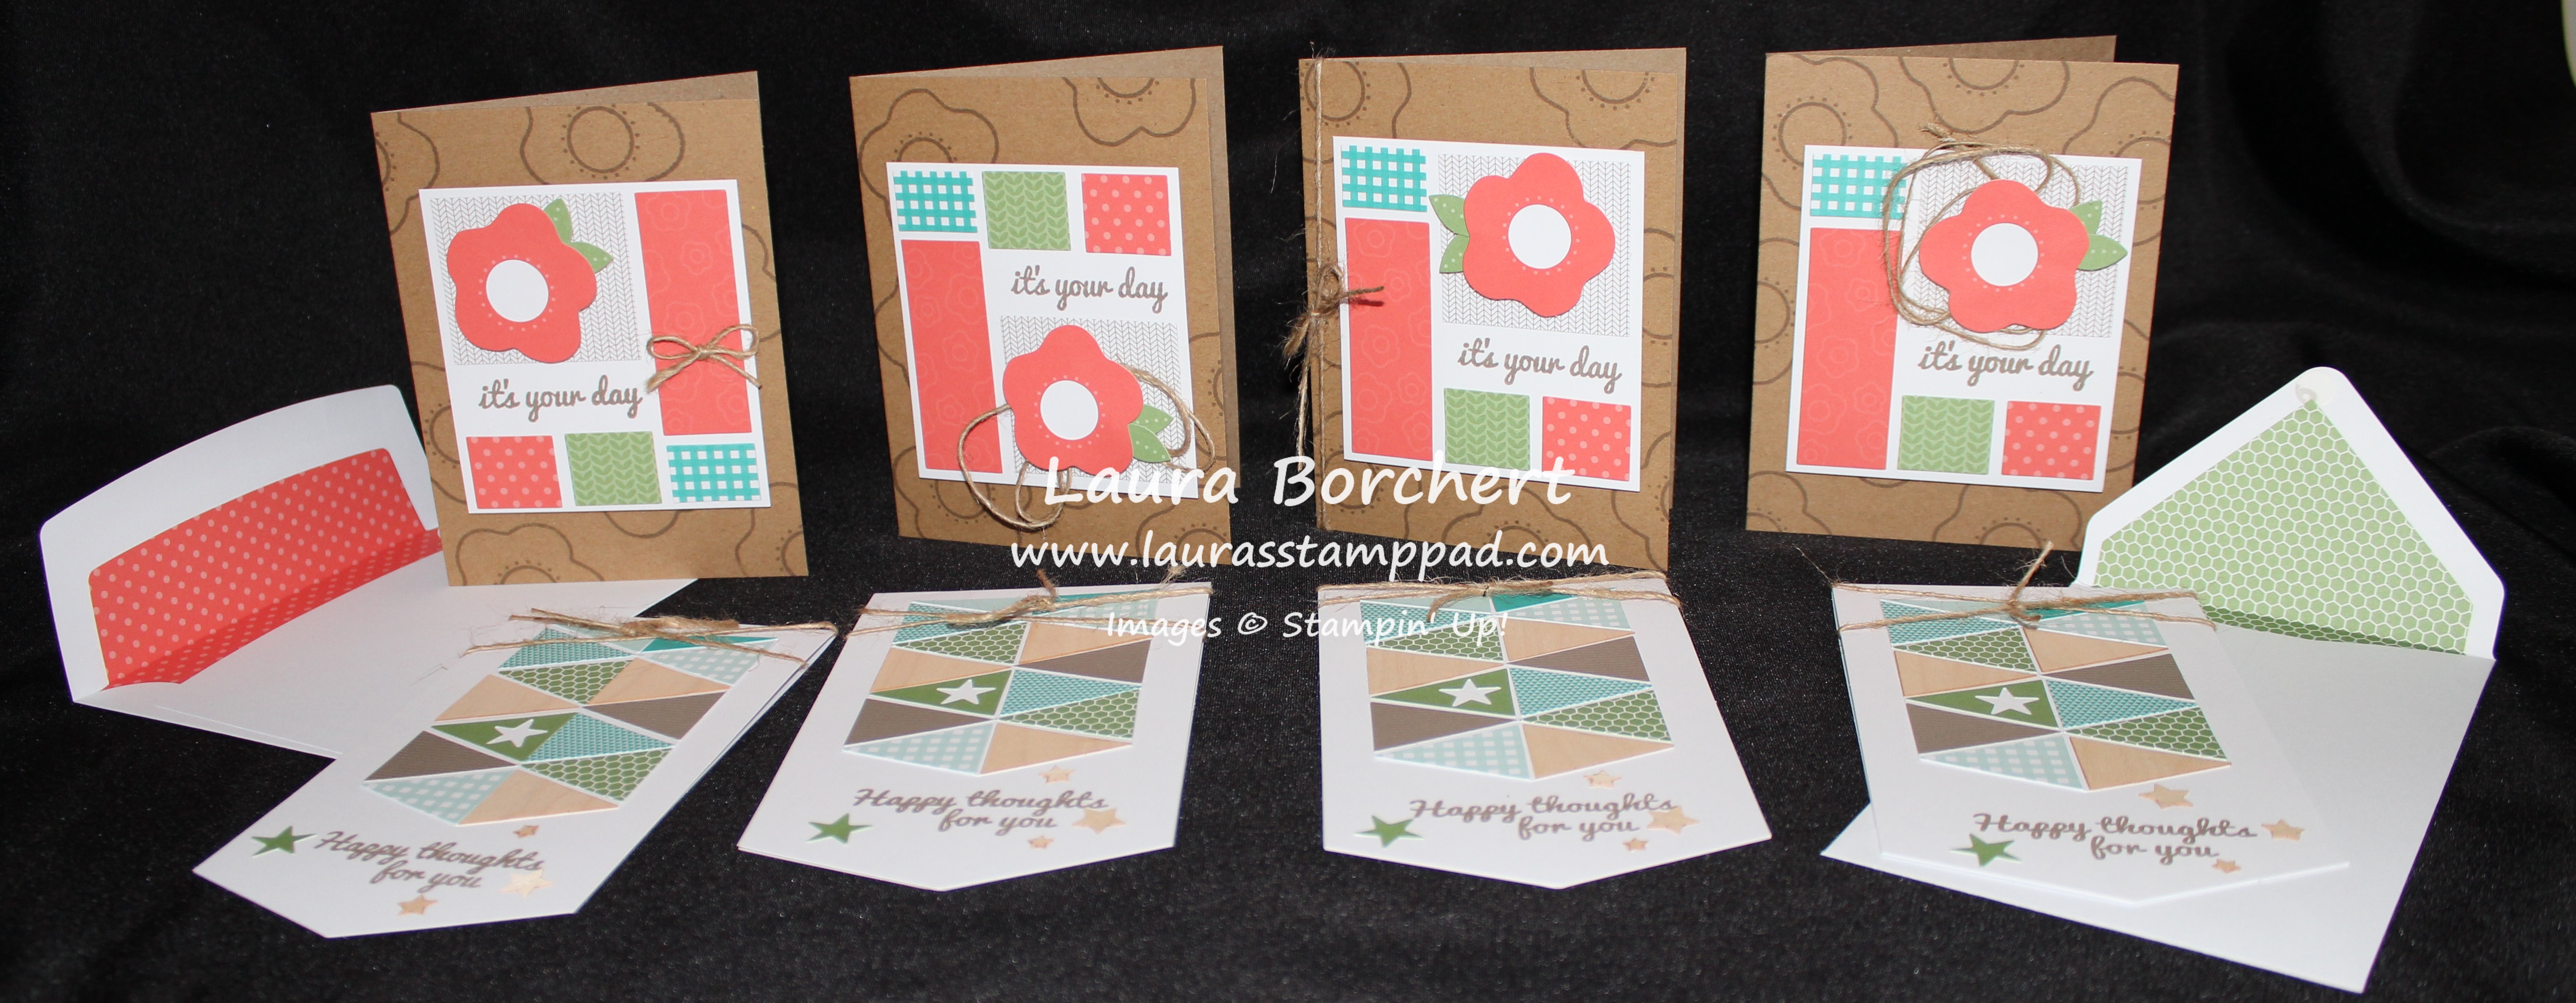
Look at all of these adorable cards from the June 2015 Paper Pumpkin Kit!!! I love how it is a perfect mix of masculine and girlie cards!!!! Also, I am in love with the adorable envelope liners. There were a total of 8 cards with envelopes, a great stamp set, and Tip Top Taupe was the ink pad. I love that Stampin’ Up did a NEW In-Color!!!! The font on the stamp set is perfect and loopy……just the way I life it!!!
Here is an upclose look at one of the coral cards. Each of those rectangles were a sticker and you could arrange them any way you wanted. Stamp your greeting, add the flower, and the twine and you are all set. I did the twine differently on each card – bow, peaking out from the flower and around the card!!! I also stamped the flower image all over on the card base! Love it!!! There were large faceted buttons for the center of the card but I am holding off on putting those on in case I need to mail the card. I will either attach it for a hand delivered card or I will use them for another project!!!
Here are all of the coral cards!!!
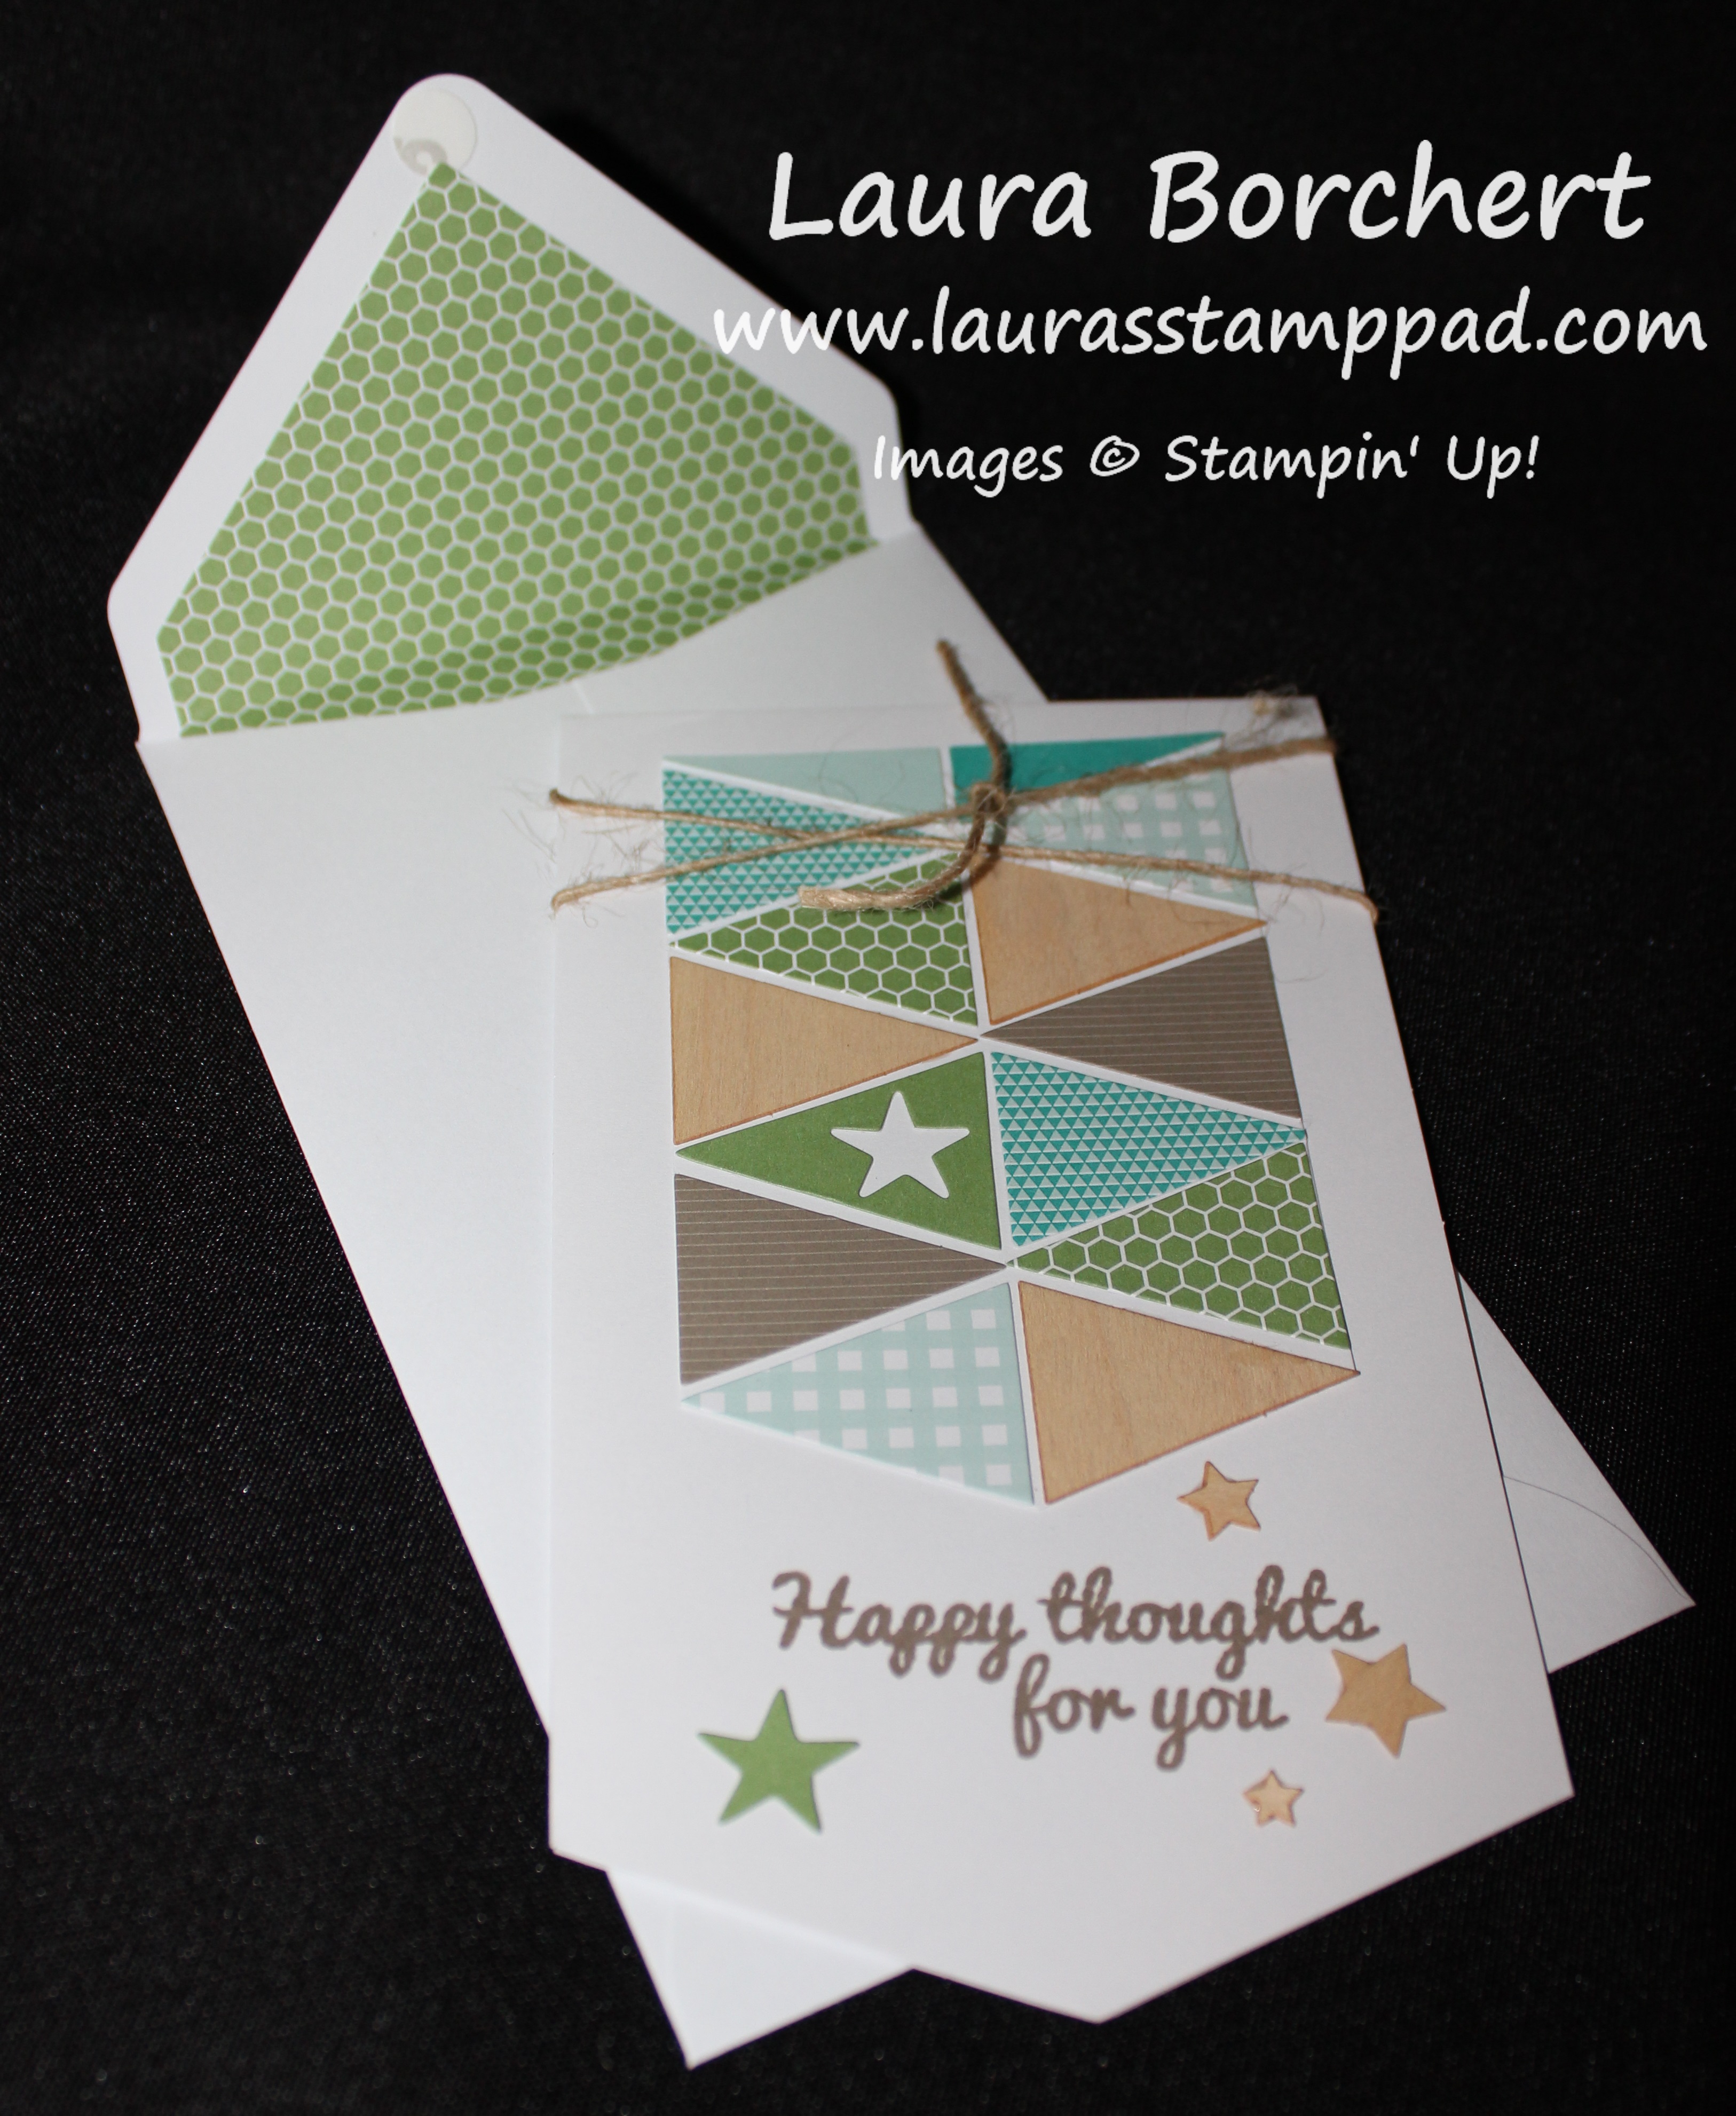
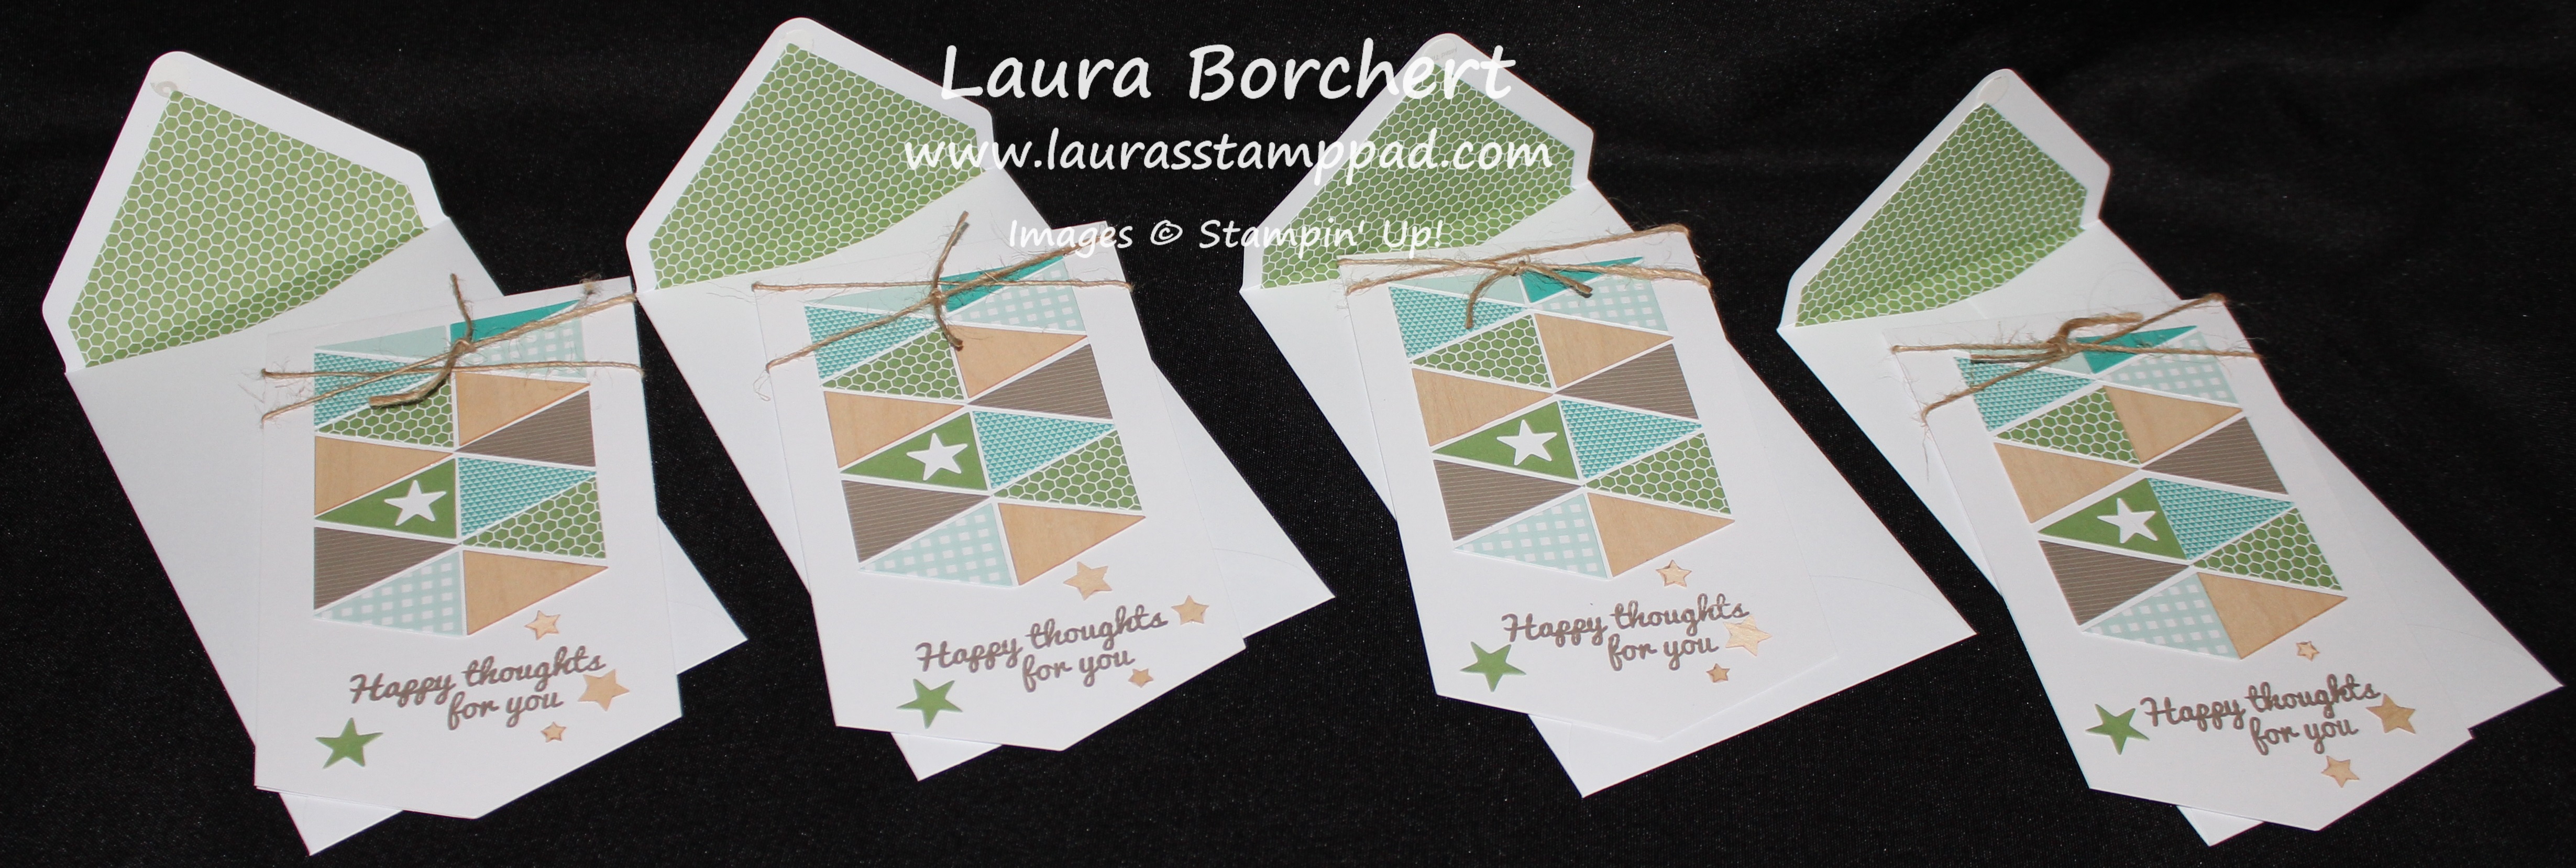
Here is an upclose view of the man cards! The banner style of the card is super fun and different! It also has a longer envelope! Each of the triangles were die-cut stickers and then the tan ones are wooden elements. I added the green star from the center of the one triangle to the bottom for some flare as well as the wooden element stars! Those are really thin so they will mail just fine!!! I wrapped my twine around twice and just did a knot rather than a bow so they could stay masculine! 🙂
These I did all the same!!! I loved the look and didn’t want to change it!!! That’s the thing about Paper Pumpkin; you can follow the directions and just have fun without thinking up a new idea or you can let your mind go wild and create anything you want. This day my mind was mush and I just wanted to play without thinking!!!
Be sure that you don’t miss out on the July Paper Pumpkin Kit!!! You will want to be signed up by the 10th! Click here to sign up!! Also, don’t forget that you can purchase 1,3,6, and 12 month subscriptions!! They make perfect gifts for you or a friend; or both so you can do the kits together!!! You can even earn Laura’s Loyal Stampers Points when you purchase online AND you can earn Hostess Benefits when you purchase the 12 month subscription!
If you would like to see my excitement opening the June Paper Pumpkin, you can check it out here! Be sure to subscribe to My Channel so you don’t miss out on the July Reveal!