Happy Friday and Happy Birthday Eve to ME!!!!! Of course, I have been celebrating all month long. I think everyone should celebrate their Birthday Month…..trust me it’s more fun that way!!! The week of my Birthday, I like to have a special stamp class. We did all flower cards because those are my favorites, we enjoyed cupcakes and everyone got Stampin’ Dimensionals!!! I couldn’t figure out the timer on my camera so the photos were a bit crazy. Also, it is rather hard to take a selfie when you have short arms and you camera is really big! 🙂 I love the photos anyway!!! The bottom left photo is of my stamper girl, Vel who also is celebrating her birthday tomorrow!!!! BIRTHDAY BUDDIES!!!! My heart is full!!!
Of course, it isn’t a Friday without the Weekly Deals!!! These items are right up my alley as well. Gold Glimmer Paper for a little bling or Silver Glitter Powder for those who live on the edge. I don’t do powder anymore after spilling an entire container all over myself. Glimmer Paper and Dazzling Details for this girl now!!! The Pansy Punch (FLOWER) is super fabulous as well!!
Tomorrow I will have a Special Saturday Post for my Birthday as well as a Video on my YouTube Channel! Stay tuned!!! I’m off to do some more celebrating!!!
I told you I have had lots of fun with the Watercolor Wings Stamp Set and here is another amazing creation!!! Click here to see more! I love how the Fluttering Embossing Folder gives a great background texture to the card! I embossed a piece of Daffodil Delight measuring 4″ x 5-1/4″ and tied a piece of Pumpkin Pie Cotton Ribbon around the lower half. I adhered this to a Whisper White card base! For the butterflies, I used a scrap piece of Whisper White and used the Watercolor Wings Stamp Set. I used Pumpkin Pie for the first stamp, Tangerine Tango for the second, and Real Red for the third one. Then I used the coordinating Framelits to cut these out. You can Bundle & Save 15% when you purchase the Watercolor Wings Stamp Set and Bold Butterfly Framelits! You will also want to get the Butterflies Framelits! Together both sets of Framelits will cut out both the big and little butterflies as well as do the overlay which I will be showing some fabulous samples with that next week! 🙂 Stay tuned!!!
Here are some butterfly color combinations that I have created and click here to see a Video Tutorial on the Watercolor Wings Stamp Set!!!
This card scream little boy!!! It would be a perfect kid’s birthday card!!! I have been having fun with the No Bones About It Stamp Set because there are so many combinations!!! Here is another fun one!!
I started this one with a Whisper White Card base and added a piece of Basic Black measuring 4″ x 5-1/4″. Then I took little pieces of Whisper White measuring 1-1/4″ x 1-3/4″ and stamped a dinosaur and his coordinating bones onto it. I used Lost Lagoon, Hello Honey, and Cucumber Crush. I layered this piece onto the coordinating cardstock (1-1/2″ x 2″ ) and added the little star! I punched the star out with the Itty Bitty Accents Punch Pack! I love how the star adds a little pop and it fills in that white at the top! Then I added 2 Stampin’ Dimensionals to the back down the center! Set these aside and we are going to work on the banners. The banners are 3/4″ x 3-3/4″. Add the little banner tips to one end and stamp the feet from the dinosaur in the coordinating color! At my stamp class, my stampers made sure to put the feet in the same direction as the dinosaur….that never really occurred to me! 🙂 The things we all catch!!! Now for spacing, I added the dinosaur rectangles to the banner strips by putting them all close together to make sure the spacing was correct along the banner strips. Now for the spacing on the card, place them all down how you would like them and then pick up each one individually for adhesive! I found this to be the best way. When I tried adhering the banner strips first, I ended up with horrible spacing. I hope this helps with your card!!!
I know that the multiple stamping and cleaning to switch colors might make this card a little bit more time consuming but it is a fun card. It uses up lots of scraps of various colors of cardstock AND making multiples at one time would work really well! What colors would you use for the dinosaurs?? Let me know in the comments below!
Happy Tuesday!!! That means I have a fabulous technique to share with you today!!! This one is super exciting because it is all about FLOWERS!!! I just love stamping flowers and creating beautiful cards with them!!! This is no exception!!!!
How amazing is this card with the depth and texture and colors of the flowers??? I love it!!! So let’s get started on how it was created!
I started with a Whisper White card base measuring 4-1/4″ x 11″ and embossed the card front with the Elegant Dots Embossing Folder. Then I took scrap Whisper White pieces and stamped the flowers. The large center flower was done in Blackberry Bliss and the medium flower was stamped in Tempting Turquoise with the other flower on top stamped in Island Indigo. For the smaller flower, I stamped it in Crushed Curry and the smallest one (layered on top of the yellow flower) was stamped in Tangerine Tango. For the leaves, I stamped the solid image in Cucumber Crush and stamped off, then I took the center piece and stamped it also in Cucumber Crush (no stamping off). I then used the coordinating Flower Fair Framelits to cut out each of the flowers and leaves!!! No fussy cutting necessary here. I have a couple tips for finding the correct way to line up the flowers without spinning them around and around to see how it lines up. Check out the video below for those tips!! 🙂 I adhered the flowers with Stampin’ Dimensionals to a piece of Tip Top Taupe. I also stamped the greeting and little mini flower from the Flower Patch Stamp Set in Tip Top Taupe. I love it!!! You could use so many color combinations for a card like this and each one would be stunning I’m sure!! I finished off the flowers with a few Pearls!!! Love it!!!
Here is the Video Tutorial showing the tips and tricks on stamping and using the Framelits!!! I will be posting the other samples from the video soon! Be sure to subscribe to my blog in the upper right corner so you don’t miss out!!
I love this card for some many reasons – the shades of Purple, that adorable Fork Bow, the little background images and the Dazzling Details!!! I love it ALL!!!!
I started with a card base of Whisper White! Then I took a piece of Whisper White measuring 3-7/8″ x 5-1/8″ and stamped different images from the Perpetual Birthday Calendar Stamp Set. I did the stars in Rich Razzleberry, the dots in Wisteria Wonder, and the starburst image in Elegant Eggplant! I just stamped them all randomly around making sure to fall off the paper so it looks completely covered! I adhered this stamped piece onto a piece of Wisteria Wonder measuring 4″ x 5-1/4″. For the ribbon, I took a piece of Rich Razzleberry Cotton Ribbon measuring 4-1/4″ and adhered the ends to the back of the Wisteria Wonder. Then I took another piece of the ribbon and created the Fork Bow. Click here for a video tutorial on how to create one! I adhered the mini bow with a Mini Glue Dot. Now you can adhere this to your card base! For the greeting, I stamped HI from the Layered Letters Alphabet Stamp Set in Elegant Eggplant onto a piece of Whisper White scrap paper. I punched it out with the Decorative Label Punch. I then punched out a second one in Elegant Eggplant and cut it in half to layer it on. You can see a tutorial on that here! Of course I adhered this to the card front with Stampin’ Dimensionals. To finish the card off, I added a little bit of Dazzling Details to the center of the starburst images!! Everything is better with a little bling! What color combination would you use for this card? Let me know in the comments below!!
Happy Friday everyone!!! This has been a busy week and all this talk about back to school makes me sad….that means summer is almost over. I will embrace all that is left of Summer and not think about what’s to come….winter. I am super excited that my cousin is attending college here at SIUE so hopefully we can spend more time together! 🙂 You know how I love family time!!!
Okay so here are a few things before you head into the weekend!!! First off….the Weekly Deals!!!
Black and White Baker’s Twine screams Halloween!!! Stock up now to wrap those little treat bags closed here in a few months…ha a month! At that price it is 9 cents a yard and $0.0025 an inch!!!! You can’t beat that price!!!! I have totally fallen in love with Gold lately and you check out this card using that Gold Satin Ribbon!!! Love it!!! Check out this card and this card for great samples using the Bow Builder Punch!
I have been playing A LOT!!!! My Paper Pumpkin Kit came in the mail on Monday and I couldn’t wait any longer and assembled it on Tuesday! I big puffy heart LOVE that kit and was thinking how amazing that kit would be for Baby Girl Shower Invitations/Party. You can check out the reveal here and I will be posting the finished cards soon!!! Don’t forget you can try out September and October Paper Pumpkin at Half Price with the Promo Code: HALFOFF. Click here to sign up!! I have also been playing with my new Holiday Catalog Kits, Stamp Sets and more!!! I’ll be posting samples soon and planning classes! If you would like to gather with your friends to make Holiday Cards, Wreath for the front door and any other project, let me know! My calendar is filling up fast (especially weekends). I can’t wait to stamp with you soon!!!
I hope you all have a fabulous weekend and enjoy this amazing weather (here in the midwest)!!!
Is this card not super elegant and fabulous? What occasion would you use this card for?? Let me know in the comments below! I’m thinking Wedding or Anniversary or Birthday or a Wine Lover? It has that wine look doesn’t it?
For this card, I started with a piece of Very Vanilla measuring 4″ x 5-1/4″. This piece is smaller in the sample above because I made a mistake with the sponge dauber and had to cut off some. 🙂 First, you will color the vine image from the Thoughts & Prayers Stamp Set with Elegant Eggplant and Mossy Meadow Markers! Since this is a larger image, you might want to huff on the image a little before stamping it down to re-moisten the ink. I stamped the image twice before inking it up again so I could have some color variation and so I didn’t have to color it as many time. Once it is all stamped, I ran it through the Big Shot with the Brick Wall Embossing Folder. You will want to make sure your cardstock is in the folder correctly….laying on the rectangle popped up pieces. I did do it the other way and it looked great as well but the sponge dauber hits more surface area so it came out darker.
After embossing the cardstock, I used a So Saffron and Soft Suede Sponge Dauber to add a little color and rustic look to the brick wall. Be sure to go really light so there aren’t streaks or blobs of color. To finish it off, I added some Gold Satin Ribbon to the bottom and attached it with Stampin’ Dimensionals to an Elegant Eggplant card base! Love it!!!
To see this all in action, check out my Video Tutorial below!! Don’t forget to give it a thumbs up if you liked it!!!
Don’t forget to let me know what occasion you would use this card for!!!
I just love Pink, Orange and Yellow together and this card is just so fun!!! I’ll admit I typically don’t do birthday cards specifically for each individual person. I usually go to my stash and pick out a card I think they will like but every once in awhile when I’m playing I like to do a special one. I knew that Gracie’s Birthday was coming up so I thought this would be perfect for her. I use to babysit her back when I was younger and now she is all grown up…..yet I haven’t aged a bit. 🙂
For this card, I started with a Melon Mambo card base and then stamped all over a piece of Whisper White measuring 4″ x 5-1/4″. I used the Perpetual Birthday Calendar Stamp Set which has fabulous background images for all year long! I love it! I stamped in Melon Mambo, Daffodil Delight and Pumpkin Pie. Then I took another piece of Whisper White and stamped the rectangle image from the Layered Letters Stamp Set in each of the colors as well. I stamped the letters of her name from the same stamp set in Basic Black!! I wish I had a good tip for spacing that was more than Good Luck!!! 🙂 I started on the outside and worked my way in. I find that usually works best for me. So I stamped the far left and far right and then moved in till I had the right amount of blocks. I layered the name onto Pumpkin Pie and added it to the card front with Stampin’ Dimensionals! I used Daffodil Delight Cotton Ribbon to tie a knot across the top. Then I tied a knot of Pumpkin Pie and Melon Mambo on either side!!! I really love working with Cotton Ribbon. It is so soft and easy to work with!
Do you like to make personalized cards a lot or just make all occasion cards to pick from when you need them?? Let me know in the comments below!
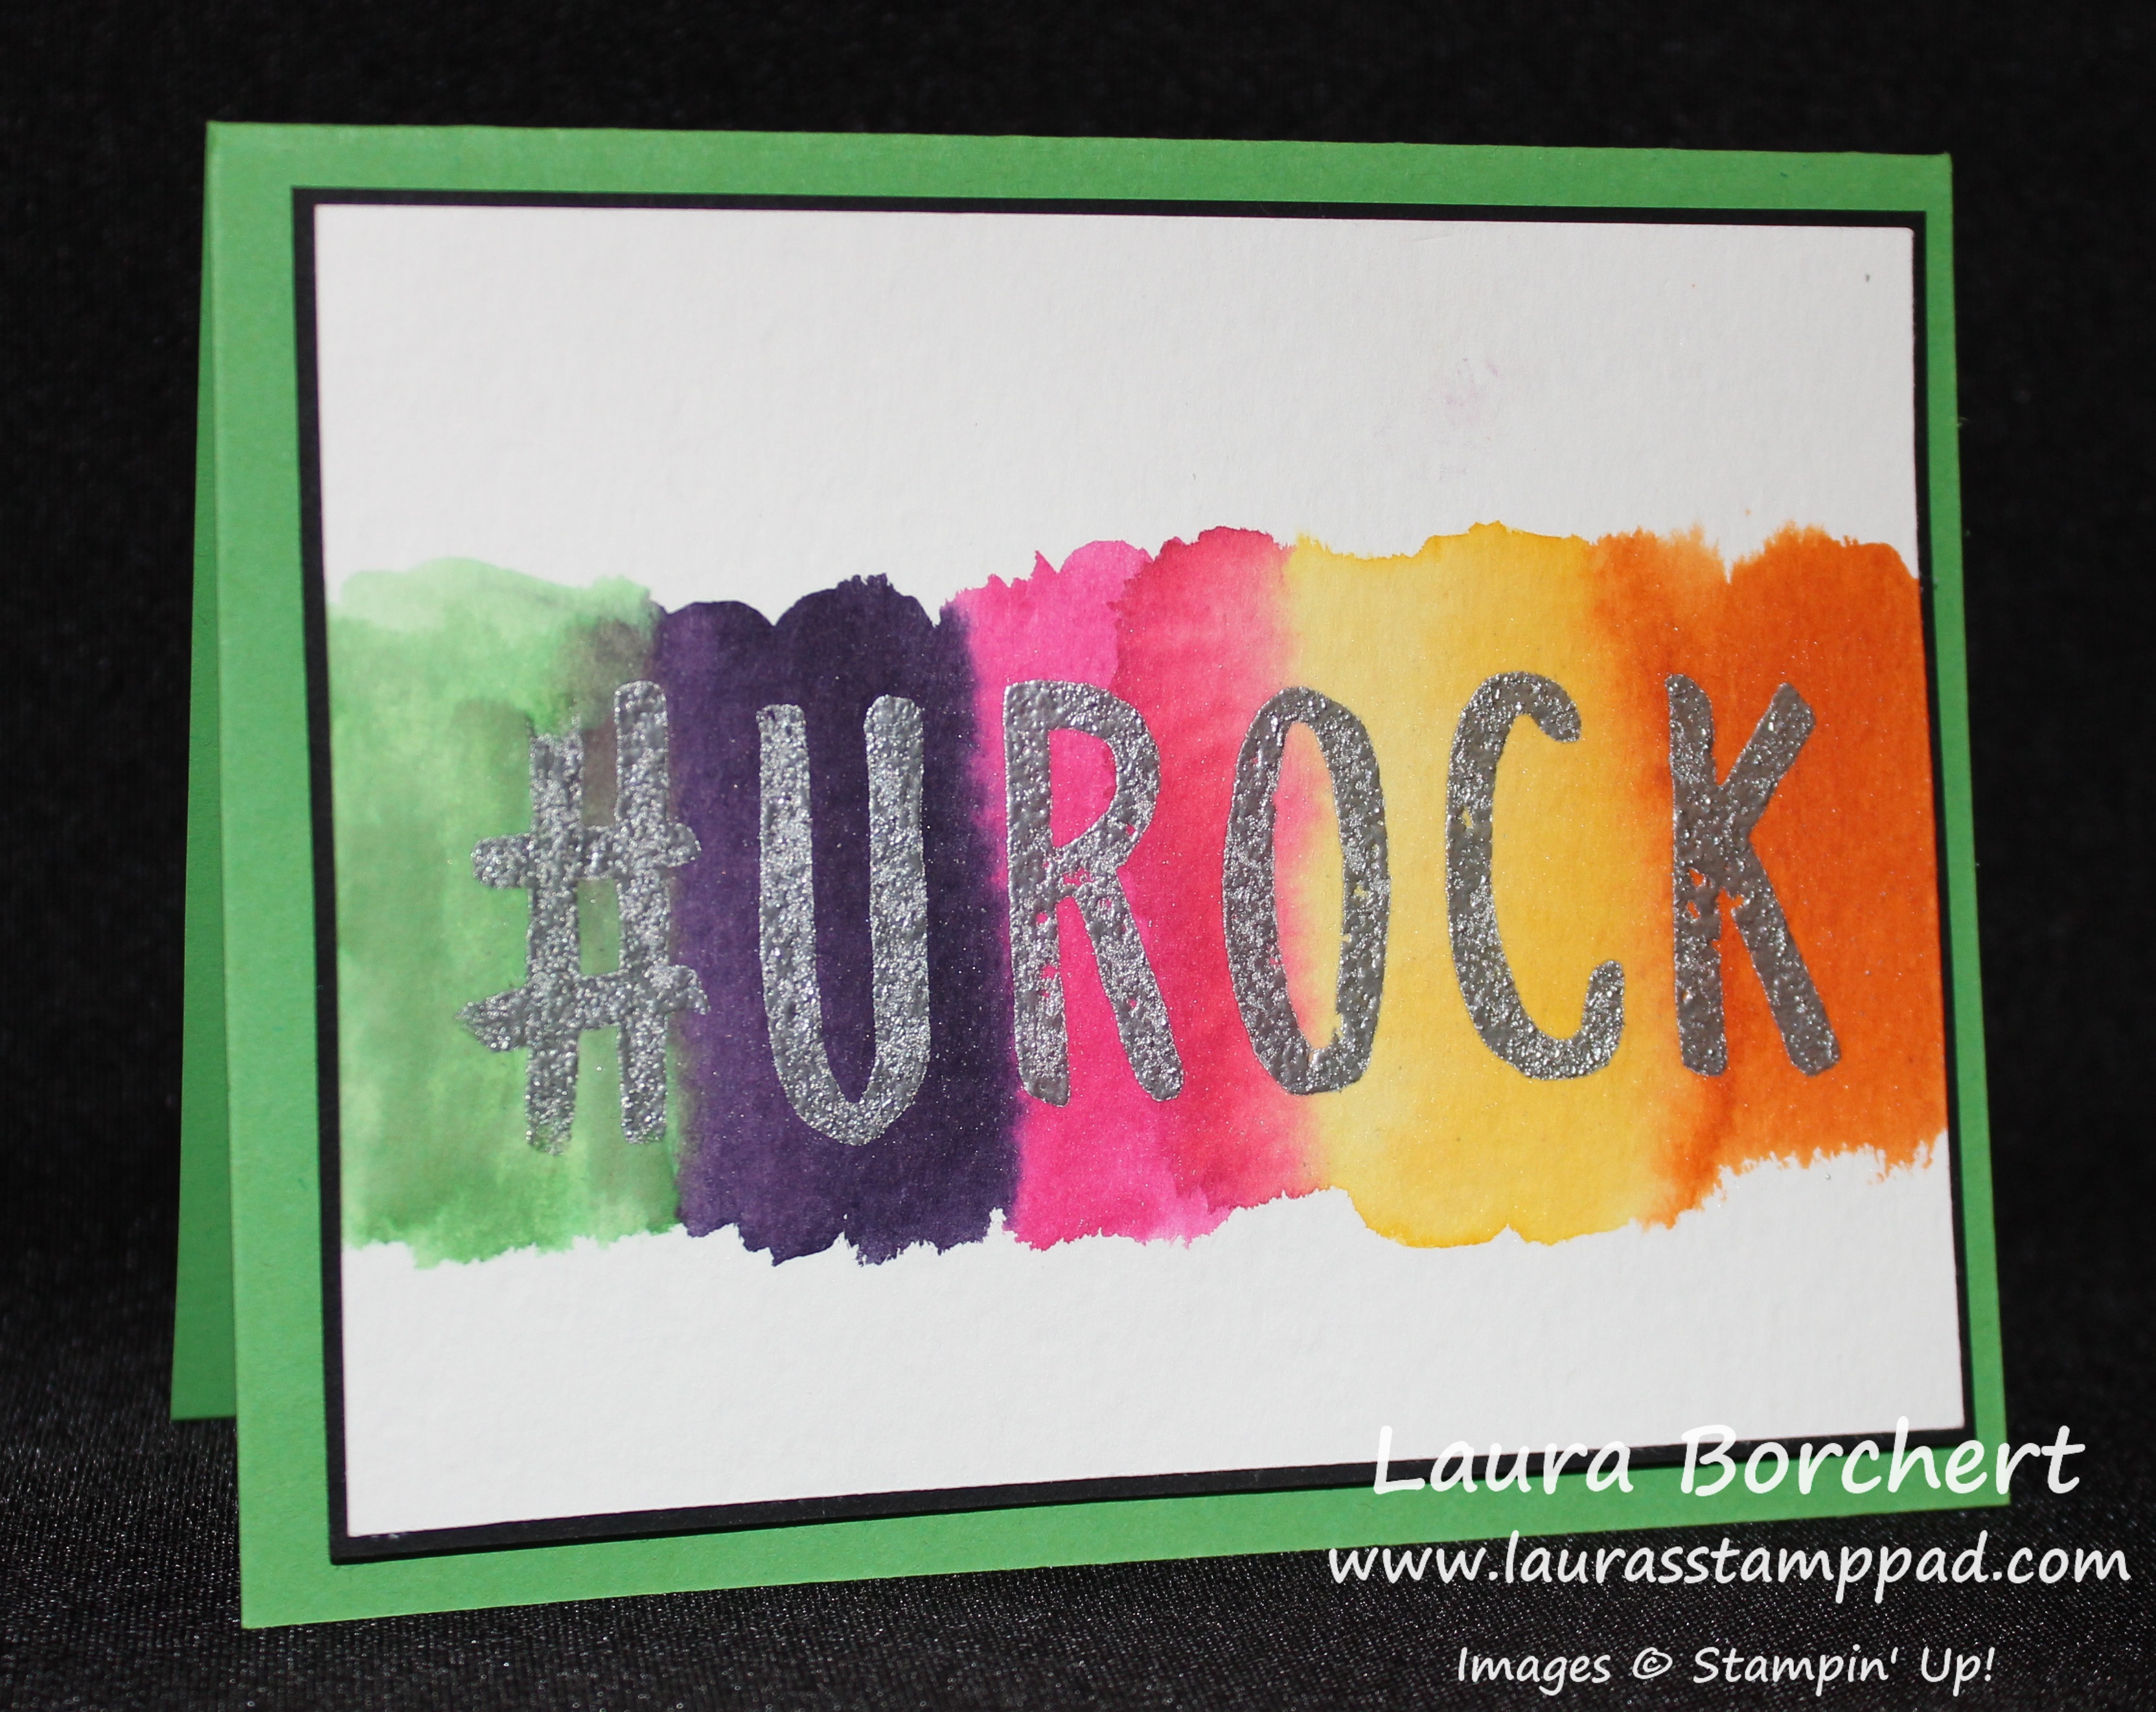
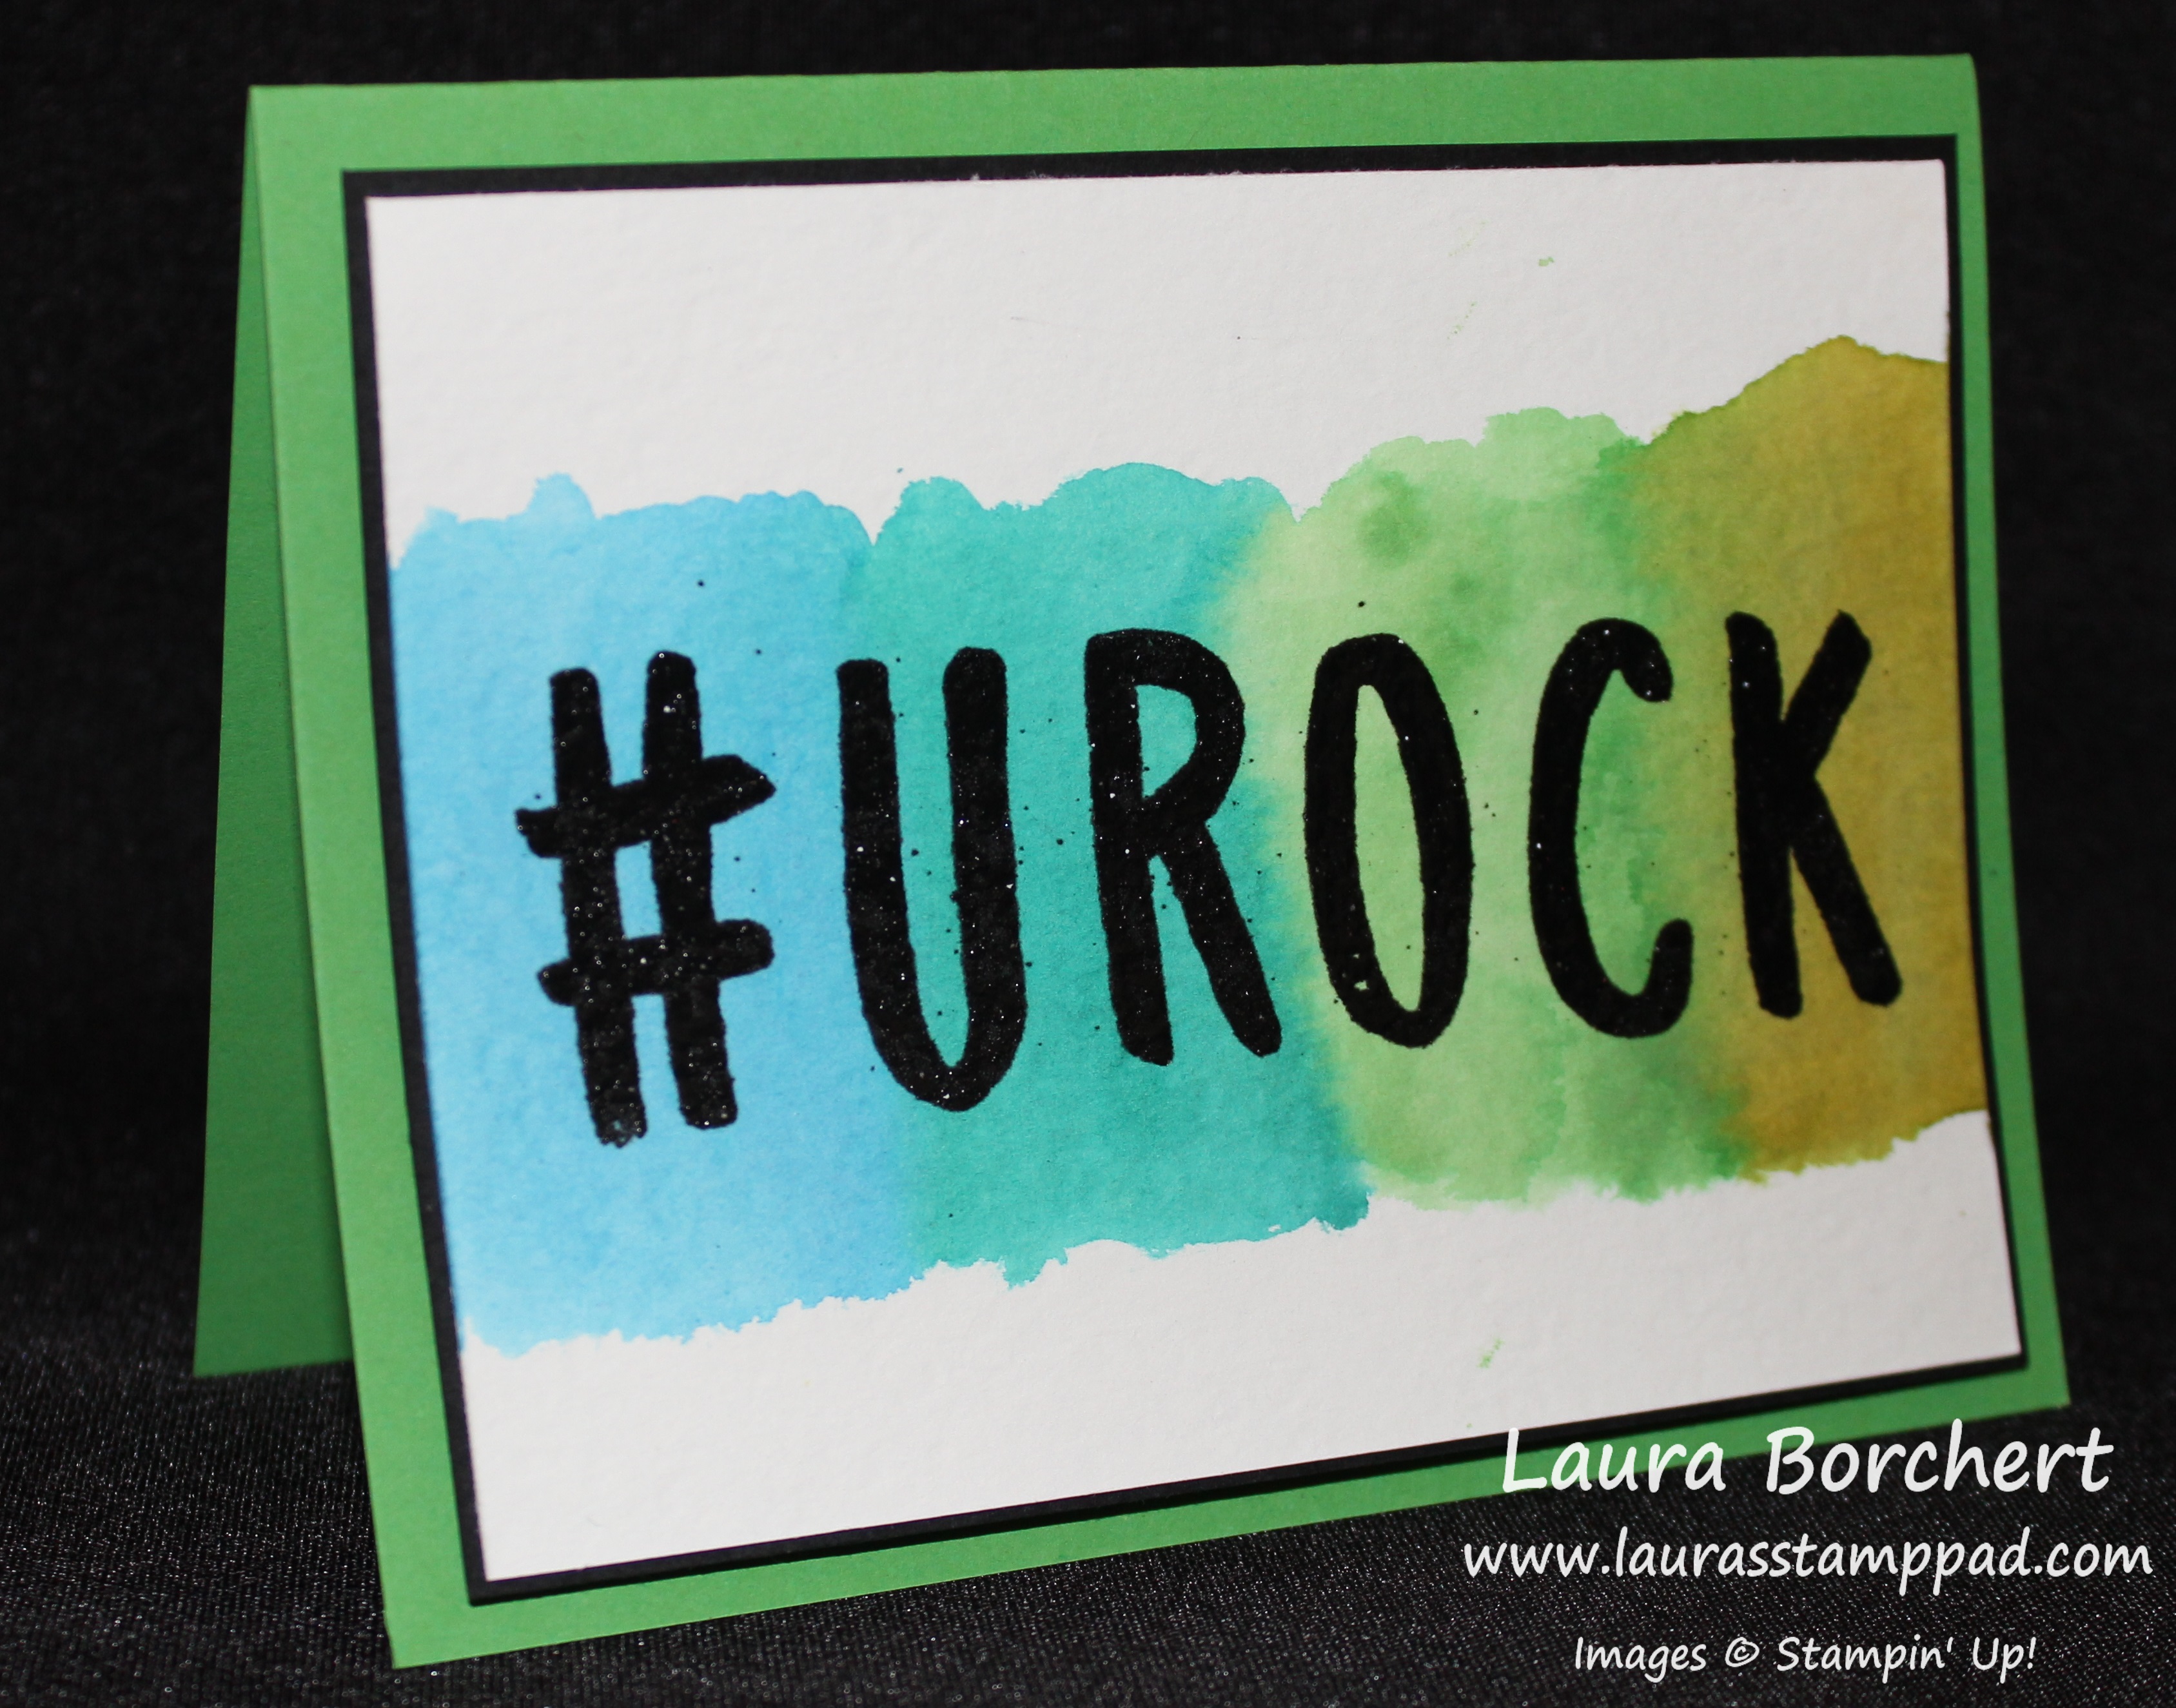
Happy Tuesday!!! You know what that means…..I have a fabulous technique to share with you today!!! Today I am showing you a little watercoloring, a little heat embossing and a lot of FUN!!! A shout out to Mary Ellen who gave me the inspiration and idea for this card!!! Thank you so much! I loved your sample and couldn’t wait to try it out!
See how fun this card is!!!! It is so colorful and bright and makes me smile every time I look at it. So let us dive in and get started!
You will start off with a piece of Watercolor Paper measuring 3-3/4″ x 5″ and lightly wet the entire piece with the Aqua Painter. It should not be dripping wet but lightly glistening. This will allow the color to soak in and the colors to bleed better! Now you can pick your colors and using your Aqua Painter paint on a swish of color. In the sample above, I used Pumpkin Pie, Daffodil Delight, Melon Mambo, Elegant Eggplant, Cucumber Crush and Tempting Turquoise! Once you are done with one color, just run the Aqua Painter clean on a paper towel and move to the next color. Be sure not to squeeze the Aqua Painter because then you will have too much water and your colors will come out super light. Once all of your colors are on, you can go back and add a little more in spots if you wish. Now you need to set it aside to dry completely or you can use your Heat Tool to speed up the process!!!
Once it is dry, you can stamp your letters on with VersaMark Ink. TIP: Be sure that your VersaMark Pad is inked very well because you want to make sure you have plenty on the stamp so it gets into the rough surface of the Watercolor Paper. I used the Layered Letters Alphabet Stamp Set which I am loving right now. The images and font are perfect!!! Once you have your letters stamped, you can pour on the embossing powder of your choice. I used Black Embossing Powder for the sample at the top and Silver for the one above! Now you will heat with your Heat Tool until it is set. TIP: Don’t wave the heat tool around. Point it in one spot until it heats up and starts to melt, then move it along until it is all melted. If you swing it around, it won’t heat evenly or as quickly. Now you are ready to assemble to your card. I layered mine onto Basic Black and then a Cucumber Crush card base! I love how the black really makes it pop!!!!
If you would like to see this in action, check out my Video Tutorial below!! Be sure to give it a thumbs up if you liked it!!!
What would you spell out on your card?? A Name? #???? Let me know in the comments below!!
The July Paper Pumpkin Kit was super fabulous and so IN right now! Is it just me or are succulents and little potted plants like THEE THING right now? I feel like I see them everywhere in stores and my mom just created this little succulent garden that is just precious. So of course when I saw this kit, I thought it had my mom written all over it with the little plants and she drinks tea a lot!!! The little tea bag stamp is adorable…..although I was unsure how to use it since it goes inside the cup. Unless the cup is clear, where do you stamp it??? Let me know how you would use it in the comments below. I did stamp it once alongside the cup on the card above (top row, second from the left).
I love the bright green and orange with that subtle gray!! Super fabulous! Also, the texture is perfect with the notebook fringe and the Stampin’ Dimensionals on the cup and the ribbon and paper clip! Love it! The stamp set includes the cup, the 2 plants shown above, the tea bag, and a few greetings. It is very versatile and could be used again and again for lots of different card styles.
See this is how I used the little tea bag…..how would you use it??? Can’t wait to hear your ideas!!!
Don’t forget that there is still time for you to join Paper Pumpkin and get your September and October Kits at half off (regular $19.95). Click here to sign up and enter the Promo Code: HALFOFF to enjoy this deal!!!
I can’t wait to get the August Kit in the mail any day now!!! I will be doing the unboxing and reveal of that kit on my YouTube Channel!!! Stay Tuned!!!