I have really been loving this Flip Flap style of card and find myself creating it over and over in different designs. I’m not sure what to call it so I’m going with Flip Flap! LOL Here’s hoping you love it and try it out too!

The best part about this card is that you can use both the front and back of a sheet of Designer Paper!!! Eeee That is super fabulous especially when creating with the Florals In Bloom Designer Series Paper! I just love flowers!!!
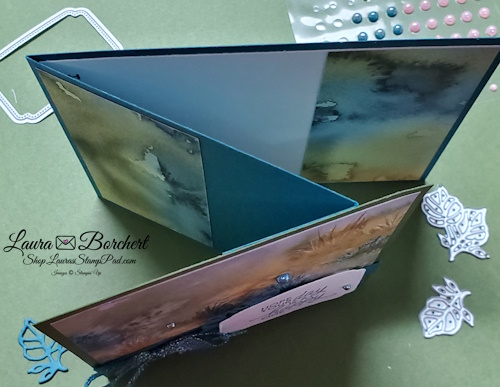
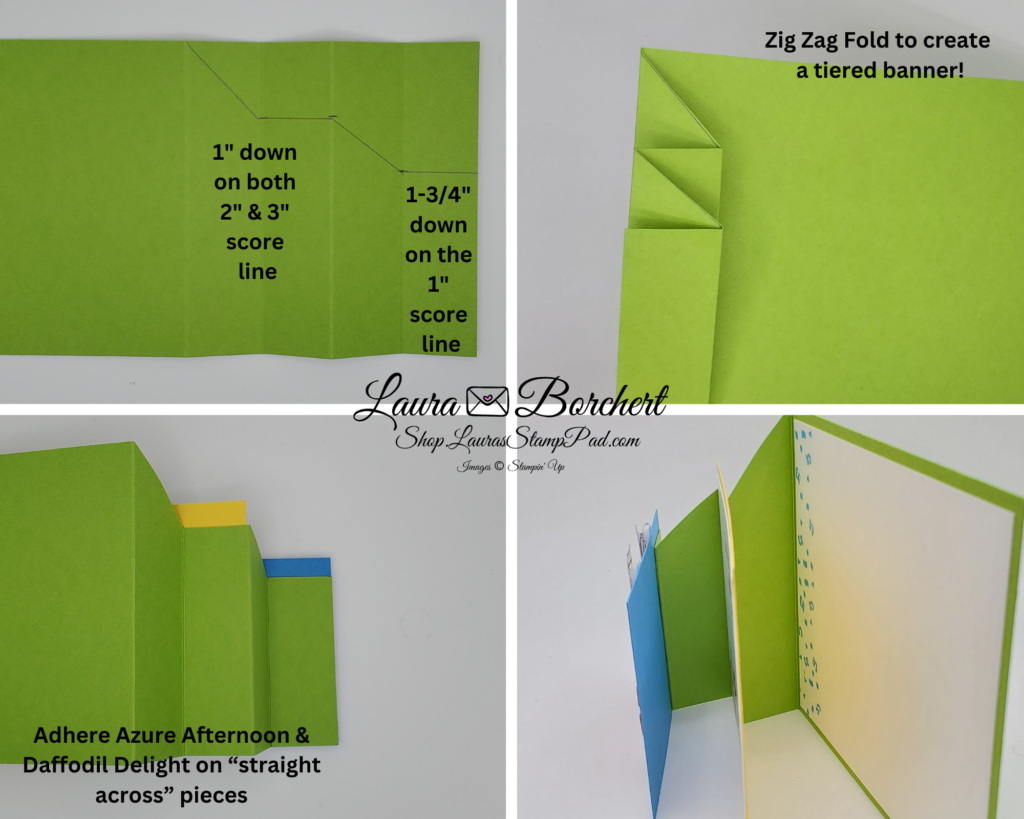
Start with a piece of cardstock (Garden Green) measuring 8-3/4″ x 4-1/4″, scored at 5-1/2″. The flap will be on the right hand side folding in! Layer a piece of Designer Paper on this right side flap measuring 3″ x 4″. I love measurements like this because then there is no waste in a sheet of 12″ x 12″ Designer Paper.

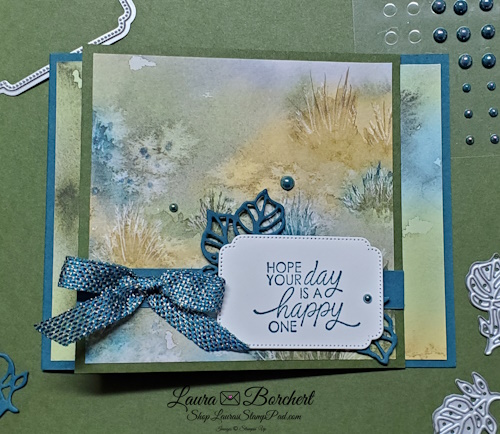
Next, layer a piece of coordinating cardstock (Secret Sea) on the “inside” of the card in the center measuring 4-1/2″ x 3-1/4″. Then adhere a piece of cardstock (Garden Green) measuring 8-1/2″ x 3″ and scored at 4-1/4″ onto the inside layer. This creates a mini card in the center of the full size card! Layer a piece of Florals In Bloom Designer Paper to the front flap measuring 4″ x 2-3/4″.
Since I felt this paper was so beautiful and I didn’t want to cover it, I went with a very simple greeting for the front! Using the Sweet Blooms Stamp Set, I stamped Hello In Secret Sea Ink and then added a little leaf to the side. Since I didn’t want the leaf to over shadow the greeting, I stamped off once for a lighter look. The leaf was stamped in Garden Green. Using the To The Point Punch, I punched out the greeting but trimmed off the extra. Again, I didn’t want a huge greeting to hide the pretty flowers. The greeting was added with Stampin’ Dimensionals and then I embellished with a few Secret Sea In Color Flat Pearls!

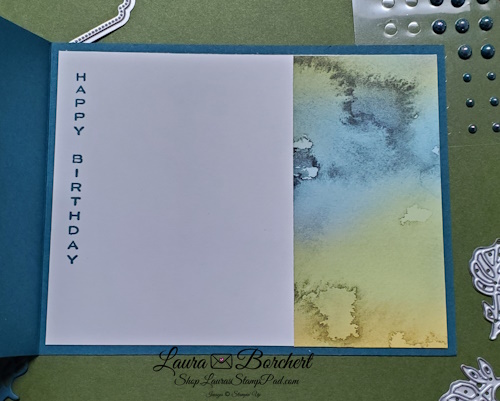
For the inside of the card, I added a piece of Basic White Cardstock measuring 4″ x 2-3/4″. You can always stamp a greeting of your choice on this piece. I added a little leaf from the Sweet Blooms Stamp Set in Garden Green Ink!
I hope you try out this fun Flip Flap Card yourself! Be sure to share it with me if you do! I have been using almost every Designer Paper Pack with this card design and loving them all! Check out the supplies below if you wish to recreate this card exactly! Want an amazing deal on these products?? Check out Stampin’ Up’s Special going on this month!
Happy Stampin’
~Laura
Product List![Florals In Bloom Suite Collection (English) [ 165193 ]](https://assets1.tamsnetwork.com/images/EC042017NF/165193s.jpg "Florals In Bloom Suite Collection (English) [ 165193 ]")
![Sweet Blooms Photopolymer Stamp Set (English) [ 165181 ]](https://assets1.tamsnetwork.com/images/EC042017NF/165181s.jpg "Sweet Blooms Photopolymer Stamp Set (English) [ 165181 ]")
![Floral Impressions 12" X 12" (30.5 X 30.5 Cm) Designer Series Paper [ 165603 ]](https://assets1.tamsnetwork.com/images/EC042017NF/165603s.jpg "Floral Impressions 12\" X 12\" (30.5 X 30.5 Cm) Designer Series Paper [ 165603 ]")
![Garden Green 8-1/2" X 11" Cardstock [ 102584 ]](https://assets1.tamsnetwork.com/images/EC042017NF/102584s.jpg "Garden Green 8-1/2\" X 11\" Cardstock [ 102584 ]")
![Secret Sea 8 1/2" X 11" Cardstock [ 165624 ]](https://assets1.tamsnetwork.com/images/EC042017NF/165624s.jpg "Secret Sea 8 1/2\" X 11\" Cardstock [ 165624 ]")
![Garden Green Classic Stampin' Pad [ 147089 ]](https://assets1.tamsnetwork.com/images/EC042017NF/147089s.jpg "Garden Green Classic Stampin' Pad [ 147089 ]")
![Secret Sea Classic Stampin' Pad [ 165285 ]](https://assets1.tamsnetwork.com/images/EC042017NF/165285s.jpg "Secret Sea Classic Stampin' Pad [ 165285 ]")
![To The Point Label Punch [ 164568 ]](https://assets1.tamsnetwork.com/images/EC042017NF/164568s.jpg "To The Point Label Punch [ 164568 ]")
![2025–2027 In Color™ Flat Pearls [ 165192 ]](https://assets1.tamsnetwork.com/images/EC042017NF/165192s.jpg "2025–2027 In Color™ Flat Pearls [ 165192 ]")

")

 Specialty Designer Series Paper")


")
 Designer Series Paper")


")
 Designer Series Paper")


 Circle Punch")
 Circle Punch")
 Frayed Grosgrain Ribbon")
 Center Stripe Ribbon")

")
 Designer Series Paper")

 Metallic Ribbon")


")

")


 Designer Series Paper")


")
 Designer Series Paper")