I make over 150 cards to send at Christmas time. They all vary because I enjoy making different cards. Some (very few) are very detailed and many are easier cards. When making multiples, I like to go with an quick, easy look! That is where this card comes in!
I think this card would look great with a variety of colors. Let me know in the comments what colors you think would look good in place of the Misty Moonlight.
I started with a Misty Moonlight card base. Next, I took a piece of Crumb Cake and stamped the manger scene from the Peaceful Nativity Stamp Set in Early Espresso Ink. I suggest stamping the “barn” first and as high as possible. Next, fill in with the Joseph and Mary and the animals on the side. I added this piece to a piece of Whisper White with just a bit showing at the top. This seems to make it really POP! On the bottom, I stamped a greeting from the For Unto Us Stamp Set in Misty Moonlight. Then I tied some Misty Moonlight Ribbon around the cardstock before adding it to the card front.
On the inside of the card, I added a few animals and a greeting! Just a little fun to pull it all together.
If you would like a more detailed manger scene, check out this card. I colored the scene with Stampin’ Blends and die cut them out with the coordinating dies. I make only a few of these and LOTS of the simple version up top!
If you would like to make either of these, check out supplies listed below. Also, let me know which style you prefer when making multiples – simple or more detailed?? Enjoy making them and sending them this season! 🙂
Today only Stampin’ Up is having their Online Extravaganza!!! 10% off almost everything in the Annual Catalog…….that includes BUNDLES!!!! Which means it’s like a 20% discount on those since they are already 10% off! Woot Woot! Click here to start shopping! Remember it is today only!
Have you seen the NEW Curvy Celebrations Suite?? There are 2 stamp sets and dies and paper and they are super fun! Check out this fun card I created with snowy slopes!
I love the color combination – Sahara Sand and Shaded Spruce! This would make a great Winter card for any occasion! It is so fun and peaceful!
I started with a Sahara Sand card base and added a piece of the Classic Christmas Designer Series Paper (4″ x 5-1/4″). The awesome thing is that there are lots of prints in the pack that work for this piece so there are lots of fabulous looks! Next, I took a piece of Whisper White and die cut the dotted slope. This creates 2 pieces with slopes. Two for one in die cutting is totally my kind of die cutting!
Before adding the snowy slopes to the card front, place one down where you would like it to be and then slide it down a smidge. Then I stamped the trees in Shaded Spruce just above that slope. I used it as a guide. Once the trees were stamped, I added the slopes. They can overlap and swag any which way! Then I added this piece to the card front with Stampin’ Dimensionals. You know I can’t have a card without them! I finished off the card with a little green rhinestone from the Holiday Rhinestone Pack!
For the inside, I used the greenery and greeting from the same Curvy Christmas Stamp Set! This greenery image is amazing and perfect for card insides and envelopes! I love it!
Check out all of the supplies below so you can recreate this snowy slopes card! Don’t forget these products are while supplies last or till the end of the year! Get them before they are gone!
The moment I saw the Evergreen Embossing Folder, I saw Christmas beauty. Simple, elegant and fabulous! These embossed trees have so much texture that just makes you stare at it forever! I did this card in Real Red with Gold Foil but I think Shaded Spruce, Night of Navy and Merry Merlot would be amazing as well as other foils! Let me know your pick in the comments below!
This card is beyond simple and oh so fabulous! You could crank out multiples in no time at all. I also used a 4″ x 4″ piece of Gold Foil Paper so not an inch goes to waste!
I started with the following supplies: Real Red Card Base (5-1/2″ x 8-1/2″), 2 pieces of Whisper White (4″ x 5-1/4″), Gold Foil Paper (4″ x 4″) and Real Red Satin Ribbon (approx. 12 inches). That’s it!!!!
First, I embossed the Gold Foil Paper with the Evergreen Embossing Folder and then added it to the Whisper White cardstock. Next, I stamped a greeting on the bottom from the Itty Bitty Christmas Stamp Set. I did a few others with the For Unto Us Stamp Set and there are many more options you could go with! Then I wrapped the Real Red Satin Ribbon around the cardstock and tied it. This helps the transition from gold foil to the white look more seamless! Then add it to the card front!
For the inside of the card, I decorated with another greeting and some fun corner images from the Banner Year Stamp Set. I only used the 1 ink pad for this entire card – Real Red! See, I told you this was fabulous and simple! Embossed Trees are just so elegant for Christmas time but also all year long. I think this card would be perfect for a masculine card as well!
REMINDER: Christmas is right around the corner. Let your friends and family know what you want with a Stampin’ Up List! Fill this out and pass it out to anyone who asks! All of my contact information is on there for them to reach out and place an order for you or order online! I have already had fun being an elf this year and helping some with early shopping!
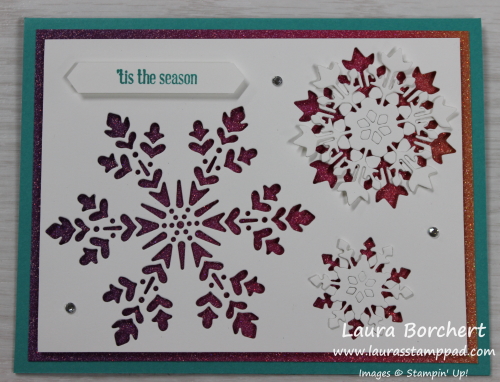
Disclaimer: Still not a fan of winter! LOL I sure have been stamping a lot lately with snowflakes and wintery themes as I’m working on my Christmas Cards. One of them is this gorgeous Rainbow Snowflakes Card!!! What do you think?
I just love the bright colors….surprise, surprise. 🙂 Also, this card is fairly simple to create with few layers and minimal stamping! The die cutting and poking out can make a person go crazy though! LOL
I started with a Bermuda Bay card base and then layered on a piece of that AMAZING Rainbow Glimmer Paper. This stuff is so beautiful and brings happiness to my life for sure! Each sheet is ombre of purple, blue, green, pink, orange, and yellow. Since this piece is only 4″ x 5-1/4″, you can pick which colors you use for your card! You can see 2 different color combinations with the samples here!
Next, I took a piece of Whisper White cardstock (3-3/4″ x 5″) and die cut 3 snowflakes using the So Many Snowflakes Dies. Try to leave a small little spot to put a greeting. I went super small since I used a greeting from the Itty Bitty Christmas Greetings Stamp Set! After die cutting the snowflakes, I delicately popped out the two smaller ones.
Check out the photo above and below these words. In the sample above, all of the pieces popped out from the snowflake center so I added Fine Tip Glue Pen to the edges and glues them off set to the coordinating one. The center is just hanging there. In the sample below, the snowflake centers stayed in and I added a Stampin’ Dimensional to the center to hold them in place and popped the snowflake in the middle. There was no intention on these 2 options, it just happened and I went with it!
I added the Whisper White cardstock to the card front with Stampin’ Dimensionals. This gives that 3D look and makes it pop more! The greeting was stamped in Bermuda Bay from the Itty Bitty Christmas Stamp Set. I did it on a piece of scrap Whisper White as to not mess us my super cute snowflake piece after all of that work. You can always use your favorite punch or just snip the ends diagonal. Then I finished off the card with some Rhinestones for additional bling!
This card would be perfect for any occasion throughout the Winter season so leave off the greeting till you need a card and then add it on!
For the inside of the card, I simply stamped some snowflakes and a greeting from the Snowflake Wishes Stamp Set in Bermuda Bay! Click here for one click shopping for the items used in this Rainbow Snowflakes cards!!!
REMINDER: Christmas is right around the corner. Let your friends and family know what you want with a Stampin’ Up List! Fill this out and pass it out to anyone who asks! All of my contact information is on there for them to reach out and place an order for you or order online! I have already had fun being an elf this year and helping some with early shopping!
So many of my friends are posting pictures of snow and I’m over here freaking out in my flip flops! I am so not a fan of Winter. I don’t snub it completely and still make cute wintery cards! Check out this beautiful layered snowflake card using the Snowflake Splendor Designer Series Paper!!! It’s also on sale this month!!!! Only a few more days!
The different shades of blue and that hint of sparkle just make this card POP! I love it! It’s really a fairly simple card to create too which is a bonus since I make a lot of Christmas Cards!!!
I started with a Whisper White card base. Did you know that Stampin’ Up! has THICK Whisper White and Very Vanilla??? It is perfect for card bases to hold up a bit more and ink doesn’t bleed through! I love it! I stamped the greeting on the bottom in Balmy Blue from the Snowflake Wishes Stamp Set! Next, I stamped one of the bigger snowflakes onto a scrap piece of Thick Whisper White and die cut it out! Normally, for a layering piece I wouldn’t use the Thick Whisper White but since snowflakes can be delicate, I thought this would be perfect and help it hold up better when popping it out of the die and handling it!
Taking a piece of regular Whisper White measuring 4″ x 4″, I embossed it with the Winter Snow Embossing Folder. This is super subtle but yet adds that texture and dimension to the card. Next, I layered a piece of the Snowflake Splendor Designer Series Paper (2″ x 3″) onto the embossed piece and added it to the card.
For the focal piece, I added a small strip of Snowflake Splendor Ribbon across the center with a small dab of adhesive in the middle. Just enough to hold there for now because the snowflake will also be holding it in place! Then I took that die cut stamped snowflake and added it over the top with Stampin’ Dimensionals! For some bling, I die cut another snowflake from the Balmy Blue Glimmer Paper and layered it on the snowflake with the Fine Tip Glue Pen! For some final bling, I placed a few Blue Adhesive Backed Gems on the card front!
Simple and fabulous! This card could be used for Christmas or even Winter birthdays and events. If you would like to recreate this Layered Snowflake card, check out the supply items below and there is even an Add All To Cart Button for simple shopping! The Designer Series Paper Sale ends Saturday so get it now!!!
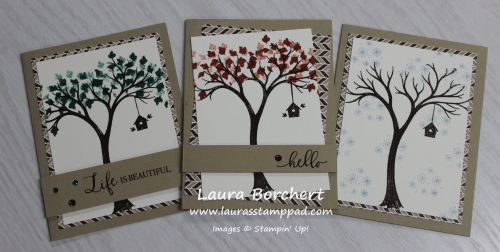
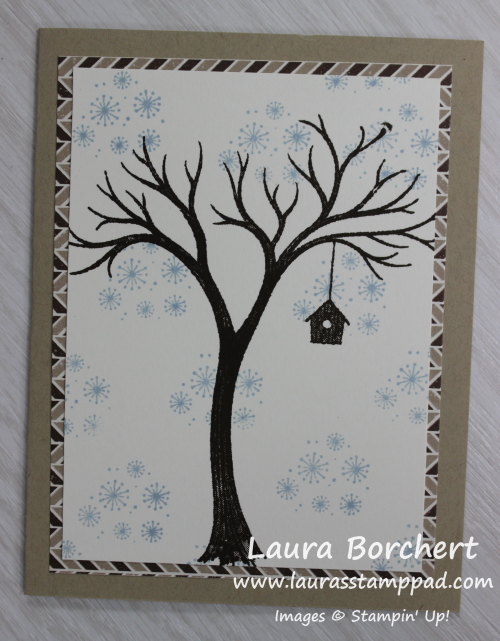
Happy Tuesday!!! So you all know that the Free Stamp Set of the Month is Life is Beautiful!!! This set is AMAZING!!! I have had so much fun playing with it! Check out this card! It’s also super fun to use the same stamp set to create a card for every season!!!
Aren’t these cards beautiful??? So simple and even the same concept for each but yet a different season and look! I love it! Don’t forget that you can earn this set for FREE with a $75 order or more before shipping and tax when you shop with me!!!
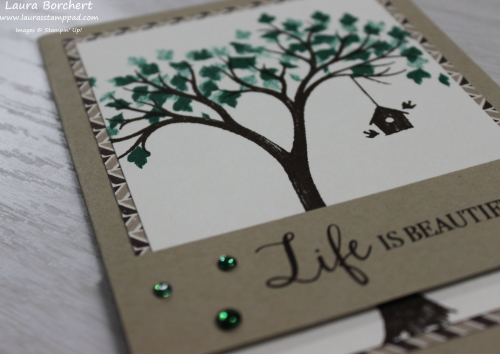
I started with a Crumb Cake card base. Next, I stamped the tree onto a piece of Very Vanilla (3-1/2″ x 4-3/4″) in Early Espresso Ink. Be sure to stamp the base of the tree at the bottom and note that it will fall off both sides of the cardstock! For the leaves on the Fall card, I stamped them in Cajun Craze and added the little bird house in Early Espresso Ink. For the Spring/Summer card, I stamped the leaves in Shaded Spruce and the Winter card, I did snowflakes in Seaside Spray!
I layered the tree onto a piece of Gilded Autumn Designer Series Paper measuring 3-3/4″ x 5″. For the Fall card, I angled them for a fun look but the others, I just layered straight. I kind of like to go a little crooked sometimes. LOL My husband said it looks like craziness and he is not a fan! What about you? Let me know in the comments below!
For the greeting, I simply took a strip of Crumb Cake and stamped a greeting from the Life is Beautiful Stamp Set and layered it on top. Using the Holiday Rhinestone Basics, I added a bit of bling! The Winter card just seemed so peaceful and serene that I didn’t add a greeting to the front.
If you would like to recreate a card for every season, check out the supplies listed below and don’t forget that you can earn the Life Is Beautiful Stamp Set for FREE with a $75 order this month!!! Just a few days left!
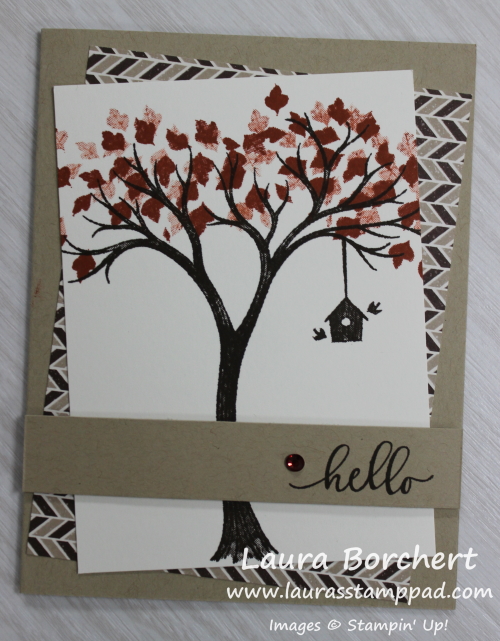
When was the last time you raked up the leaves and then jumped in??? For me it was forever ago but just think about that for a moment. Can you picture it? The joy! The silliness! The fun! It sure makes you smile and while I don’t see leaf jumping happening this season for me and my pregnant belly, instead let’s jump in on this cute card of leaves!
This card is just beautiful! I love the Fall colors and that elegant gold foil background! You can always add a different greeting for any occasion this season! I made a lot with this greeting to send as #happymail.
I started with an Early Espresso card base. Next, I layered on a piece of the Gilded Autumn Designer Series Paper. This piece is that weird mushroom/half flower/who knows pattern. It works perfectly for this card because it’s the right color and the pattern is mostly masked yet it’s beautiful! Next, I created layers of Whisper White (4″ x 3-1/2″), Cajun Craze (4-1/4″ x 3-3/4″) and Early Espresso (4-3/8″ x 3-7/8). On the white layer, I stamped my images which are all from the Life Is Beautiful Stamp Set! This is also the Free Stamp Set of the Month! Woot Woot!!
First, I stamped the tree base in Early Espresso. It will fall off the bottom as the cardstock isn’t big enough. Next, I stamped the leaves in Cajun Craze Ink. I inked it up, stamped on the left, lifted it up and moved it a smidge over and up and stamped again. Repeat on the right side. This gives a full tree look with that color variation! You can stamp even more if you want a fuller looking tree! The greeting was stamped in the lower right corner and then all layered together. I finished it off with a Gilded Gem near the greeting for a pop of bling and texture!
Now we jump in to the inside of the card, I double stamped the leaves all along the bottom of some Whisper White cardstock! By double stamping, that means I stamped it twice before going back to the ink to get that variation of color! It looks like a fun pile of leaves and coordinates well with the front of the card. You can always do the same with the envelope!
So jump in and try out this fun Fall card this season. Check out the supplies listed below to create this card. Don’t forget you can earn the Life is Beautiful Stamp Set for FREE this month with a $75 order before tax and shipping. This is an exclusive offer through me!
Hey There, Pumpkin…it could be a pick-up line but it could also be a fun #happymail card too!!! Check out this cute Fall card!
The Plaid Tidings Paper is so perfect for so many different seasons and styles of cards! It really gives this card that cozy feel! The other amazing thing is that this paper is on sale this month for 15% off! Woot Woot!!! Click here to get yours!
I started with a Cajun Crazy card base and layered on some Early Espresso and then that fabulous Plaid Tidings Paper! For the focal point, I used the Stitched So Sweetly Dies. I just love that scalloped edge and stitching. It really adds so much more to the label!
For the greeting and pumpkin, I used the Harvest Hellos Stamp Set. I found that Early Espresso Ink worked better than a Black. It was that perfect softer look! Using the Pumpkin Pie and Soft Suede Stampin’ Blends Markers, I colored the pumpkin and stem! Be sure to let them dry a smidge before punching them out with the Apple Builder Punch. I found that a few of mine didn’t punch well when they were still a smidge damp from coloring. The pumpkin and the label are popped up with Stampin’ Dimensionals for some added texture!
I used some leftover plaid paper from the sheet I used on the front to decorate the inside. The little leaves are from the Harvest Hellos Stamp Set too! This just adds a cute little flare to coordinate the inside.
If you would like to recreate this Hey There, Pumpkin card, check out the supplies listed below or click here to easily add them to your shopping cart!! It’s super simple! Don’t forget that the Plaid Tidings Paper is on sale this month too!!
I am in love with the Snowflake Splendor Designer Series Paper!!! I’m even more in love with the fact that it’s 15% off this month too! STOCK UP!!!! Check out this beauty and stayed tuned for more fabulous samples too!
Okay first of all the greeting on this card is THE CUTEST ever!!! I love it! It is from the Snowflake Wishes Stamp Set!!! In fact, all of the products used on this card are from the Snowflake Splendor Suite!!!
Pacific Point is the card base and then I layered on Coastal Cabana and Whisper White! Each of the Snowflake Splendor Designer Series Paper pieces measure 1″ x 3-3/4″. I find that the best way to space these evenly is to place them all down and then pick one up at a time to adhere. Another option is to do the outside ones first and then work your way in! Really any of the paper in the pack would work wonderful for this card so you could make TONS of this card with the whole pack!
Next, I added a dab of adhesive in the center and pressed the Snowflake Splendor Ribbon into it. This ribbon is gorgeous but also a bit stiff so it’s not really something you would easily create knots and bows with. This little strip gives some texture and bling without having to worry about that! 🙂 Don’t worry about the dab of adhesive not being enough because the greeting with go over the top and secure it some more!
For the greeting, I used a 1″ x 4-1/4″ strip of Whisper White cardstock and punched both ends with the Banners Pick a Punch for those cute banner ends. Then I stamped the greeting from the Snowflake Wishes Stamp Set in Pacific Point Ink. I added this to the card front with Stampin’ Dimensionals! To finish it off, I added a few Adhesive Backed Snowflakes!
If you would like to recreate this card, you can click any of the supplies listed below. OR you can now click right here to have all of the items right in your cart and ready to go! Anything you already have or don’t need, simply uncheck the box next to that item! It’s as simple as that! 🙂 Also, don’t forget that the Snowflake Splendor Designer Series Paper is on Sale this month!!! WOOT WOOT!
Happy Tuesday……Technique Tuesday at that!!! Fall is in full swing and one of the amazing things about it is all of the beautiful colors! Today, I’m going to show you how to create Fall colors in your stamping projects too!!!
This card uses the Rooted in Nature Stamp Set but really any stamp with leaves, trees, or any Fall image would work!! The technique is super fun and simple but note that each time it will come out differently….kind of like watercoloring! That part sometimes drives me nuts as I love the look and want to do it again but it comes out a bit different!
To get started you need to place your image on the table face up! Next, pick out your favorite Fall colors. I used Crushed Curry, Cajun Craze, Pumpkin Pie, Cherry Cobbler, and Early Espresso. I found that inking up the entire image in the lightest color (Crushed Curry) helped give the stamp a nice all over coverage and you didn’t have to worry about missing a spot. Then, using a Sponge Dauber, I lightly dabbed ink in each of the other colors randomly on the stamp. Starting with Early Espresso on the tree trunk as well as 2 little spots with branches up in the tree. This kind of gave a green look on the stamped image but that still works!
Continuing on with each of the other colors, dab a little bit of ink all around. I did find that I needed to really focus on where I was dabbing each time so I didn’t always hit the same spot. This is what happens when you talk while stamping or try to multi-task. LOL Once you have all of your colors on, it’s time to stamp it down onto the cardstock.
Like I mentioned before, each time you stamp it will come out differently! Also, be sure to clean the stamp after each time since you won’t want to contaminate your Crushed Curry Ink Pad. The card below was actually stamped quickly a second time which resulted in a fabulous look just a bit lighter. This made all the hard work I did for the one image work for me again! 🙂
I used greetings from the same Rooted in Nature Stamp Set and layered this piece on Cajun Craze or Cherry Cobbler! The card bases are all Crumb Cake! To add some texture to the cards, I used some of the Early Espresso Faux Suede Ribbon and some of that soft cheesecloth type ribbon from the Forever Greenery Ribbon Pack. I love them all even though there is just a bit of difference in each!
I hope you try out this fun technique to create Fall colors on your next project! If you would like to see the list of supplies I used, check that out below!


")


 2020–2022 In Color Ribbon")


")


")
 Double-Stitched Satin Ribbon")


")

")


 Ribbon")


")


 Designer Series Paper")


 Faux Suede Trim")
