It’s hot out there and everyone is looking for things to do inside in the middle of the afternoon! Here is a fun new technique you can try and it’s perfect for summer! This ombre dip dye technique looks like a popsicle to me!!! Check it out!
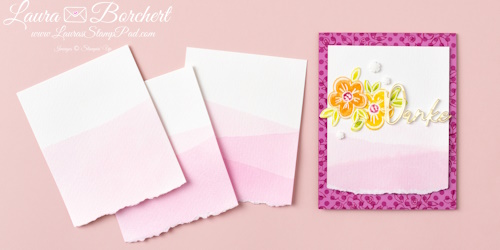
Step 1 – Add 30–40 drops of ink refill to approximately 32 ounces of water and stir. Tear a piece of watercolor paper along the bottom, dip it in color, and then hold it in place for 30–60 seconds. Let the paper air dry (or dry on a low setting using the Heat Tool to speed things up)!
Step 2 – Add 10–15 more drops of ink and stir. Dip the paper again, but not quite as far as the first time so that you can that lighter to dark ombre look! Allow it to dry or use your Heat Tool again! Dip tip: tilt your paper to one side when dipping for added interest.
Step 3 – Add another 10–15 drops of ink to your water and stir. Dip the final section—but this time, only submerge it a little. Dip tip: tilt your paper in the opposite direction for interest. Allow to dry or use your Heat Tool!
Now you have a fun piece to add to any project! This would be fun to do with so many different colors and even possibly different colors. I’m thinking yellow, orange and red for a beautiful sunset perhaps! 🙂 Give this Ombre Dip Dye technique next time you are crafting! Come back and let me know in the comments what color you used!!!
Happy Stampin’
~Laura
Product List![Heirloom Boutique Bundle (English) [ 167731 ]](https://assets1.tamsnetwork.com/images/EC042017NF/167731s.jpg "Heirloom Boutique Bundle (English) [ 167731 ]")
![Daffodil Delight Classic Stampin' Pad [ 147094 ]](https://assets1.tamsnetwork.com/images/EC042017NF/147094s.jpg "Daffodil Delight Classic Stampin' Pad [ 147094 ]")
![Lemon Lime Twist Classic Stampin' Pad [ 147145 ]](https://assets1.tamsnetwork.com/images/EC042017NF/147145s.jpg "Lemon Lime Twist Classic Stampin' Pad [ 147145 ]")
![Old Olive Classic Stampin' Pad [ 147090 ]](https://assets1.tamsnetwork.com/images/EC042017NF/147090s.jpg "Old Olive Classic Stampin' Pad [ 147090 ]")
![Timid Tiger Classic Stampin' Pad [ 165278 ]](https://assets1.tamsnetwork.com/images/EC042017NF/165278s.jpg "Timid Tiger Classic Stampin' Pad [ 165278 ]")
![Berry Burst Classic Stampin' Ink Refill [ 144089 ]](https://assets1.tamsnetwork.com/images/EC042017NF/144089s.jpg "Berry Burst Classic Stampin' Ink Refill [ 144089 ]")
![Berry Burst 8-1/2" X 11" Cardstock [ 144243 ]](https://assets1.tamsnetwork.com/images/EC042017NF/144243s.jpg "Berry Burst 8-1/2\" X 11\" Cardstock [ 144243 ]")
![Brights Painted Patterns 12" X 12" (30.5 X 30.5 Cm) Designer Series Paper [ 167754 ]](https://assets1.tamsnetwork.com/images/EC042017NF/167754s.jpg "Brights Painted Patterns 12\" X 12\" (30.5 X 30.5 Cm) Designer Series Paper [ 167754 ]")
![Gold Foil Sheets [ 132622 ]](https://assets1.tamsnetwork.com/images/EC042017NF/132622s.jpg "Gold Foil Sheets [ 132622 ]")
![Water Painters [ 168253 ]](https://assets1.tamsnetwork.com/images/EC042017NF/168253s.jpg "Water Painters [ 168253 ]")
![Dreamy Flowers [ 167916 ]](https://assets1.tamsnetwork.com/images/EC042017NF/167916s.jpg "Dreamy Flowers [ 167916 ]")
![Words & Wishes Dies (English) [ 167894 ]](https://assets1.tamsnetwork.com/images/EC042017NF/167894s.jpg "Words & Wishes Dies (English) [ 167894 ]")
![Heat Tool (Us And Canada) [ 129053 ]](https://assets1.tamsnetwork.com/images/EC042017NF/129053s.jpg "Heat Tool (Us And Canada) [ 129053 ]")