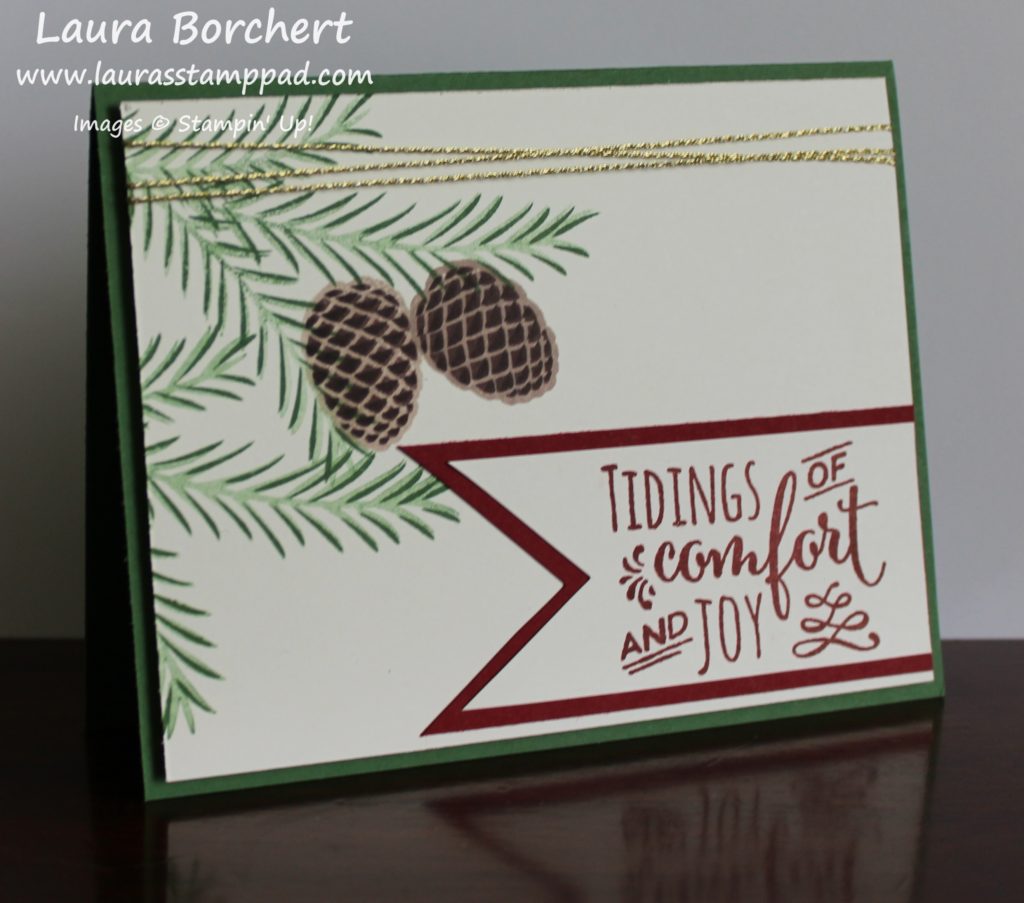
Happy Tuesday!!! I hope you are having an amazing week so far! Today I’m going to show you the beautiful Christmas Pines Stamp Set and how real looking it is!!! I love it!
I just love how real the pine branches and pine cones look!!! The branches are 2 step stamping and the pine cones are 3 step stamping! It does take a little practice but no worries, you got this!!! I have faith in you! 🙂
I started with a Garden Green card base! Then I took a piece of Very Vanilla (4″ x 5-1/4″) and started by stamping the pine branches in the upper left corner. I used the Christmas Pines Stamp Set for all of the image. First I stamped the wider needle image in Garden Green Ink (stamped off once) and then I stamped it with the skinnier needle image in Garden Green Ink (full strength). Even if the needles don’t match up perfectly, it is okay because it just makes for a fuller branch. Also, always remember that it is stamped with love and not perfection! 🙂 The image is large so be sure to press in the middle of the branch as well for a nice even image. Now for the pine cones, I used Chocolate Chip Ink for all 3 images. I prefer to use one ink pad for my multi-step stamping because it reduces supplies needed but it also has a nice gradual look rather than one color popping more than the others. I started with the smooth solid image, stamped off twice and then onto my cardstock. Then I took the diamond pine cone image, inked it in Chocolate Chip, stamped off once and then on top of the solid image. You will line things up with the bubble part on the top and the ripples along the sides. Now for the final image (the triangle pine cone image), you will ink it in Chocolate Chip and stamp it full strength. You can see the diamonds through the stamp to help line things up as well as the top and sides like before. For the greeting, I took a 1-3/4″ x 3-1/2″ strip of Cherry Cobbler and added banner tips to the end. You can use the Banner Triple Punch or scissors. If you use scissors, cut straight up in the center and then diagonal from the corner to that middle line. Then I took a 1-1/2″ x 3-1/2″ strip of Very Vanilla and stamped the greeting from the Christmas Pines Stamp Set in Cherry Cobbler Ink. I added the banner tips to this piece as well and layered it onto the cherry banner. If you need to trim off some on the length you can do so to make them match. I added the greeting to the lower right corner of the card. Then I added some of the Gold Twine from the Baker’s Twine Trio Pack around the top a few times and tied the knot in the back. I added this piece to the card base with Stampin’ Dimensionals to give a little texture to the card and for a smooth look since the twine is wrapped around. Now you are all done!!!
If you would like to see this in action, check out my Video Tutorial below or click here! Be sure to give it a thumbs up if you liked it and don’t forget to subscribe if you are new!!!
Happy Stampin’
~Laura
Don’t forget about my Cut For Christmas Offer this season!!! Click here for more information!


Very pretty card. Thank you for sharing with us at The Crafty Corner. Hope to see you tomorrow (Wednesday at 6 am EST) at the next party!
Thank you! Can’t wait for the next party! ~Laura