Happy Tuesday!!! I have a fabulous technique to share with you today and I’m sure you are just as excited as I am because I know you all LOVE the One Sheet Wonder Technique!!!! I just can’t get enough of this technique because it is so much fun and it is so very simple…..once you figure out the template. 🙂 hehe No worries, I have this fabulous template created for you AND a video!!!
Look at all of these cards!!!!! I was able to get 15 cards out of one sheet of the 12″ x 12″ Back to Black Designer Series Paper!!!! Love it! I also love that you can pick a color or 2, a greeting stamp set and you are all set to create! Let’s get started!!!
Supplies Needed: Age Awareness Stamp Set, Remembering Your Birthday Stamp Set, A Dozen Thoughts Stamp Set, 2013-2015 In Color Markers and cardstock (minus Baked Brown Sugar), 1 sheet of Back to Black Designer Series Paper, and a Paper Trimmer
Of course you can pick any of your favorite greeting stamp sets or one specific greeting that you need to make lots of cards with! The colors that I used are the 2013-2015 In-Colors which are Crisp Cantaloupe, Pistachio Pudding, Coastal Cabana, and Strawberry Slush! I used the markers to color in the Back to Black Designer Series Paper on some of them!!! I love that!
Okay lets get started on the cutting on your Designer Paper first! Starting with a sheet of 12″ x 12″ Designer Series Paper, you will cut at 5-1/2″. This creates a 5-1/2″ x 12″ strip which you will then cut at the following numbers: 4-1/4″, 2-1/4″, 2″, 1-3/4″, 1-1/2″ and you will be left with a little piece that is 5-1/2″ x 1/4″. If you wanted to you could add that 1/4″ onto one of the other pieces (except the 4-1/4″ because then it wouldn’t work). Now set all of those pieces aside and pull in your leftover piece which measures 12″ x 6-1/2″. You will cut at 4-1/2″ all the way across giving you a piece measuring 12″ x 4-1/2″ and then you will cut at the following measurements: 3-1/2″, 1-1/2″, 1-1/2″, 2″, 2″, and 1-1/2 will be left. Now you can cut one of the 1-1/2″ x 4-1/2″ pieces down to just 4-1/4″ and the other one down to 4″. One of the 2″ x 4″ pieces will need to be cut in half to make Two 2″ squares. That last piece that is 4-1/2″ x 1-1/2″ needs to be cut into Three 1-1/2″ squares. All of those little pieces you cut off can be tossed or used on another project OR you can leave some of them and work with a larger piece. Now that top piece that you have left over which measures 2″ x 12″ can be used for more cards like in the set above, I cut it into Two 2″ x 4-1/4″ and the last piece is 2″ x 3-1/2″. That is how I got 15 cards. You could also use that piece as a belly band around a box or cellophane bag that you stick all of the cards in as a gift. You can do whatever you would like with that piece!!!
Now some close ups on the cards…..sorry for the long post today. I hope you are still with me! 🙂
I love the Man Cards that I created with this set, I think I could do an entire sheet of Man Cards with this technique just to get me though a few months of Birthdays!
As you can see some of the…chevron? checker?…whatever that pattern is called….I colored in with my Markers and some of them I left white!
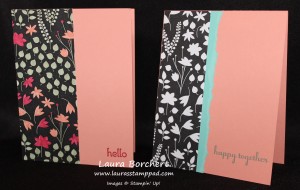
Oh how you know I love my flowers! I colored these in with the Markers! Also, that little Coastal Cabana strip on the left side card is only about 3/4″ wide. It is a scrap piece that I had leftover from another project. Use up those scraps on simple cards like these!!!
As you can see, I didn’t color the flowers on these and they look fabulous as well!
This is the piece that was cut diagonal. You can tear it as well if you would like!
Same style of card but one is colored and one just has a border! Love them both!
I actually didn’t use that 3rd 1-1/2″ square because I added my greeting on there. You can always mix it up and cut larger pieces into little squares like this or leave it long. Mix it up and have fun with it! I love it!!!!
Here is a little Video Tutorial for you to follow along with as well! Don’t forget to subscribe to my YouTube Channel so you don’t miss out on any of the videos! Click here to subscribe!
I have 2 more sets of these fabulous One Sheet Wonder Techniques so stay tuned. If you want to see some of them that I have done in the past, click here!
Happy Stampin’
~Laura


Pingback: Something Borrowed One Sheet Wonder Card Set!!! | Laura's Stamp Pad